
Related Manuals for Vizualogic A-1250

Summary of Contents for Vizualogic A-1250
- Page 1 1493 Bentley Drive • Corona, CA 92879 • 951-272-1996 • 800-624-7960 • Fax 951-272-1584 www.vizualogic.com 99-9138-000 Rev. 1 7/06...
-
Page 3: Welcome
Welcome Congratulations on your purchase of a Vizualogic A-1250 System that will provide your family with many years of enjoyment. This sophisticated product provides video entertainment to rear seat passengers without altering the appearance of your vehicle’s original interior. Reviewing this owner’s manual thoroughly prior to operation will provide you with the best performance and help explain the simple requirements for proper care. -
Page 4: Table Of Contents
Table of Contents Welcome ............2 Purchase Information . -
Page 5: Monitor Control Button Layout
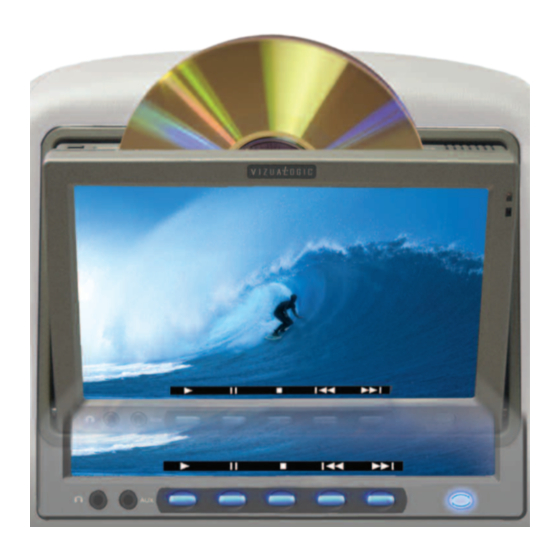
Monitor Control Button Layout 1. IR Sensor – Allows the remote to navigate the OSD (On Screen Display) on this unit and to control other functions and accessories. 2. Light Sensor – Detects ambient light levels and dims the screen accordingly. 3. - Page 6 To open/reveal the DVD loading slot, PRESS on the top-center of the monitor frame (indicated by the Vizualogic logo). NOTE: Do not put pressure directly on the screen. Latch the monitor in the fully closed position when DVD loading slot is not in use.
-
Page 7: Monitor On-Screen Basic Functions
Monitor On-Screen Basic Functions SOFT BUTTON CONTROLS When any of the DVD / Monitor Control buttons are pressed, a row of icons will appear directly above the buttons. To alternate between DVD and Monitor Control functions, momentarily press the POWER / TOGGLE button. To perform a desired function, press the button directly underneath the desired icon. -
Page 8: Dvd Controls
(Next) – Accesses the next chapter or track. Adjusting the Picture Settings The A-1250 features multiple picture adjustment settings that allow the user to tailor the picture to their preferences. To access the picture adjustment settings, press the MENU button. Each press of the MENU button will advance through the settings shown below. -
Page 9: Connecting External Devices
A/V Control Module. Devices connected to this input can be viewed on either screen (independently or simultaneously), as well as output through the vehicle stereo via the A-1250’s FM Transmitter. To view this input press the SOURCE button until EXT. AUX is displayed. -
Page 10: Remote Control Operations
Remote Control Operations NOTE: The remote control will control all Monitor and integrated DVD functions. The remote is not a fully universal remote control and is only guaranteed to work with Vizualogic products. MONITOR FUNCTIONS 1. MONITOR POWER – Press... - Page 11 DVD FUNCTIONS 9. UP – Moves up within the DVD SETUP menu. SOURCE SOURCE 10. DOWN – Moves down MONITOR ZOOM FREQ PICTURE within the DVD SETUP RETURN menu. MENU SETUP 11. RIGHT – Moves right within ENTER TITLE PLAY PAUSE STOP the DVD SETUP menu.
- Page 12 Remote Control Operations (continued) 18. PLAY – Press this button to play a disc that is loaded into the integrated DVD player. 19. PAUSE – Press this button to pause a disc that is loaded into SOURCE SOURCE MONITOR the integrated DVD player. For ZOOM FREQ PICTURE...
- Page 13 27. DISPLAY – Shows information on the top of the screen including title, chapter/track, time elapsed, and time remaining, or turns off the display. 28. SUBTITLE – Changes the subtitle language to other available languages or turns the subtitles off (only applicable if the disc contains multiple SOURCE...
-
Page 14: Playing Audio Cds
Playing Audio CDs When playing an audio CD, the DISPLAY banner appears automatically. It displays the current track and the amount of the time for that track playing, the total amount of time on the disc and the current time running on the disc. Press the DISPLAY button on the remote to display the DISPLAY banner. - Page 15 SELECTING FOLDERS AND SONGS When an MP3 disc is inserted in the player, the navigation screen appears automatically. You can change folders and songs by navigating through the file system. The DVD player plays the songs in order they were burned onto the disc.
-
Page 16: Audio Playback
Audio Playback The Vizualogic A-1250 System features multiple ways to enjoy the audio portion of a desired source. The audio can be experienced through the use of Infrared Headphones or with the integrated wireless FM Modulator FM Modulator Playback To listen to the audio portion of the viewed source though the vehicle’s stereo system aim the remote at the driver’s side monitor and simply press the... -
Page 17: Ir Headphones
IR Headphones The Vizualogic A-1250 System features integrated Infrared (IR) transmitters on the front of each monitor. The driver’s side monitor transmits on channel ‘A’ and the passenger side transmits on channel ‘B’. To listen to the source displayed on monitor, turn on the headphones and select the corresponding audio channel for the monitor being viewed. -
Page 18: Optional Accessories
Optional Accessories To increase the enjoyment and utility of your Vizualogic System, several accessories are available from your local authorized distributor/retailer: WIRELESS STEREO HEADPHONES • 2-channel • IR headphones (90-3018) AUXILIARY INPUT ADAPTER CABLE • 3.5mm to RCA (90-6015) AUXILIARY INPUT iPOD ®... -
Page 19: Care & Maintenance
Care and Maintenance Your Vizualogic System is a product of superior design and craftsmanship and should be treated with care. The suggestions below will help to fulfill any warranty obligations and provide many years of enjoyment. • Cleaning the Monitor Screen and Housing: The components may be cleaned by occasionally wiping with a soft, lint-free, cotton cloth that has been slightly dampened with water. -
Page 20: Troubleshooting
Troubleshooting No Picture (1) Verify that the correct video input mode is used on the monitor. (2) Verify that the video cables are securely connected. No Sound (1) Verify that the correct audio output mode is used on the monitor. (2) Verify that the audio cables are securely connected. -
Page 21: Limited Warranty
Limited Warranty Terms of Warranty TMI Products, Inc (Company) warrants to the original retail purchaser that the automotive video product(s) purchased from a Company authorized installer, within the first ninety (90) days after new vehicle delivery, are free from defects in materials or workmanship under normal use and conditions for a period of at least three (3) years from date of purchase or the first 36,000 miles as registered on the vehicle’s odometer at time of installation, whichever occurs first, with exception of remote control(s), and / or... -
Page 22: Warranty Service
How to Obtain Warranty Service To obtain warranty service, the product(s) must be returned to a Company authorized installer accompanied by proof of warranty coverage. How State Law Relates to the Warranty Some states do not allow limitation on how long an implied warranty lasts. In such states, the limitations or exclusions of this Limited Warranty may not apply. - Page 23 Notes Federal Communication Commission Interference Statement This equipment has been tested and found to comply with the limits for a Class B digital device, pursuant to Part 15 of the FCC Rules. These limits are designed to provide reasonable protection against harmful interference in a residential installation. This equipment generates, uses and can radiate radio frequency energy and, if not installed and used in accordance with the instructions, may cause harmful interference to radio communications.
- Page 24 Notes...
Need help?
Do you have a question about the A-1250 and is the answer not in the manual?
Questions and answers