Table of Contents
Advertisement
Advertisement
Table of Contents

Related Manuals for TRENDnet TPE-TG44ES


Summary of Contents for TRENDnet TPE-TG44ES
- Page 1 Cover Page TRENDnet User’s Guide...
-
Page 2: Table Of Contents
Add, modify, and remove VLANs ................. 8 Technical Specifications ..............20 Trunk/Link Aggregation ....................10 Troubleshooting ................22 Configure port trunk settings ................10 Appendix ..................23 Mirroring ........................10 Configure port mirror settings ................10 © Copyright 2017 TRENDnet. All Rights Reserved. -
Page 3: Product Overview
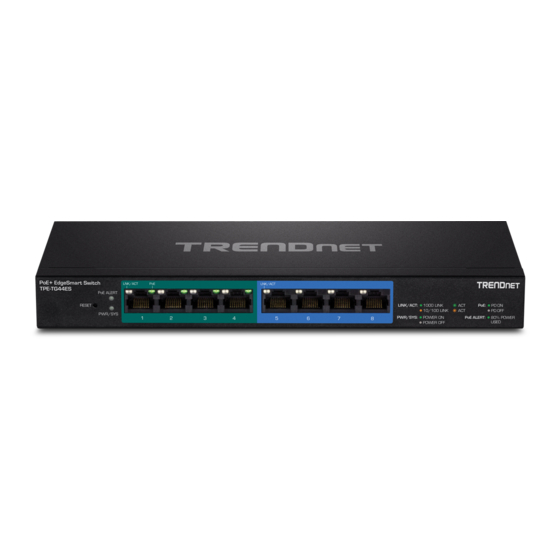
TRENDnet User’s Guide Features Product Overview TRENDnet’s 8-Port Gigabit EdgeSmart PoE+ Switch, model TPE-TG44ES, is a cost- effective switch solution for high-speed gigabit PoE+ applications. This EdgeSmart switch features the most commonly used managed switch features, reducing unnecessary switch complexity. The web-based management interface offers features for traffic control, troubleshooting, access controls, and monitoring. -
Page 4: Product Hardware Features
On/Off Power Switch – Turns the switch on (|) or off (o). Power Connector – Connect the included DC power adapter to the connector and the other side of the power adapter to an available power outlet. © Copyright 2017 TRENDnet. All Rights Reserved. -
Page 5: Applications
The link is disconnected or not established. On (Green) : When the Green LED lights are on, PoE power is being supplied to the connected device. PoE power is off and not supplying power to the connected device. © Copyright 2017 TRENDnet. All Rights Reserved. -
Page 6: Switch Installation
Enter. The default IP address is 192.168.10.200. Note: You may need to modify the static IP address settings of your computer’s network adapter to IP address settings within your subnet in order to regain access to the switch. © Copyright 2017 TRENDnet. All Rights Reserved. -
Page 7: Connect Additional Devices To Your Switch
Note: If you encounter issues connecting to your network, there may be a problem with your computer or device network settings. Please ensure that your computer or device network settings (also called TCP/IP settings) are configured properly within the network subnet your switch is connected. © Copyright 2017 TRENDnet. All Rights Reserved. -
Page 8: Configure Your Switch
Mode Name: The model name of the switch. Device Name: The current device name assigned to the switch. This can be changed by clicking the TPE-TG44ES, entering new device name and clicking 2. Enter the user name and password. By default: Apply. -
Page 9: Configure Ip Address Settings
IP Address: Enter the new switch IP address. (e.g. 192.168.200.200) Subnet Mask: Enter the new switch subnet mask. (e.g. 255.255.255.0) Gateway: Enter the default gateway IP address. (e.g. 192.168.200.1 or typically your router/gateway to the Internet). © Copyright 2017 TRENDnet. All Rights Reserved. -
Page 10: Port Status
ID as the VLAN to be properly configured. (ex. If adding ports 7 & 8 as untagged port members of VLAN ID 100, the PVID assignment for ports 7 & 8 should be set to 100.) © Copyright 2017 TRENDnet. All Rights Reserved. - Page 11 By default, all ports are set as tagged members of the new VLAN. To change the port membership to untagged or non-member, click on the port box multiple times to cycle through the port membership type based on the color code. © Copyright 2017 TRENDnet. All Rights Reserved.
-
Page 12: Trunk/Link Aggregation
Link Group Member - Only ports 7 & 8 may be used for link aggregation. The ports will not be checked if a link aggregation trunk has not been established. If a link aggregation trunk has been successfully established, ports 7 & 8 will automatically be checked. © Copyright 2017 TRENDnet. All Rights Reserved. -
Page 13: Qos (Quality Of Service)
32 being the highest. The higher the weight value assigned to a 2. Click on IEEE 802.1p QoS and when prompted to change the QoS mode, click OK. specified queue, the higher the amount of packets from that queue are sent © Copyright 2017 TRENDnet. All Rights Reserved. -
Page 14: Storm Control
DLF (Destination Lookup Failure) – Click the drop-down list and select the speed threshold for unicast (DLF) traffic which will be applied to the switch on all ports. © Copyright 2017 TRENDnet. All Rights Reserved. -
Page 15: Rate Limiting
Loopback Prevention. Click Apply to save changes. Egress rate – Click the drop-down list to select the rate or bandwidth limit for transmitted from a specific port. © Copyright 2017 TRENDnet. All Rights Reserved. -
Page 16: Igmp Snooping
VLAN ID. Maximum Power Class Output Power Ranges of the PDs from a Switch Port 15.4W 0.44W to 12.95W 4.0W 0.44W to 3.84W 7.0W 3.84W to 6.49W 15.4W 6.49W to 12.95W 12.95-25.50W © Copyright 2017 TRENDnet. All Rights Reserved. -
Page 17: Configure Poe Settings
Port – Displays the port number. You can manually enable or disable PoE on the specified port by clicking the number and selecting Turn on or Turn off. By default, PoE is enabled on all PoE ports. © Copyright 2017 TRENDnet. All Rights Reserved. -
Page 18: Switch Maintenance
1. Log into your switch management page (see “Access your switch management page” on page 6). 2. Click on Password. 3. In the New Password and Confirm Password fields, enter the new password. Click Confirm to save the settings. © Copyright 2017 TRENDnet. All Rights Reserved. -
Page 19: Upgrade Your Switch Firmware
6). TRENDnet may periodically release firmware upgrades that may add features or fix problems associated with your TRENDnet switch model and version. To check if there is 2. Click on Management. a firmware upgrade available for your device, please check your TRENDnet model and version using the link. -
Page 20: Backup And Restore Your Switch Configuration Settings
6. Wait for the switch to restore settings. Note: If prompted, choose the location on your local hard drive. If you are not prompted, the configuration file (switch_cfg.bin) will be saved to your default downloads folder. © Copyright 2017 TRENDnet. All Rights Reserved. -
Page 21: Reboot/Reset To Factory Defaults
Reboot System, click OK. Wait for the switch complete the rebooting process. The switch factory default settings are below. Administrator User Name admin Administrator Password admin Switch IP Address 192.168.10.200 Switch Subnet Mask 255.255.255.0 © Copyright 2017 TRENDnet. All Rights Reserved. -
Page 22: Technical Specifications
Trusted Host/IP Access List MAC Address Table: 4K entries Jumbo Frames: 9 KB Storm Control Forwarding rate: 11.9 Mpps (64-byte packet size) Broadcast (Min. Limit: 512Kbps) Multicast (Min. Limit: 512Kbps) © Copyright 2017 TRENDnet. All Rights Reserved. - Page 23 PD auto classification Over current/short circuit protection Fan / Acoustics Fanless design MTBF 1,089,244 hours Operating Temperature 0 – 50°C (32 - 122°F) Operating Humidity Max. 90% non-condensing © Copyright 2017 TRENDnet. All Rights Reserved.
-
Page 24: Troubleshooting
Then click Use the following IP address, and make sure to assign your network adapter an IP address in the subnet of 192.168.10.x. Click OK Note: If you are experiencing difficulties, please contact your computer or operating system manufacturer for assistance. © Copyright 2017 TRENDnet. All Rights Reserved. -
Page 25: Appendix
From the Location drop-down list, select Automatic. 2. In the Network Preference window, next to "Show:", select Network Status. You'll see d. Select and view your Ethernet connection. your network status and your IP address settings displayed. © Copyright 2017 TRENDnet. All Rights Reserved. - Page 26 1. Apple Menu > System Preferences > Network 2. Select Ethernet from the list on the left. 3. Click the Advanced button. 3. On the Ethernet tab, the Ethernet ID is your MAC Address. © Copyright 2017 TRENDnet. All Rights Reserved.
- Page 27 REACH Regulation (EC) No. 1907/2006 This transmitter must not be co-located or operating in conjunction with any other antenna or transmitter. Country Code selection feature to be disabled for products marketed to the US/CANADA © Copyright 2017 TRENDnet. All Rights Reserved.
- Page 28 An RMA number is required in order to initiate warranty service support the event that the RMA unit needs to be replaced, TRENDnet may replace it with a for all TRENDnet products. Products that are sent to TRENDnet for RMA service must refurbished product of the same or comparable model.
- Page 29 OF SUCH DAMAGES, AND LIMITS ITS LIABILITY TO REPAIR, REPLACEMENT, OR REFUND evidence of the original purchaser's date of purchase. Replacement products may be OF THE PURCHASE PRICE PAID, AT TRENDNET'S OPTION. THIS DISCLAIMER OF LIABILITY refurbished or contain refurbished materials. If TRENDnet, by its sole determination, is...
Need help?
Do you have a question about the TPE-TG44ES and is the answer not in the manual?
Questions and answers