Advertisement
INSTALLATION
& OPERATION
MANUAL
MODEL 3599L5
WARNING
Sirens produce loud sounds that may damage hearing
•
Wear hearing protection when testing
•
Use siren only for emergency response
•
Roll up windows when siren is operating
•
Avoid exposure to the siren sound outside of vehicle
Distributed By:
IMPORTANT:
H
Covert
TM
2
with Hand-Held Controller
INSTALLER
Read all instructions and warnings before installing and using.
This manual must be delivered to the end user of this equipment.
Remote Siren System
Contents:
Parts List
Troubleshooting
Notes
1
2
3
3
3
4
7
12
12
12
14
15
16
Advertisement
Table of Contents

Summary of Contents for Code 3 3599L5
-
Page 1: Table Of Contents
INSTALLATION & OPERATION MANUAL MODEL 3599L5 Covert Remote Siren System with Hand-Held Controller WARNING Sirens produce loud sounds that may damage hearing • Wear hearing protection when testing • Use siren only for emergency response • Roll up windows when siren is operating •... -
Page 2: Introduction
4 auxiliary controls, EU Lock, and Title 13 Compliance. The purpose of this document is to aid in the setup and installation of the 3599L5, and to provide instructions for its proper operation. -
Page 3: Standard Features
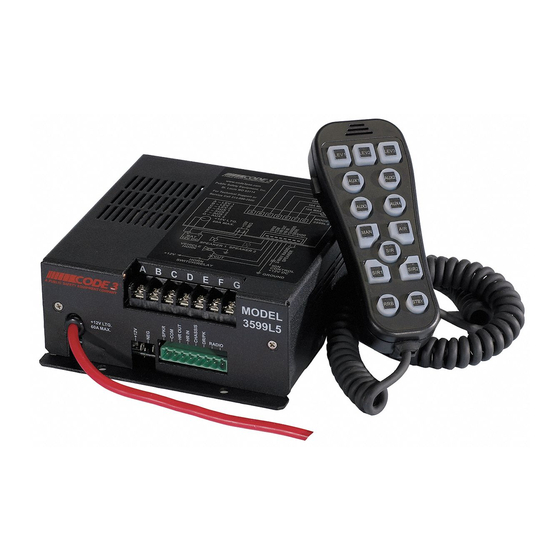
Standard Features The 3599L5 system offers the following features: Primary Tones: Wail, Yelp, Hi-Lo, Hyper-Yelp, Hyper-Lo, Whoop, Manual Wail, Air Horn Vehicle Light Control Buttons – 7 levels: 3 Progressive, Auxiliary PA with Built-In Noise Cancelling Microphone Integrated Volume Control... -
Page 4: Connections
The 3599L5 amplifier is not waterproof. It must be mounted in a location that is sheltered from rain, snow, standing water, etc. It must be also installed in an adequately ventilated area. Do not install near heater ducts or under the vehicle’s hood. - Page 5 +12V source (such as a battery), or through a switch (such as an ignition switch). Special care should be taken if the 3599L5 is connected directly to a battery as it will always have a small current draw, even in standby mode (up to 180 mA).
- Page 6 6. The unit is supplied with an eight-position, pluggable connector (color green) for the other connections. Insert the wire into the connector and tighten the screw at these appropriate connector positions: a. Speaker – the siren is designed to operate with one 11-ohm impedance speaker (100W) or two 11-ohm impedance speakers (200W).
-
Page 7: Operation
Operation Any electronic device my create or be affected by electromagnetic interference. After installation of any electronic device, operate all equipment simultaneously to insure that operation is free of interference. Push to Talk and Radio Gain Adjust the gain trimmers located on the rear of the amplifier to reduce distortion. Horn Ring Feature The Horn Ring feature allows the driver to enable and change the audible siren sound via the vehicle’s horn ring. - Page 8 California Title 13 Compliance By setting Dip switch #1 to the “on” position, the 3599L5 operates in a California Title 13 Compliance mode. In this mode, Hyper Yelp, Hi-Lo, Hyper-Lo, and Whoop siren tones are disabled. In addition, the Air Horn is disabled if Light Levels 2 or...
- Page 9 Configurable Dip switches There are ten dip switches on the front of the 3599L5 amplifier that can be used to set various different features of the sys- tem. When a dip switch is facing downward (towards the mounting bracket), it is considered to be in the “on” position. When it is facing upward (towards the wiring diagram), it is considered to be in the “off”...
- Page 10 Hand Held Controller (See Picture on Next Page) The microphone for talk. LEV1, when depressed/released once, supplies power to the load connected to Terminal A. This will also shut off the siren if EU Lock Level 2 or 3, or Auto Siren is enabled. When depressed/released again, cuts power to Terminal A and shuts off the siren if EU Lock Level 1 is enabled.
-
Page 12: Specifications
Maintenance Your Code 3 siren has been designed to provide trouble free service. In case of difficulty, consult the Troubleshooting Guide of this manual. Also check for shorted or open wires. The primary cause of short circuits has been found to be wires passing through firewalls, roofs, etc. - Page 13 T15062 Hand Held Controller Mounting Bracket T15061 Hand Held Controller with Coil Cord Extension Adapter (Included in T15065 Parts Bag) T15066 25' Extension Cord T15060 Siren (Amplifier) Model 3599L5 T15064 Eight Position Pluggable Connector (Included in T15065 Parts Bag) (Wire Harness NOT Included)
- Page 14 TROUBLESHOOTING GUIDE (Refer to Figure 1 - Wiring Diagram) PROBLEM PROBABLE CAUSE REMEDY NO SIREN OUTPUT. A. SHORTED SPEAKER OR SPEAK- A. CHECK CONNECTIONS. ER WIRES. SIREN IN OVER CUR- RENT PROTECTION MODE. FUSE BLOWS. A. AMPLIFIER POWER WIRES RE- A.
- Page 15 NOTES...
- Page 16 *Code 3®, Inc. reserves the right to repair or replace at its discretion. Code 3®, Inc. assumes no responsibility or liability for expenses incurred for the removal and /or reinstallation of products requiring service and/or repair.; nor for the packaging,...
Need help?
Do you have a question about the 3599L5 and is the answer not in the manual?
Questions and answers