Table of Contents

Related Manuals for EDLUND FDW-014


Summary of Contents for EDLUND FDW-014
- Page 1 SAFETY & OPERATING INSTRUCTIONS EDLUND TITAN Max-Cut, Models FDW/FDWW-014, -038, -012 READ AND UNDERSTAND THIS MANUAL AND ALL INSTRUCTIONS BEFORE OPERATING THE TITAN MAX-CUT. 159 Industrial Parkway, Burlington, VT 05401, USA 800-772-2126...
-
Page 2: Table Of Contents
Table of Contents CHAPTER 1 - INTRODUCING THE EDLUND TITAN MAX-CUT ............1 Conventions used in this manual ..................1 Specifications for the Edlund TITAN Max-Cut, Models FDW/FDWW-014, -038, -012......2 CHAPTER 2 - GENERAL SAFETY RULES ................. 3 Labels .......................... 3 Operating the TITAN Max-Cut Safely .................. -
Page 3: Chapter 1 - Introducing The Edlund Titan Max-Cut
CHAPTER 1 - INTRODUCING THE EDLUND TITAN MAX-CUT This manual will help you set up and safely operate your new Edlund TITAN Max-Cut. Careful adherence to the safety and operating instructions in this manual will ensure many years of productive use. Please let us know of any questions you may have. -
Page 4: Specifications For The Edlund Titan Max-Cut, Models Fdw/Fdww-014, -038, -012
Specifications for the Edlund TITAN Max-Cut, Models FDW/FDWW-014, -038, -012 Model Number FDWW-014 1/4" Dice Grid (6.4mm) w/ wall mount Model Number FDW-014 1/4" Dice Grid (6.4mm) w/ suction cup base Model Number FDWW-038 3/8" Dice Grid (10mm) w/ wall mount Model Number FDW-038 3/8"... -
Page 5: Chapter 2 - General Safety Rules
Labels Your Edlund TITAN Max-Cut carries prominent labels as reminders for its proper and safe use. Shown below are copies of all the labels that appear on the equipment. Take a moment to study them and make a note of their location on your Edlund TITAN Max-Cut before you operate the Max-Cut. -
Page 6: Operating The Titan Max-Cut Safely
DO NOT, UNDER ANY CONDITIONS, REMOVE, BEND, CUT, FIT, WELD, OR OTHERWISE ALTER · STANDARD PARTS ON THE EDLUND TITAN MAX-CUT. MODIFICATIONS COULD CAUSE PERSONAL INJURIES AND WILL VOID YOUR WARRANTY. CHECK THE BLADES FOR WEAR, CRACKS, DENTS AND BENDS. -
Page 7: Additional Information And Potential Changes
Additional Information and Potential Changes The Edlund Company reserves the right to discontinue, change, and improve its products at any time without notice or obligation to the purchaser. The descriptions and specifications contained in this manual were in effect at printing. -
Page 8: Chapter 3 - Operating Your Edlund Titan Max-Cut
CHAPTER 3 - OPERATING YOUR EDLUND TITAN MAX-CUT This chapter covers the procedures for operating your new Edlund TITAN Max-Cut and discusses basic operation features. You may find it helpful to review the Features in Figure 2 on page 11. - Page 9 NOTE: The Cartridge Retainer will not close until the Blade Cartridge is fully seated into the Max-Cut. Do not operate without the Cartridge Retainer end cap fully closed and “snapped” down. 7. Place a container at the front of the Max-Cut, beneath the Blades to receive the cut product. 8.
- Page 10 Plastic Pusher up until the clips "snap" over the Pusher Plate tabs. 4. Install the Blade Cartridge by following the "Using the Edlund TITAN Max-Cut" instructions. 5. Check the clearance between the Pusher Tips and the Blades: the Pusher Tips should be spaced evenly between the Blades.
- Page 11 Changing Between Table and Wall Mount The Edlund TITAN Max-Cut can be used in several different locations, maximizing through-put and yield quantity. Select from one of the options below which outline the procedures for removing and changing between the various mounting options.
- Page 12 4. Rotate the Wall Lock Latch (Figure 2, page 11) counterclockwise to disengage from the Wall Mount Bracket. 5. Lift the Max-Cut straight up until the Locking Tabs on the Wall Mount Bracket are disengaged from the Max- Cut. Edlund Company TITAN Max-Cut, Models FDW/FDWW-014, -038, -012...
-
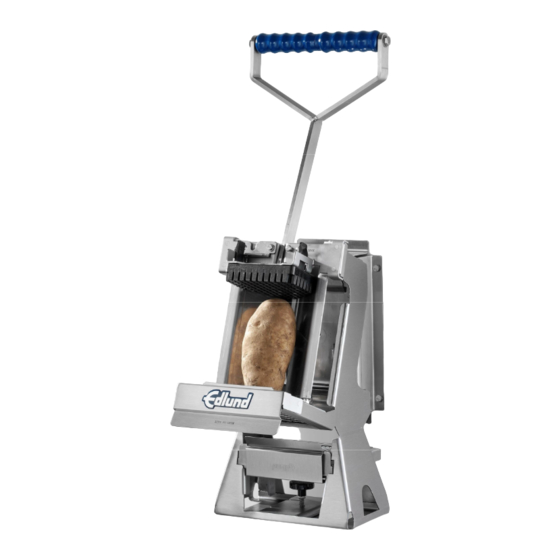
Page 13: Edlund Titan Max-Cut Features
Edlund TITAN Max-Cut Features NOTE: The model shown in Figure 2 may look slightly different from your Max-Cut. Figure 2 CALL TOLL FREE 1-800-772-2126... -
Page 14: Chapter 4 - Maintaining The Edlund Titan Max-Cut
CHAPTER 4 - MAINTAINING THE EDLUND TITAN MAX-CUT This chapter covers regular maintenance procedures that will ensure the best performance and long life of your Max-Cut. You should always clean the Max-Cut after every use. USE CAUTION WHEN HANDLING THE BLADE CARTRIDGE, THE BLADES ARE VERY SHARP. ALWAYS HAVE THE WASH GUARD ATTACHED TO THE BLADE CARTRIDGE WHEN HANDLING. - Page 15 8. Wash the Blade Cartridge assembly by hand or in a dishwasher. The Blade Cartridge should always be washed with the Wash Guard installed. The components of the Edlund Titan Max-Cut are completely dishwasher safe. 9. After washing, inspect the Blades for nicks, bends and other damage. If damaged, replace or return to Edlund for repair.
-
Page 16: Chapter 5 - Troubleshooting
Þ The Pusher Assembly Tips are bent out of shape; replace the Pusher Assembly. See page 9. Þ The Guidance Plate hardware is loose. Contact Edlund Customer Service for further assistance. Þ If the clearance between the Pusher Assembly Tips and the Blades cannot be achieved, contact Edlund Customer Service for further instruction. -
Page 17: Chapter 6 - Parts Lists, Diagrams, And Warranty
CHAPTER 6 - PARTS LISTS, DIAGRAMS, AND WARRANTY Parts List - Edlund TITAN Max-Cut, Models FDW/FDWW-014, -038, -012 NOTE: Part numbers listed are available through the Edlund Company or authorized parts supplier. Part# Description WD127 WELDMENT, TITAN FRAME BK111 BRACKET, GUIDE PLATE... -
Page 18: Exploded View - Edlund Titan Max-Cut, Models Fdw/Fdww-014, -038, -012
Exploded View - TITAN Max-Cut, Models FDW/FDWW-014, -038, -012 Edlund Company TITAN Max-Cut, Models FDW/FDWW-014, -038, -012... - Page 19 THIS PAGE INTENTIONALLY LEFT BLANK CALL TOLL FREE 1-800-772-2126...
-
Page 20: Warranty
1 5 9 I N D U S T R I A L P A R K W A Y , B U R L I N G T O N , V E R M O N T 0 5 4 0 1 1-800-772-2126 • www.edlundco.com ©2014 Edlund Co. LLC, M179...
Need help?
Do you have a question about the FDW-014 and is the answer not in the manual?
Questions and answers