Table of Contents
Advertisement
Quick Links
Advertisement
Table of Contents

Related Manuals for Woody Valley X-Rated 7


Summary of Contents for Woody Valley X-Rated 7
-
Page 2: Thank You
SAFETY NOTE By the purchase of Woody Valley equipment, you are responsible for being a certified paraglider pilot and you accept all risks inherent with paragliding activities including injury and death. Improper use or misuse of equipment greatly increases these risks. In no case shall Woody Valley or Woody Valley equipment resellers be held liable for personal or third party injuries or damages under any circumstances. -
Page 3: Table Of Contents
INDEX 1- GENERAL INFORMATION ........................................1 1.1- C ......................................................2 ONCEPT 1.2- X-R ................................................. 2 ATED PROTECTION 1.3- M ..................................................2 YSTEM 1.4- S.O.S. L ....................................................3 ABEL 2- BEFORE USE ............................................4 2.1- R ..................................................4 ESERVE PARACHUTE 2.1.1- Connecting the deployment handle to the deployment bag .................................. 4 2.1.2- Connecting the reserve parachute to the harness .................................... - Page 4 2.3.8- Speed-bar adjustment ..............................................25 2.3.9 Stability System ................................................. 26 2.3.10 Extractable headrest ..............................................26 2.3.11 Pee tube .................................................... 27 2.3.12 Replacing the air scoop supports ..........................................27 3- FLYING WITH X-RATED 7 ........................................28 3.1- P ..................................................28 FLIGHT CHECKS 3.2- P .......................................................
-
Page 5: 1- General Information
1- GENERAL INFORMATION This equipment should contain: Harness Carbon seat plate Composite foot plate Hook-in karabiners Emergency parachute deployment handles Two spare elastic loops for fastening the emergency parachute container Two spare long elastic loops for fastening the emergency parachute container ... -
Page 6: Concept
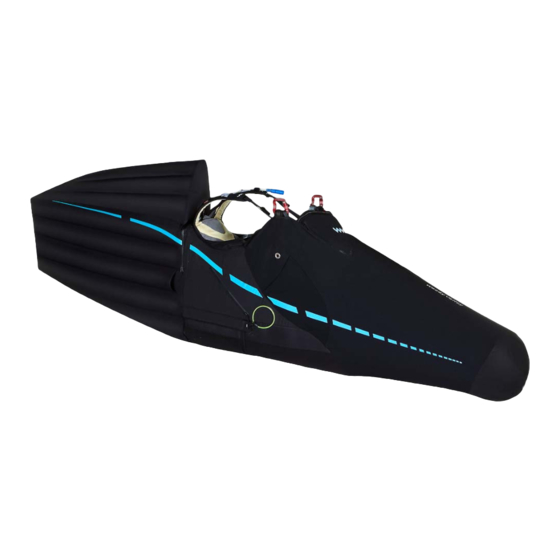
The X-Rated 7 is meant to be used as harness in paragliding as “light ais sports equipment” with a maximum weight of 120 kg. X-Rated 7 is the most extreme example of Woody Valley’s many years of experience in competition harnesses. It has been designed to meet the demanding requirements of professional pilots in term of comfort, flying performance, aerodynamics, and safety. -
Page 7: S.o.s. Label
1.4- S.O.S. Label This label, coloured red with white lettering, is readily visible in a pocket on the right shoulder-strap padding and it is easy to pull out. On the back of this label, you can write the information that you think should be given to rescue personnel in case of accident. -
Page 8: 2- Before Use
2.1- Reserve parachute X-Rated 7, to meet the requirements of new competition rules and to ensure a high level of safety in flight, has two emergency containers, one on the right and one on the left, and offers the possibility to have a third parachute in the front under the cockpit (optional). The containers have an adjustable volume and allow the use of a larger main emergency chute combined with a smaller secondary chute. -
Page 9: 2- Connecting The Reserve Parachute To The Harness
2.1.2- Connecting the reserve parachute to the harness X-rated 7 is equipped with a dual bridle and two loops for parachutes with directional control with a double-riser bridle. There are three different systems for attaching the parachutes to the harness, each of which applies to both right and left side installation: First system (for non-steerable rescue parachute): Use a screw-lock karabiner with a breaking strength of at least 2,400 kg. - Page 10 Second system (for non-steerable rescue parachute): The reserve parachute bridle is passed through the loop at the end of the harness’s built in reserve parachute bridle. The reserve parachute itself is then passed through its own webbing loop. This connects the two bridles. The loops should be pulled as tight as possible to avoid any chance of dangerous friction developing between the two bridles during the shock caused when the reserve parachute opens.
- Page 11 The two connections should be made using screw-lock karabiners with a breaking strength of at least 1,400 kg. It is important to verify that the length of the bridle is sufficient to position the reserve parachute inside the harness pocket, and that there is sufficient play to enable the parachute to be taken out of the pocket without causing the reserve parachute deployment bag to open during extraction.
-
Page 12: 3- Inserting The Reserve Parachute Into The Harness
2.1.3- Inserting the reserve parachute into the harness Push the slider of the zipper that encloses the bridle into its Lycra cover located behind the pilot’s neck, then open the zipper starting from the reserve container flap, in order to free the bridle route that goes from the shoulder loops to the rescue parachute container under the seat. Next attach the rescue parachute to the harness following one of the three methods explained above. - Page 13 It is essential to remove the cords after this operation. The cords should be pulled out slowly in order not to damage the elastic loops by excessive friction. Push the two zipper sliders at the side of the rescue parachute container to the bottom, pushing them into the container. Return the slider of the bridle zipper to the top of the zip, and into its Lycra cover located behind the pilot’s neck.
-
Page 14: 4- Extracting The Reserve Parachute
IMPORTANT: Every new combination of reserve parachute and harness or the external container assembled for the first time should be tested by an official harness or reserve parachute dealer, or by a flying instructor. Deployment of the reserve parachute should be perfectly feasible from the normal flying position. The paragliding harness and its rescue parachute deployment system are not suitable for diving and strong opening shocks. -
Page 15: 5- Closing The Parachute Container Flaps In Case Of Major Service Intervals
2.1.5- Closing the parachute container flaps in case of major service intervals If you use the harness with just one bottom parachute you need to follow a procedure to close the flaps of the unused parachute container. Use the plastic cable provided with the rescue handle and then close all the flaps. -
Page 16: 1- Connecting The Deployment Handle To The Deployment Bag
2.2.1- Connecting the deployment handle to the deployment bag The front rescue container is supplied complete with the handle for parachute deployment, marked as n°13. Only this deployment handle should be used. The black loop on the handle should be put through the loop attached to the deployment bag, and then the entire handle should be passed through the handle’s loop in order to link the two. - Page 17 Second system (for non-steerable parachutes): The reserve parachute bridle is passed through the loop at the end of the harness’s inbuilt reserve parachute bridle. The reserve parachute itself is then passed through the large loop in its own bridle. This connects the two bridles. The loops should be pulled as tight as possible to avoid any chance of dangerous friction developing between the two bridles during the shock caused when the reserve parachute opens.
-
Page 18: 3- Inserting The Front Emergency Parachute
2.2.3- Inserting the front emergency parachute Fasten the emergency parachute bridle using the two Velcro strips inside the parachute container, ensuring that the two loops leading to the main karabiners are on opposite sides and emerge from the cockpit symmetrically, therefore with the same length. These two loops also make it possible to adjust the height of the container. - Page 19 Insert the metal pins into the elastic loops and insert the handle beneath the fabric flaps. The cord must be removed at the end of this phase, and must be extracted slowly in order to avoid damaging the elastic loops due to excessive friction between the parts. Once the parachute has been inserted into the container, it must be secured to the harness by connecting the loops on the restraint ropes to the karabiners: the loop on the right always remains fastened to the corresponding karabiner, while the loop on the left must be connected when closing the harness before each takeoff.
-
Page 20: 4- Extracting The Front Reserve Parachute
IMPORTANT: - Each new combination of emergency parachute and harness, or change in emergency parachute container, should be checked to ensure that the emergency parachute can be correctly deployed, by an official harness or emergency parachute dealer, or by a flight instructor. Emergency parachute deployment should be perfectly feasible from the normal flying postion. -
Page 21: 5- Back Storage Pocket
2.2.5- Back storage pocket To access the rear pocket, you must first fully open the zipper on the rear aerodynamic side of the harness and turn it for easier access to the pocket. This compartment has been carefully designed and sized to hold a paraglider rucksack. For smaller objects such as keys, wallets and coins, there is a second smaller pocket near the main pocket. -
Page 22: Harness Adjustments
2.3- Harness adjustments LEGEND : 1. Main straps 2. Back straps paragraph 2.3.1 3. Depth Sit straps paragraph 2.3.1 4. Depth Thigh straps paragraph 2.3.1 5. Shoulder straps paragragh 2.3.2 6. Chest straps paragragh 2.3.3 7. Leg straps paragragh 2.3.4 8. - Page 23 Please remember that the size of your X-Rated 7 harness should be chosen according to your height, and not according to seat width. Unlike a harness based on a fundamentally seated position, in which the height of the seat back is not essential for comfort, in this harness the pilot flies in a more supine position, and so the height of the back support is very important for comfort and a correct flying position.
-
Page 24: 1- Adjusting Seat And Back Position
IMPORTANT: Before making any adjustments, the emergency parachute must be inserted. Every adjustment must be made symmetrycally on both sides Every adjustment strap has to be tight. 2.3.1- Adjusting seat and back position This photo shows how the lateral adjustments are arranged, and the many points at which the pilot is actually supported, from the upper back down to the lumbar area. -
Page 25: 2- Shoulder Strap Adjustment
In the detailed photo, adjustment n° 1 changes the angle between thighs and back (seat depth), distributing load between seat and the lumbar area and thus improving pilot comfort. Adjustment n° 3 is principally used to alter the angle between the torso and the vertical. Adjustment n° 2 and n° 4 are useful for fine back adjustments, but they are secondary adjustments that improve contact between the harness back and the pilot’s back, improving support and comfort. -
Page 26: 3- Chest Strap Adjustment
2.3.3- Chest strap adjustment The chest strap which controls the distance between the two karabiners can be adjusted from 40 to 51 cm. For the first flight with X-Rated 7, we suggest setting the chest strap to the minimum length, then locating the preferred length in flight by means of gradual adjustment. When the chest strap is shorter and tighter, stability is greater. -
Page 27: 5-Self Limiting Of The Adjustable Shoulder Straps
Vice versa, the tighter it is adjusted, the more stable the harness becomes, requiring more pronounced pilot movements in flight. X-Rated 7 is supplied with this adjustment set to a position that is suitable for most pilots. If you wish to change this setting, take great care and make very... -
Page 28: 7- Leg Cover
2.3.7- Leg cover The leg cover is made of special wind-proof and water-proof Lycra material. It also features a magnet so it stays closed even at high speeds, thus eliminating the “flapping” phenomenon. The geometry of the innovative cords of the leg-cover’s automatic closing system makes it easier for the pilot to insert their legs after takeoff. -
Page 29: 8- Speed-Bar Adjustment
2.3.8- Speed-bar adjustment X-Rated 7 is already equipped with a three step speed bar: the first two steps are flexible, while the last step is rigid. The length of the speed-bar system should be adjusted only after the optimum harness adjustments have been completed. -
Page 30: Stability System
2.3.9 Stability System This system is for stabilizing the harness in flight. The pilot can activate the stability system by pulling the two little red spheres located near the karabiners and deactivate it with the metal trim. It is also possible to climb in thermals with the stability system on but the harness will not move as smoothly; to have a more dynamic harness deactivate the stability system with the metal trim inside the turn or even both metal trims. -
Page 31: Pee Tube
2.3.11 Pee tube The hole for the pee tube is on the left side of the harness in front of the rescue handle. 2.3.12 Replacing the air scoop supports Take out the damaged Mylar supports and replace them with spare ones from the plastic bag provided. Insert the support into the two little pockets located inside the air scoops. -
Page 32: 3- Flying With X-Rated 7
3.2- Pockets The X-Rated 7 harness has a roomy back pocket and various side pockets. The two side pockets that are situated close to the main karabiners are ideal for a radio or mobile phone, and they are fitted with a safety loop. The harness has another two large side pockets. The instrument deck was designed so that it can easily be removed from the cockpit, so that the pilot can have the instruments with him or her at all times, for briefing, or to protect them from the pressure that may be caused by folding the harness. -
Page 34: Camel-Bak
3.3- Camel-bak The X-Rated 7 harness was designed specifically for use with a water bladder. Place the water bladder as shown in the photo, in the rear storage pocket. Push the tube through the eye on the harness. The tube should run below the Lycra cover of the shoulder strap, emerging from the eye as shown in the photo. - Page 35 The procedure for installing the ballast is illustrated below: Open the zipper beneath the instrument compartment to access the ballast lodging. Next, open the Velcro over the discharge tube’s outlet hole and insert the tube. There is a second hole inside the harness, which allows the discharge tube to be inserted into the external pocket, where it can be hidden and extracted whenever necessary.
-
Page 36: Installing The Lower Ballast
3.5- Installing the lower ballast X-Rated 7 is supplied with a 7,8 litre ballast bag with carrying handle already installed beneath the seat. In order to take maximum ballast capacity, we suggest not removing it from its housing. The easiest way to fill it is via the discharge tube with the aid of a funnel or a connecting tube, ensuring as much air as possible is discharged from the ballast bag beforehand. -
Page 37: Anti -Gparachute
To attach the Anti-G to X-Rated 7, a special pocket has been designed, passing from right to left, with a strap and a karabiner inside used to attach the bridle of the small drag chute. This pocket is on both sides of the harness and can be accessed through the oblique waterproof zipper. - Page 38 WARNING : To ensure correct use of the ‘‘Anti-G’’ parachute it is important that you carefully read and understand the instruction included in the parachute manual. The ‘‘Anti-G’’ braking parachute is optional and can be purchased separately. (1) “Anti-G” side pocket; (2) karabiner for attaching the drag chute bridle; (3-4) “Anti-G” stowage; (5) Example of extracting the drag chute;...
-
Page 39: Flying Above Water
3.8- Tow bridle attachment The X-Rated 7 harness can be used for towed launches. The tow bridle release should be hooked directly to the main karabiners, ensuring that the karabiners are positioned with the opening bar facing the rear. For further details, refer to the documentation provided with your tow release, or ask a qualified towing instructor at your flying site. -
Page 40: 4- Packing The Harness
4- PACKING THE HARNESS The X-Rated 7 harness can be packed into the rucksack whether or not the paraglider is hooked onto the karabiners (1). The sequence of operations shown below will help you pack up the harness properly. Fold the left side of the leg cover inwards so it lies flat on the seat, then fold the right side of the leg cover over it. - Page 41 Once the harness is inserted (8) turn over the entire package and close the zipper (9). Fold the tail inside (10), the materials used allow any amount of folding without affecting how it functions in flight. Enough space will be available in the top part for the instruments and helmet (11-12).
-
Page 42: 5- Features And Assembly Of Optional Accessories
5- FEATURES AND ASSEMBLY OF OPTIONAL ACCESSORIES 5.1- Ballast bag Our ballast bag has a carrying handle, drain pipe and tap. It can contain up to 7 litres of water, and it can be inserted into the central ballast compartment or the ballast compartment under the seat. -
Page 43: 6- Maintenance And Repairs
In order to create a high-performance, lightweight harness, the materials used are of excellent quality, but have a lower weight per square metre with respect to standard harnesses. Therefore, pilots should take the utmost care when using and packing the X-Rated 7 harness. Correct use will extend harness life. -
Page 44: 7- Technical Data
Width rear 27,5 cm; Width front 24,8; Depth 34,6 cm Size of polycarbonate seat, size XL Width rear 29,7 cm; Width front 26,8; Depth 37,4cm Total weight of X-RATED 7, complete with reserve chute handle, karabiners, M = 7,1 Kg; L = 7,7 Kg; XL = 8,5 Kg protection, speed-bar, ballast.
Need help?
Do you have a question about the X-Rated 7 and is the answer not in the manual?
Questions and answers