Advertisement
Boltzero Bunk Bed
Assembly Instructions
428/3256
- Please keep for future reference
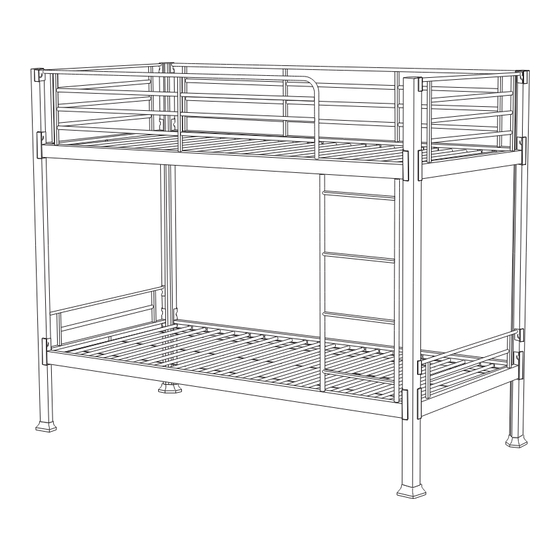
Dimensions
Width - 2010mm
Depth - 990mm
Height - 1630mm
Important
- Please read these instructions fully before starting assembly
If you need help or have damaged or missing parts, call the Customer Helpline:
Argos = 0345 640 0800
Issue 1 - 31/07/15
Advertisement
Table of Contents

Related Manuals for B&M Boltzero Bunk Bed


Summary of Contents for B&M Boltzero Bunk Bed
- Page 1 Boltzero Bunk Bed Assembly Instructions 428/3256 - Please keep for future reference Dimensions Width - 2010mm Depth - 990mm Height - 1630mm Important - Please read these instructions fully before starting assembly If you need help or have damaged or missing parts, call the Customer Helpline:...
-
Page 2: Care And Maintenance
Safety and Care Advice Important - Please read these instructions fully before starting assembly • Check you have all the • During assembly do not stand • Unit weight: 41kgs. components and tools listed on or put weight on the product, this the following pages. -
Page 3: Components - Parts
Components - Parts If you have damaged or missing components, call the Customer Helpline: Argos = 0345 640 0800 Please check you have all the parts listed below sticker (1) sticker (2) sticker (3) Back Left End Post Front Left/Back Right End Post Front Right End Post Upper Side Rail x 2 Lower Side Rail x 2... -
Page 4: Tools Required
Components - Parts (cont.) Please check you have all the parts listed below Upper Front Safety Rail Upper Back Safety Rail Slat x 12 Components - Fittings Please check you have all the fittings listed below Note: The quantities below are the correct amount to complete the assembly. In some cases more fittings may be supplied than are required. - Page 5 Assembly Instructions Step 1 Attaching footings Attach footings to end posts shown. Step 2 Attaching lower side rails With the help of an assistant holding the end posts, attach the lower side rails to the end posts as shown. Insert into holes on the end posts first then push down the siderails to...
- Page 6 Assembly Instructions Step 3 Attaching upper side rails Attach the upper side rails (4) to the end posts as shown. Insert into holes on the end posts first then push down the rails to lock. Step 4 Attaching lower rails Attach the lower front rail (6) and lower back rail (7) to the end posts (1) and...
-
Page 7: Into Holes On The End
Assembly Instructions Step 5 Attaching right hand end panel Attach the lower front rail (6) and lower back rail (7) to the other end posts (2) and (3) as shown. Insert into holes on the end posts first then push down the rails to lock. - Page 8 Assembly Instructions Step 7 Attaching ladder Attach the ladder (8) into holes on washers the lower front rail (6) as shown. Arrow up Note: Make sure to position the ladder with the arrow sticker on the ladder pointing up. Step 8 Attaching upper front safety rail Position the upper front...
-
Page 9: Lock
Assembly Instructions Step 9 Attaching upper slats Note: Before attaching the slats carefully make adjustments to ensure the bed frame is straight. Note: Position the horizontal rail below when attaching the slats onto the bed. Starting on one end, attach the slats by one into upper rails (9) and (10). - Page 10 Assembly Instructions Step 11 Attaching caps Attach long caps short caps into holes on the end posts as shown. Insert and lock it carefully into holes by using a rubber mallet. Step 12 Fixing to wall This unit must be fixed to a wall.
-
Page 11: A Guide To - Wall Mounting & Fixings
A Guide to - Wall Mounting & Fixings Important: When drilling into walls always Important note: check that there are no hidden wires or pipes etc. If plastic wall plugs Make sure that the screws and wall plugs being used are supplied with your are suitable for supporting your unit. - Page 12 Guide to Disassembling the Slats Tools required Metal Slats Pusher (Provided) Please keep this tool for future use. Use the metal slats pusher to remove the slats as shown in the diagram. Insert it into the front/back/safety rails then pull it until the slats is detached.
Need help?
Do you have a question about the Boltzero Bunk Bed and is the answer not in the manual?
Questions and answers
How to disemble boltzero bunk bed have trouble taking it down
To disassemble the B&M Boltzero Bunk Bed, follow these steps:
1. Use the provided metal slats pusher tool.
2. Insert the pusher into the front, back, or safety rails.
3. Pull the tool until the slat detaches from the rail.
4. Repeat for all slats.
Keep the tool for future use.
This answer is automatically generated