Table of Contents
Advertisement
Advertisement
Table of Contents

Related Manuals for VTech Kidizoom Action Cam 180


Summary of Contents for VTech Kidizoom Action Cam 180
- Page 1 Parent’s Guide 91-003365-002...
-
Page 2: Included In This Package
INTRODUCTION Thank you for purchasing Kidizoom Action Cam 180 by VTech ® ® Capture photos and videos of all your adventures. Built with you in mind, the Kidizoom Action Cam 180 can go anywhere you go with ® included mounts and a waterproof case. This kid-tough camera has a color screen and 180 degree rotatable camera. - Page 3 WARNING: All packing materials such as tape, plastic sheets, packaging locks, removable tags, cable ties and packaging screws are not part of this toy, and should be discarded for your child’s safety. ATTENTION: Pour la sécurité de votre enfant, débarrassez-vous de tous les produits d’emballage tels que rubans adhésifs, feuilles de plastique, attaches, étiquettes et vis d’emballage.
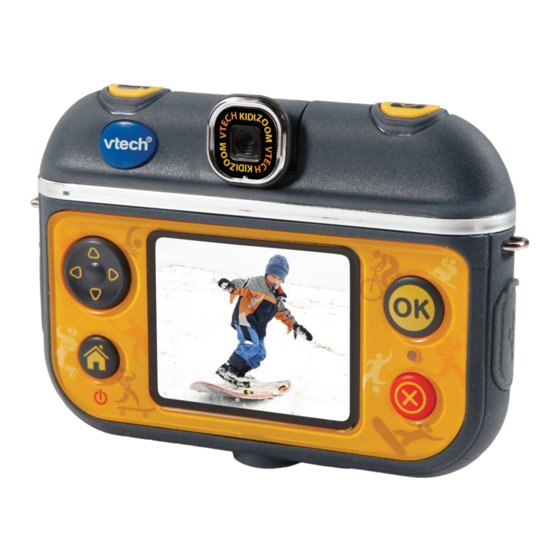
- Page 4 PRODUCT LAyOUT AND bUTTONS Rotatable Camera Lens Video Button Camera Button D-Pad Strap Hook Memory OK Button Card Slot Micro-USB Port Home/On/Off LED Indication Light Button Delete Button Microphone Master Power Switch Tripod Screw Hole Note: The speaker is located on the back of Kidizoom Action Cam 180 ®...
-
Page 5: Product Specification
Delete Button Press this button to delete the selected file or cancel the current effect selected in Camera Mode or Video Mode. D-Pad Press these buttons to navigate the menu screens. Memory Card Slot Insert a microSD card here for memory expansion. Micro-USB Port Connect to a computer with the included Micro-USB Cable to transfer files and to charge the Kidizoom... -
Page 6: Getting Started
Rechargeable Li-ion Polymer battery Batteries (battery is not replaceable) Optimum Operating 32°F - 104°F (0°C - 40°C) and Charging Temperature STORAGE CAPACITy FOR REFERENCE Set to Set to Set to 0.3 MP 160 X 120 320 X 240 640 X 480 Photos (Minutes) (Minutes) -
Page 7: Battery Recharging
bATTERy RECHARGING Note: Adult operation required. To charge the Kidizoom Action Cam 180, the camera needs to be ® connected to a computer with the included Micro-USB Cable. To do so correctly, please follow these steps: • Make sure that the Master Power Switch is set to the ON position before charging. -
Page 8: Automatic Shut-Off
AUTOMATIC SHUT OFF To preserve battery life, the Kidizoom Action Cam 180 will ® automatically turn off after a short period of time when no buttons are pressed. When recording videos or using the time-lapse photo function, the camera will not automatically turn off until the process is complete. The preview screen can also be set to automatically turn off after a short period of time from within the Settings Menu to help save power. -
Page 9: Memory Card Installation
MEMORy CARD INSTALLATION Kidizoom Action Cam 180 supports the below memory card types for ® storage expansion: • microSD • microSDHC • Make sure the camera is turned OFF. • Locate the Memory Card Slot on the side of the camera. •... -
Page 10: Take Photos
Press the Home/On/Off Button to turn the Kidizoom Action Cam 180 ® on. When turning the camera on for the first time, you will need to select the language. Press up or down on the D-Pad to select your desired language and press the OK Button to confirm. -
Page 11: Connecting To A Computer
USB port is usually marked with this symbol: • Two removable drives called VTech 5070 and VT SYSTEM will appear on your computer. VTech 5070 is for storage of your data; VT SYSTEM is for storage of system data and cannot be accessed. If there is a memory card in the camera, the removable drive will show the content on the memory card only. -
Page 12: System Requirements For Computer Connection
• Locate and open the DOWNLOAD folder on the removable drive VTech 5070, and drag and drop the photo or video files into the PHOTO or VIDEO subfolders. Note: Do not transfer photo or video files created by other cameras onto Kidizoom Action Cam 180, as these files may not be compatible. -
Page 13: Video Mode
Press the OK Button or Camera Button to stop recording, otherwise recording will continue until the maximum number of time-lapse photos is reached or battery is empty. Note: VTech recommends setting the screen to auto-off when ® the camera is mounted for sports, such as on a bicycle, scooter or skateboard. - Page 14 • Press up on the D-Pad to access Video Settings. From here, you can change the video resolution and enable or disable the self-timer. Press the OK Button to confirm any changes. Video Resolution Press up on the D-Pad to access the Video Resolution Settings Menu.
- Page 15 Special Videos Select the Special Video icon from the Home Menu to take stop- motion, fast-motion, or slow-motion videos. Press left or right on the D-Pad to select the mode you want to use and press the OK Button to confirm.
- Page 16 • Please check that there is enough free memory for this mode, as the camera will stop recording if the memory gets too low. Games There are three built-in games on the Kidizoom ® Action Cam 180. From the Games Menu, press left or right on the D-Pad to select a game, and press the OK Button to play it.
- Page 17 Enable or disable the camera screen auto-off function. If this is turned on, the screen will automatically turn off after a set amount of time when in Camera Mode or Video Mode. Note: For safety, VTech highly recommends setting the screen to auto ®...
-
Page 18: Care And Maintenance
CARE & MAINTENANCE • Keep the rubber covers over the micro-USB port and memory card slot tightly closed when they're not in use in order to prevent dust or water from getting in. • Keep the camera clean by wiping it with a slightly damp cloth. •... - Page 19 1. Turn the Master Power Switch OFF for 30 seconds. 2. Turn the Master Power Switch ON again Screen is not and then press the Home Button to turn the working correctly camera on. The Kidizoom Action Cam 180 ® screen should now function normally.
-
Page 20: Battery Disposal
1. Check if the memory card is correctly inserted. 2. Check to see if the memory card is the supported type. The camera only supports microSD or microSDHC cards Class 6 or above. 3. Check to see if the file system of your memory Memory card not card is FAT or FAT32. - Page 21 4. Loosen the six screws on the Kidizoom Action Cam 180 using a ® Phillips head screwdriver, then remove the cover. 5. The whole Kidizoom Action Cam 180 can then be disassembled. ® Pull out the circuit board and turn it around to reveal the battery on the back.
-
Page 22: Waterproof Case
KIDIzOOM ACTION CAM 180 ® ACCESSORIES Waterproof Case Camera Button Video Button Strap Hook Strap Hook Buckle Handle Case Body Mic Hole Buckle OK Button Home/On/Off Button Tripod/Bicycle Mount Screw Hole O-Ring Case Cover... - Page 23 Inserting the Camera Into the Waterproof Case • Make sure the Wrist Strap is not attached to the camera to avoid a water leak and damage to the camera. • Inspect the O-Ring for water leaks before inserting the camera into the case.
- Page 24 Notes On Waterproof Case Usage • This Waterproof Case is operable up to a water depth of 6 feet (2 meters) for 30 minutes with the camera inserted. • The waterproof performance is in accordance with the current toy safety standards. •...
- Page 25 Perform the above maintenance each time you use the case. In the unlikely event that a malfunction of the case causes damage to the equipment inside due to a water leak, VTech does not guarantee ® against damage to the equipment contained within it (camera, battery...
- Page 26 bICyCLE MOUNT/ADHESIVE MOUNT Bicycle Mount Adhesive Mount (Mounting Attachment + Adhesive Flat Mount) Screw QUICK SETUP GUIDE Using the Bicycle Mount 1. Loosen both Adjustment Handles by turning them counterclockwise. Note: You do not need to completely unscrew them.
- Page 27 2. Push the Adjustment Handle as illustrated below. If you cannot see the whole screw head, continue to turn the handle counterclockwise until you see the whole screw head exposed. 3. Pull out the Adjustment Handle as illustrated. 4. Attach the Head Tube Clamp onto the Head Tube of the bicycle. Note: It is recommended to mount the camera on the Head Tube of the bicycle instead of the Handle Bar as illustrated.
- Page 28 7. The Kidizoom Action Cam 180 is affixed to the bicycle and ready to ® use. Loosen the Angle Adjustment Handle and then you can rotate the Angle Adjustment Arm to adjust the capture angle.Tighten the Angle Adjustment Handle after you set the capture angle. Using the Adhesive Mount 1.
- Page 29 4. Firmly apply pressure to the Adhesive Flat Mount and the contact surface, making sure that the surface makes contact over the entire area. 5. It is recommended that the Adhesive Flat Mount stay on the surface at room temperature for 1 day before use to allow the maximum strength to be achieved.
- Page 30 WRIST STRAP ATTACHMENT INSTRUCTIONS STEP 1: Locate the thread loop on the end of the strap. Insert it into the groove behind the Strap Hook and then push it through. STEP 2: Feed the end of the strap up through the loop and pull it all the way through.
-
Page 31: Disclaimer And Limitation Of Liability
IMPORTANT NOTE: Creating and developing VTech® products is accompanied by a responsibility that we at VTech® take very seriously. We make every effort to ensure the accuracy of the information, which forms the value of our products. However, errors sometimes can occur. - Page 32 • Connect the equipment into an outlet on a circuit different from that to which the receiver is connected. • Consult the dealer or an experienced radio / TV technician for help. THIS DEVICE COMPLIES WITH PART 15 OF THE FCC RULES.
-
Page 33: Product Warranty
Return of the product under Warranty must adhere to the following rules: If VTech believes that there may be a defect in the materials or workmanship of the product and can confirm the purchase date and location of the product, we will at our discretion replace the product with a new unit or product of comparable value. - Page 34 Visit our website for more information about our products, downloads, resources and more. vtechkids.com TM & © 2017 VTech Holdings Limited. All rights reserved. Printed in China. 91-003365-002...
Need help?
Do you have a question about the Kidizoom Action Cam 180 and is the answer not in the manual?
Questions and answers