Table of Contents
Advertisement
Quick Links
Advertisement
Table of Contents
Troubleshooting

Subscribe to Our Youtube Channel
Related Manuals for Jands Vista T4


Summary of Contents for Jands Vista T4
- Page 1 The Vista Simple, Powerful, Visual Version 2.1 B ...
- Page 2 Information contained in this manual is subject to change without notice and does not represent a commitment on the part of the vendor. Jands Pty Limited shall not be liable for any loss or damage whatsoever arising from the use of information or any error contained in this manual. It is recommended that all service and repairs this product be carried out by Jands Pty Limited or its authorised service agents.
- Page 3 Contents Contents 1. Welcome to the Vista..............2‐1 What’s different about the Vista? ............... 2‐1 What things are the same as on other consoles?..........2‐1 About the generic fixture model................2‐2 Need more information? ..................2‐2 2. Getting started................2‐1 Setting up the console ..................2‐1 Switching on ......................2‐2 Creating and loading shows ................. 2‐4 3. Using the interface..............3‐1 Menu bar......................3‐1 Main toolbar......................3‐1 The Sidebar......................3‐9 Toolbars......................3‐10 4. Patching your rig ..............4‐1 Adding fixtures to the patch ................4‐1 Changing universes ....................
- Page 4 Contents SmartFX.......................5‐49 Extracts .......................5‐50 Using a keypad in the programmer window ............5‐51 The Programmer hardware controls ..............5‐53 6. Working with cuelists ............. 6‐1 Store All ........................6‐1 Store Part......................6‐6 Opening a Cuelist in the Editor................6‐9 The Timeline window ..................6‐10 Creating a Move in Black cue ................6‐18 About the timeline....................6‐33 Timeline events ....................6‐40 Creating and applying extracts................6‐47 Extracts .......................6‐47 Using commands within cuelists ................6‐48 Updating Presets and Cuelists during playback ..........6‐50 7. SmartFX.................. 7‐1 Effect types ......................7‐1 Using effects ......................7‐1 Effect controls.......................7‐4 Creating an effect from scratch................7‐12 Stopping an effect ....................7‐13 8.
- Page 5 Contents S1 Control Surface....................11‐2 M1 Control surface .................... 11‐3 Grand Master and DBO ..................11‐3 Function keys ..................... 11‐3 The modifier keys....................11‐4 The Super Playback / Programmer controls ............11‐4 Playbacks with faders..................11‐11 Playbacks without faders ................. 11‐12 Page controls....................11‐12 Configuring the console for Playback .............. 11‐13 Playback status indication................11‐17 Playback popup menu..................11‐18 Setting cuelist properties ................. 11‐19 Group Masters ....................11‐19 Pages ........................ 11‐21 Snapshots ......................
- Page 6 Contents Troubleshooting ....................17‐30 Private IP addresses..................17‐30 18. Appendix 5 – using VNC on T & I‐ series consoles....18‐31 VNC password....................18‐31 Starting VNC......................18‐31 Connecting to Vista using a Windows PC ............18‐31 Connecting to Vista using a Mac ..............18‐32 19. Appendix 6, Using midi show control (MSC) to control cues 19‐34 Configuring the midi port .................19‐34 MSC lighting messages ..................19‐35 20. Appendix 7, Using serial communication to control cuelists 20‐38 Connecting to the serial port................20‐38 Enabling the serial port ..................20‐38 Playback commands ..................20‐39 Setting fixture levels ..................20‐39 21. Appendix 8 – The Fixture Editor.......... 21‐41 The Fixture Type Library Editor ................21‐41 Creating a Fixture Profile..................21‐42 Main tab: ......................21‐43 DMX Chart tab: ....................21‐45 Channels with Custom Ranges .................21‐66 22.
- Page 7 Contents General Specifications..................24‐83 25. Index..................25‐1 Vista User Guide, Version 2 v ...
- Page 9 What’s different about the Vista? 1. Welcome to the Vista Welcome to the User Guide for the Jands Vista lighting console. This guide is intended to give you the information you need to get your Vista up and running as quickly as possible. Note that this guide will be regularly updated as enhancements are made to the Vista.
- Page 10 About the generic fixture model Welcome to the Vista About the generic fixture model One thing about the Vista that’s not immediately obvious is the ‘generic fixture model’. What is it? It’s a part of the software that works in the background and enables all fixtures, no matter what type or manufacturer to be treated the same way.
- Page 11 Getting started Setting up the console 2. Getting started Setting up the console Power Connect the Vista T, I or S series console to any mains supply between 100 and 240vAC. The Vista M series obtains power via the USB port External displays You can attach two external displays, including touch screen monitors to the Vista T series consoles using standard VGA connectors.
- Page 12 Switching on Getting started Switching on When you switch the console power on or launch the application on your PC, Vista starts up and displays the opening splash screen: Once it finishes loading the program, Vista displays the Patch screen. If this is the first time you’ve opened Vista V2 or you are starting a new show the patch table will be empty.: 2‐2 ...
-
Page 13: Toolbars
Getting started Switching on This is the Patch window, waiting for you to start creating a new show. To see the other Vista windows you use the buttons on the toolbar at the top left of the screen: This button… does this… displays the Patch window displays the Console hardware simulation window displays the Programmer Fixtures window... - Page 14 Creating and loading shows Getting started Creating and loading shows Creating a show To create a new show at any time, choose the New Show option from the File menu. Loading existing shows To load a show you’ve already created, choose the Open Show option from the File menu. Vista displays the Open Show window: To load a show archive you’ve previously saved (or transferred to the console using the export / import function), find the directory containing it, then click on the filename to select it and hit the Open button to load it.
- Page 15 Getting started Creating and loading shows The first time you save a new show, Vista displays the Save As window: Type a name for the file and then click the Save button. Vista automatically creates a show folder, with the same name and puts the show file inside it. Once you’ve named the file, each time you choose the Save option from then on, Vista overwrites that file with the new details without displaying this window.
- Page 16 Creating and loading shows Getting started Click on the Show button and then select the show to backup from the list of show files. Click the Next button. Vista displays the Export window: Click the Browse button and choose a drive and directory on the computer or storage device and hit the Export button.
- Page 17 Getting started Creating and loading shows This option… does this… Lock entire the password is required to use any console functions or console controls. Disable all the password is required to edit cuelists, groups, presets and editing all other show components Lock current the password is required to save changes to the show file show Select an option from the popup menu.
- Page 19 Using the interface Menu bar 3. Using the interface The latest version of Vista features a new simpler layout. No matter whether you have worked with Vista before or are seeing it for the first time it’s worth taking some time to get familiar with the new window layout and options. Menu bar ...
- Page 20 Main toolbar Using the interface This button… does this… displays the Programmer Fixtures window (Alt + 3) displays the Programmer Timeline view. (Alt + 4) displays the Playback control window (Alt + 5) displays the fixture Output window (Alt + 6) V1 classic style window navigation If you prefer to select windows from the bottom of the screen you can open a toolbar that emulates the earlier versions of Vista.
-
Page 21: Smartfx
Using the interface Main toolbar Standard buttons When you first start a new show Vista loads the standard set of buttons but you can customize each and every button, as described below. This button… does this… Saves the show file to disk Opens a new Cuelist in the Editor Opens an existing Cuelist in the Editor Turns on the Editor’s ‘Highlight’... - Page 22 Main toolbar Using the interface This button… does this… Clicking this button releases all the fixtures from their current settings as determined by the cuelists that are running and returns them to their default state. Release All Modified soft buttons The soft buttons provide different functions when you press the Red (Shift), Green (Alt), Yellow (Control) or Blue (Control+Alt) modifier.
- Page 23 Using the interface Main toolbar This button… does this… De-selects all fixtures De-select all Vista remembers the last set of fixtures you selected; you use this button to toggle back to your previous fixture selection. Previous selection If you have used the previous selection command this button will toggle back to the fixture selection you had before pressing previous selection.
- Page 24 Main toolbar Using the interface This button… does this… Adds a new cue at the end of the cuelist being edited Append cue Inserts a new cue, before the cue that is being edited Insert before Adds a new cue after the cue that is being edited. Insert after Deletes the selected cue Delete Cue...
- Page 25 Using the interface Main toolbar Ctrl set (Yellow Modifier) Hold down the Yellow modifier button or the Control button, on your keyboard, to access and display the Control set. This button… does this… Live properties Opens a Live tab properties window. Cuelist Opens the Cuelist properties window. properties Insert Opens the Insert Command window where you can add a...
- Page 26 Main toolbar Using the interface This button… does this… Move in Black Opens the Move in Black window where you can Mark a cue and add MIB events that pre-set the selected fixtures so that when they turn on you don’t see them moving, changing colour etc.
- Page 27 Using the interface The Sidebar Configuring the soft buttons To change the function of a soft button, right click on the button and choose a command or function from the popup menu. Any command from any menu can be assigned to the soft button. To change one of the alternate sets hold the Shift, Alt or Ctrl key while right clicking.
- Page 28 Toolbars Using the interface You can adjust the width of the sidebar by clicking on the window divider and dragging to the left or right. Toolbars Most windows have optional toolbars that provide buttons for sets of menu commands. To show or hide any of the optional toolbars select the ‘Toolbars’ option from the view menu.
- Page 29 Using the interface Toolbars This button… does this… Ignites the lamps in the selected fixtures. Strike Switches off the lamps in the selected fixtures off. Douse Resets the selected fixtures to their factory default settings. Reset This is useful if a fixture has a control problem and you need to get it ‘back to normal’.
- Page 30 Toolbars Using the interface This button… does this… displays the Store Look window where you can save the complete output (the look on stage). Storing this way will ensure that when you play a Cue back it will appear exactly as Store Look it did when you saved it Clear all information coming from the Live tab.
- Page 31 Using the interface Toolbars This icon… does this… Undo the last action Ctrl+Z Redo the last action Ctrl+Y Fixture selection toolbar To open or close a toolbar select the ‘Toolbars’ option from the View menu: This icon… does this… Vista remembers the last set of fixtures you selected; you use this button to toggle back to your previous fixture selection.
- Page 32 Toolbars Using the interface This icon… does this… Select all the fixtures that are programmed in the current cue. Programmed Command Line toolbar See Using a keypad in the programmer windowon Page 5-51 Fan toolbar The fan toolbar is used to set how Feature values and Event times are spread. This option…...
- Page 33 Using the interface Toolbars Components toolbar The components toolbar includes buttons to create new Presets, Groups and Extracts This option… does this… Opens the create New Preset window. Preset Opens the create New Group window. Group Opens the create New Extract window. Extract Vista User Guide, Version 2 ...
- Page 35 Patching your rig Adding fixtures to the patch 4. Patching your rig Once you’ve got your Vista system connected and powered up you can patch your fixtures the way you want them using the Patch window. If it’s not already open click on the Patch icon or select the ‘Patch’ option from the Window menu, Vista displays the Patch screen: This is where you set up all the fixtures in your rig.
- Page 36 Adding fixtures to the patch Patching your rig Choosing a fixture from the Factory list To add a fixture from the Factory list: Click the ‘+’ symbol beside ‘Factory’ in the Fixture Type box. Vista displays a list of manufacturer’s folders. Click the ‘+’ symbol beside the name of the manufacturer you want, to display the list of fixtures in that folder.
- Page 37 Patching your rig Adding fixtures to the patch In our example above the selected fixture is called ‘2 VL2500Sp’. This title consists of two components: • a unique ID number [2], that Vista assigns automatically. This number identifies the fixture uniquely within the whole system, across all the universes (i.e. no two fixtures will ever have the same unique ID number).
- Page 38 Changing universes Patching your rig In the DMX Universe field, Vista automatically displays the number of the currently selected universe. If you want to add these fixtures to another universe, enter the universe number. In the DMX address field, set the number of the DMX channel where you want this group of fixtures to start.
- Page 39 Patching your rig Setting fixture properties Note that you can’t place them in such a way that any of the channels will ‘fall off’ the end of the universe. Renaming fixtures To rename one or more fixtures select them in the universe panel and choose the Properties tab in the sidebar: Enter the name you want to give the selected fixtures in the ‘Name’...
- Page 40 Setting fixture properties Patching your rig To view and set the properties for one or more fixtures, use the pen to select the fixtures you want on the patch panel. Vista displays the details of those fixtures in the Properties and Transforms tabs: If you select multiple types of fixture, Vista displays the details of the first type you selected.
- Page 41 Patching your rig Setting fixture properties lamp life or prevent fixtures from ever reaching full intensity. Dimmer This popup lets you select a dimmer fade curve. The default Curve option is Linear but you can select one of the available opti ons; Linear, Damp, Snap Start, Snap end, Square Law, I nverse Square, Switch, Hot power, Flourescent and Sinus Preview in...
- Page 42 Viewing the patch in different ways Patching your rig ome of the tran sformers a re also availa ble from the Properties tab as described bove. To choose one of th e advanced tr ansformers click on Pan offset or Tilt ffset. This option… does this… Minimum Sets the minimum (percentage) value for this f eature.
- Page 43 Patching your rig Viewing the patch in different ways Table view The Patch screen defaults to the Table view, as shown earlier in this section. This is the view you will use most of the time: here you can drag and drop fixtures into the patch panel for each universe and arrange them the way you want them. List view ...
- Page 44 Controlling the fixtures Patching your rig You use this screen to display the output values of each and every DMX channel. Each cell displays the channel number and it’s DMX output value. The cells are clear if there is no output and change to a highlighted box if the output is adjusted.
- Page 45 Patching your rig Exporting and importing patch information Select the ‘Clone Fixtures’ option from the Patch menu or right-click on the patched fixture and select Clone from the popup menu. Vista creates a clone of the selected fixture(s) in the fixture pool at the bottom of the Patch window Drag the cloned fixture(s) into the patch table.
- Page 46 Exporting and importing patch information Patching your rig 1:241 VL2000 Spot Enhanced 16 bit V2000Se6 Color Block 2 Mode 3 ColBk2m3 5:17 Color Block 2 Mode 3 ColBk2m3 MediaMaster Layer Full 1.0 MeMaLF10 9:44 MediaMaster Layer Full 1.0 MeMaLF10 12:22 VL3000 Spot VL3000Sp 12:50 VL3000 Spot VL3000Sp In this example the spreadsheet has a header row, which is optional, but shown here for explanation.
- Page 47 Patching your rig Configuring the DMX & Ethernet Outputs Configuring the DMX & Ethernet Outputs V2 Vista does not automatically connect Universes to the DMX outputs on your console or to external Artnet devices. To make these connections you click the Connect button on the toolbar to open the DMX Connections screen: You use this screen to connect to Vista’s DMX outputs, to external Ethernet-DMX interface boxes and to broadcast Art-net.
- Page 48 Configuring the DMX & Ethernet Outputs Patching your rig Connecting Universes to the Console DMX & Ethernet Outputs The DMX connections window lists all the internal DMX connections, USB-DMX, Ethernet-DMX connection boxes and ArtNet compatible devices attached and visible to the Vista: In this example above you can see several entries: four are the T4 console’s inbuilt DMX connections ;...
- Page 49 Patching your rig Configuring the DMX & Ethernet Outputs Click on the box in the ‘DMX Universe’ column and either type a Universe number or use the up and down arrow buttons to select the Universe you want. Vista User Guide, Version 2 4‐15 ...
- Page 51 The Chooser window The Chooser screen 5. The Chooser window The Chooser screen To get all your fixtures up and running you click the Chooser button on the toolbar at the top of the screen. If this is the first time you’ve opened this window you should be in the Live tab, otherwise click on the Live tab to make it active. Vista displays the Fixtures screen: This screen consists of four main elements: The Editor control section where you can select to work with the Live editor...
- Page 52 Arranging fixtures in a layout The Chooser window Arranging fixtures in a layout Vista displays all of the fixtures you added on the Patch screen as icons on the Fixture layout panel. When you first view this screen, the fixtures are arranged in numerical order, by unique ID, as a bank of icons. To re-arrange the fixtures: Click on the ‘Locked’...
- Page 53 The Chooser window Arranging fixtures in a layout Type a name for the layout and click OK. Vista creates a new layout and adds a corresponding ‘tab’ at the bottom of the layout panel: Arrange the fixtures as described above. When you are finished Click on the ‘Unlocked’ button so that it changes back to ‘Locked’.
- Page 54 Arranging fixtures in a layout The Chooser window • Rename a layout by double-clicking on the name and typing a new one. • Change the order of the layout tabs by selecting a layout and moving it up or down the list using the Move Up, Move Down, Move to Top and Move to Bottom buttons •...
- Page 55 The Chooser window Arranging fixtures in a layout This option… does this… Snap to Grid Locks or Unlocks the current layout. Fixture and Group icons can not be moved when a layout is locked. But they can be scaled. Show Gridlines Display a grid on the Fixture Chooser layout pane Grid Spacing Sets the space between the grid lines.
- Page 56 Arranging fixtures in a layout The Chooser window Layout options The Layout options submenu let’s you quickly configure some commonly used layout properties. To do this: Select the Layout you want to adjust by clicking on its tab at the bottom of the Fixture C hooser p anel.
- Page 57 The Chooser window Arranging fixtures in a layout ayout organ isatio There are a number of ways to customise layouts and the way the fixture icons are displayed. To make a change select an op tion from the Chooser menu. This option… does this… Colours and Opens a submenu Background (submenu)
- Page 58 Arranging fixtures in a layout The Chooser window This option… does this… Manage Layouts Opens the Layouts window where you can add, delete, organise and customise your layouts. New layout Opens the New layout window. Duplicate layout Duplicates the current layout and opens a window to name it.
- Page 59 The Chooser window Arranging fixtures in a layout This option… does this… Align Lets you align a group of fixture icons, to the right, left, top or bottom of the group. Distribute Lets you distribute a group of fixture icons vertically between the top and bottom fixtures or horizontally between the furthest left and furthest right fixture in the selection.
- Page 60 Arranging fixtures in a layout The Chooser window Adding notes to the layout window You can add text boxes to the fixture window to help identify different fixture types or areas. Notes can be either attached to an object on the layout, such as a fixture, or can be independent. To add a note you do this: To attach a note to a fixture or group, first select the item.
- Page 61 The Chooser window Arranging fixtures in a layout This option… does this… Rows Specify the number of rows you want in the grid. If you enter a value here the number of columns is calculated automatically. Columns Specify the number of columns you want in the grid. If you enter a value here the number of rows is calculated automatically.
- Page 62 Arranging fixtures in a layout The Chooser window Adjust the size of the matrix by clicking on the handle on the bottom right hand corner and dragging to the size you want. Drag your fixtures into the matrix. You can either drag them one by one or as a group.
- Page 63 The Chooser window Arranging fixtures in a layout Sorting fixtures It’s often important to sort fixtures in a certain order. For example when you are, storing groups, applying effects fanning parameters or copying and pasting information from one set of fixtures to another. Vista lets you show the selection order and quickly sort fixtures based on their ID, selection order, layout position and more.
- Page 64 Arranging fixtures in a layout The Chooser window Random random order. Each time you de-select and re-select fixtures they are sorted into another random order. Position by columns and rows, from top left to bottom right, based on their position in the layout window. Manage Sorts This option opens the Manage Sorts window where you can customise and save sorts.
- Page 65 The Chooser window Arranging fixtures in a layout Fixture allow fixtures grouped together, so that if you spread or fan a Ganging feature setting across some fixtures, the settings can be in blocks and / or repeated throughout the selection. See the examples below. Blocking Let’s you group fixtures in "blocks"...
- Page 66 Arranging fixtures in a layout The Chooser window Custom Fan shapes In these examples, there are 10 fixtures selected and intensity is fanned across the fixtures using the following Fan shapes: Fan from Centre: Fan from both ends: Fan shapes The are several fan shapes that can be set and saved in a Custom sort. This option…...
- Page 67 The Chooser window Arranging fixtures in a layout To fan a feature or events, select the fan mode and hold the Yellow modifier or Control key while setting the feature value or dragging the event bars. The Vista V1 "Mirror" o ption is replaced by the ‘Fan from Centre’ and ‘Inverted Fan’...
- Page 68 Using the Programmer Sidebar The Chooser window Using the Programmer Sidebar The Programmer Sidebar has two tabs: The Palette tab includes panels to control all the main aspects of your lighting fixtures: intensity, position, co lour gobo and beam. The Components tab includes the items you store such as Groups, Presets, Extracts and Snapshots along with the in-built effects.
- Page 69 The Chooser window The Palette tab Common features of the palettes All palettes have a popup menu that you open by clicking the palette type button: Click on the drop down arrow on any of the palette type button to open a popup menu This option… does this… Clear This option lets you clear all events for that parameter type or just some of those events.
- Page 70 The Palette tab The Chooser window Checking that everything is working One of the first things you’ll probably want to do after setting up your rig and patching it all in on the Patch screen, is check that everything’s working. The quickest way to do this is to select the fixtures, one-by-one or in groups on the Fix ure panel, and crank the intensity and colour up a bit.
- Page 71 The Chooser window Using the All panel Using the All panel The All panel has controls for all the most commonly used features of your fixtures. I t provides a quick easy way to set Intensity, Position, Colour, Gobo and Beam without swapping panels. The same controls plus any advanced ones are available on the individual feature panels.
- Page 72 Using the All panel The Chooser window Fine Mode Some parameters, such as position, can be difficult to control when the palette is in normal mode. To switch to fine click on the ‘Fi ne’ button. Repeat this to turn fine mode off. Setting colour The Colour palette provides four buttons so you can choose the way you want to set your colours: •...
- Page 73 The Chooser window Using the All panel Swatch This tab provides the actual gel colours, numbers and names from the Lee swatchbook so you can pick the exact colour you want: Click in the Colour, Number (#) or Name (N) button to sort the list by name number or colour.
- Page 74 Using the All panel The Chooser window Setting gobo The Gobo summary panel displays icons of the gobos available on the selected fixtures: If you have only one t ype of fixture selected, the icons Vista displays represent all the gobo types of that fixture. Fixtures that have more than one gobo wheel w show a line of availab le gobos for each wheel.
- Page 75 The Chooser window Using the All panel Setting beam size and focus The summary Beam panel has two tabs for controlling the most used beam attributes: Focus The Focus tab controls the focus and zoom of the selected fixtures: Use the focus slider to soften or sharpen the beam shape. U se the Zoom slider make the beam spread softer or sharper.
- Page 76 Using the detailed panels The Chooser window Using the detailed panels Intensity Click on the Intensity button to select the detailed settings panel for all fixture channe ls in the Intensity group: In this view: • the 10 to 90 buttons set the intensity of the selected fixtures to the corresponding percentage value.
- Page 77 The Chooser window Using the detailed panels Position The detailed Position panel provides a larger version of the position target panel. You’ll notice that on this panel you can also adj ust just the pan or just the tilt by using the Pan and Tilt sliders located on the bottom and left side of the target panel.
- Page 78 Using the detailed panels The Chooser window The buttons, in the middle of the colour panel select the colour mechanism. There are three options. • – hue and saturation values. • Lee – Lee colo ur s watch. • Wheel – pick a col our from the fixture’s colour wheel If a fixture only has a colour mixing mec hanism (CMY / RGB) you ca n choose a...
- Page 79 The Chooser window Using the detailed panels Hue and Saturation values When you select the HSV colour option the colour panel provides a colour pic panel and a set of sl iders: To pick a hue and its saturation, just click on the shade you want in the spectrum area, and drag around to select a colour and set the saturation level.
- Page 80 Using the detailed panels The Chooser window Lee Swatch This option provides a list of Lee filters so you can pick a colour by it’s name, number or swatch. Click in the Colour, Number (#) or Name (N) button to sort the list by name number or col swatch.
- Page 81 The Chooser window Using the detailed panels Custom values Some fixtures hav e e fects and other special features that can be used by setting channel to a particula r value. These features vary from fixture to fixture so they aren’t included in Vis ta’s ‘generic’ controls. See About Custom value s on page 5-35 for more details on using the custom control panels.
- Page 82 Using the detailed panels The Chooser window On some fixtures you can rotate the individual gobos. For these fixtures: • You can move the selected gobo by small increments, to align the image, by clicking on the Gobo and Index bu ttons and adjusting the slider to rotate the gobo clockwise or anti-clockwise.
- Page 83 The Chooser window Using the detailed panels Beam The detailed Beam panel provides sliders for all the beam features and a graphic representation of frame (shaping s hutters) , if the fixtures have this feature: Focus Use the focus slider to soften or sharpen the beam shape.
- Page 84 Using the detailed panels The Chooser window Framing The Frame tab is specifically for fixtures that have beam shaping frames, so yo can shutter-off parts of the beam: To set the posit ions you want the frames to be in on the selected fixtures, click and drag each frame to the position you want, as shown in this example:...
- Page 85 The Chooser window Using the detailed panels About Custom values Some fixtures have effects and other special features that can only be used by setting a channel to a particular value. These features vary from fixture to fix ture so they aren’t incl uded in Vista’s ‘generic’ controls. For example some fixtures have special settings for the Strobe channel that provide a random strobe effect.
- Page 86 Using the detailed panels The Chooser window or many fixtu res the Vista library inclu des information about the value channels eed to be set t o for a parti cular effect. In this case you can cli ck on the custom anel’s title bar o r double- click anywhere on the panel to open the Custom feature window:...
- Page 87 The Chooser window The Components tab This field… does this… Range buttons In this column there will always be one button that selects the entire channel range (i.e. 0-255). If the Vista library includes information about the fixtures custom values there will be a button for eac of the special values or value ranges.
- Page 88 The Components tab The Chooser window This button… does this… Groups displays and let’s you s elect or modify the groups you’ve saved. Presets displays and let’s you select or modify the presets you’ve saved. displays and let’s you select any of Vista’s built in effects Extracts displays and let’s you sele ct or modify the Extracts.
- Page 89 The Chooser window The Components tab This button… does this… Clears the search box. Quicker Picker panels The Quick Picker panels provide an e asy way to select any of the following items you’ve created: • Groups • Presets • SmartFX (FX te mplates) • Cuelists •...
- Page 90 The Components tab The Chooser window The Sidebar has two panels (QP1 and QP2) that normally display three quickpicker panels. To adjust size of a Quick picker clic on the divider bar and drag up or down. To hide one or two of the Qu ickpickers drag the divider(s) to the bottom of the panel.
- Page 91 The Chooser window The Components tab he Multi Quick picker is a floating win dow, it can either be docked inside the ain window or it can floa t on top of or beside the main window. o un-dock a floating wind ow, click on the header ba r and drag it off the main indow.
- Page 92 The Components tab The Chooser window This option… does this… Clear page Clears all playbacks on the current page – the assigned components are removed and a blank page is left. Delete page Deletes the current page. Set as default play back Sets the selected cuelist’s buttons and faders as the layout.
- Page 93 The Chooser window The Components tab This button… does this… Icon size adjusts the size of the icons displayed in the Quickpicker. Text size adjusts the amount of space available for the label. Padding adjusts the amount of space between the icons. Icon click this button to display just an icon for each item.
- Page 94 Groups The Chooser window Groups If you have a big rig, the last thing you want to do is manipulate dozens of individual fixtures. To make it easy to control all the fixtures in your rig Vista auto matically creates groups for each fixture type that you patch.
- Page 95 The Chooser window Presets To create a group: Select the fixtures you want in the group: Click the [+] Add Group button at the bottom of the Group panel. Vista opens the Create New Group window: Type a name for the Group and click OK or press Enter. If you don’t want to name the Group right away you can accept the suggested name and rename...
- Page 96 Presets The Chooser window Enter a name for the p reset in the name box (beside the icon) Click on the icon and sel ect and different image if required. Set the Preset store options: is option… does this… Update options Only applicable if you are updating an existing Preset.
- Page 97 The Chooser window Presets separate presets for intensity, colour, gobo, beam and miscellaneous features. However the filter bar lets you in clude or exclude any features. To include a feature click on it’s icon so that it is highlighted. To exclude a feature click on it’s icon so that it is not highlighted.
- Page 98 Presets The Chooser window ive Time If you are working live w ith Presets, Palettes or any of the Sidebar panels the ‘Live Time’ window can be used to control crossfade time. When you are applying a presets or simply selecting a (non-linear) value in the sidebar palettes you can set a time for the Preset or selected value to fa de in.
- Page 99 The Chooser window SmartFX Fade Curve sets the fade curve. To set the fade curve click on the icon and select an option from the popup list. See the glossary for more about fade curves Click on the ‘Save as’ button and give this Timing preset a name. Click OK to save.
- Page 100 Extracts The Chooser window Click the Stored (Canned) FX tab. Vista displays the list of available stored (canned) effects. The letters in the ‘content’ column each effect tell you which parameters are in this effect (e.g. I-Intensity, P-Positio n, C-Colour, etc). To apply an effect, click on the effect you want. To adjust the parameters of an effect, open the SmartFX window and use the controls to adjust it (see Effect controls on page 7-4).
- Page 101 The Chooser window Using a keypad in the programmer window Click the Ex tracts button on the Components tab of the sidebar. Find the extract you want and click on it to select it. Set the mask buttons s o that the attribut es you want are applied. Any attribute that is masked, even if it is part of the extract, will not be applied.
- Page 102 Using a keypad in the programmer window The Chooser window This button… does this… Group Store All (Look) Store Part Time Selecting fixtures t in he CLI. For simple fixture sele ctions you can just type the fixtures numbers. However you can also select Groups and Fix tures by prefacing the ID numbers with a ‘G’...
- Page 103 The Chooser window The Programmer hardware controls Storing with the CLI The Command Line can also be used to store cues and set timing. For example: For example: • S 100 Enter Store Look Cue 100 to the open or the most recently used Cuelist. • S 2 / 10 Enter Store Look Cuelist 2 Cue 10 •...
-
Page 104: Index
The Programmer hardware controls The Chooser window This button… does this… I + P Press this button to put the encoders and lower 6 buttons in Intensity plus Position mode. Pressing it again cycles the controls through any available parameters or alternate modes (Angular position and Strobe & Shutter). Hold the red modifier (or the shift key) and click to cycle the controls in reverse. - Page 105 The Chooser window The Programmer hardware controls This button… does this… Sets the associated parameter to it’s maxim um values. I.E. would set Intensity to 100. Press Home and Full together to set the parameter to it’s mid value. Holding the Yellow modifier (or Ctrl key) changes this button to Half Encoders Rotate to set the associated parameter to the required value.
- Page 107 Working with cuelists Store All 6. Working with cuelists Once you’ve set up your patch, arranged your fixtures, assigned them to groups, and created the presets you want, you’re ready to create a Cuelist. This is where the Vista differs in a big way from traditional keypad-controlled lighting consoles, because instead of telling it what you want by entering strings...
- Page 108 Store All Working with cuelists • all the settings that the console is sending to your fixtures are saved. The settings could be coming from the Live tab or any other Cuelist being edited, a playback or any other control on the console. •...
- Page 109 Working with cuelists Store All The new Cuelist is ready to use and you can move the fader to bring the level down and back up. When you Store All this way the console fader is automatically set to be a Submaster. Storing a look with o ptions ...
- Page 110 Store All Working with cuelists Vista sets the ‘Store to’ cue to a new cue number at the end of the cuelist you last saved. If you want to a different cue number or store over an existing cue number can either: • type a new number or, •...
- Page 111 Working with cuelists Store All This option… does this… Cuelist number Displays the cuelist numb er to save. You can enter a new number in this field. field Search (cuelists) Typing a few letters or numbers in the se arch box filters the browser to show just the cuelists that match what you type.
- Page 112 Store Part Working with cuelists In the detailed view you can set a fade time, delay time and fade curve for each of the six feature types – Intensity (in and out), Position, Colour, Gobo, Beam and Miscellaneous channels. To set times either type in the boxes or click on the timing bars and adjust them.
- Page 113 Working with cuelists Store Part To store this way you do this click on the ‘Store Part’ button or select the Store art option on th e To ols menu. Vis ta displays the Store Part window: Selecting the Cuelist to Store to Vista automatically sets the ‘Store to ’...
- Page 114 Store Part Working with cuelists This option… does this… Search (cuelists) Typing a few letters or numbers in the search box filters the browser to show just the cuelists that match what you type. Selecting the Cue and store opt ions You can add a new cue, or merge to or replace the contents of an existing cue. When you first open the Store Part window the Cue ‘Add’...
- Page 115 Working with cuelists Opening a Cuelist in the Editor This option… does this… Selected Fixtures Only includes fixtures that are selected in the Live tab or cue being edited. Select the parameters to store using the filter bar. Click on any of the Intensity, Position, Colour, Gobo, Beam or Miscellaneous icons to mask or un-mask that parameter.
- Page 116 The Timeline window Working with cuelists You can also start a new cuelist from scratch or open an existing one in the editor. To do this click on the New Cuelist button (normally F2) or select the ‘New Cuelist option from the Components menu. Whichever method you choose, Vista creates a new Cuelist tab and displays the Editor window.
- Page 117 Working with cuelists The Timeline window Cuelist tabs When you first op en the Editor’s Chooser or Timeline windows you’ll see the Live tab – this is the equivalent of want other consoles call the ‘Programmer’ or ‘Editor” . If you o pe a cuelist or start a new one from scratch, Vista adds a new tab labelled with the c uelist name.
- Page 118 The Timeline window Working with cuelists Cuelist Navigator The cuelist navig atio section shows you an overview of all the cu es in a cuelist. Each cue is represe te n d by a mini cue icon in a scrollbar so you can see all the cues you’ve stored.
- Page 119 Working with cuelists The Timeline window In the ‘Tiles’ view: • each cue tile shows the number, name, duration and start of cue action • the cue or cues that are vis ible in the, in the timeline section shows with a green underline •...
- Page 120 The Timeline window Working with cuelists With these options you can: • open the cue or cuelist properties window • set the Cue Follow mode (aka Cue start action) for the selected cue(s) • block, superblock or unblock the selected cue • append a cue at the end of the cuelist or insert a new cue before or after the selected cue or at the playhead position.
- Page 121 Working with cuelists The Timeline window In the ‘Layout’ view: • the cues are laid out end to end, in timeline view. Cues that are set to start before the previous cue finishes overlap and appear on a separate line. • the selected cue shows with an outline and white text. Click on a row to select a cue, shift-click or ctrl-click to select a range or group of cues.
- Page 122 The Timeline window Working with cuelists Choose the ‘Merge cues’ option from the Tools > Cues submenu on the Cuelist menu. Cues always merge to the lowest cue number. Moving an d copying cues Often you’ll have an effect in one of more cues of a cuelist that you’d like to use in another place or another cuelist.
- Page 123 Working with cuelists The Timeline window Alias cues If yo u want to use th e same cue, in a cuelist, several times you can make an ‘Alias’. This way if you update any one of the associated alias cues they will all update. To create an alias cue Copy the cue by selecting it and cho osing the copy option from the edit...
- Page 124 Creating a Move in Black cue Working with cuelists Click on the ‘Untrack’ button on the t oolbar or select the ‘Un-track events (cue only)’ o ption from the Tools menu. Vista inserts events in the following cue to set the lights ba ck to the state they were in before the change. If th were no events of t hat ty pe originally, Vista inserts release events instea...
- Page 125 Working with cuelists Creating a Move in Black cue Choose the ‘Mark Cue’ option on the Tools menu. Vista opens the Move in Black window: This screen shows the op tions available; you use it to set the way Vista stores the Move in Black event: This option…...
- Page 126 Creating a Move in Black cue Working with cuelists This option… does this… Start action Sets how the MIB cue is started. the options are: Halt - Press the Go button to play this cue. Auto Follow - the cue plays automatically after the previous cue. Finish ith preceding –...
- Page 127 Working with cuelists Creating a Move in Black cue ue Propert ies Each cue has a number, name and fade time that you can set by clicking on the ue tiles and edit the fields. You can also set these properties and other advanced options mo the Cue Properties window. To do this: Select the cue yo u w nt in the Cuelist navigator.
- Page 128 Creating a Move in Black cue Working with cuelists This option… does this… Follow Time sets how the cue will start, the options are: (Cue Start Mode) (Halt) Press the Go button to play this cue (Follow) Play ‘n’ seconds after the previous cue ends (Start) Play ‘n’ seconds after the start of the previous cue.
- Page 129 Working with cuelists Creating a Move in Black cue This option… does this… Loop direction Sets the direction of the loop. The options are: • Forwards - loops from last to first • Backwards - loops from last to previous. • Bounce - loops backwards then forwards. •...
- Page 130 Creating a Move in Black cue Working with cuelists To view or modify the blocking for a cue open the ‘Blocking’ section of the Cue properties window: This option… does this… None The cue is stored normally Blocking Ensures that events th at are tracking through to the cue being stored will not be changed even if they are modified in the earlier cue(s).
- Page 131 Working with cuelists Creating a Move in Black cue This option… does this… Events stop Free If the cue includes an event that a baseless effect would effects act on the effect will be stopped. Audio Playback To add and play an audio file, when the selected cue plays click on the ‘Audio Playback’...
- Page 132 Creating a Move in Black cue Working with cuelists To do this: Open the cuelist in the editor. Select the Cue Propert ies option on the Edit menu. This property… does this… Name Sets the name for this cuelist. Sets the number for this cuelist. This field is not editable.
- Page 133 Working with cuelists Creating a Move in Black cue This property… does this… Ignore Snapshots The cuelist will not be affected by a snapshot being loaded. Release in Black Releases cuelists when they are no longer contributing to intensity output HTP Enabled Causes the intensities of a cuelist to activate as soon as you move the playback fader from 0.
- Page 134 Creating a Move in Black cue Working with cuelists Cuelist Timecode To set timecode properties click on the ‘Timecode’ heading to open that section. This property… does this… Mode Sets how the cuelist responds to timecode input. Disabled – timecode is ignored. Enabled – timecode will be followed if the cuelist is ‘Armed’...
- Page 135 Working with cuelists Creating a Move in Black cue This property… does this… ase rate Chase rate when in chase mode, expressed as steps- per-minute. Chase crossfade % Proportion of time spent fading vs. time spent at each step of a chase. Playback rate BPM Playback rate for the cuelist. uelist proper ty defa ults ...
- Page 136 Creating a Move in Black cue Working with cuelists Default times At the top of the timing section there’s a timeline ruler that controls the over all fade times f or all events in a cue – except the ones you explicitly set elsewhere as explained below. When you first open the Timeline (or Chooser) window the uler wi ll be in it’s collapsed form, as shown here: The ‘up’...
- Page 137 Working with cuelists Creating a Move in Black cue To adjust a feature type fade time click on the on the end point of the bar and when the cursor changes to a double arrow drag to increase or decrease the time. Or type a value in the corresponding ‘Time’ box. To adjust a feature type delay time click on the bar and when the cursor changes to a hand drag to move the bar so that it starts after the )s mark.
- Page 138 Creating a Move in Black cue Working with cuelists This icon… does this… Sinus If you make any adjustment the default time for Position, Colour, Gobo, Beam or Miscellaneous that feature type will no longer be changed when you adjust the ‘Up’ fade time in the condensed timeline ruler. Saving and re‐applying timing configurations ...
- Page 139 Working with cuelists About the timeline Applying saved timing configurations To apply a timing set to a cue: Select the cue. Select the timing set you want from the Timing drop-down list. Vista applies the thing set to the cue. This will not change the timing of any event in the cue that has already adjusted in some way.
- Page 140 About the timeline Working with cuelists The event bars represent the activities of those fixtures over time. As you can see in this example, the bars go from the ‘0s’ point on the timeline scale to the ‘2s’ point. This means that these fixtures are moving to a new setting over two seconds: The settings you’ve applied to these fixtures on the palettes (e.g.
- Page 141 Working with cuelists About the timeline Summary by feature This view shows a set of fixtures by their attributes: By default, t he view sho ws each bar minimised. To expand each attribute and se he details , click the ‘ +’ symbol beside the attribute name (e.g. ‘colour’). Vist displays the details o f that attribute: Summary by fixtures...
- Page 142 About the timeline Working with cuelists Filtering the All Events view As well as displaying the Feature and Fixture views, you can also choose to filter out different classes of information on the timeline. To do this, choose an option from the list below the line in the View drop-down menu: When you choose a filter, Vista displays only those types of events.
- Page 143 Working with cuelists About the timeline This option… does this… Selected Fixtures Filters the timeline to show only the fixtures that are selected in the Chooser window In the Current Filters the timeline to show only the fixtures that have programming in the current cue. With New Filters the timeline to show only fixtures that hav e new...
- Page 144 About the timeline Working with cuelists Managing your saved Filters You can rename, du licate or modify a saved filter. To do this select the ‘ Manage View Filters’ option fr om the Filter drop down list. Vi sta opens the Manage View Filters window: To modify one of the built in filters or a custo m sort you’ve saved: Select the Filter n...
- Page 145 Working with cuelists About the timeline This icon… does this… Shows all fixtures in the cuelist Shows just the selected fixtures. Selected Shows the fixtures in the current cue. Useful for removing ‘white space’ in the timeline Shows just the fixtures with new programming. ming in and ou t ...
- Page 146 Timeline events Working with cuelists In the status bar the three fields show: • the Cuelist that is open in the editor, this field will correspond to the selected tab. • the Cue that is being edited, this field will correspond to the cue that yo u have selected in the Cue navigator bar.
- Page 147 Working with cuelists Timeline events Adding events to the timeline Whenever you store a cue, using ‘Store Look’ or ‘Store Part’ you create events on the Cuelist’s timeline. To work with those events and make timing adjustments you open the cuelist in the editor and select the ‘Timeline’ window. You can als o create a new Cuelist, from scratch, in the editor and work with the events straight away.
- Page 148 Timeline events Working with cuelists The event label shows: • the event sett ing. In the example above the event shows the CMY settings and an icon of the colour. Not all event types include icons. • the fade time. Snap events Events that are set to a zero second (0s) fade time are shaped like a banner with an arrow at the left end: When you select a snap event there is only one selection handle (the aqua...
- Page 149 Working with cuelists Timeline events Working with selection handles A quick and easy way to create dynamic lighting effects is to ‘skew’ the events on the timeline. When you select a group of events, Vista displays a selection box around them with aqua /black squares on the corners and sides known as ‘handles’: You use these handles to change the duration of the selected...
- Page 150 Timeline events Working with cuelists ista displays this sc reen: This option… oes this… Start Select to set the start time of an event Middle Select to set the mid point of an event Select to set the end time of an event. TIme Enter a time to set the start mid or end of an event to that position on the timeline.
- Page 151 Working with cuelists Timeline events You can also right-click on select the event(s) and select these options from the popup menu. Setting the event fade curve Vista automatically selects the most suitable fade curve for each feature type but you can choose from a set of pre-defined fade path shapes to set how an event will progress.
- Page 152 Timeline events Working with cuelists This icon… does this… The feature goes to the end state very quickly. Switch The feature goes to the end state very quickly. Hot power Flourescent Sinus Instead of making an event very short, you can just set it to Snap at Start.
- Page 153 Working with cuelists Creating and applying extracts Stopping effects overriding an event ‘Baseless’ effects are designed to run on top of a feature setting. For example a aseless c ircle effect w ill cause fixtures to move in a circle around whatever position is been set in a cue. If you want to stop a baseless effe ct running on an event, right click on the event and select the ‘Stop free effects’...
- Page 154 Using commands within cuelists Working with cuelists Find the extract you want and click on it to select it. Set the mask butto ns so that the attributes you want are applied. Any attribute that is masked, ev en if it is part of the extract, will not be applied. Using commands within cuelists ...
- Page 155 Working with cuelists Using commands within cuelists This option… does this… ibit Inhibits (b linds) or un-inhibits the cuelist. You must enter either ‘on’ or ‘off’ in the Parameter box. Rate The Parameter field is a text field and only allows valid input (e.g. numerical BPM value). R lease All Releases All active cuelists.
- Page 156 Updating Presets and Cuelists during playback Working with cuelists Updating Presets and Cuelists during playback When you make changes in the Programmer Live tab while a cuelist is being played back, you can make those changes apply to the presets from which you constructed the cuelist, or just make the changes to the cuelist itself. Update is designed to change settings that are already in a Cuelist and does not automatically add new events or fixtures to a Cuelist, but you can open a Cuelist and add new information in the programmer window on the Update...
- Page 157 Working with cuelists Updating Presets and Cuelists during playback To make the changes to all Fixtures in the Cuelist or Preset, click the ‘All fixtures’ button. To make th e changes to just the selected fixtures click ‘Selected fixtures’ button. You can use the parameter filter icons to select or de-select the features you want to include in the preset - Intensity, Position, Colour, Gobo, Beam and Misc.
- Page 159 SmartFX Effect types 7. SmartFX Effect types Vista provides several effect types: • Wave effects where Intensity or Colour or Position or any other feature of your lights fo llows a waveform. With this sort of effect you can create In tensity chases, Position shapes such as a circle and Colour mix effects including...
- Page 160 Using effects SmartFX The icon indicate s th effect type and letters in the ‘Content’ column show which features are in thi s e ect: This icon / letter… indicates this… An Intensity effect A Position effect. A Colour effect. An effect designed to run on a matrix (See creating a Matrix / matrix on page [TBC]) or multi-element fixture (a Multi-element...
- Page 161 SmartFX Using effects The SmartFX has two panes: the effects list, on the left and effect controls on the right: The ‘Show effects from…’ pane normally shows the effects that are active (i.e. running in the Live tab or in a Cuelist). Effects list ...
- Page 162 Effect controls SmartFX This option… does this… Save as template Click this button to save the effect as a template th will appear in the Components list and Quickpickers. hen you click on an effe ct in this list, Vista displays the settings and co ntrols for this effect in the right hand pane.
- Page 163 SmartFX Effect controls he Feature tab (s) for ‘W ave’ effects Effects can include one or more feature types (IPCGBG). Vista creates a feature tab for each type with con trols for the effect waveform, size, rate multiplier, an direction. Click on the feature tab (i .e.
- Page 164 Effect controls SmartFX This option… does this… This tab shows the available effect waveforms, in graphical form. To select a waveform click on one of the buttons. Base tab When multiple waveforms are being used the Waveform buttons buttons show the effect that will be created. For example •...
- Page 165 SmartFX Effect controls The feature tab(s) will not appear unless the effect is selected in the left pane. This opt ion… does this… Stop Clicking on a ‘Stop’ icon pauses the swing effect so that you can set a value for the feature. To set a value choose a preset or set a value in the sidebar palette dows.
- Page 166 Effect controls SmartFX The Sequence tab When you apply an effect to a number of fixtures you can use the controls on the sequence tab to set how the effect is applied to those fixtures. This option… does this… Overlap affects how much each fixture overlaps the next when the effect is running: •...
- Page 167 SmartFX Effect controls This option… does this… Spread Vista dyna mically calculates a waveform offset value for ea ch fixture depending upon this control: • Spread = 0% - all fixtures have a uniform offset • Spread = 100% each fixture has a unique offset ranging from 0% to 100%.
- Page 168 Effect controls SmartFX This option… does this… Fixture Ganging sets how the set of fixtures are grouped together. ‘No Blocking’ indicates tha t the effect runs across Blocking the fixtures one at a time. Fixtures can be ganged so that two or more fixtures are doing the same thing.
- Page 169 SmartFX Effect controls This option… does this… O fset adjusting the Offset value, rolls the waveshape within its own window. For example a 0% Phase ase offset) offset for a sine waveform would start and end at the midpoint while a 25% Phase offset would have the sinusoid start &...
- Page 170 Creating an effect from scratch SmartFX This option… does this… c at Start sets what happens as this effect star ts when another effect is already running. Auto-sy nc the effect starts on the same phase as the already running effect Restart the e ffect always starts at it’s 0 point and so will always look the same when it starts.
- Page 171 SmartFX Stopping an effect In this case, when you click OK, Vista adds two swing point in the feature tab of the SmartFX window. o set va es for the two points: Click the first ‘Stop’ button. Use either the palettes or the controls to set a value for the feature type you are using .
- Page 172 Stopping an effect SmartFX Click the SmartFX button on the main toolbar – usually F11, or select the SmartFX Editor option from the Tools menu (Ctrl + K). Select the effect you want to stop from the list of effects. Click on the Disable button. Stopping effect running on a feature ...
- Page 173 Assigning Audio to a Cuelist Stopping an effect 8. Assigning Audio to a Cuelist can assign an audio track to a cuelist or cue and play it in Vista. This can be useful if you want to programme for a particular piece of music or dialogue. To a ssign an audio file to a Cuelist With the cuelist open in the editor select the ‘Cuelist properties’ op tion from the Edit menu or, right click on the Cuelist icon in a Quick picker and select the‘Properties’...
- Page 174 Using Learn Timing to adjust cue timing Assigning Audio to a Cuelist Follow steps 2 – 4 as above. Using Learn Timing to adjust cue timing You can programme a Cuelist then use the ‘Learn timing’ window to adjust the Cue start times based on your actions. This can be useful if you wa nt to fine-tune Cue timing to an audio or video track.
- Page 175 Assigning Audio to a Cuelist Using Learn Timing to adjust cue timing Adjusting cues based on audio or video You can adjust cue timing to match the audio in a cuelist or while you are listing to or watching a recording. To do this: Click the skip to start button , in the Learn Timing window, twice to ensure you are at the start of your first cue When you are ready click the play b utton...
- Page 176 Using Timecode to control Cuelists Automating Playback 9. Automating Playback Using Timecode to control Cuelists You can use Linear Time Code (LTC) or Midi Time Code (MTC) to trigger cues. To do this see If you are going to be using timecode to running the Vista in onjunction with a device that generates SMPTE timecode, you can simul...
- Page 177 Automating Playback Using Date and Time to control cuelists Playback Lag Compensation The Lag compensation field is used to compensate for slow midi data transmission. If your cues are not running at the expected time you may need to enter a value in this field. For example enter ing 0.5s will mean that all your cues run half a second earlier than programmed.
- Page 178 Using Date and Time to control cuelists Automating Playback This option… does this… Edit Opens the selected event so that you can modify it’s settings. Duplicate Duplicated the selected event Test Now Click this button to test the event, no matter what the current time is. Global Enable You can disable all date and time events by un- checking this box..
- Page 179 Automating Playback Creating a New Event Disabling all date and time events ou can also disable all date and time events by choosing the Disable All ime/Date Events option from the Vista menu. This can be useful is you want mporarily to stop events being triggered. Creating a New Event Date / Time events can automatically control playback and other actions. To create a new event: Choose the New Event...
- Page 180 Creating a New Event Automating Playback This option… does this… Rate The Rate field is a percentage field and only allows valid input (e.g. numerical % value). Release All eleases All active Cuelists. No other options are available when this command is selected. Timecode reset esets the timec ode to 00:00:00:00.
- Page 181 The Playback Control Window Controlling and monitoring playback 10. The Pla yback Cont rol Window Controlling an d monitoring playback When you’ve got a full sho w going it’s likely that you’ll hav e multiple Cuelists on the console and being played back. To see what’s going on at any time, click the Playback Control button on the main toolbar at the top of the screen.
- Page 182 Controlling and monitoring playback The Playback Control Window This column… indicates… Cuelist Name The name of the Cuelist. Current Cue Shows the current Cue name and number. Cuelists that have not been run show the first Cue name. Status The Playback State of the cuelist - HTP set o - On Playback.
- Page 183 The Playback Control Window Controlling and monitoring playback This column… indicates… Shows the Cue number Shows the Cue name. Programming Shows the features types programmed in this cue. Click this button to play the cue Progress Provides a visual display of the Cue’s progress and Shows the progress of the Cue as a percentage Click this button to skip to the end of the cue Time...
- Page 184 Controlling and monitoring playback The Playback Control Window This button… does this… Pauses playback of the selected Cuelist(s) Commences (Go) Playback the selected Cuelist(s) Cues forwards to the next Cue of the Cuelist Jumps to the end of the selected Cuelist. Releases the selected Cuelist – fixtures return to their previous settings: Filtering the cuelists ...
- Page 185 The Playback Control Window Controlling and monitoring playback Click on the > button on the left side, of the bar, to play the Cue, click on the >> button to go to the end of the Cue or click anywhere in the Cue bar to jump to at point.
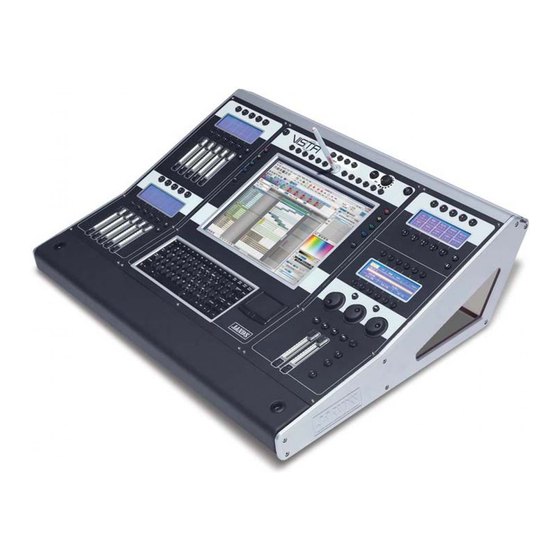
- Page 187 Using the console hardware Console layout 11. Using the console hardware Console layout Vista consoles and control surfaces provide the faders, encoders, switches and displays you’ll need to control your lighting rig. The layout of each product is slightly different and the quantity of playback controls varies. T4 Console ...
- Page 188 T2 Console Using the console hardware T2 Console The T2 console features: • LCD Pen/Tab let module that includes, the Grand Master & DBO, 12 Function buttons, 2 sets of modifier buttons, a keyboard & trackpad • 2 Playback modules with faders • 1 Playb ack modules without faders •...
- Page 189 Using the console hardware M1 Control surface M1 Control surface The M1 control surface features: • 1 Playback modules with faders. Grand Master and DBO The rotary Grand Master control scales the intensity of all output from the Vista system. The Dead Black Out (DBO) button takes all intensity to 0%, while it is held down. Function keys ...
- Page 190 The modifier keys Using the console hardware he mod ifier keys The LR key (T serie s consoles only) The LR button chan ges a pen tablet tap to a right tap. To ‘right-clic k’ hold this utton d own then t ap the pen. The coloured modi fier keys The coloured (Red, Yellow, Green, Blue) modifier buttons provide alternate unction s when you press a button on the console while programming and...
- Page 191 Using the console hardware The Super Playback / Programmer controls Editor (aka Programmer) mode When you select fixtures in the Chooser or Timeline window the hardware controls can be used instead or th e on screen palettes to adjust setting for Intensity, Position, Colour, Gobo and Miscellaneous parameters Programmer mode If the controls are not already in Programming mode press the menu button the the button labelled ‘IPCG’...
- Page 192 The Super Playback / Programmer controls Using the console hardware This button… does this… Beam Press this button to put the encoders and lower 6 buttons in Beam mod e. Pressing it again cycles the controls through any available parameters or alternate modes. Menu Opens the Super Playback top level menu screen. Double tap the menu button to switch between Playback and Programming mode.
- Page 193 Using the console hardware The Super Playback / Programmer controls ditor intensity The overall intensity from the Editor is controlled by the fader located, on the left ide, be low the enco der wheels. Editor ‘Live’ time The fader located, on t he right side, below the en coder wheels can be used to adjust the Live time .
- Page 194 The Super Playback / Programmer controls Using the console hardware This button… does this… (Right) Not used Crossfade can config ure these buttons in the Console window. See Assigni ng a ponent to th e playback controls on page 11-13 Super Playback mode extended controls f the controls ar ot already in Playback mode press the menu bu tton then the utton lab elled ‘Pla...
- Page 195 Using the console hardware The Super Playback / Programmer controls This button… does this… Jump Opens the cuelist jump window on the main screen. Used to jump from one cue to another cue ou t of sequence. Select the Cue you want to jump to in the Jump window. See Using the Jump window on page 11-10 Press Go to fade to that cue.
- Page 196 The Super Playback / Programmer controls Using the console hardware Cuelist FX (effects) mode In the Cuelist ‘FX ’ m de you can control the size, rate and phase of effects th are running on th e c nsole: This button… es this… Encoders ables the encoders. To avoid accidentally changing FX settings turn the encoders off.
- Page 197 Using the console hardware Playbacks with faders This option… does this… Cuelist Selects the cuelist to jump to. This field is automatically set to the cuelist on the superplayback. Selects the cue to jump to. To find the cue you want to jump to type the cue number or a part of the cue name in the search box, or select the cue from the list Cue Timing Crossfades using the new cues fade time...
- Page 198 Playbacks without faders Using the console hardware These playbacks consist of: • a Select button – normally used to select the playback • a display – used to display the name of the cuelist or other component that’s being controlled • a Go button – normally used to play the the cuelist or other component •...
- Page 199 Using the console hardware Configuring the console for Playback Configuring the console for Playback Once you’ve stored a number of Cuelists, Presets, Extracts, etc, you can a ssign those components to the playback controls the way you want them using Console screen. When you click the Console button on the toolbar Vista displ ays the Console screen: On this window the Sideba...
- Page 200 Configuring the console for Playback Using the console hardware Tip: You can assign y combinatio n of components to the playback controls – Cuelists, Groups, Presets, Extract, Effects, Favourites and Snapshots. Splitting playback controls hen a comp onent is assig ned to a playback it uses all the controls that are available –...
- Page 201 Using the console hardware Configuring the console for Playback onfiguring the pl back butt ons and faders Normal, split and expanded playbacks have their buttons and faders set up with the default configuration. T o see how the buttons and faders are configured press the Help key [!] on T series consoles Ctrl + ? on a PC.
- Page 202 Configuring the console for Playback Using the console hardware This button action … does th is… Skip Forward Steps forwards to the next Cue of the cuelist. Release Releases a cuelist. Skip Back Steps backwards to the previous Cue marker of the selected cuelist. Skip to End Jumps to the end of the cuelist.
- Page 203 Using the console hardware Playback status indication Cuelist faders The following fader actions are available: This button action … does this… Blank fader has no action. Intensity Fader s the fader to control the Intensity of a cuelist. This is t he default assignment for all faders. Cross Fader Sets the fader to manually crossfade between cues.
- Page 204 Playback popup menu Using the console hardware Running Green Green Completed Overridden Red Flashing Red Flashing Playback popup menu You can make changes to Cuelists Pages and other components using the Playback context menu. To open this menu right-click on the label area of any playback control. Vista displays the context menu: This option …...
- Page 205 Using the console hardware Setting cuelist properties This option… does this… Set as default cuelist Sets the selected cuelist’s properties as the defaults configuration for all new cuelists. Adjust contrast Adjusts the contrast of the selected LCD window Setting cuelist properties o set the cuelis t propertie s, right click on the Cuelist name and the Propertie ption from the popup me...
- Page 206 Group Masters Using the console hardware is Group type you can do this… Scale ( + ) Increase the intensity of fixtures in the group. When a Scale(+) fader is pushed up, while a cuelist is being also known as an played, the intensity of fixtures in that group will be Additive group mas increased.
- Page 207 Using the console hardware Pages This button action … does this… Flash HTP Control the the intensity of fixtures in the grou p on an HTP basis. If there’s no cuel ist, containing the Highest takes fixtures in the group, being played the button will set precedence the level of the fixtures between to 100%.
- Page 208 Snapshots Using the console hardware The Page Up and Down buttons work in three ways: • press quickly to change the page immediately • press and hold, for less than two seconds to display the current page number, without changing it • press and hold, for more than two seconds to scroll the number.
- Page 209 Using the console hardware Snapshots This option… does this… Name Sets the name for the snapshot Record Sets the options for the snapshot: Playback State The state of cuelists on the current pages will be included in the snapshot. For example if a Cuelist is active in Cue 2 when the snapshot is recorded it will also be active in Cue 2 when recalled.
- Page 210 Snapshots Using the console hardware Assigning a Snapshot to a Playback You assign Snapshot to a playback button in the Console window. Reca lling a Snapshot To recall a Snapshot, you can: • use a playback button that has been set up as a snapshot, or • right-click on a snapshot icon and select the ‘Apply’ option from the popup menu, or •...
- Page 211 The Output window Snapshots 12. The Output window o open the Output window click on the icon on the main toolbar or select th ‘Output’ option from the Window menu. Vista displays the Output window in icon view: You use this screen to display the state of fixtures that are active – that is fixtures that have one or more parameters that are being controlled by the playbacks.
- Page 212 Configuring the Output window The Output window You can create as many different views of your fixtures as you like, each arranged in its own away. To create a new layout view: Select the ‘Add view’ option from the View menu. Vista creates a new view tab at the bottom of the window.
- Page 213 The Output window Configuring the Output window This option… does this… dd selected Adds the fixtures, selected in the Fixture Chooser, to the ixtures output window Remove selected Removes the selected fixtures from the output window fixtures Show only selected Filters the window to only show the selected fixtures fixtures Clear view Clears all fixtures from the output window...
- Page 215 The Console control panel System settings (T & I series only) 13. The Console control panel System settings (T & I series only) There are a number of system settings that configure and determine how the Vista T and I series consoles operate. To set these preferences, choose the ‘Control Panel’ option from the File menu. Vista displays the Settings screen.
- Page 216 Display and Input Devices The Console control panel Follow the on screen prompts to complete the cali bration process. Display and Input Devices If you are using a S or M series contro l surface the display and input device (mouse, pen tablet, etc) settings are controlled by the PC operating system. Vista has been tested with Wacom pen tablet LCDs and ELO ‘Intellitouch’...
- Page 217 The Console control panel Using the screensaver To configure the monitors cl ick on the drop down arrow and select the screen type connected to each outpu t. If your monitor does not appear it may not be supported. Using the screensaver If you are using a S or M series control surface the display , screensaver, settings are controlled by the PC operating system.
- Page 218 Network preferences The Console control panel etwork preferences If you are using a S or M series control surface the network settings are controlled by the PC operating system. To set the networking preferences, on a T or I series console click the Network settings button on the Settings screen: This option…...
- Page 219 The Console control panel Date and time ate and time Vista displays the time in the title bar of the main windows. If you are using a S or M series control surfac e the date and time settings are controlled by th e PC perating system.
- Page 220 Menus Appendix 1 – menu & toolbar reference 14. Appendix 1 – menu & toolbar reference Menus ile menu This optio n… does this… New Show Creates a new show file, opening the Patch window. Open Show Opens an existing Show file Save Show Saves the current show Save Show As Saves the current show with a new name. Autosave &...
- Page 221 Appendix 1 – menu & toolbar reference Menus This option… does this… Lock - Entire console Prevents any operation of the console. - Disable editing Only allows playback - Lock current show Prevents any changes being made to the show file. Control panel ns the system properties window where y ou can calibrate the screens, configure displays, network and (consoles only)
- Page 222 Menus Appendix 1 – menu & toolbar reference Components menu This option… does this… New Cuelist Opens a new empty cuelist. Switches to the Ch ooser window if the Chooser or Timeline is not the t window. Open Cuelist Opens the Select Cuelist win dow where you can open an existing cuelist.
- Page 223 Appendix 1 – menu & toolbar reference Menus This option… does this… Cue only editing Move in Black Opens the Move in Black window. This enables you to move fixtures when their intensity is at zero so they’re in the right position when they turn on. The fixtures you want to pre-position must be selected before choosing this comma Insert Commands...
- Page 224 Menus Appendix 1 – menu & toolbar reference This option… does this… Clear selected Clears all events from the selected fixtures. Home selected Inserts events to send all features of the selected fixtures to their home values. i.e. Intensity to 0%, position to 50/50, colour to clear, etc. Cues Opens the cues submenu with commands - Append a new cue at the end of the cuelist.
- Page 225 Use default media Connect Universes Opens the Connect Universes window where you can connect the Vista universes to DMX outputs, Artnet, and Pathport devices and the Jands UD512 USB to DMX cable. Vista User Guide, Version 2 14‐11 ...
- Page 226 Menus Appendix 1 – menu & toolbar reference This option… does this… Strike Sends a strike command to the selected fixture(s). Douse Sends a douse command to the selected fixture(s). Reset Sends a reset command to the selected fixture(s). Park Fixtures Holds the fixture in it’s current settings. For example to provide fixed lighting for back stage.
- Page 227 Appendix 1 – menu & toolbar reference Menus This option… does this… Deselect All Fixtures Deselects all fixtures across fixt ure chooser tabs Invert selection Deselects all selected fixtures and selects all other fixtures on the current layout Select Active Selects all fixtures whose intensity is above 0% Select Programmed Selects all fixtures that have active p rogramming.
- Page 228 Menus Appendix 1 – menu & toolbar reference This option… does this… Show Timeline Switches to the Timeline window, if it is not already open. Show tracked events Shows or hides features that are tracking through from previous cues. Tracked events are shown as lighter bars that cannot be selected. Align start Aligns the start points of the selected events.
- Page 229 Appendix 1 – menu & toolbar reference Menus This option… does this… Show Patch Switches to the Patch window Show Console Switches to the Console window Show Fixture Switches to the Fixture Chooser window Chooser Show Timeline Switches to the Timeline window. Show Playback Switches to the Playback window Show Output Switches to the Output window.
- Page 230 Menus Appendix 1 – menu & toolbar reference This option… does this… earch cuelists Opens a search box so you can find a cuelist by nam Auto Scroll tomatically scrolls the list of cues so that the cue ng played is always visible. Dragable Playhead Allows the ‘position’ bar to be dragged to play the cuelist.
- Page 231 Appendix 1 – menu & toolbar reference Menus Vista User Guide, Version 2 14‐17 ...
- Page 232 Installation (T2, T4, I3 & L5 Consoles) Appendix 2 – installing new software 15. Appendix 2 – installing new software Installation (T2, T4, I3 & L5 Consoles) If installing Vista V2 software on a Vista T2, T4 and I3 console for the first time the har d-drive in these consoles must be re-imaged from CD or USB stick, using the Vista V2 Console Image file. Installation of this so ftware on a console will erase all saved shows and other data.
- Page 233 Appendix 2 – installing new software Installation (T2, T4, I3 & L5 Consoles) To install the dual boot software make sure that both the Vista1 and Vista2 check boxes are selected and click the Next button. The Confirm Installation window will open. Select a Hard Disk to install to in the Target Disk Device box and select ‘Yes’ in the Proceed with Installation box.
- Page 234 To install Vista V 2 Windows Update files on a PC: Close all open applications on the PC. Switch off and disconnect all Jands Vi sta USB devices. Launch the Vista V2 Windows Installer file. If an earlier version of Vista V2 is already installed on the PC, there’s no need to un-install it - simply install the new version over the top of the old one.
- Page 235 Appendix 2 – installing new software Connecting to the console via FTP Vista software setup Open the Network window from the Control panel option on the File me nu, and check the ‘IP Address’ setting. If the IP address is already set, make note of the address and close the Control panel. If there’s no IP address or it’s set to 0. 0.0.0, you’ll need to assign one.
- Page 236 Connecting to the console via FTP Appendix 3 – creating a bootable USB device 6. Appendix 3 – creating a boota ble USB device Major upgrades, that require the console’s hard drive to be erased, can be installed from a suitably formatted USB device. To create a USB FlashDrive that can be used to reinstall the ope rating system and Vista software on a T or I series console follow the steps below.
- Page 237 Appendix 3 – creating a bootable USB device Connecting to the console via FTP Close the ISO file extractor. Using a file manager, navigate to the isolinux directory of the extracted file for example navigate to c:\temp\iso_extract\isolinux.. Copy all of the fil es from the isolinux directory to the “root” of the extrac files eg from c:\temp\iso_extract\isolinux to c:\temp\iso_extract.
- Page 238 Connecting to the console via FTP Appendix 3 – creating a bootable USB device Note the drive letter assigned to the Flash drive by Windows, e.g. ‘E’. Open a command prompt and using this drive letter, type the following: [Flash Drive letter]:syslinux –ma [Flash Drive letter]: –f Example: e: <switch to the usb drive letter to run the syslinux program E:\syslinux –ma E: -f The FLASH Drive is now ready for use.
- Page 239 Appendix 4 – tracking backup Setting up 17. Appendix 4 – tracking backup With Vista’s new tracking backup feature you can connect a computer, running the Vista application, or a second console that synchronises it’s show file and settings with your main console. If the main console fails for any reason, the backup system will automatically take control.
- Page 240 Setting up Appendix 4 – tracking backup Click the Network button. Vista opens the Network window: This field… does this… Hostname Indicates the consoles network name. You can change this field to something more meaningful (i.e. ‘T4_main’) but no two devices, on the network, can have the same hostname. Address Set this field to DHCP if you are con necting to a LAN or...
- Page 241 Appendix 4 – tracking backup Starting Tracking Backup Computer network settings Configuration of the network settings on your PC will vary depending on the OS are using but what you’ll need t o enter is similar to the information detailed above. most important thing is that each console or computer should have a unique IP and be on the same subnet.
- Page 242 What happens if the Master fails Appendix 4 – tracking backup On the main console or computer click on the ‘Network’ tab. Vista displays a list of any Vi sta systems running on the same network. You should see your backup device and it should have the same Node Group name as the master: The console or computer you are working on is marked with an asterisk (*).
- Page 243 Appendix 4 – tracking backup Backup status On the slave console there are two options Click on the ‘Abort’ button to prevent the slave console from taking over th show and beginning to output. lick on the Failover now button to have the slave console take over the ow immediately and begin to output.
- Page 244 Troubleshooting Appendix 4 – tracking backup Troubleshooting If you cannot see your slave console on the Network tab of th e backup window: Check all your Ethernet cables and connections. If you are using a computer turn off any firewall or port blocking application. Check that the Group name is exactly the same on all devices in your backup system.
- Page 245 Appendix 5 – using VNC on T & I‐ series consoles VNC password 18. Appendix 5 – using VNC on T & I‐ series consoles VNC password The default password for VNC connections is ‘password’. Starting VNC To start the VNC server on a Vista T series or I series console: Restart the console. When the red Boot Menu screen appears press any k to stop at this window.
- Page 246 Connecting to Vista using a Mac Appendix 5 – using VNC on T & I‐ series consoles In the ‘Connections Details’ window click the Options button, then the Misc tab: Tick the box marked ‘Shared Connec tion (do not disconnect other viewers)’. Click OK to close the options window. In the ‘Connections Details’ window en ter the Vista IP (i.e.
- Page 247 Appendix 5 – using VNC on T & I‐ series consoles Connecting to Vista using a Mac In the ‘Open D play’ window tick the box marked ‘Allow shared desktop’: In the ‘Hostname : display’ window enter the Vista IP (i.e. 192.168.0.68). Clear the entry in the box to the right of the IP (or enter 0). Click OK..
- Page 248 Configuring the midi port Appendix 6, Using midi show control (MSC) to control cues 19. Appe ndix 6, Using midi show contro l (MSC) to control cues You can activate and control cues by sendin g Midi Show Control (MSC) essages via the mid i in port on the Vista L, T, I and S series consoles. For nformatio n on using Midi Time Code (MTC) see Using Timecode to control Cuelists on page 9-4...
- Page 249 Appendix 6, Using midi show control (MSC) to control cues MSC lighting messages SC lighti g mess ages Midi controllers use s tandard terminolgy for lighting cues and cuelists This MSC term is equivalent to this Vista comp onent… Q_number Cue Number <Q_list> Cuelist Number <Q_path> Not used Vista supports all the most commonly used MSC lighting messages.
- Page 250 MSC lighting messages Appendix 6, Using midi show control (MSC) to control cues This message… does this… esume Causes Stopped transition(s) to continue runni ng. If no Cue Number is specified, all Stopped transition Resume. If a Cue Number is specified, only tha transition Resumes, leaving all others unchange All_O Turns all cuelist intensity output to 0% without changing any o ther features.
- Page 251 Appendix 6, Using midi show control (MSC) to control cues MSC lighting messages This message… does this… Close_cuelist Makes a Cue List unavailable to all other command s and excludes any cues it may contain from the current s how. When CLOSE_CUE_LIST is received, the specified Cue List becomes inactive and cues in it cannot be accessed by normal show re quirements, but the status of the cues in the list does not...
- Page 252 Connecting to the serial port Appendix 7, Using serial communication to control cuelists 20. Appendix 7, Using serial communication to control cuelists You can activate and control cues by sending text commands via the serial port on a Vista console or PC running the Vista application. Mac users will need a Keyspan 19H USB to serial converter to receive serial com mands.
- Page 253 Appendix 7, Using serial communication to control cuelists Playback commands PC (Windows) systems should be set the same way but the Com port can be changed to suit your computer’s configuration n Mac systems the Keyspan 19HS device will appear in the Serial Por dropd own menu. Playback commands ...
- Page 254 Setting fixture levels Appendix 7, Using serial communication to control cuelists Examples: • 1@F - fixture 1 to full • 1>10-5@ 75 - fixture's 1,2,3,4,6,7,8,9 & 10 to 75% • 1>10-3>7@f – fixtures 1,2,8,9&10 to 100% Serial command acknowledgements Vista does no t echo characters sent to the serial port but does send acknowledgements to confirm that commands have been received and either been accepted or have failed.
- Page 255 Patch window menu ‘Patch’ by selecting ‘Fixture Editor’. When launched a w indow is presented with an expanded directory of all the JANDS supplied fixtures, listed as manufacturer sub-di rectories, this is the factory default directory. Once this directory is co llapsed, another directory is visible, this is the User Fixture Library and will initially be empty.
- Page 256 Type Ed itor is opened, the inbuilt library is automatically panded, presenting a nufacturers list containing all JANDS supplied fixtures. The fixture library is updated regularly and the latest revision should be installed to see if the fixture profile you...
- Page 257 Appendix 8 – The Fixture Editor Main tab: This tab… is for… Main entering general fixture data. DMX Chart All DM X channel assignments and channel range values are entered in this tab DMX Macros Control macros, including strike, douse and reset are entered here. Notes Personal notes relating to the fixture can be entered here.
- Page 258 Main tab: Appendix 8 – The Fixture Editor This field… is for… Full Name The complete, unabbreviated name as supplied b the manufacturer. Short Name An abbreviated name, of your choice, for the Fixture. This name will be used in the Chooser window when ‘show Short Name’ is selected. Fixture Status Choose from the popup menu to select the appropriate status of the fixture file.
- Page 259 Appendix 8 – The Fixture Editor DMX Chart tab: This field… is for… Is a Scroller Defines whether the fixture is a scroller mechanism. Patch Part Count determines how many patchable parts there are for the fixture. i.e. a par with a colour scoller will hav two parts.
- Page 260 DMX Chart tab: Appendix 8 – The Fixture Editor This icon… does this… Adds a DMX range to an existing channel. Inactive until a channel is created. Adds a Custom Mode to a channel, used when a feature range is not mappable to a generic control. i.e. Iris Pulse or Gobo Shake Adds a slot to a colour or gobo wheel channel.
- Page 261 Appendix 8 – The Fixture Editor DMX Chart tab: This field… is for… Feature This determines which controls on the palette cont Type which feature. For example one Beam Type may be Iris and another Zoom. Both features appear o n the Beam contol palette, mapped to their respective controls.
- Page 262 DMX Chart tab: Appendix 8 – The Fixture Editor DMX channel specification for a VL1100D (I) Iris Model 21‐48 Vista User Guide, Version 2 ...
- Page 263 Appendix 8 – The Fixture Editor DMX Chart tab: Channel 1: Intensity Click the DMX button to open the Add DMX Channel dialog. By default the dialog opens for the first time as below, it will open in the last opened state from now on. Notice the values are correct for this feat ure.
- Page 264 DMX Chart tab: Appendix 8 – The Fixture Editor The Pan 16 bit channels 2 and 3 have been created in the DMX Chart window. Channel 4 and 5: Tilt Hi and Tilt Lo: 16b Click the DMX button to open the Add DMX Channel dialog. Select Position i Class and Tilt in Type. In the DMX channel section select 16 bit and assign the correct channel numbers.
- Page 265 Appendix 8 – The Fixture Editor DMX Chart tab: The Tilt 16 bit channels 4 and 5 have been created in the DMX Chart window. Channel 6: Edge Click the DMX button to open the Add DMX Channel dialog. Select Beam in Class and Focus in Type. In the DMX channel section select Standard and assign the correct channel number.
- Page 266 DMX Chart tab: Appendix 8 – The Fixture Editor The Intensity 8 bit channel 6 has been created in the DMX Chart window. Channel 7: Zoom Click the DMX button to open the Add DMX Channel dialog. Select Beam in Class and Zoom in Type. In the DMX channel section select Standard and ass the correct channel number.
- Page 267 Appendix 8 – The Fixture Editor DMX Chart tab: The Zoom 8 bit channel 7 has been created in the DMX Chart window. Channel 8: Frost Click the DMX button to open the Add DMX Channel dialog. Select Beam in Class and Zoom in Type. In the DMX channel section select Standard and assign the correct channel number.
- Page 268 DMX Chart tab: Appendix 8 – The Fixture Editor The Frost 8 bit channel 8 has been created in the DMX Chart window. Channel 9, 10 and 11: CMY Colour mix Click the DMX button to open the Add DMX Channel dia log. Select Colour Mix in Class and Cyan in Type. In the DM X channel section select Standard and assign the correct channel number.
- Page 269 Appendix 8 – The Fixture Editor DMX Chart tab: The three Colour Mix 8 bit channels 9,10 and 11 have been created in the DMX Chart window. Channel 12: Gobo Wheel Click the DMX button to open the Add DMX Channel dialog. Select Gobo Wheel in Class and Gobo Wheel in Type. In the DMX channel section select St andard and assign the correct channel number.
- Page 270 DMX Chart tab: Appendix 8 – The Fixture Editor The Gobo Wheel 8 bit channel 8 has been created in the DMX Chart window. Channel 12: Gobo Wheel (cont.) Note there are three items added for this feature unlike previous features that have one simple range value assigned. Index Mode: Expand this section and select the range value section as below. As the specification requires the range for Gobo Wheel Indexing to be 0-127, the values need changing.
- Page 271 Appendix 8 – The Fixture Editor DMX Chart tab: The change to the channel range is reflected in the DMX Range column. Rotation Mode: Expand this sectio n and select the range value section as below. As the specification requires the range for Gobo Wheel Rotation is to be 128-255, only one range of values is required.
- Page 272 DMX Chart tab: Appendix 8 – The Fixture Editor As the Open slot values are already correct, select Slot #2. Channel 12: Gobo Wheel (cont.) On the right hand side of the DMX Chart window the controls are now available to add appropriate data with the selected slot. A Name may be applied, a Slot Type can be set (G obo or Colour) a Category can be assigned, Category is useful in re modelling gobo patterns when changing...
- Page 273 Appendix 8 – The Fixture Editor DMX Chart tab: As with other features th e DMX Range section is used to set the appropriate values for the slot, as the specificatio n below indicates, different values are required to operate the slot in ei ther Indexing or Rotating modes. Channel 12: Gobo Wheel (cont.) ...
- Page 274 DMX Chart tab: Appendix 8 – The Fixture Editor Click the Select Image button to open up the Images window, navigate to the gobos directory and search for the image required, select and open it then name it in the Name field. Tip: Switch the window view to Thumbnails for image previews. Channel 13 and 14: Gobo Rotation ...
- Page 275 Appendix 8 – The Fixture Editor DMX Chart tab: The Gobo Wheel Slot 16 bit channels 13 and 14 have been created in the DMX Chart window. Channel 13 and 14: Gobo Rotation (cont.) Expand the Index Mode and Rotate ranges. Vista User Guide, Version 2 21‐61 ...
- Page 276 DMX Chart tab: Appendix 8 – The Fixture Editor Select the range to edit and adjust t he values on the right hand side of the DMX Chart window in the DMX range se ction. As this fixtures rotation Clockwise and Ant-clockwise are reverse to the default values inserted the ranges need to be edited.
- Page 277 Appendix 8 – The Fixture Editor DMX Chart tab: The Iris 8 bit channel 15 has been created in the DMX Chart window. Channel 16,17 and 18: Timing channels These three channels differ from the previous channels creat ed in that they do not map to generic controls. They will be Custom Feature ch annels that are associated with the Class of feature.
- Page 278 DMX Chart tab: Appendix 8 – The Fixture Editor Repeat this process for the remaining channels 17 and 18. C hannel 17 will need Class and Type set to Custom Colour and named Colour T ime, channel 18 will need Class and Type set to Custom Beam and named Beam Time. Channel 19: Control ...
- Page 279 Appendix 8 – The Fixture Editor DMX Chart tab: The Control 8 bit channel 19 has been created in the DMX Chart window. Channel 19: Control (cont.) To assign control macros, open the DMX Macros tab and enter the relevant information using the specification from the manu facturer. Syntax: channel @ value wait milliseconds , next command. Complex macros ...
- Page 280 Channels with Custom Ranges Appendix 8 – The Fixture Editor Saving the Fixture: nce all channel ranges have been created, spend a few minutes che cking them ainst the manufacturers specification. Click the OK button then cho ose OK om the resulting Save Fixture And Exit dialog. To use the fixture you will first need to exit the Fixture Library Editor, close the editor window and a confirmation dilaog will be presented.
- Page 281 Appendix 8 – The Fixture Editor Channels with Custom Ranges Double click the widget to open the Custom Feature Browser, in order to access the custom Pulse range controls: Vista User Guide, Version 2 21‐67 ...
- Page 282 Al ough unusual software crashes can occur. If they do it is important that as much detail as possible is returned to Jands to enable the cause to be determined eliminated. In order to simplify this process the console software includes ns to package all of the necessary files for return to Jands support.
- Page 283 Retrieving Software Crash Files from a Windows PC Please follow the procedure below to configure a Windows PC controlling the Jands Vista 2 application such that crash dump files may be collected and subsequently analysed in the event of a Vista crash. This procedure is for Microsoft Windows operating systems onl This procedure must be executed before any crash, as files generated without this application cannot be retrieved or analysed.
- Page 284 Retrieving Software Crash Files from a Console Appendix 9 – Crash Logs Check the modification date of the “user.dmp” and “drwtsn32.txt” files to make sure that you are looking at the file that corresponds with when the crash occurred. Rename the "user.dmp" file to something a more descriptive eg Byron2-0- 6838_20101124_01.dmp".
- Page 285 Download the file “ActivateCrashDumps.reg” file from the Jands Vista website http://www.jandsvista.com/ActivateCrashDumps.reg . Some browsers helpfully add a ".txt" to the filename (which may not be shown if...
- Page 286 Retrieving Software Crash Files from a Console Appendix 9 – Crash Logs Each crash will result in a new directory below "ReportQueue". Package up the entire directory naming each file something more descriptive eg “Vista_1.13.522X_20090720_01.dmp" along with the show file and a brief explanation of what was being done, and email them to support@jandsvista.com. 22‐72 ...
- Page 287 Appendix 10 – the touchpad and the pen tablet Using the touchpad 23. Appendix 10 – the touchpad and the pen tablet Using the touchpad Like all pointing devices, the touchpad may take a short time to get used to. However you will soon find that using this device is natural and intuitive. Simply glide your finger across the surface of the pad to move the cursor and tap r finger to ‘click’.
- Page 288 Working with the grip pen Appendix 10 – the touchpad and the pen tablet Glide Extend To drag further than the pad surface, lift and reposition your finger after reaching the textured edge. GlideExtend will virtually eliminate the edge of the pad while you drag. In other words, if you are dragging an item and you hit the textured edge, GlideExtend will hold the drag for three seconds while you reposition to complete the drag.
- Page 289 Appendix 10 – the touchpad and the pen tablet Using a pen Eraser To u se the eraser, hold the Gr ip Pen upside down. When the eraser is within proximity of the active area, the tablet reports the pen coordinates and the pressure applied to the eraser. eraser is not implemented in Version 1 of the Vista software. DuoSwitch ...
- Page 290 Using a pen Appendix 10 – the touchpad and the pen tablet Because the drawing surface will be a little higher than a normal desk, consider adjusting the height of you desk or chair to assure comfortable use of the device When working with the pen tablet, maintain a good posture at all times and change your position if you feel any discomfort due to your work position or the weight of the tablet.
- Page 291 Appendix 10 – the touchpad and the pen tablet Using a pen When you have made your changes, press the Enter button to save. To exit, press the Menu button. All settings are automatically saved when the O SD menu closes. If you make changes to the display appearance and cannot re turn to the original settings, use the Reset Recall option to return The pen tabl et to its original factory...
- Page 292 Removing and installing the Duo Switch Appendix 10 – the touchpad and the pen tablet To insert a new tip: Slide it straight into the barrel of the pen. Firmly push the tip until it stops. The new tip will slide into the correct position. If the pen tip wears and becomes an gular, it may damage the coating on the Pen tablet display screen.
- Page 293 Appendix 10 – the touchpad and the pen tablet Removing and installing the Duo Switch To Install the DuoSwitch: Remove the pen tip cone by turning it counterclockwise. Then pull the grip forward over the pen tip. Install the original grip (the one with the DuoSwitch access slot) by aligning the pen case rails with the grooves inside the grip and pushing the grip over the pen tip.
- Page 294 Precautions on using and handling the Pen‐Tablet Appendix 10 – the touchpad and the pen tablet recautions o using and handling e Pen ‐ Tablet Temperature and Humidity Operating temperature and humidity 5˚ to 35 ˚C, 20 to 80% RH Storage temperature and humidity -10˚ to 60˚C, 20 to 90% RH CAUTION. Do not use or store th e pen tablet where: •...
- Page 295 Appendix 10 – the touchpad and the pen tablet Precautions on using and handling the Pen‐Tablet CAUTION: Do not dis assemble the Grip Pen. This may cause the device to malfunction. In this cas e, Wacom shall have no responsibility to repair or replace the product. CAUTION: Do not scratch the display screen. Avoid placing sharp objects the display screen surface.
- Page 296 Power Appendix 11 – technical details 24. Appendix 11 – technic al details Power T4 / T2 / E2 / S3 I3 / L5 Power Requirements: 100VAC to 240VAC +/- 10%, 50-6 0 Hz powered Power Consumption: 400 Watts 40 W atts 0 Watts Watts Power Connector: IEC 3-pin Service & Maintenance ...
- Page 297 Appendix 11 – technical details Installation Installation Vista consoles and control surfaces must be installed in a location that allows adequate ventilation around the rear of the product. There must be at least 50mm of free space around the rear and sides of the console when in use. Failure to allow adeq uate ventilation may result in premature shutdown of the console.
- Page 298 General Specifications Appendix 11 – technical details Description Type Pin Outs Function MIDI Thru/Out 5 pin Female DIN Shield COM (RS232) 9 pin D Trigger In 6.5mm Jack Socket Trigger In Sleeve Ground Trigger Out 6.5mm Jack Socket Trigger Out Sleeve Ground Video 1 15 pin High Density D Video 2 Green Blue...
- Page 299 Appendix 11 – technical details General Specifications Description Type Pin Outs Function esk Lamp 1 Chassis esk Lamp 2 Lamp – Vista User Guide, Version 2 24‐85 ...
- Page 301 Index General Specifications 25. Index applying, 5-51 buttons configuring, cue, 6-1 buttons , 3-2 adding Shift, Alt, Ctrl, 3-4 events to th e timeline, 6-41 adjust timing, 6-44 calibrating the pen, 13-2 Advanced Prop erties , 4-8 anging ias cues, 6-17 a cue, 6-18 alias cues , 6-23...
- Page 302 General Specifications Index I3, 11-2 date & time contr ol, 9-6 M1, 11-3 default prope rties, 6-29 S1, 11-2 editing, 6-10 , 11-2 midi control, 1 9-36 T2, 11-2 moving arou nd in, 6-11 moving even ts around, 6-43 nsole navigator, 6-12 layout, 11-1 notes, 6-29 setting up, 2-1...
- Page 303 Index General Specifications Ethernet-DMX interface changing settings of, 5-2 ate & Time, 9-6 nfiguring, 4-15 date an d time, 13- conne cting, 4-16 BO, 11-3 disconnecting, 4-16 setting the port, 4-16 default times, 6-30 event bars, 6-34 delete about, 6-42 cue, 6-15 deleting ents...
- Page 304 General Specifications Index adding to the patch panel, 4-2 fixtures, 5 -4, 5-5 arranging fixtures in a layout, 5-2 ghlight, 5-21 checking that your fixtures are preset, 5-49 working, 5-21 SV, 5-23, 5-30 choosin g, 4-2 e, 5-23, 5-30 cloning, 4-12 controlling, 4-11 deleting, 4-6 importing shows, 2-5...
- Page 305 Index General Specifications options, 5-6 events, 6-47 organising, 5-7 properties, 5-5 LCDs screensaver, 13-4 renaming fixtures, 4-6 Learn Timing, 8-2 navigating, 3 e swatchbo ok, 5-24 network mit, 4-8 prefer ences, 13-5 list view, 4-10, 4-11 Live Time Wind ow, 5-49 adding to the layout w indow, 5-10 loading...
- Page 306 General Specifications Index complete fixture list, 4-2 cue, 6-21 cuelist, 6-26 tching your rig, 4-1 fixtures, 4-7 n, 23-75 youts, 5-5 calibra ting, 13-2 setting cuelist properties, 11-20 ayback assigning componen ts to controls, 11-14 popup menu, 11-19 ickpicker status indica tion, 11-18 arranging, 5-40, 5 multi, 5...
- Page 307 Index General Specifications service & maintenance, 24-84 effects, 6-47 Session menu, 14-7 store selecting a cue and store options, set timing window, using, 6-44 setting selecting a cuelist, 6-7 beam, 5-26 store all, 6-2 colour, 5-23 gobo, 5-25 store part, 6-6 position, 5-22 storing setting cuelist properties, 11-20...
- Page 308 General Specifications Index applying, 6-33 USB interfaces, 4-16 making precise adjustments, 6-44 using effects, 7-1 using the set timing window, 6-44 Timing Learn, 8-2 view timing configurations summary, 6-35 saving, 6-32 the rig, 4-10 toolbar reference, 14-7 using different views, 5-3 toolbars, 3-10 View menu, 14-16 chooser and timeline windows, 3-...
Need help?
Do you have a question about the Vista T4 and is the answer not in the manual?
Questions and answers