Table of Contents
Advertisement
Quick Links
AquaLiv Water System – Model A305
Usage & Installation Instructions
Welcome to AquaLiv Water and congratulations! You just purchased the most complete and comprehensive water
purification and enhancement system available today.
The AquaLiv Water System produces energized, structured, alkaline water - just as nature intended. Our holistic process
naturally removes contaminates while carefully preserving the beneficial minerals that other water treatment options like
reverse osmosis strip away. The AquaLiv Water System also creates a healthful, stable alkaline pH that common water
ionizers fail to achieve. AquaLiv Water hydrates the body rapidly, boosts metabolism, increases circulation and blood
oxygen levels, and has a cleansing effect within the body. Enjoy the water!
DAILY USE
Some AquaLiv technologies require water to be moving, while others require water to be still. Therefore, it will
take 24 hours of normal use for the system to 'charge up' and up to a week of normal use for maximum power.
NOTE: After installation, the water may be cloudy or taste heavily of minerals and/or somewhat bitter for 2-3
weeks. This is normal as it takes some time for the filters to become conditioned to the source water. To help
alleviate this condition, AquaLiv suggests a 5-minute flush when the off-taste is noticed or daily for the first week
of use.
The Purification Module will require filter changes every 12 months or 1000 gallons – whichever comes first – or if
the water begins to flow too slowly.
To order replacement filters visit shop.aqualiv.com and select Filter Set FS300.
The AquaLiv Water Revitalizer requires no maintenance. Attempts to open the tank may damage the head and
sub-assembly. If the internal tamper seals are broken, the system warranty will be void.
Don't forget to schedule a Filter Change Reminder! www.aqualiv.com/filter-change-reminder
pH TESTING – pH testing drops and paper strips do not work with structured water. Use a digital pH meter.
WARRANTY – Your Warranty begins with the purchase date on your receipt. Do not lose your receipt!
Your AquaLiv Water System is warrantied against material defects and errors in workmanship for a period of two (2) years. Faucets have a one (1) year
warranty. The warranty does not cover damage to the system or any property damage, including flood and/or water damage. All plumbing systems
should be inspected periodically after installation to ensure an absence of leaks that may result in damage to surrounding areas.
1
Advertisement
Table of Contents

Subscribe to Our Youtube Channel
Related Manuals for AquaLiv A305


Summary of Contents for AquaLiv A305
- Page 1 WARRANTY – Your Warranty begins with the purchase date on your receipt. Do not lose your receipt! Your AquaLiv Water System is warrantied against material defects and errors in workmanship for a period of two (2) years. Faucets have a one (1) year warranty.
- Page 2 (1x) Usage & Installation Instructions INSTALLATION OVERVIEW AquaLiv suggests that you have the AquaLiv Water System installed by a professional plumber. However, anyone with handy-person skills and a few basic tools can accomplish the task. It is best to remove all under-sink contents before continuing with installation.
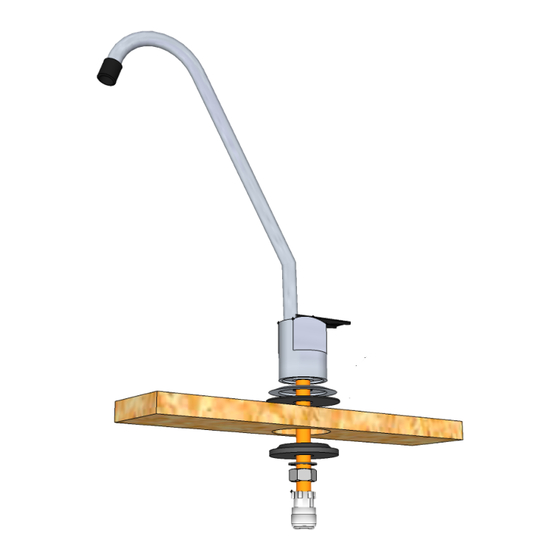
- Page 3 4. Connect the tube/hose/pipe from the kitchen faucet to the Cold Water Connection Tee. Do not overtighten In the event that the Cold Water Connection Tee does not fit your water connection, please visit shop.aqualiv.com/components for alternative installation components. STEP #2: Install faucet NOTE: Not all parts contained in the faucet box will be used during installation.
- Page 4 The Purification Module OUT will be connected to the Revitalizer IN. The Revitalizer OUT will be connected to the AquaLiv faucet. Ensure the preferred position of the Modules is possible within the length of the 36” flexible tubing units.
- Page 5 Messy cuts can damage fitting o-rings and result in leaks. Only shorten tubing if your installation requires it. STEP #7: Filling and Flushing AquaLiv Water System 1. Open the system faucet fully and then slowly open the cold water supply valve.
- Page 6 The AquaLiv Water System in now installed! IN AN EMERGENCY Should the water supply to the AquaLiv Water System need to be shut off while cold water is wanted at the kitchen faucet: 1. Close the cold water supply valve 2.
Need help?
Do you have a question about the A305 and is the answer not in the manual?
Questions and answers