Sonos ZonePlayer ZP100 User Manual
Digital music system
Hide thumbs
Also See for ZonePlayer ZP100:
- Setup manual (132 pages) ,
- User manual (114 pages) ,
- Product manual (18 pages)
Table of Contents
Advertisement
Advertisement
Table of Contents

Subscribe to Our Youtube Channel
Related Manuals for Sonos ZonePlayer ZP100


Summary of Contents for Sonos ZonePlayer ZP100
- Page 1 Sonos Digital Music System User Guide...
- Page 2 Sonos Digital Music System User Guide. For use with the Sonos ZonePlayer ZP100 (including Sonos System Setup software CD-ROM) and the Sonos Controller CR100. THIS DOCUMENT CONTAINS INFORMATION THAT IS SUBJECT TO CHANGE WITHOUT NOTICE . No part of this publication may be reproduced or transmitted in any form or by any means, electronic or mechanical, including but not limited to photocopying, recording, information retrieval systems, or computer network without the written permission of Sonos, Inc.
-
Page 3: Table Of Contents
Installing the Sonos Setup Assistant Software ........ - Page 4 Updating Your Sonos Assistant Software ........
-
Page 5: Chapter 1 The Sonos Digital Music System
With a Sonos Digital Music System you don't need a computer in every room, a music server, or a wireless computer network. Just a Sonos ZonePlayer and speakers in the rooms of your choice, and a Sonos Controller in hand to access all your digital music - no matter where it’s stored. -
Page 6: Your Computer Network
Sonos Digital Music System User Guide During setup, a unique Household ID is assigned to your Sonos Digital Music System. This ensures that your system operates independently and securely even if there are other Sonos Digital Music Systems in your neighborhood. -
Page 7: Sonos Online Services
• WAV (uncompressed) • AIFF (uncompressed) • FLAC (lossless) • Ogg Vorbis Sonos Online Services • For the latest Sonos Digital Music System information, go to www.sonos.com. • For product service and support, and the latest user documentation, go to http://support.sonos.com. -
Page 8: Technical Support
• Telephone: (800) 680-2345 Documentation Conventions These symbols may appear in your Sonos Digital Music System documentation. Caution. This label warns against dangerous practices that may result in possible system failure or damage to the equipment. Warning. This label warns against dangerous practices that will result in personal injury or possible system failure. - Page 9 Chapter 1: The Sonos Digital Music System Do not install near any heat sources such as radiators, heat registers, stoves, or other apparatus (including amplifiers) that produce heat. Do not defeat the safety purpose of the polarized or grounding-type plug. A polarized plug has two blades with one wider than the other.
- Page 10 Sonos Digital Music System User Guide This equipment has been tested and found to comply with the limits for a Class B digital device, pursuant to part 15 of the FCC Rules. These limits are designed to provide reasonable protection against harmful interference in a residential installation.
-
Page 11: Chapter 2 Zoneplayer Setup And Operation
Note: If you should experience any difficulty during the setup process, see Appendix A for additional help. 1-2-3 Setup It takes just 3 steps to get your Sonos Digital Music System up and running: Connect speakers to your ZonePlayer Connect the first Sonos ZonePlayer (with Ethernet cable supplied) to your home... -
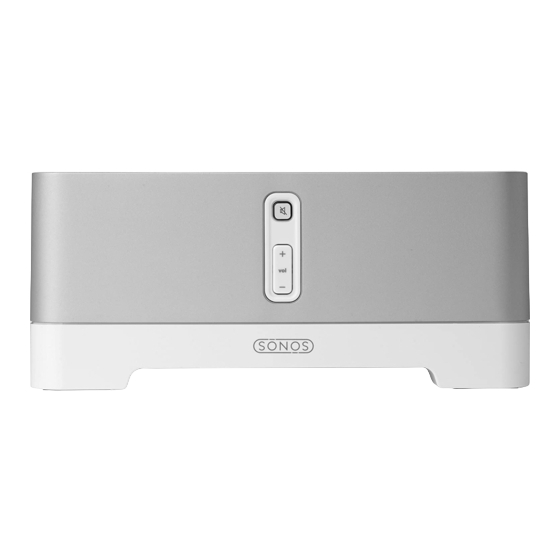
Page 12: Zoneplayer Zp100 Front
Volume down (-) • ZonePlayer status indicator Indicator flashes white when powering up or connecting to your Sonos Digital Music System. • Indicator is solid white when powered up and connected to your Sonos Digital Music System. • See "ZonePlayer LED Explanations" on page A-5 for additional status indications. -
Page 13: Rear Panel Connectors
Chapter 2: ZonePlayer Setup and Operation Rear Panel Connectors Right speaker Left speaker terminals terminals Ethernet switch connectors Voltage select 115V/230V AC power (Mains) input Subwoofer output Analog audio outputs Analog audio inputs Use Category 5 Ethernet cable to connect to a router, Ethernet switch connectors (4) computer, or additional network device such as a network-attached storage (NAS) device. - Page 14 ZonePlayer output. Set Up Speakers and Apply Power Follow the directions below to connect your speakers to the Sonos ZonePlayer ZP100. Your speaker’s power rating should be at least 75W for 8 Ohm speakers and at least 150W for 4 Ohm speakers. Do not connect speakers rated at less than 4 Ohms.
- Page 15 Chapter 2: ZonePlayer Setup and Operation The Mute button indicator (green) and the ZonePlayer Status indicator (white) will begin to flash. (If this ZonePlayer was previously connected to another Sonos Digital Music System, the ZonePlayer Status indicator may light solid white instead.)
-
Page 16: Install Software
ZonePlayer to overheat. Install Software Once your ZonePlayer is powered, you are ready to install the software. The Sonos System Setup software will guide you through the process of initializing your ZonePlayer(s) and setting up access to your music files. -
Page 17: Adding More Zoneplayers
Chapter 2: ZonePlayer Setup and Operation Adding More ZonePlayers After your Sonos Digital Music System is up and running, you can add more ZonePlayers to your Sonos Digital Music System any time. Decide upon the best locations for your additional ZonePlayers. If your house has structured (built-in) wiring, you can make a wired connection to the additional ZonePlayers. - Page 18 System, the ZonePlayer Status indicator may light solid white instead.) Choose one of the following options and then follow the on-screen instructions: • Use the Sonos Controller to add the ZonePlayer to your Sonos Digital Music Sys- → tem by selecting System Settings Add a ZonePlayer from the Music menu.
-
Page 19: Chapter 3 Windows® Setup And Operation
If you have digital music files stored on a computer or other device on your home network such as network-attached storage (NAS), the computer directories or folders that contain your music files must be shared so that the Sonos Digital Music System can access them. During setup the Desktop Controller software will automatically enable Windows file sharing for your computer. -
Page 20: Installing The Desktop Controller Software
You should always allow full access to the Sonos application. You may also need to change the settings of your firewall software to ensure that Windows file sharing is not blocked. Go to our Web site at http//faq.sonos.com/ firewall for detailed instructions. -
Page 21: Starting The Sonos Setup Wizard
Chapter 3: Windows® Setup and Operation Starting the Sonos Setup Wizard Start the Sonos Desktop Controller software. The Sonos Setup Wizard Welcome screen appears. Click Next. When instructed, press and release the Mute and Volume Up buttons simultaneously on the ZonePlayer you are connecting. (Remember, the first ZonePlayer you install must connect to your home network using a standard Ethernet cable). - Page 22 • If you do not wish to add more, select No, I do not wish to add another Zone- Player at this time, and click Next. During the setup process, you will be asked to register your Sonos Digital Music System. Your registration information is necessary in order for us to be able to provide you with technical support and software upgrades.
- Page 23 Next. Click Finish. If you purchased a Sonos Controller, you are now ready to add it to your music system. If it is not yet fully charged, plug the Sonos Controller into the power adapter and follow the on-screen prompts to add the Controller to your music system.
-
Page 24: Renaming A Zoneplayer
Sonos Digital Music System User Guide Adding More ZonePlayers You can add more ZonePlayers to your Sonos Digital Music System any time by → → selecting Zones Zone Setup Add. Turn to Chapter 2 if you’d like help with the placement and setup of your new ZonePlayer(s). - Page 25 Chapter 3: Windows® Setup and Operation The Desktop Controller Main Menu Playback controls Menu bar Volume controls Zones pane Now Playing pane Music Library pane Music queue Music selection Queue pane controls controls You can select an action using the following method(s): •...
-
Page 26: Playback Controls
Sonos Digital Music System User Guide Playback Controls The Now Playing pane displays track information for the music you are currently listening to. You can control the music settings for the current selection using the playback controls below: Play/Pause Toggles between playing and pausing the current track. -
Page 27: Controlling The Volume
Chapter 3: Windows® Setup and Operation Controlling the Volume You can control the volume for an individual zone, or for a zone group if you have joined more than one room together. The volume change affects the zone or zone group currently highlighted in the Zones pane. -
Page 28: Adjusting Zoneplayer Sound Settings
3-10 Sonos Digital Music System User Guide Adjusting ZonePlayer Sound Settings You can change the sound settings (treble, bass, loudness, balance, or volume) for each individual ZonePlayer. Choose one of the following options: • Click the Equalizer button displayed in the Now Playing pane. -
Page 29: Zone Groups
You can link or drop zones from a zone group while the music is playing. You can also link all the ZonePlayers in your house with one touch by selecting All Zones-Party Mode. Sonos in the bedrooms. Sonos in the Sonos in bathroom. - Page 30 Note: Any zones you link will automatically drop their current music queue and begin to play the music queue from the highlighted zone. You may sometimes want to save your music queue before linking a zone. See "To create a Sonos playlist" on page 3-17.
-
Page 31: Making Music Selections
• Library (shared folders on your network) • Music services • Sonos playlists (music queues you have saved for future play) • Internet Radio • Line-In Sources (external device such as a CD player or a portable music player) Note: The music you select will play in the zone or zone group that is highlighted in the Zones pane. -
Page 32: The Music Queue
• shared folders on another computer in your network • network-attached storage (NAS) devices The Sonos Digital Music System does not change music or playlist files created by other applications; these files are always treated as “read-only”. The Music Queue As you make music selections, they are added to a list of tracks called a music queue. - Page 33 Click to expand the music tree for any selection. If you’ve created Sonos playlists (music queues you have saved), you can browse these playlists using the Sonos Playlists tab. See "Sonos Playlists" on page 3-17 for more information.
- Page 34 3-16 Sonos Digital Music System User Guide To remove a track from the music queue From the Queue pane, click to highlight the song you want to remove from the music queue. Choose one of the following options: • Click Remove Track.
-
Page 35: Sonos Playlists
• Click Queue Save Queue as Sonos Playlist from the Play menu. Type a name for the new Sonos playlist, and click OK. This queue will now be accessible from the Sonos Playlists tab. To play a saved queue, click the desired playlist from the Sonos Playlists tab and click Play Now to start the playlist immediately, or Add to Queue to add it to the end of your current music queue. -
Page 36: Internet Radio
3-18 Sonos Digital Music System User Guide Internet Radio The Internet Radio tab provides a list of third-party streaming MP3 broadcasts for you to select from. Simply select the zone you want to listen in, select a radio station from the list, and then click Play Now. - Page 37 Chapter 3: Windows® Setup and Operation 3-19 Type the radio station’s name in the Station Name field, and click OK. The new radio station is added to your Favorites list, not to the Sonos-supplied Internet radio station list. To edit a radio station Note: You can only edit the streaming URL or station name for radio stations that are in your Favorites list.
-
Page 38: Connecting Line-In Sources
Sonos Digital Music System User Guide To set Internet radio preferences You can receive automatic radio station updates whenever Sonos releases a new list. Your music system must be registered in order to receive updates. If you have not yet registered, see "Sonos System Registration"... -
Page 39: Managing Music Folders
Over time, you may wish to add or remove music folders from this list. These music folders are indexed by the Sonos Digital Music System so that you can view your music by categories. If you add new music to a folder that has already been... - Page 40 Sonos Digital Music System User Guide To add a shared folder From the Music menu, select Music Library Setup. The shared music folders that are currently available to your Sonos Digital Music System appear. Click Add a Share. Choose one of the following options: •...
- Page 41 Chapter 3: Windows® Setup and Operation 3-23 Click to highlight a music folder, and then click Next. Click Next to confirm. Click Finish when you have no more folders to add. • To add music stored on a remote computer or a NAS device, select Add music stored in folders that are currently shared on my network.
-
Page 42: Getting Software Updates
"ready" appears. Getting Software Updates Sonos provides software updates for your music system in order to improve performance and add features. Your music system must be registered in order to receive software updates. If you have not yet registered, see "Sonos System Registration"... - Page 43 "Your Sonos Digital Music System is up to date. No updates are required" will appear instead. Your ZonePlayers and computer software will be updated as all Sonos components must carry the same software version number. This process may take several minutes per device, depending upon your network connection.
- Page 44 Sonos Digital Music System while this process is running. Contact Sonos Customer Support if an error occurs. ZonePlayer(s) software updates If a ZonePlayer’s software version gets out of sync from the rest of your Sonos Digital Music System components, you will see the following message displayed in the Zones pane:...
-
Page 45: Sonos System Registration
Resetting Your Desktop Controller Software If you want to join your computer to a different Sonos Digital Music System, you must reset your Desktop Controller. Select Reset Desktop Controller from the Help menu. - Page 46 Desktop Controller software, the Setup Wizard will appear to prompt you through the setup process. If you are joining your computer to an existing Sonos Digital Music System, you do not have to press the Mute and Volume Up buttons on every...
-
Page 47: Chapter 4 Macintosh® Os X Setup And Operation
Operation The Sonos Setup Assistant Now that you have connected your first ZonePlayer, you are ready to install the Sonos Assistant. The Sonos Setup Assistant software for Macintosh will guide you through the process of configuring your music system and setting up access to your music files. - Page 48 Sonos Digital Music System User Guide During the setup process, you will be asked to configure your Macintosh’s firewall. Follow the on-screen instructions, and then click Continue. During the setup process, you will be asked to press and release the Mute and Volume Up buttons simultaneously on the ZonePlayer you are adding to your music system.You may release the buttons as soon as the Mute indicator (green)
- Page 49 Sonos Digital Music System. Connecting your Controller Once setup is complete, if you purchased a Sonos Controller you can add it to your music system now. Plug your Sonos Controller into the AC adapter and follow the on-screen prompts to add the Controller to your music system.
-
Page 50: The Sonos Assistant Main Menu
Adding More ZonePlayers You can add more ZonePlayers to your Sonos Digital Music System any time by selecting Set up ZonePlayers from the Main Menu. Turn to Chapter 2 if you’d like help with the placement and setup of your new ZonePlayer(s). -
Page 51: Renaming A Zoneplayer
Chapter 4: Macintosh® OS X Setup and Operation Renaming a ZonePlayer If you name a ZonePlayer incorrectly, or if you move your ZonePlayer to another room, you can rename it to suit your preference. From the Main Menu, click Set up ZonePlayers. Highlight the ZonePlayer you wish to change, and click Rename. -
Page 52: Changing Your Preferences
Sonos Digital Music System. Software update preferences Sonos provides software updates for your music system in order to improve performance and add features. Your music system must be registered in order to receive these software updates. If you have not yet registered, see "System registration"... -
Page 53: Updating Your Sonos Assistant Software
Select the desired setting, and click Continue. Updating Your Sonos Assistant Software You can check for updates to the Sonos Assistant software by choosing Update Sonos Assistant from the Sonos menu. This option will automatically take you to the Sonos Support Web site where a message displays indicating whether or not there is a later version available for you to download. - Page 54 Sonos Digital Music System User Guide To add a shared music folder to the list From the Main Menu, choose Set up your music. The music folders that are currently being accessed are displayed. Click Add. • If you select In My Music Folder, click Continue and then turn to "If you have music stored in your music folder...
- Page 55 Chapter 4: Macintosh® OS X Setup and Operation If you have music stored in your music folder... Provide an administrator name and password, and then click Continue. If Windows Sharing is already enabled on your computer, this screen will not appear If your computer does not currently allow Windows Sharing, you will be prompted to enable it.
- Page 56 4-10 Sonos Digital Music System User Guide Choose one of the following options: • Click Add to add another music folder. • Click Continue if you have no more music folders to add. If you have music stored on the network...
- Page 57 Chapter 4: Macintosh® OS X Setup and Operation 4-11 Resetting the Sonos Assistant If you want to join your Macintosh computer to a different Sonos Digital Music System, you must reset your Sonos Assistant. Choose Reset Sonos Assistant from the Sonos menu.
- Page 58 4-12 Sonos Digital Music System User Guide...
- Page 59 Using Your Sonos Controller Sonos puts the control of all your music and all your rooms in the palm of your hand. With a Sonos Controller in hand, you'll have instant access to your entire digital music collection, no matter where it's stored. And because it's wireless, you can control the music and where it's being played from any room in your house - with no pointing or line of sight requirements.
- Page 60 Music. Use the Music button to browse or select music. From the Music menu you can select new music to play, manage your music queues, access playlists, and change the default settings for a Sonos ZonePlayer or Controller. The Music button will also toggle you between the Music menu and the Now Playing screen.
- Page 61 Chapter 5: Using Your Sonos Controller Scroll wheel. The scroll wheel is used to navigate through a displayed list whenever one is present on the Controller screen. Use your thumb or finger to "turn" the wheel clockwise to scroll down through the list, and counterclockwise to scroll up through the list.
- Page 62 Sonos Digital Music System User Guide Mute. Use the Mute button to temporarily silence the music in a zone (within a zone group, the mute button automatically mutes the last room where volume controls were adjusted.) Touch the Mute button again to unmute. To mute all zones in the house, press and hold the Mute button for 3 seconds.
-
Page 63: Advanced Settings
Controller for approximately 3 seconds. The Controller will restart momentarily. Factory reset If you want to join your Controller to a different Sonos Digital Music System, you must factory reset your Controller. Select System Settings→Controller Settings→Advanced Settings→Factory Reset from the Music menu.
Need help?
Do you have a question about the ZonePlayer ZP100 and is the answer not in the manual?
Questions and answers