Table of Contents
Advertisement
Quick Links
Advertisement
Table of Contents

Related Manuals for Clare Controls Clare Video Doorbell

Summary of Contents for Clare Controls Clare Video Doorbell
- Page 1 Clare Video Doorbell Quick-Start Guide...
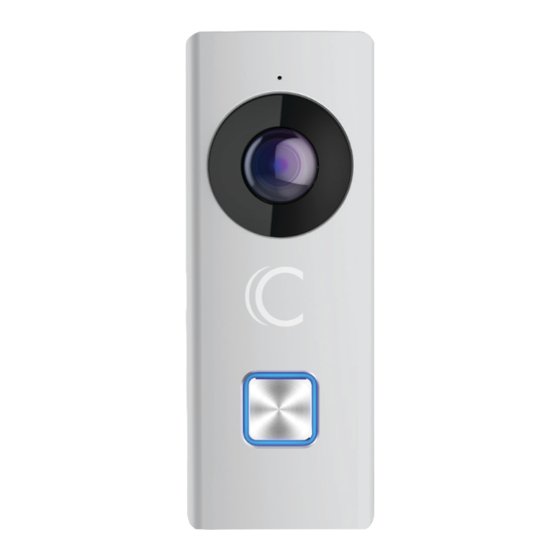
- Page 2 Welcome To Your New Clare Getting Started Video Doorbell Omni-directional Microphone 180º 2MP HD Camera Uses Existing Doorbell Wiring Mode Button Doorbell Button Micro-SD card...
- Page 3 Check Out What’s Included Getting Started In The Box. Clare Video 4 Faceplates 1 Mounting template Doorbell Camera 2 Wire extensions 3 Mounting screws 4 Terminal screws 2 Security screws 3 Wall anchors 4 Wire connectors 1 Security key 1 Drill bit...
-
Page 4: Clare Video Doorbell Power Requirements
Getting Started Power Requirements The Clare Video Doorbell will work with mechanical and digital doorbells that use 16-24VAC power only. NOTE: If you are unsure what voltage your doorbell uses, please consult your original doorbell packaging or a licensed electrician. -
Page 5: Wi-Fi Signal Strength Requirements
Getting Started Requirements The Clare Video Doorbell can only be connected to a 2.4GHz network, and requires a minimum of -65dBm of Wi-Fi signal strength at the installation location. We recommend downloading a Wi-Fi analysis tool for your phone or tablet to check signal strength. - Page 6 Getting Install Step 1 Started Before starting installation, make sure to shut off the power being supplied to your doorbell at the breaker panel. Next, remove your existing doorbell and disconnect the wires connected to the screws on the back.
-
Page 7: Preparing The Video Doorbell For Wall Mounting
Preparing The Video Doorbell Install Step 2 For Wall Mounting Remove the faceplate attached to the video doorbell to access the mounting holes used for installation. Refer to diagram 1 on how to easily remove the faceplate. Diagram 1 When mounting the doorbell to brick, concrete, or stucco, use the supplied drill template as a guide to mark the locations for installing the supplied wall anchors. -
Page 8: Connecting Power To The Video Doorbell
Connecting Power To The Install Step 3 Video Doorbell Next, refer to diagram 3 to connect your existing doorbell wiring to the leads located on the back of the video doorbell. If your existing wiring is not long enough, use the supplied wires and connectors to extend the wiring. -
Page 9: Installation When Using A Digital Doorbell Chime
Installation When Using a Optional Step Digital Doorbell Chime (Proceed to App Step 1 if using a mechanical chime) A diode must be installed on the leads of the chime for proper operation. Simply wrap the ends of the supplied diode around the terminals on the doorbell chime. - Page 10 Getting Started With The ClareVision Plus App Step 1 Download and open the ClareVision Plus App for iOS and Android. After opening the App, tap on the Clare Cloud icon on the bottom menu bar and follow the on-screen instructions to create a new account.
-
Page 11: Setting Up The Video Doorbell In The Clarevision Plus App
Setting Up The Video Doorbell In The ClareVision Plus App Step 2 Tap the Cloud Device icon in the bottom menu, and then tap icon in the top right corner to add your doorbell. Select “Video Doorbell” from the menu screen, and then scan the QR code on the front of the video doorbell. -
Page 12: Installing The Faceplate And Restoring Power
Installing The Faceplate Done! And Restoring Power After the video doorbell has been installed, reinstall the faceplate by pressing gently until it clicks into place. Refer to diagram 6 to install the security set screw located on the bottom of the doorbell faceplate. Diagram 6... -
Page 13: Using The Clarevision Plus App
Using the ClareVision Plus App Live and Recorded Video Settings 2-Way Audio Take Photo Take Video HD/Basic Video Live View Configuration Stop/Start Volume Camera View Zoom Main Menu Settings Back Settings Add Device Playback... - Page 14 Configuring The Motion Detection Area And Sensitivity By default, the Clare Video Doorbell is set to record the full field of view of the camera. In certain situations, some objects may trigger an abundance of notifications. This is a normal issue, and is simple to correct.
- Page 15 Factory Reset Press and hold the Mode button for 10 seconds or until the device notifies you. This will factory reset your Clare Video Doorbell camera to default settings. (You can only factory reset the doorbell after it has been connected to a Wi-Fi network. If the doorbell is not connected to Wi-Fi, holding the mode button will restart Wi-Fi pairing mode.)
- Page 16 We’re Here To Help! Clare Support is here to assist and help answer questions 7 days a week. You can also visit www.ClareControls.com to learn more and watch helpful installation setup videos. ClareCare Support: US: 941.315.2273 (CARE) Canada: 844.360.4816 help@clarecontrols.com Dealer Technical Support US: 941.404.1072 Canada: 844.360.4806...
Need help?
Do you have a question about the Clare Video Doorbell and is the answer not in the manual?
Questions and answers