Table of Contents
Advertisement
Quick Links
Instruction Manual
Bed Frame Accessory
Model MAST-3
Due to the presence of small parts during assembly, keep
out of reach of children until assembly is complete.
Model MAST-3 Bed Frame Accessory
Read all instructions before assembly and use.
Keep instructions for future use.
ADULT ASSEMBLY REQUIRED
Lancaster, PA 17601
tradecraftspecialties@gmail.com
www.tradecraftspecialties.com
Revised 10/27/2016
1900 Alfa Drive
(717) 269-8934
Page
1 of 10
Advertisement
Table of Contents

Related Manuals for Tradecraft Specialties MAST-3


Summary of Contents for Tradecraft Specialties MAST-3
- Page 1 Due to the presence of small parts during assembly, keep out of reach of children until assembly is complete. 1900 Alfa Drive Lancaster, PA 17601 (717) 269-8934 tradecraftspecialties@gmail.com www.tradecraftspecialties.com Page Model MAST-3 Bed Frame Accessory Revised 10/27/2016 1 of 10...
-
Page 2: General Specifications
Each one of our products is handmade, hand painted, and hand packaged. Minor imperfections may occur that are not manufacturing defects, but rather a result of the handcrafting process that makes our products unique and special. Page Model MAST-3 Bed Frame Accessory Revised 10/27/2016 2 of 10... -
Page 3: Care And Maintenance
If using power tools to aid in assembly, use caution. Power tools may over-tighten fasteners and split or damage the material. Tools required (not included): Phillips head screw driver 7/16” wrench or adjustable wrench Page Model MAST-3 Bed Frame Accessory Revised 10/27/2016 3 of 10... -
Page 4: Parts List
Parts List Page Model MAST-3 Bed Frame Accessory Revised 10/27/2016 4 of 10... -
Page 5: Assembly Steps
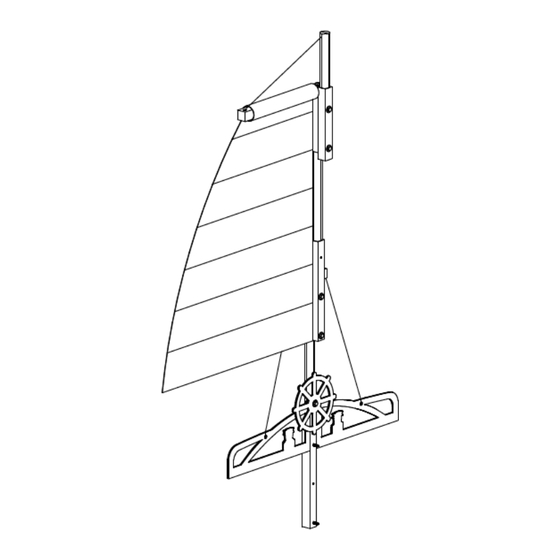
Step 3: Fasten mast [F] to rear of headboard using lag screws [A] and washers [B]. If this kit is equipped with a ship's wheel, make sure to use the mast drilled for wheel placement. Page Model MAST-3 Bed Frame Accessory Revised 10/27/2016 5 of 10... - Page 6 Step 3 - A: Fasten wheel [K] to mast using lag screw [L] and washers [B]. Use washers on each side of wheel as necessary for shimming. Back of lag screw whould not protrude from rear of mast. Do not over-tighten lag screw; wheel should turn freely around screw. Page Model MAST-3 Bed Frame Accessory Revised 10/27/2016 6 of 10...
- Page 7 Step 6: Fasten top [G] to lower mast [F] using lag screw [A] and washer [B]. Note that these holes may be drilled slightly off-center to allow top to be biased rear-ward for less interferance with mast. Page Model MAST-3 Bed Frame Accessory Revised 10/27/2016 7 of 10...
- Page 8 Step 7: Gently work the yard [H] through the top of the sail [D] with the smaller hole towards the back (flat, vertical part). Gently work the wire rod [M] through the vertical fabric loop to stiffen the sail vertically, if necessary, with the loop end up. Page Model MAST-3 Bed Frame Accessory Revised 10/27/2016 8 of 10...
- Page 9 Step 9: Measure length of cord [E] sufficient for the following step. Only cut to length when certain of proper length. Thread rope [E] through hole on end of yard [H], and tie a knot. wrap other end around top-mast [I] and tie a knot. Page Model MAST-3 Bed Frame Accessory Revised 10/27/2016 9 of 10...
- Page 10 4) Run rope end to pulley, loop around and tie a knot. Repeat for opposite side. Step 11: Tighten all hardware. Make sure all assembled parts are tight and secure. Page Model MAST-3 Bed Frame Accessory Revised 10/27/2016 10 of 10...
Need help?
Do you have a question about the MAST-3 and is the answer not in the manual?
Questions and answers