Table of Contents
Advertisement
Quick Links
Introduction
This Quick Start Guide provides a basic overview of KUMO system connections
and configuration.
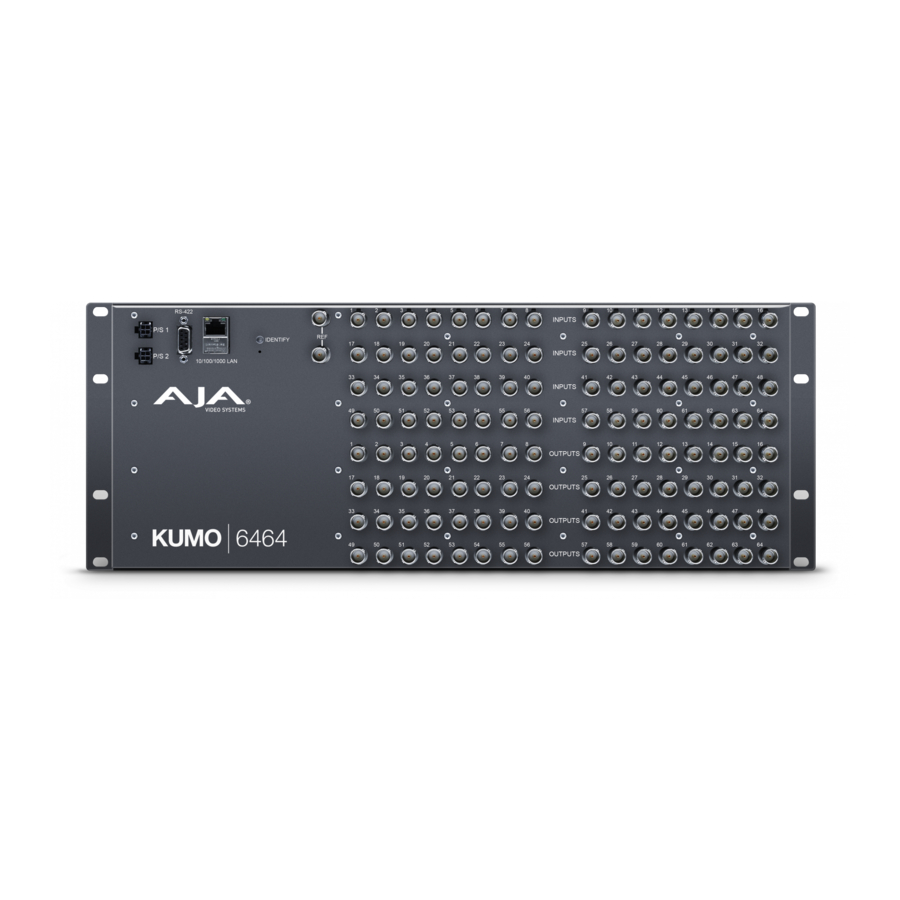
KUMO Router Connections
Figure 1. KUMO Rear Panel Connections (3232 shown, other models similar)
Redundant 12 VDC
Power Supplies
PS1 & PS2
RJ-45 Ethernet
RS-422 Serial
9 Pin Female
LAN Connector
D Connector
Published May 1, 2017
KUMO Quick Start Guide v4.2
KUMO
Quick Start Guide
REF BNCs
Identify
Ext Ref Video
LED
Looping
Resessed
10/100/1000
Reset Button
SDI Video Inputs 1-32
(Top Two Rows)
SDI Video Outputs 1-32
(Bottom Two Rows)
1
www.aja.com
Advertisement
Table of Contents

Subscribe to Our Youtube Channel
Related Manuals for AJA KUMO


Summary of Contents for AJA KUMO
-
Page 1: Quick Start Guide
KUMO Quick Start Guide Introduction This Quick Start Guide provides a basic overview of KUMO system connections and configuration. KUMO Router Connections Figure 1. KUMO Rear Panel Connections (3232 shown, other models similar) Redundant 12 VDC REF BNCs SDI Video Inputs 1-32... -
Page 2: Rj-45 Ethernet Connector
If no reference is present, the KUMO will switch at random times. Video Inputs and Outputs Depending on your KUMO model, up to 64 SDI video inputs and outputs can be connected to the video input and output BNC connectors. Normal Mode In Normal mode, BNC inputs and outputs have a one-to-one relationship with the SDI signals being routed. -
Page 3: Kumo Control Panel Connections
KUMO routers that use RS-422 control. NOTE: Only older KUMO 1604, 1616, and 3232 routers with a serial number ending in -R0 require this adapter. KUMO routers with serial numbers ending in -R1 or higher do NOT require the adapter. -
Page 4: Dhcp On An Existing Network
DHCP server and automatically be given compatible IP network settings. If auto discovery is configured on a computer on that network, that computer will be able to find and control the KUMO router via a web browser (see below). -
Page 5: Kumo Temporary Static Ip Address
IP. When the KUMO router default IP is set the Identify LED will blink. • For a KUMO CP, press and hold the two SHIFT buttons on the panel for five seconds and then release. When the KUMO CP default IP is set, the Source and Destination buttons will flash alternately. -
Page 6: Larger System Control Configurations
KUMO CP2 64 button hardware panel, web browser, Ethernet control, and RS-422. If the KUMO will be attached to a WAN, talk to your IT administrator and obtain the details on how to configure the KUMO (DHCP or static IP). -
Page 7: Static Ip Configuration
From the Home screen, use the pulldown menu in the upper left to see all of the KUMO devices present on the local LAN and select the router you want to control, or select the KUMO CP you want to use. -
Page 8: Locating A Specific Kumo Device On The Network
The web browser button will alternate between blue and gray background color in Identify mode. Click again to turn the Identify function off. • On a KUMO router, the Identify LEDs on the front and back will flash, enabling quick physical location of the router in a populated rack of equipment.
Need help?
Do you have a question about the KUMO and is the answer not in the manual?
Questions and answers