Table of Contents
Advertisement
Available languages
Available languages
PORTABLE DISHWASHER / LAVAPLATOS PORTATIL
INSTRUCTION MANUAL / MANUAL DE INSTRUCCIONES
Model Numbers / Números de Modelos: DW6W / DW6PS
BEFORE USE, PLEASE READ AND FOLLOW ALL SAFETY RULES AND OPERATING
INSTRUCTIONS.
La sección en español empieza en la página 23.
Avanti has a policy of continuous improvement on its products and reserves the right to change materials and
specifications without notice.
Avanti Products, A Division of The Mackle Co., Inc.
P.O. Box 520604 - Miami, Florida 33152
www.avantiproducts.com
1
Advertisement
Table of Contents

Related Manuals for Avanti DW6PS


Summary of Contents for Avanti DW6PS
- Page 1 INSTRUCTIONS. La sección en español empieza en la página 23. Avanti has a policy of continuous improvement on its products and reserves the right to change materials and specifications without notice. Avanti Products, A Division of The Mackle Co., Inc.
-
Page 2: Table Of Contents
Rinse-Aid Dispenser Loading the Dishwasher Care and Maintenance Troubleshooting Guide Error Codes Service for Your Dishwasher Your Avanti Products Warranty Instrucciones en Español Registration Information and Registration Card TABLE OF CONTENTS 7 – 9 10 – 11 15 – 16 17 –... -
Page 3: Help Us Help You
Keep it handy to answer your questions. If you don't understand something or you need more assistance, please call: Avanti Customer Service 800-220-5570 Keep proof of original purchase date (such as your sales slip) with this guide to establish the warranty period. -
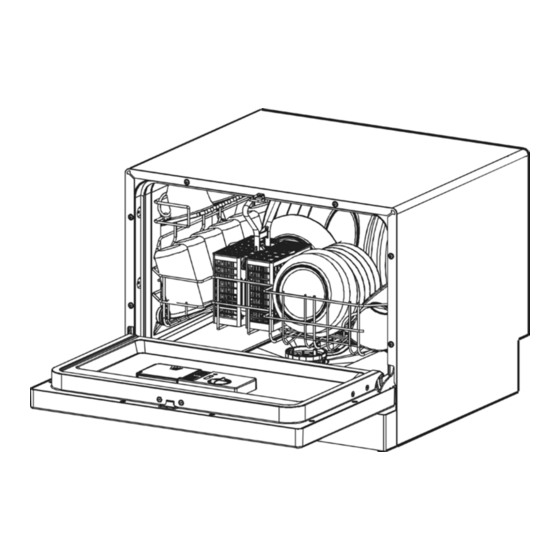
Page 4: Parts And Features / Control Panel
PARTS AND FEATURES 3 4 5 Control Panel Rinse-Aid Warning Indicator Start / Reset Light Start / Reset Button Front View (Open) Cup Shelf Detergent Dispenser Cutlery / Silverware Basket Filter Assembly Rinse-Aid Dispenser Water Spray Arm Rack Rear View Drain Pipe Connector Water Inlet Pipe Connector... -
Page 5: Important Safety Instructions
Dispose of discarded appliances and shipping or packing material properly Do not attempt to repair or replace any part of your dishwasher unless it is specifically recommended in this manual. All other servicing should be referred to a qualified technician. -
Page 6: Electrical Connection
Improper use of the grounded plug can result in the risk of electrical shock. If the power cord is damaged, have it replaced by an authorized Avanti Products service center. This appliance should be properly grounded for your safety. The power cord of this appliance is equipped with a three-prong plug which mates with standard three prong wall outlets to minimize the possibility of electrical shock. -
Page 7: Installation Instructions
Do not abuse, sit on or stand on the door or dish rack of the dishwasher. Do not allow children to play around the dishwasher when opening or closing door due the possibility of small fingers being pinched in door. -
Page 8: Connecting Your Dishwasher
• Connect the six-sided connection of the drain hose to the drain port connection on the back of the dishwasher cabinet. Do not over-tighten (to avoid damage to threads). • Connect the star-shaped connection of the inlet hose to the inlet port on the back of the dishwasher cabinet. Do not over-tighten (to avoid damage to threads). -
Page 9: Disconnecting Your Dishwasher
Clean the interior surface with lukewarm water using a soft cloth. Operating Instructions To get the best performance from your dishwasher, read all operating instructions before using it for the first time. You can locate your model number on the tub wall just inside the door. Throughout this manual, features and appearance may vary from your model. -
Page 10: Cycle Sequence
(The START / RESET indicator light with be ON indicating that the unit is in PAUSE mode. While in the PAUSE mode you will hear a beep once every minute until the dishwasher is put back into normal operation or “RUN” mode.) b) Make the necessary changes to the wash program / cycle selection, add/remove the items from the dishwasher. -
Page 11: At The End Of The Wash Cycle
/ cycle accordingly. (See the section “Proper Use of Detergent on page 13) At the End of the Wash Cycle Once the dishwasher has completed the selected wash cycle / program, there will be a buzzer sound for 8 seconds indicating the end of the cycle and then stop. -
Page 12: Cycle Sequence
Cycle Sequence Cycle Water (Approx) Heavy 4.2 Gallons Normal 3.6 Gallons Light 3.0 Gallons Glass 2.4 Gallons Rapid 3.0 Gallons Pre-Wash 0.7 Gallons Time (Approx) Sequence Pre-wash Pre-wash (122ºF/50ºC) Pre-wash (122ºF/50ºC) Wash 115 Minutes Wash Rinse Rinse Pre-wash Pre-wash Pre-wash 80 Minutes Wash Rinse... -
Page 13: Proper Use Of Detergent
Use the information in the table below as a guideline to determine the amount of automatic dishwasher detergent to place in the dispenser:... -
Page 14: Use Jet-Dry Rinse Agent
The rinse agent dispenser holds 3.5 oz. of rinse agent. Under normal conditions, this will last approximately one month. Try to keep it full, but do not overfill. 1) Make sure the dishwasher door is fully open. 2) Turn the dispenser knob to the left and lift it out. -
Page 15: Loading The Dishwasher Rack
Loading the Dishwasher Rack Position the dishes and cookware so that they will not get moved by the spray of water. To remove the plate bracket from the rack:... -
Page 16: Silverware Basket
Press and hold the START / RESET button for approximately 3 seconds. (The START / RESET indicator light will be on indicating that the dishwasher is in PAUSE mode). Slowly open the door to both stop the water spray arm and to release any steam if applicable. -
Page 17: Care And Maintenance Instructions
To clean the coarse filter and the fine filter, use a soft cleaning brush. Reassemble the filter parts as shown in following and reinsert the entire assembly in the dishwasher, positioning in its seat and pressing downward. -
Page 18: How To Keep You Dishwasher In Shape
Seals One of the factors that cause odors to form in the dishwasher is food that remains trapped in the seals. Periodic cleaning with a damp sponge will prevent this from occurring. -
Page 19: Troubleshooting Tips
Replace the fuse or reset the circuit breaker. Remove any other appliances sharing the same circuit with the dishwasher. • Make sure the dishwasher is turned on and the door is closed securely. • Make sure the power cord is properly plugged into the wall socket. - Page 20 Wrong program / cycle selected. Using cutlery with a low quality coating. See the notes in Loading the Dishwasher section of this manual. Select a more intense program. Use more detergent, or change the type of detergent being used.
-
Page 21: Error Codes
We are proud of our customer service organization and the network of professional service technicians that provide service on your Avanti dishwashers. With the purchase of your Avanti dishwasher, you can have the confidence that if you ever need additional information or assistance, the Avanti Products Customer Service team will be here for you. -
Page 22: Your Avanti Products Warranty
WHAT IS COVERED LIMITED ONE-YEAR WARRANTY For one year from the date of purchase by the original owner, Avanti Products will, at its option, repair or replace any part of the dishwasher which proves to be defective in material or workmanship under normal use. -
Page 23: Uso Apropiado
INSTRUCCIONES EN ESPAÑOL INFORMACIONES IMPORTANTES DE SEGURIDAD PRECAUCION Lea todas las instrucciones antes de usar su electrodoméstico. Peligro o Precaución: Existe el riesgo que los niños queden atrapados. Niños atrapados o sofocamiento no son un problema del pasado. Los electrodomésticos son peligrosos aún si solo los deja en el garaje por un par de días. - Page 24 EL USO INAPROPIADO DEL ENCHUFE A TIERRA PUEDE OCASIONAR RIESGO DE UN CHOQUE ELECTRICO. SI EL CORDON SE DAÑASE, LLEVELO A UN CENTRO DE SERVICIO AUTORIZADO POR AVANTI PRODUCTS PARA QUE SE REEMPLACE. • Bajo ninguna circunstancia corte o retire la tercera punta (cable a tierra) del enchufe del cordón eléctrico.
-
Page 25: Instrucciones De Instalación
Instrucciones de Instalación ADVERTENCIA Si el grifo que ud. tiene no es compatible con la manguera “Quick Connect” que incluimos entonces: • Conecte el adaptador del grifo (incluido con Lavadora de Platos) a su grifo. • Si su grifo tiene incluida una conexión de rosca tipo “macho”, entonces use solamente la arandela de jebe estándar (0.2”/5mm grosor) que viene dentro del adaptador. - Page 26 • Coloque la conexión circular de la manguera de drenaje en la conexión “macho” (abajo/mas larga) del “Quick Connect”. • Coloque la conexión circular de la manguera de entrada en la conexión “macho” (arriba/mas corta) del “Quick Connect”. • Ajuste el ”Quick Connect”al adaptador del grifo, halando hacia abajo el cuello sellador externo del “Quick Connect”, y al mismo tiempo empujando el ”Quick Connect”...
-
Page 27: Panel De Control
Desconectando su Lavadora de Platos • Cierre el suministro de agua caliente del grifo. • Desconecte el cordón de suministro eléctrico. • Recuerde liberar la presión de agua de la manguera de entrada. Para aliviar la presión de agua en la manguera de entrada, (asegúrese que la línea de agua (grifo) este cerrada): presione el botón rojo (de alivio de presión de agua) en el ”Quick Connect”... - Page 28 Operando su Lavadora de Platos a) Asegúrese que todas las conexiones eléctricas, de entrada de agua y de drenaje hayas sido instaladas correctamente antes de proceder. b) Coloque los platos dentro de la Lavadora de Platos (siguiendo las instrucciones de acuerdo a la sección “Colocando platos en la canasta de la Lavadora de Platos Rack”.
- Page 29 SECUENCIA DE CICLOS DE LAVADO Cyclo / Cantidad de Programa Agua (Aproximada) Heavy 4.2 Galones (Intensivo) Normal 3.6 Galones Light 3.0 Galones (Ligero) Glass 2.4 Galones (Vidrio) Rapid 3.0 Galones (Rapido) Pre-Enjuague 0.7 Galones Tiempo Secuencia (Aproximada) Pre-enjuague Pre-enjuague (122ºF/50ºC) Pre-enjuague (122ºF/50ºC) Lavado 115 Minutos...
- Page 30 Dispensador de Detergente El dispensador debe rellenarse antes de comenzar cada ciclo de lavado de acuerdo a las instrucciones detalladas en la tabla de ciclo de lavado. Este lavaplatos usa menor cantidad de detergente y aditivos de enjuague que los lavaplatos convencionales. Generalmente, sólo se necesitará una cucharada de detergente para una carga en el programa de lavado normal.
- Page 31 DEPOSITO DE ADITIVOS DE ENJUAGUE Para abrir el depósito, de vuelta a la tapa hacia la flecha izquierda (“open”) y tire de ella. Vierta el aditivo de enjuague en el depósito, tenga cuidado de no sobrepasar el tope de llenado. Coloque la tapa alineándola con la flecha izquierda (“open”) y dándole vuelta hacia la flecha derecha (“close”).
- Page 32 COMO CARGAR LOS PLATOS Antes de cargar el lavaplatos. Para un mejor desempeño, siga estas recomendaciones. Las características y apariencia de la canasta pueden variar. Partículas de comida: 1) Remueva cualquier residuo de comida de la vajilla. Ablande residuos de comida quemada en las ollas o sartenes.
- Page 33 Como utilizar la canasta. La canasta está diseñada para lavar la vailla mas dlicada tal como vasos, tazas de te o café, platos o recipientes pequeños y sartenes pequeñas (siempre y cuando no estén muy sucias). Coloque los platos y las ollas de manera que el agua no los mueva durante el ciclo de lavado. Se recomienda que coloque los articulos más grandes y más dificiles de lavar en el centro de la parrilla.
-
Page 34: Mantenimiento
ADVERTENCIA Nunca use el lavaplatos sin filtro. Limpiando la puerta Para limpiar el borde alrededor de la puerta use un trapo húmedo, suave y tibio. Para prevenir el ingreso de agua al seguro de la puerta y a componentes eléctricos, no use limpiadores en aerosol de ninguna clase. -
Page 35: Registration Information And Registration Card
Thank you for purchasing this fine Avanti product. Please fill out this form and return it to the following address within 100 days from the date of purchase and receive these important benefits: Avanti Products, A Division of The Mackle Co., Inc. - Page 36 PRINTED IN CHINA...
Need help?
Do you have a question about the DW6PS and is the answer not in the manual?
Questions and answers