Table of Contents
Advertisement
Advertisement
Table of Contents

Related Manuals for Intelitek SCORA-ER 14

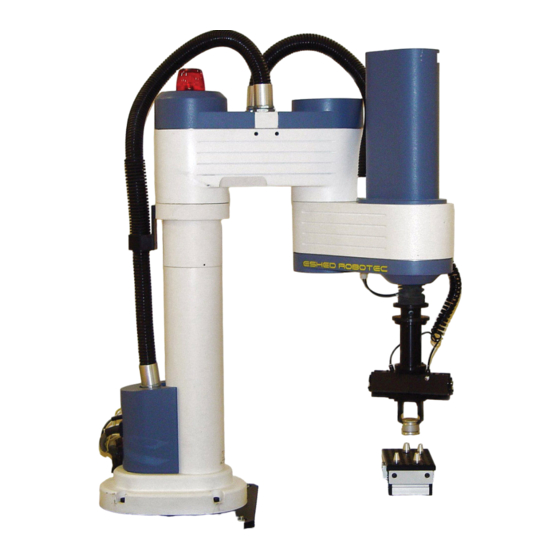
Summary of Contents for Intelitek SCORA-ER 14
- Page 1 SCORA-ER 14 User Manual Catalog #100067 Rev. B...
- Page 3 Every effort has been made to make this book as complete and accurate as possible. However, no warranty of suitability, purpose, or fitness is made or implied. Intelitek is not liable or responsible to any person or entity for loss or damage in connection with or stemming from the use of the software, hardware and/or the information contained in this publication.
-
Page 5: Table Of Contents
Robot Setup ..... . . 4-1 SCORA-ER 14 Installation ....4-2 Controller Installation . - Page 6 Troubleshooting ..... . . 9-2 Messages ......9-6 SCORA-ER 14 - vi - User’s Manual...
-
Page 7: Unpacking And Handling
CHAPTER Unpacking and Handling ‹ Read this chapter carefully before you unpack the SCORA-ER 14 robot and controller. Unpacking and Handling the Robot The robot is packed in expanded foam. Save the original packing materials and shipping carton. You may need them later for shipment or for storage of the robot. -
Page 8: Acceptance Inspection
Item Description Includes: Cabling with air hoses; SCORA-ER 14 Robot Arm Hardware for mounting robot: 4 M8x60 bolts; 4 M8 washers; 4 M8 nuts. Pneumatic Gripper includes pneumatic solenoid valve and 6 M4x8 screws for mounting gripper. -
Page 9: Chapter 2 Specifications
CHAPTER Specifications The following table gives the specifications of the robot arm. SCORA-ER 14 Robot Arm Specifications Mechanical Structure Horizontal articulated (SCARA) Arm Length Link 1 270mm (10.6") Link 2 230mm (9.0") Axis Movement Axis Range Effective Speed Axis 1: Rotation 288°... -
Page 10: Structure
Structure is a horizontal articulated (SCARA) robot. SCORA-ER 14 The first two joints are revolute and determine the position of the end effector in the XY plane. The third joint is prismatic and determines the height (Z coordinate) of the end effector. -
Page 11: Work Envelope
Figures 2-2 and 2-3 show the dimensions of the , while Figure 2-4 gives a top view of the robot’s work envelope. SCORA-ER 14 The base of the robot is normally fixed to a stationary work surface. It may, however, be attached to a slidebase, resulting in an extended working range. - Page 12 Figure 2-3: Dimensions (Top View) Figure 2-4: Working Range (Top View) SCORA-ER 14 2 - 4 User’s Manual 9603...
-
Page 13: Chapter 3 Safety
CHAPTER Safety is a potentially dangerous machine. Safety during operation is SCORA-ER 14 of the utmost importance. Use extreme caution when working with the robot. Precautions The following chapters of this manual provide complete details for proper installation and operation of the . -
Page 14: Warnings
Warnings Do not operate the until you have thoroughly studied both this SCORA-ER 14 User’s Manual and the Controller-B User’s Manual. Be sure you follow the safety guidelines outlined for both the robot and the controller. Do not install or operate the... -
Page 15: Chapter 4 Installation
Robot Setup Refer to Figures 4-1 and 4-2. Set up the on a sturdy surface with at least 70 cm of free space all SCORA-ER 14 around the robot. Set up the robot so that it faces in the proper direction—... -
Page 16: Scora-Er 14 Installation
SCORA-ER 14 operating area to protect both the operator and bystanders. Figure 4-2: Robot Base Layout SCORA-ER 14 Installation Controller Installation Perform the installation procedures detailed in the following sections of Chapter 2, “ Installation,” in the Controller-B User’s Manual: Computer/Terminal–Controller Installation... - Page 17 When disconnecting the robot from the controller, do it in the opposite order: • Disconnect the warning light connections. • Disconnect the power cable connections. • Disconnect the encoders cable connections. • Disconnect the ground wires. User’s Manual SCORA-ER 14 9603...
-
Page 18: Homing The Robot
If the HOME process is not completed, an error message identifying the failure is displayed. For example: *** HOME FAILURE AXIS 3 If the home switch is found, but not the encoder’s index pulse, the following message is displayed: * * * INDEX PULSE NOT FOUND AXIS 2 SCORA-ER 14 User’s Manual 9603... -
Page 19: Gripper Installation
Connect the coiled double hose from the gripper to the quick coupling on the underside of Link 2, as indicated in Figure 4-7. Figure 4-6: Pneumatic Gripper Figure 4-7: Gripper Connectors User’s Manual SCORA-ER 14 9603... - Page 20 (C) terminal of the same relay output, as shown in Figure 4-9. Attach the valve to the Figure 4-9: Valve— Controller Connections controller or any other metalic surface by means of the valve’s magnetic base. SCORA-ER 14 User’s Manual 9603...
-
Page 21: Servo Gripper
At the end of each work session (before turning off the controller), or before homing the robot, make sure the gripper’s position is as shown in Figure 4-11. Gripper Mounting Flange Figure 4-10: Connecting Gripper to SCORA-ER 14 User’s Manual SCORA-ER 14 9603... -
Page 22: Activating The Gripper
Figure 4-11: Connecting Gripper to SCORA-ER 14 ‹ Axis 5 is reserved by default controller configuration for a servo gripper. To connect a different device as axis 5, you must change the system configuration by means of the ACL command CONFIG. -
Page 23: Operating Methods
CHAPTER Operating Methods The SCORA-ER 14 robot can be programmed and operated in a number of ways. Controller-B User’s Manual includes two chapters which guide you through the basic commands for operating and programming the robot. Software ACL, Advanced Control Language, is an advanced, multi-tasking robotic programming language developed by Eshed Robotec. -
Page 24: Acloff-Line
The teach pendant is a hand-held terminal which is used for controlling the robot and peripheral equipment. The teach pendant is most practical SCORA-ER 14 for moving the axes, recording positions, sending the axes to recorded positions and activating programs. Other functions can also be executed from the teach pendant. -
Page 25: Axes 1 And 2
CHAPTER Drive System utilizes several different mechanical transmissions for SCORA-ER 14 transferring motion from the motors to the joints. The structure and operation of the various components used to drive the SCORA axes are described in this chapter. ‹ Note that the illustrations of... -
Page 26: Axis 3
Its main PULLEYS & TIMING BELT components are the motor, a worm gear and a spline, as shown in Figure 6-3. Figure 6-2: Drive System Axis 3 Figure 6-3: Drive System Axis 4 SCORA-ER 14 6 - 2 User’s Manual 9603... -
Page 27: Motors
As shown in Figure 6-4, the motors of the SCORA-ER 14 located close to the axes they drive. Figure 6-4: Motor Locations in SCORA-ER 14 User’s Manual 6 - 3 SCORA-ER 14 9603... -
Page 28: Dc Motor Structure
Figure 6-5 shows the basic structure and components of a DC motor comparable to the structure of the motors used in the . This motor has three main SCORA-ER 14 components: • Stator: This is a static component which creates the magnetic field. The stator may be a permanent magnet, or an electromagnet consisting of a coil wound around thin iron plates. -
Page 29: Scora-Er 14 Motors
SCORA-ER 14 Motors uses permanent magnet DC motors to drive the axes. SCORA-ER 14 Axes 1 and 2 of the are powered by the motor shown in Figure 6-6. SCORA ER-14 Axes 3 and 4 are powered by the motor shown in Figure 6-7. -
Page 30: Harmonic Drive Gear
Harmonic Drive Gear The Harmonic Drive transmission used in the , shown in Figure 6-8, SCORA-ER 14 offers a very high gear ratio. The Harmonic Drive gears used in the have four main components: SCORA-ER 14 • Circular spline: a solid steel ring, with internal gear teeth, usually fixed to the robot link. - Page 31 The Harmonic Drive gear ratio for axis 1 and axis 2 of the is 160:1 SCORA-ER 14 Figure 6-9: Operation of the Harmonic Drive Figure 6-10: Operation of the Harmonic Drive User’s Manual 6 - 7 SCORA-ER 14...
-
Page 32: Pulleys And Timing Belt
The gear ratio of the belt drive is the ratio of the output pulley to the input pulley, calculated according to the number of teeth on each pulley. The belt drive used in the has a a ratio of 80:21. SCORA-ER 14 Thus, for each rotation (360°) of the input pulley, the output pulley moves OUTPUT PULLEY 94°, or approximately one-quarter of... -
Page 33: Ball Bearing Screw
Figure 6-12. In the screw rotates and the nut SCORA-ER 14 travels along the length of the screw. As shown in Figure 6-13, a ball bearing screw thread is actually a hardened ball race. -
Page 34: Worm Gear
Worm Gear A worm gear transmission, shown in Figure 6-14, is used in the to transfer SCORA-ER 14 the rotation of motor 4 to the rotation of the Z-axis. The ratio of a worm gear transmission is defined as: # teeth on worm gear... -
Page 35: Axis Gear Ratios
4.2 mm. Axis 4 is driven by a worm gear with a ratio of 50:1. Thus, one rotation (360°) of motor 4 output shaft causes the end effector flange to rotate 7.2°. User’s Manual 6 - 11 SCORA-ER 14 9603... - Page 36 Á SCORA-ER 14 6 - 12 User’s Manual 9603...
-
Page 37: Encoders
This IC contains several sets of photodetectors and the circuitry for producing a digital signal. A perforated, rotating disk is located between the emitter and detector IC. Figure 7-1: SCORA-ER 14 Encoder User’s Manual 7 - 1 SCORA-ER 14 9603... - Page 38 This index pulse serves to Figure 7-2: determine the home position of the axis. SCORA-ER 14 Encoder Disk The photodetectors are arranged so that, alternately, some detect light while others do not. The photodiode outputs are then fed through the signal processing circuitry, resulting in the signals A, A, B, B, I and I, as shown in Figure 7-3.
-
Page 39: Encoder Resolution
Encoder Resolution From the quadrature signal the controller measures four counts for SCORA-ER 14 each encoder slot, thus quadrupling the effective resolution of the encoder. The resolution of the encoder is expressed as: 360° Where: is the resolution of the encoder. -
Page 40: End Of Travel (Limit) Switches
Axes 1 and 2 each has two limit switches—one at each end of the axis’ working range. Figure 7-5: SCORA-ER 14 Limit Switch The limit switches are mounted on a disk which is attached to the robot’s frame, as shown in Figure 7-6. -
Page 41: Hard Stops
When the joint reaches this hard stop, the impact protection and thermic protection processes detect an error, thus activating COFF. CON must be activated and the robot arm must be manually moved away from the impact condition. User’s Manual 7 - 5 SCORA-ER 14 9603... -
Page 42: Home Switches
Home Switches uses an optical home switch on each axis to identify the fixed SCORA-ER 14 reference, or home, position. For axes 1 and 2 the home switch is mounted on the same disk as the end of travel switches, and a “ flag” is attached to the Harmonic Drive output shaft, as shown in Figure 7-8. -
Page 43: Chapter 8 Wiring
CHAPTER Wiring Figure 8-1 is a schematic diagram of the SCORA-ER 14 cable connections. Figure 8-1: SCORA-ER 14 Cabling The power (robot) cable, encoder cable and warning light cable connect the Controller-B to the connector panel of the SCORA-ER 14 robot. Safety ground wires from the robot and the encoder cables are connected to safety ground studs on the connector panel and on the controller back panel. -
Page 44: Power (Robot) Cable And Connector
M3_A Twisted Pair Motor 4 + yellow M3_B Motor 5 – black M4_A Twisted Pair Motor 5 + green M4_B +24V to PCB white +24V Twisted Pair 24VRET to PCB black 24VRET SCORA-ER 14 8 - 2 User’s Manual 9603... -
Page 45: Encoder Cable And Conenctor
Pair B3 (Encoder Pulse B) black CHB 2 C3 (Encoder Index Pulse) orange CHC 2 Twisted Pair COMMON 3 COMMON 2 H3 (Home) blue MSWITCH 2 Twisted Pair with J2 – 34 User’s Manual 8 - 3 SCORA-ER 14 9603... -
Page 46: Warning Light Cable And Connector
Figure 8-4. Amphenol 3 Pin The following table details the warning light cable Connector and connector. Warning Light Cable and Connector Pin Description Wire Pin Description Robot Side (J3) Color Controller Side black SCORA-ER 14 8 - 4 User’s Manual 9603... -
Page 47: Chapter 8 Maintenance
Bring the robot to a position near home, and activate the Home procedure. Check the following items: • Robot movement is normal. • No unusual noise is heard when robot arm moves. • Robot reaches home position in every axis. User’s Manual 9 - 1 SCORA-ER 14 9603... -
Page 48: Periodic Inspection
Do not attempt to open the robot arm. There are no user-serviceable parts inside. If you are unable to determine and/or correct the problem, contact your service representative. Only qualified technicians may remove and/or replace robot components. SCORA-ER 14 9 - 2 User’s Manual 9603... - Page 49 HS will change to either 1 or 0 (defined by parameter 560+axis) when the home switch is detected. To help you perform this test, prepare and continuously run a simple ACL program, as follows: User’s Manual 9 - 3 SCORA-ER 14 9603...
- Page 50 +12VA, –12VA, +12VDR, –12VDR. Turn off the controller and disconnect it from the power source. Check each of these four fuses. Replace the blown fuse. SCORA-ER 14 9 - 4 User’s Manual 9603...
- Page 51 • System parameters are not properly adjusted. Refer to the ACL Reference Guide. • Problem in axis driver card(s) in the controller. Refer to the Controller-B User’s Manual. User’s Manual 9 - 5 SCORA-ER 14 9603...
-
Page 52: Messages
(3) Hardware fault on this axis. Home on group/axis not done. You attempted to move the arm to a recorded positions, or to record a position, before homing was performed on the group or axis. SCORA-ER 14 9 - 6 User’s Manual 9603... - Page 53 No homing. The homing parameters for the axis (PAR 460+axis and PAR 600+axis) are set to 0; as a result, the homing procedure will not be performed on the axis. User’s Manual 9 - 7 SCORA-ER 14 9603...
- Page 54 (2) Since the trajectory is not calculated prior to a linear or circular movement, the linear or circular movement may cause one of the joints to move too fast. Lower the value of speed for that movement. SCORA-ER 14 9 - 8 User’s Manual 9603...
- Page 55 Modify the coordinate values of the positions which define the trajectory. *** UPPER LIMIT AXIS n During keyboard or TP manual movement of the specified axis, its encoder attained its maximum allowed value. Move the axis in the opposite direction. User’s Manual 9 - 9 SCORA-ER 14 9603...
Need help?
Do you have a question about the SCORA-ER 14 and is the answer not in the manual?
Questions and answers