Table of Contents
Advertisement
Preface
Thank you for purchasing Hytera PT580H Plus F4 TETRA digital terminal. The terminal
has a large translucent TFT color display, and supports both TMO and DMO modes. The
benefits that PT580H Plus F4 can deliver you will dramatically improve your working
efficiency.
To derive optimum performance from the terminal, please read the Safety Information
Booklet and Owner's Manual carefully before use.
Advertisement
Table of Contents

Related Manuals for Hytera PT580H Plus F4


Summary of Contents for Hytera PT580H Plus F4
- Page 1 Preface Thank you for purchasing Hytera PT580H Plus F4 TETRA digital terminal. The terminal has a large translucent TFT color display, and supports both TMO and DMO modes. The benefits that PT580H Plus F4 can deliver you will dramatically improve your working efficiency.
- Page 2 Telephone Call Telephone call is usually a full duplex call initiated between PT580H Plus F4 and a PSTN subscriber (such as telephone user or mobile phone user). To send or receive telephone calls, the terminal must operate in TMO mode, and must be authorized to access public network through PSTN gateway.
- Page 3 Hytera and HYT are trademarks or registered trademarks of Hytera Communications Co., Ltd. (“Hytera”) in PRC and/or other countries or areas. Hytera retains the ownership of its trademarks and product names. All other trademarks and/or product names that may be used in this manual are properties of their respective owners.
-
Page 4: Rf Radiation Information
Hytera. Disclaimer Hytera endeavors to achieve the accuracy and completeness of this manual, but no warranty of accuracy or reliability is given. All the specifications and designs are subject to change without notice due to continuous technology development. No part of this manual may be copied, modified, translated, or distributed in any manner without the express written permission of Hytera. -
Page 5: Fcc Regulations
U.S, and the manufacturer shall post a RF label on the product to inform users of operational instructions, so as to enhance their occupational health against exposure to RF energy. As a conscientious company centering on users, Hytera strictly complies with the forgoing requirements from design, production and test. -
Page 6: Table Of Contents
Contents RF Radiation Information ....................3 RF Radiation Profile ....................3 RF Radiation Safety ....................3 FCC Regulations ....................... 4 Checking Items in the Package ..................6 Product Overview ......................7 Terminal Controls ....................... 7 Function Keypad ......................8 Programmable Keys ....................8 Before Use ........................ -
Page 7: Checking Items In The Package
Checking Items in the Package Please unpack carefully and check that all items listed below are received. If any item is missing or damaged, please contact your dealer. Battery Charger Power Adapter Antenna Belt Clip Strap Owner’s Manual Safety Information Booklet Quick Reference Guide Portable Terminal... -
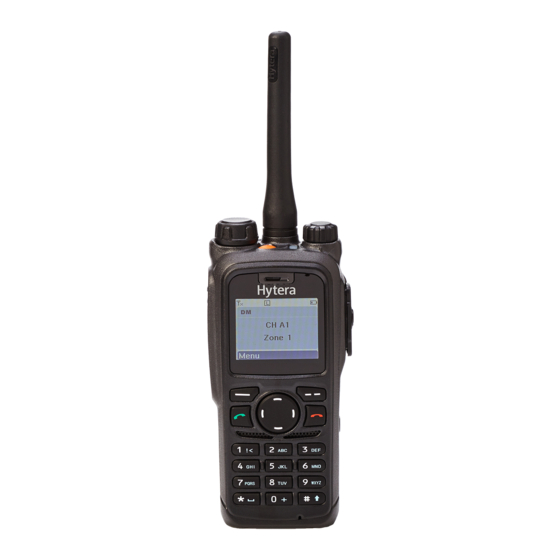
Page 8: Product Overview
Note: Frequency band is marked on the label of antenna; if not, please refer to the label on the terminal for frequency band information. Product Overview Terminal Controls Part Name Part Name ○ ○ SK1 (programmable) PTT Key ○ ○ SK2 (programmable) Emergency Key ○... -
Page 9: Function Keypad
Encoder/channel selector Receiver ○ ○ knob ○ Translucent Color ○ Function Keypad Display ○ Speaker ○ Numeric Keypad ○ Duplex Microphone ○ Volume Control knob ○ ○ Simplex Microphone Accessory Jack Cover ○ Accessory Jack ○ Strap Hole ○ ○ Battery Belt Clip ○... -
Page 10: Before Use
Calendar Select Mode Note: Long and short press of SK1 or SK2 can be assigned with different functions. Before Use Charging the Battery Only use the charger and battery specified by Hytera. The charge LED will indicate the charging progress. - Page 11 Procedures ① Connect the power adapter to an AC source socket. See arrows Place the terminal with the battery attached into the charger. See arrow ②. Make sure the battery’s charging pieces are in good contact with the charger’s terminals. The charging process begins when the charger LED solidly glows red.
-
Page 12: Assembly And Disassembly
LED flashes red rapidly. Failure Note: Be sure to read the Safety Information Booklet, to get necessary safety information. Assembly and Disassembly Attaching the SIM Card Open the SIM card cover by loosening screw, and insert the SIM card properly into the holder. -
Page 13: Attaching The Antenna
Note: SIM card related services are not supported by the terminal currently, and require future software upgrade. Attaching the Antenna Turn the antenna clockwise to fasten it. To remove the antenna, rotate it counter-clockwise. Attaching the Battery 1. Fit the extensions at the top of the battery into the slot at the top of the terminal’s body. 2. -
Page 14: Attaching The Belt Clip
To remove the battery, turn off the terminal first. Then slide the battery latch upwards to unlock the battery. Attaching the Belt Clip 1. Remove the screws in the main radio. 2. Align the screw holes on the belt clip with those on the terminal’s body, and then tighten the screws. -
Page 15: Important Instructions
3. Tighten the screw on the plug. To remove accessories, loosen the screw. Important Instructions Caution: If audio quality deteriorates after the terminal is exposed to water, ingress of water into the speaker holes may be the reason. To solve this problem, smack the terminal against your palm with the front cover facing your palm, so that water can flow out of the speaker holes. -
Page 16: Status Indicators
not be guaranteed unless you replace it with a new and approved one. Below texts should be deleted IP Code -- The IP Code is a designation that indicates the level of protection against ingress of solid foreign objects and water. It consists of the letters IP (International Protection) followed by two numerals. -
Page 17: Led Indicator
Status Icons (TMO and DMO) Icon Name Icon Terminal Status Low battery Battery Strength Icons More bars indicate more battery power No signal RSSI More bars indicate better signal strength Unread message Message Icons Inbox is full and all are unread messages The terminal currently operates in TMO mode Operation Mode Icons... -
Page 18: Basic Operations
Basic Operations Turning the Terminal On/Off To turn the terminal on, hold down the Power On/Off key until the terminal shows the power-up screen. To turn the terminal off, long press the Power On/Off key. Adjusting the Volume You may adjust call volume through the knob. Rotate the knob clockwise to increase the volume, or counter-clockwise to decrease the volume. -
Page 19: Switching Operation Mode
completed, the keypad will return to be locked. Switching Operation Mode You may switch the terminal between TMO and DMO through any of the following methods: 1. Menu selection Press the Options key to access the menu, and then select TMO or DMO. Talk Group DMO Options Language... -
Page 20: Call
Call Individual Call Transmitting an Individual Call DMO Mode 1. Input the number you want to call through the keypad, or go to the menu PhoneBook or Call Log to select the contact you want to call. 2. Then hold down the PTT and speak into the microphone, to transmit a simplex call. -
Page 21: Group Call
LCD prompts you to press the PTT to answer a call. When the other party stops talking, you can hold down the PTT and speak into the microphone to call back. Duplex Call When a duplex call is received, you can press to receive. -
Page 22: Emergency Call
Telephone Call Transmitting a Telephone Call 1. Input the number you want to call through the keypad. 2. Press Ctype to select PABX or PSTN (it will appear on the screen). 3. Press to transmit a telephone call. Answering a Telephone Call When a telephone call is received, you can press to answer the call. -
Page 23: Menu Navigation
Menu Navigation Press the Function key to access the menu list. The operations in TMO mode are the same as that in DMO mode. Here we are going to introduce all menu items based on TMO mode. PhoneBook... -
Page 24: Message
This menu is used to store your contact information. It can contain up to 512 entries. Each entry consists of contact name and contact number. To access this menu, press “Func -> PhoneBook” in idle mode, and then you can perform these operations: ■Create new contact ■View a contact ■Modify a contact... - Page 25 This option allows you to create a new text message with 140 bytes at most. The receiving party can either be an individual or a group. ■Inbox All received messages are saved here. It can contain up to 50 entries. When a new will appear in the status bar.
-
Page 26: Call Log
Call Log This terminal can save up to 20 entries in the option Dialed Calls, Received Calls and Missed Calls respectively. When there is a missed call, appropriate indications will be given on the display. After selecting an entry, these options are available: Call, View, Save, Delete, Delete All. Profiles ■Normal In this mode, the terminal will alert you to an incoming call or a new message by giving... -
Page 27: Settings
You can use Left or Right key to select your desired alert type for an incoming call, a new message or keypad press. For an incoming call or a new message, the available options include: Off, Ring, Vibra and Rg&Vb; for keypad press, the available options include On and Off. - Page 28 ■Date&Time This option allows you to set the current date, time and time format. The method is as follows: To set date and time Press Left or Right key to select the item to be set, and then input the right value through keypad.
- Page 29 Invert Disp This option allows you to invert the displayed information by 180° so that you can access it easily. Note: when the display is inverted, the function of OK key and Back key exchanges. Brightness You can use Left or Right key to adjust the brightness level. KP Light This option allows you to enable or disable keypad light.
-
Page 30: Others
temporarily and shows “Radio Disabled”. Note: the number of times that you are allowed to input wrong PIN or PUK code is programmable through the programming software. When the terminal is disabled, contact your dealer to activate it. The default PIN code is 1234, and the default PUK code is 12345678. - Page 31 ■My Info Under this option you can view some basic information about the terminal, including MCC, MNC and ISSI. ■Shortcuts To enhance operation convenience, you can assign your desired function to a specific key as shortcut. Then you can press the key to access a function easily. To create a shortcut 1.
-
Page 32: Options
Options 【Options】Menu for TMO 【Options】Menu for DMO In the home screen, press Options to access this menu. Here we are going to introduce all menu items based on TMO mode. Talk Group Under this option, you will see Selected List, Scan List, and one or more static folders created through programming software, as shown in following picture: Selected List Under this option, you can set a talk group as the default group. - Page 33 Scan List You can receive calls only from groups that are included in the scan list and have been attached successfully (indicated by the icon ). But you can always receive from the default group and the emergency group, regardless of the foregoing condition. After entering the scan list, you can perform the following operations: Scan On: to enable Scan feature and to attach all talk groups in the scan list;...
- Page 34 You can use this option to make your terminal work in DMO mode. In DMO mode, this option shall be TMO. Likewise, you can use it to make your terminal work in TMO mode. Language This option allows you to select your favorable language. Currently, this terminal only supports English and Simplified Chinese.
- Page 35 This option allows you to calibrate the time currently displayed on your terminal with GPS time, and is correlative to the Time Zone option. Data Transmit You may choose to transmit GPS data to an individual user, a group of users, or the control center.
-
Page 36: Troubleshooting
Troubleshooting Symptom Solution terminal Please check whether battery power is too low or whether powered on. the battery fails to function. Please check the signal strength and see whether your terminal is within the network coverage. Network registration fails or Contact the network administrator, and confirm network can not be found. -
Page 37: Care And Cleaning
receiving party varies. Check the signal strength in TMO mode. Check whether you are in a place where the signals Abnormal disconnection during can be shielded (such as basement and tunnel) and a call whether the other party is out of coverage. Check the battery strength. -
Page 38: Optional Accessories
LCY002 PC36 Tube (beige) EAN17 Note: Use the accessories specified by Hytera only. If not, Hytera shall not be liable for any losses or damages arising out of use of unauthorized accessories. Appendix 1 Input Method You can enter aliases, numbers or messages using the keypad. This terminal supports... - Page 39 (123). Switch of Input Method In input mode, press to switch to your desired input method. The appropriate symbol will appear on top right corner of the screen; Simplified Chinese Pinyin Enter the pinyin through alphanumeric keys; then a list of possible combinations and corresponding characters will appear;...
-
Page 40: Appendix 2 Ssi&Tsi Dialing Rules
In English/Number mode, long press to enter a space, and short press it to enter “*”; To enter a space in Simplified Chinese Pinyin mode, press and then select the space (the first one). Note: short press Back key to delete the entered character one by one, or long press it to delete all entered characters at a time. - Page 41 Note: MCC stands for Mobile Country Code, MNC stands for Mobile Network Code and ISSI stands for Individual Short Subscriber Identity.
Need help?
Do you have a question about the PT580H Plus F4 and is the answer not in the manual?
Questions and answers