Table of Contents
Advertisement
Quick Links
WARNING
.
edges in its unassembled state. Keep unassembled parts away from children
under 3 years of age.
If used improperly, your kitchen may be pulled over or fall, creating risk of injury
or damage. Children should not be permitted to climb or pull on the kitchen.
Use on level surfaces only!
Because this product needs assembly, it is prone to working itself loose from time
to time depending on the use. Please take the time to check that all connections
are still tight and working properly for the safety and enjoyment of your child.
This Naomi Kids product is intended for a specific age or older.
Parents or Guardians should supervise the play area in case younger children
have access to it and might climb on it.
See instructions included with the wall strap.
This product includes small parts, sharp points and sharp
CAUTION
Advertisement
Table of Contents

Related Manuals for Naomi Kids Gourmet Kitchen


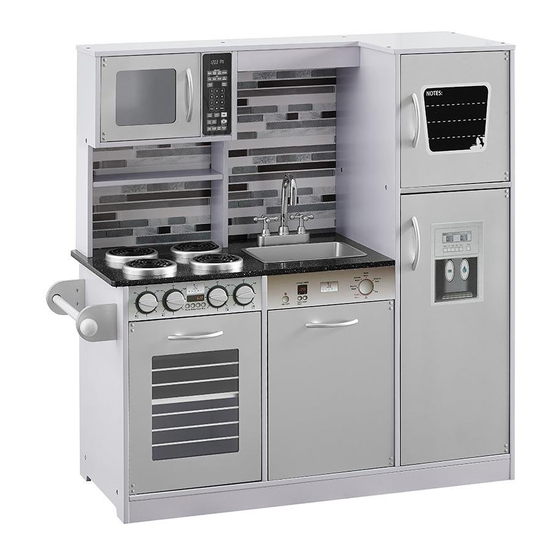
Summary of Contents for Naomi Kids Gourmet Kitchen
- Page 1 Please take the time to check that all connections are still tight and working properly for the safety and enjoyment of your child. This Naomi Kids product is intended for a specific age or older. Parents or Guardians should supervise the play area in case younger children have access to it and might climb on it.
- Page 4 Glider Spacer (x2) Plastic Gliders (x4) Counter Top (1) & Burners (x4) *See Next Page for Additional Hardware Freezer Door (x1)
- Page 5 M4 x 12mm M3 x 13mm M3 x 8mm Phillips Cone Screw (x6) M5 x 40mm Phillips Cone Screw (x32) Phillips Cone Screw (x10) Phillips Cone Screw (x52) Cam Bolt (x2) Female Lock (x4) Male Lock (x4) Cam Lock (x2) M6 x 25mm Wood Guide Pin (x27) Microwave Door Hinge Pin (x2)
- Page 8 (x4) (x8)
- Page 15 Note the drill hole at the top of part 15.
- Page 17 Insert Spacer 30 with I between the panel 2 and the plastic glider. Align drill holes and insert screw D. Repeat for panel 4 glider. No spacer needed on panel 3 gliders. Glider Spacer...
- Page 19 WARNING: The wall strap kit is only a deterrent, and it is not a substitute for proper adult supervision. 1. Attach one of the mounting brackets securely to the back edge of the top panel part 27. Install bracket to top of the unit. Use the shorter screw. 2.
Need help?
Do you have a question about the Gourmet Kitchen and is the answer not in the manual?
Questions and answers