Advertisement
Quick Links
ADULT ASSEMBLY REQUIRED.
CHOKING HAZARD. This product includes small parts, sharp points and sharp
edges in its unassembled state. Keep unassembled parts away from children
under 3 years of age.
If used improperly, your kitchen may be pulled over or fall, creating risk of injury
or damage. Children should not be permitted to climb or pull on the kitchen.
USE AND MAINTENANCE:
Use on level surfaces only!
Because this product needs assembly, it is prone to working itself loose from time
to time depending on the use. Please take the time to check that all connections
are still tight and working properly for the safety and enjoyment of your child.
PARENTAL SUPERVISION IS REQUIRED.
This Naomi Kids product is intended for a specific age or older.
Parents or Guardians should supervise the play area in case younger children
have access to it and might climb on it.
See instructions included with the wall strap.
Gourmet Kitchen
Page 01 of 20
PRN: AIM-27-3120w-NAI [13.09.23]
Advertisement

Related Manuals for Naomi Kids Gourmet Kitchen


Summary of Contents for Naomi Kids Gourmet Kitchen
- Page 1 PARENTAL SUPERVISION IS REQUIRED. This Naomi Kids product is intended for a specific age or older. Parents or Guardians should supervise the play area in case younger children have access to it and might climb on it.
- Page 2 Naomi Kids is committed to you and the safety of your children while delivering high quality products that will last. You can trust in Naomi Kids testing program to keep your growing child's mind and body safe from harm when you select a Naomi Kids product.
- Page 3 ASSEMBLY AT A GLANCE Please take a moment to read through the whole instruction booklet before assembly to familiarize yourself with this product. Once you feel ready to start, follow the instructions step by step and this should make this process as easy as we could make it for you. Due to the number of parts involved, assembly can take a few hours so set aside between 2 and...
-
Page 4: Component Parts
COMPONENT PARTS Wood Gliders (x4) Stove Control Panel (x1) Microwave Bottom (x1) Dishwasher Rack Oven Front/Back (x2) Door (x1) Shelf (x1) Dishwasher Rack Sides (x2) Bottom Left Faucet (x1) Panel (x1) Right Panel (x1) Dishwasher Rack (x1) Burners (x4) Fridge Shelves (x2) Towel Stove Rack (x1) Rack Supports (x2) - Page 5 ASSEMBLY HARDWARE M4 x 45mm Phillips Cone Screw (x43) M4 x 20mm Phillips Cone Screw (x22) M3 x 20mm Phillips Cone Screw (x22) M3 x 13mm Phillips Cone Screw (x20) M3 x 9mm Phillips Flat Screw (x40) M5 x 25mm Wood Guide Pin (x38) Hinge (x10) Cam Stud (x4) Cam Lock (x4)
- Page 6 PRE-ASSEMBLY PREP - HARDWARE ASSEMBLY Page 06 of 20...
- Page 7 PRE-ASSEMBLY PREP - HARDWARE ASSEMBLY Dishwasher side TURN OVER Stove side Page 07 of 20...
- Page 8 PRE-ASSEMBLY PREP - HARDWARE ASSEMBLY Male Lock Attachment Handle Attachment to Door (x5) (x5) Hinge Attachment to Door (x10) Page 08 of 20...
- Page 9 PRE-ASSEMBLY PREP - HARDWARE ASSEMBLY Please Note: Double check to make sure all the burners line up the same way. Top view Page 09 of 20...
- Page 10 ASSEMBLY INSTRUCTIONS Page 10 of 20...
-
Page 11: Assembly Instructions
ASSEMBLY INSTRUCTIONS Page 11 of 20... - Page 12 ASSEMBLY INSTRUCTIONS View of opposite angle Please note: After Step 8 is completed, please carefully lift up the unit from the top end so that it stands upright for Step 9. Make sure the area is clear so the unit stands flatly on the floor. Then proceed to Step 9.
- Page 13 ASSEMBLY INSTRUCTIONS Screw panel 15 into panel 17 first. Add Shelf 18 next and then attach Panel 16. Page 13 of 20...
- Page 14 ASSEMBLY INSTRUCTIONS Top view CAM LOCKING Inside view Page 14 of 20...
- Page 15 ASSEMBLY INSTRUCTIONS Place the wood dowels into the holes in the microwave side before installing the bolts in the step below. Inside view Page 15 of 20...
- Page 16 ASSEMBLY INSTRUCTIONS Page 16 of 20...
- Page 17 ASSEMBLY INSTRUCTIONS Page 17 of 20...
- Page 18 ASSEMBLY INSTRUCTIONS Hinge Attachment (x10) Page 18 of 20...
- Page 19 WALL STRAP BRACKET KIT For safe use of this kitchen we recommend that you secure it to the wall with the wall strap bracket kit included. To secure it to the wall, it is best to screw it into a wood stud but if that can't line up with the hole for the bracket on the back wall of the fridge/freezer, use the plastic wall anchor provided.
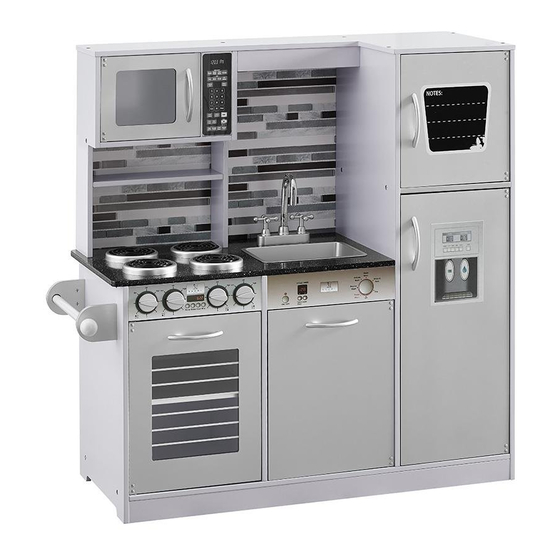
- Page 20 COMPLETED GOURMET KITCHEN Product Packaging Information Shipment info sticker goes here. www.NaomiHome.com MADE IN CHINA Page 20 of 20...
Need help?
Do you have a question about the Gourmet Kitchen and is the answer not in the manual?
Questions and answers