
Related Manuals for Kicker PWRA415


Summary of Contents for Kicker PWRA415
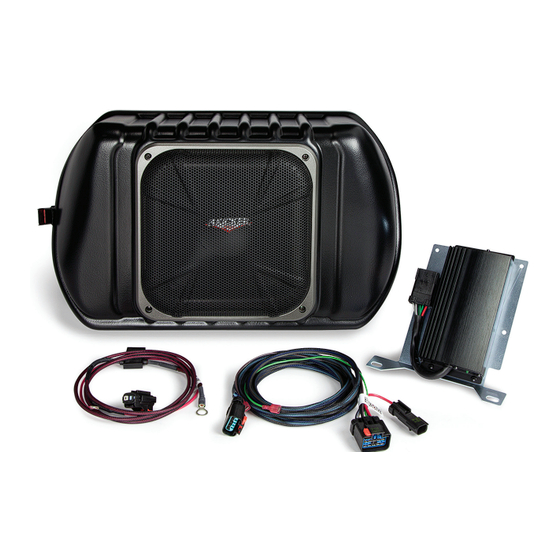
- Page 1 PWRA415 Designed for 2015 and newer Jeep® Wrangler four door with base audio T-TAP x2 10MM BOLT FUSE WIRE TIES x6 SUBWOOFER ASSEMBLY 200 WATT AMP/BRACKET POWER HARNESS OVERLAY HARNESS Page 1 of 10 ©2015 Stillwater Designs PWRA415-A1-20150224...
-
Page 2: Power Harness
POWER HARNESS 200W AMP/BRACKET ASSEMBLY OVERLAY HARNESS 10MM BOLT x2 FUSE WIRE TIES x6 INSTALLATION 1. Disconnect negative battery cable 2. Remove the rubber liner in the pocket above the radio to access the 7mm screw and remove the screw. Fig. 1 3. - Page 3 Fig. 3 Fig. 4 6. Pull the radio/instrument bezel straight back and remove from dash. Fig. 5 7. Remove the screws securing the radio and pull the radio from the dash and disconnect the wiring. Disconnect the antenna cable by pulling the locking antenna connector away from the radio. Caution: Pulling the antenna cable straight out of the radio without pulling on the locking antenna connector could damage the cable or radio.
- Page 4 Fig. 10 Fig. 9 13. Install the amp/bracket assembly into position as shown in Fig. 11 and secure the top of the amp bracket using the supplied 10mm bolts. 14. Secure the bottom of the amp bracket using the supplied ¼” screw. Fig. 12 Fig.
- Page 5 20. Install the subwoofer amplifier into position by lining up the holes in the amp bracket with the two holes for the bolts that retained the metal plate. Fig. 15 21. Install the supplied bolt into the bottom hole and leave loose. Fig. 16 Fig.
- Page 6 Fig. 18 Fig. 19 31. Remove the top of the fuse cover and using a socket and ratchet loosen and remove the nut on the positive battery accessory lug. Fig. 20 32. Connect the ring terminals of the power harnesses to the lug and retighten the nut. Torque to 10Nm. Fig.
- Page 7 Fig. 23 Fig. 24 37. Reinstall all previously removed parts in reverse order. 38. Run the wire harness along the floor under the rear seats to approximately the middle of the vehicle and pull the end of the harness under the seat to the cargo area. Fig. 25 39.
- Page 8 Troubleshooting the Kicker Integrated Systems If you experience a problem once the Subwoofer is installed use this guide to locate the trouble. The radio is working, but the Subwoofer is not working: • Check the battery voltage to make sure it is not discharged below 11 volts.
- Page 9 Symptom Possible Cause Solution Fuse not installed in inline Install fuse(s) into fuse holder(s). Refer to fuse holder on subwoofer instructions for correct placement and/or amp harness No Subwoofer Output Low battery voltage Recharge the battery Negative battery cable not Reconnect negative battery cable connected Power wire connector not...
- Page 10 If you continue to experience problems after troubleshooting with this list, please contact KICKER Technical Support at (800) 256-0808 ext. 6009, or support@kicker.com. P.O. Box 459 • Stillwater, Oklahoma 74076 • USA • (405) 624–8510 Page 10 of 10...
Need help?
Do you have a question about the PWRA415 and is the answer not in the manual?
Questions and answers