Table of Contents
Advertisement
Quick Links
Advertisement
Table of Contents

Subscribe to Our Youtube Channel
Related Manuals for Sangean RCR-4


Summary of Contents for Sangean RCR-4
- Page 1 RCR-4 Version 1...
-
Page 2: Important Safety Instructions
Important safety instructions 1. Read and understand all safety and operating instructions before the radio is operated. 2. Retain instruction: The safety and operating instructions should be retained for future reference. 3. Heed warnings. All warnings on the appliance and operating instructions should be followed. - Page 3 9. Power sources: The radio should be operated only from the type of power source indicated on the marking label. If you are not sure of the type of power supply to your home, consult your radio dealer or power company. 10.
- Page 4 14. Do not attempt to service the receiver yourself. Removing the cover may expose you to dangerous voltage, and will void the warranty. Refer all servicing to authorized service personnel. 15. Object and Liquid Entry-Never push objects of any kind into this radio through opening as they may touch dangerous voltage points or short-out parts that could result in a fire or electric shock.
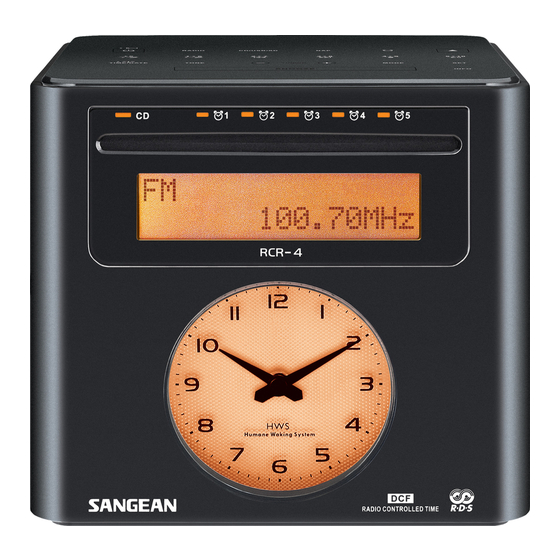
- Page 5 Controls Time/Date keys Power key Tone control key RADIO key Tuning Up and Down keys CD/USB/SD key NAP key Set key ALARM key Mode key Info key EJECT key Snooze key Presets and CD/USB/SD music playing control keys...
- Page 6 CD indicator Alarm indicators CD slot Display Clock...
- Page 7 Display backlight adjustment DCF (Auto Time setting) switch Time zone switch...
- Page 8 Volume control Earphone jack...
- Page 9 Antenna Line out jack AUX In jack Power connector...
-
Page 10: Operation
Operation Power on Connect the plug to a wall socket, then the clock shows 00:00. And the display shows “Clock not set”. Set TIME ZONE switch (on the bottom of the radio) to 0 position for regular case. Clock setting Clock Auto Setting 1. -
Page 11: Radio Operation
Clock manual setting (when there is no Radio Controlled Time service, please switch the DCF to OFF ) 1. Touch the TIME/DATE key then touch the SET key, to enter the time and date set up mode. And the year digits will flash. 2. - Page 12 B. Scan tuning 1. Touch the POWER key to turn on your radio. 2. Touch the RADIO key repeatedly to select AM (MW) or FM. 3. Touch the UP or DOWN keys for more 0.5 second and release, it will tune into the next frequency with reception. 4.
- Page 13 5. Touch UP or Down key to select the stations. The display shows such as: 6. To deactivate the recall ATS function, just touch the MODE key again, and the ATS station number will disappear. * ATS function can store up to 99 stations for each AM and FM. Radio Preset Memory –...
- Page 14 FM RDS The Radio Data System (RDS) is a system in which inaudible digital information in addition to the normal FM radio program is transmitted. Under FM band, it provides functions such as Clock Time, Program Type, Program Service and Radio Text message. * The information display is only available when the station provides R.D.S service.
-
Page 15: Alarm Operation
Alarm operation Alarm set up There are 5 alarms which can be set independently. The alarms have to be set after the clock time is set. 1. Touch the ALARM key then touch UP or Down key to select the alarm 1, 2, 3, 4, or 5 to set up the alarm. 2. -
Page 16: Snooze Function
How to deactivate alarms 1. Touch the ALARM key then touch UP or Down key to select the alarm (1, 2, 3, 4, or 5) which you would like to deactivate. 2. Touch the SET key, and then touch UP or Down key to set the alarm to be “OFF”. -
Page 17: Time Zone Setting
Sleep timer – radio auto shut off The Sleep timer can be set from 15-120 min. The radio will be switch off after the time you set has elapsed. 1. Touch and hold the POWER key for more than 2 seconds, until the required time period is shown on the display. - Page 18 CD operation This device is able to play CD-R and CD-RW discs containing MP3 and WMA files. In MP3 mode, a CD can have folders/albums, and a folder/album consists of tracks. (depends on how a CD is burned) 1. Insert an audio CD. The display will show “loading” and then “reading”...
- Page 19 5. Play mode: There are 7 modes of CD playing order. While the CD is playing, touch the MODE key repeatedly, and the display will orderly show the current mode as- (Repeat Track) - The CD player plays a single track repeatedly. (Repeat folder) - The CD player plays a single folder repeatedly.
- Page 20 USB and SD operation 1. Slot in an audio USB/SD card on the side of the radio, and the USB/SD will be played. 2. Play and stop USB/SD: a. Touch the key to pause the USB/SD playing; touch the key again to resume the USB/SD playing. b.
- Page 21 5. Play mode: There are 7 modes of CD playing order. While the CD is playing, touch the MODE key repeatedly, and the display will orderly show the current mode as- (Repeat Track) - The CD player plays a single track repeatedly. (Repeat folder) - The CD player plays a single folder repeatedly.
-
Page 22: Bass/Treble Adjustment
Bass/Treble adjustment 1. Touch the EQ key and touch UP or Down key to adjust the BASS. (-5 to +5) 2. Touch the EQ key again and touch UP or Down key to adjust the Treble. 3. Touch the EQ key to finish the setting. 24/12 hours format, year-month-date, AM, FM frequency step set up This function allows you to set up the format of 12/24 hour,... - Page 23 Display backlight adjustment Use the proper tool to adjust the Backlight adjustment.
-
Page 24: Headphone Socket
Headphone socket Plus in a headphone to the Headphone socket on the side of the radio, for headphone function, and the built-in radio speaker will be muted. AUX IN socket Plug in external audio devices such as CD player to the AUX IN socket (on the back of the radio), then play your device and touch the Radio key repeatedly until you see “AUX”...
Need help?
Do you have a question about the RCR-4 and is the answer not in the manual?
Questions and answers