Speakerbus iD808 User Manual
Hide thumbs
Also See for iD808:
- Quick start manual (2 pages) ,
- Quick start manual (2 pages) ,
- User manual (244 pages)
Table of Contents
Advertisement
Quick Links
Advertisement
Table of Contents

Related Manuals for Speakerbus iD808

Summary of Contents for Speakerbus iD808
-
Page 1: User Guide
User Guide Reordering Info: UG808/R20 (iD808 V3.1), Jan 2017... - Page 2 Speakerbus reserves the right to make changes to the products described in this document without notice. Speakerbus Technology Limited does not assume any liability that may occur due to the use or application of the product(s) describes herein. Revision History...
- Page 3 Revision History continued Dec 2015 iD808 User Guide Revision 16 Mar 2016 iD808 User Guide Revision 17 Sep 2016 iD808 User Guide Revision 18 Nov 2016 iD808 User Guide Revision 19...
-
Page 4: Table Of Contents
Instruction Symbols ..................16 Out of the Box ................17 Verify the Package Contents ................ 17 Introduction ................18 Features ......................18 iD808 Elements ................ 20 Front View ...................... 20 Fixed Function Keys ....................20 Rear View ....................... 21 Navigation Keys .................... 21 Screen Numbers ................... - Page 5 Menu Short Cut Keys ..................... 32 Fixed Function Keys ..................32 Getting Started ................. 33 Assembly ....................... 33 Turning on Your iD808 .................. 35 Logging On ....................35 Help in Your iD808 ..................35 Handsets ......................35 Making Calls ....................36 Answering Calls ....................
- Page 6 (Client Side) Conferences ............... 56 Meet Me Conference ..................57 Cisco (Server Side) Conferences ..............58 Mixing Cisco (Server Side) and iD808 (Client Side) Conferences ....59 Fast Conference ..................... 60 Ad-Hoc Conferencing (Avaya) ................63 Creating an Ad-Hoc Conference ............... 63 Ending an Ad-Hoc Conference ................
- Page 7 User Guide Muting a Call ....................67 Clearing a Call Log ..................67 Clearing all Call Logs ................... 67 Privacy ......................68 Making a Line Private ..................... 68 Turning off Line Privacy ..................68 Barging In ...................... 68 Hold ........................ 69 Placing a Call on Hold ....................
- Page 8 User Guide Speaker Channel Auto Answer ..............84 Directories and Contacts ............85 Adding Contacts to Personal Directory ............85 Personal Directory Properties ..............86 Adding Corporate Directory Users/Group Calls to Personal Directory ... 87 Adding Call List Numbers to Personal Directory ........87 Copy an Address to Personal Directory .............
- Page 9 User Guide Inserting Speed Dials ....................110 Deleting Speed Dials .....................110 Pause Feature .......................111 Lines ......................112 Line Types ......................112 Adding Lines ......................112 Line Key Properties ....................113 Editing Lines ......................114 Viewing Lines ......................115 Moving Lines ......................115 Inserting Lines .......................116 Deleting Lines .......................117 Speaker Channels ..................
- Page 10 User Guide Inserting Float Keys ..................... 139 Deleting Float Keys ....................140 Group Talk Keys ..................140 Adding a Group Talk Key ..................141 Group Talk Key Properties ................... 142 Editing a Group Talk Key ..................142 Viewing a Group Talk Key ..................143 Moving a Group Talk Key ..................
- Page 11 User Guide Activate Loud Listen ..................... 163 Audio Device ....................164 Intercom Talk Latching ................164 Hands-Free Microphone ................165 Environment ....................166 Environment Settings ................... 166 Engineering Tools ..................166 Logging into the Engineering Tools ..............167 Logging out of the Engineering Tools ..............167 Acoustic Shock Protection ................
- Page 12 User Guide Device Resync ..................... 183 Resync Device ..................... 184 Device IP Address ..................184 Accessing the Device IP Address Settings ............184 Device IP Address Settings .................. 185 iCMS Server ....................185 Accessing the iCMS Server Settings ..............185 iCMS Server Settings ...................
- Page 13 User Guide PBX Failover ................203 iD808 Intercom ............... 204 General Features ..................204 Intercom Appearances ..................204 Receiving a Call ....................204 User Busy ......................205 Mute ........................205 Mute During Call in Hands Free ..............205 Mute Handset / Headset During Call ............... 205 Adjust Volume ......................
- Page 14 User Guide Respond to Group Call Initiator ............... 224 Mixing Group Call (Conference) ................224 Making a Mixing Group Call using the Key Pad ..........224 Making a Mixing Group Call using the Directories .......... 225 Making a Mixing Group Call using Speed Dials ..........226 Talking on a Group Call ..................
-
Page 15: About This Guide
User Guide About this Guide Using this Guide Thank you for choosing the iD808 turret, also known as iD808 dealerboard, running the industry standard session initiation protocol (SIP) on IP based platforms. This unit provides business telephony features and functions such as call hold, conference, transfer and multiple call appearances. -
Page 16: Compatibility
User Guide Compatibility iD808 software version 3.1 is compatible with iManager Centralised Management System (iCMS) version 3.4. Instruction Symbols The following symbols appear in this user guide: Press the OK navigation key. Press the back/cancel navigation key. ▲ Press the up navigation key. -
Page 17: Out Of The Box
Connector Adapter (Converts RJ11 to RJ22) Anti Slip Mat 2103001 SAF808 iD808 Safety Sheet * QS808 iD808 Quick Start Guide * 1004087 iD808 Stand Instructions * ● Please note the above list only contains items that are packaged with the iD808 Deskstation as standard. -
Page 18: Introduction
The iD808 uses a host IP-PBX to reduce cost and back room infrastructure compared to traditional voice trading platforms. In addition to the above the iD808 includes IP intercom used to make and receive point to point and group calls. Features Colour schemes There are 16 different colour schemes that can be used for line labels. - Page 19 Speaker module A speaker module (iE801) can be attached to the iD808 to provide additional speaker channels. IP Intercom Functionality In addition to the Telephony the iD808 can be used to make and receive intercom point to point and group calls.
-
Page 20: Id808 Elements
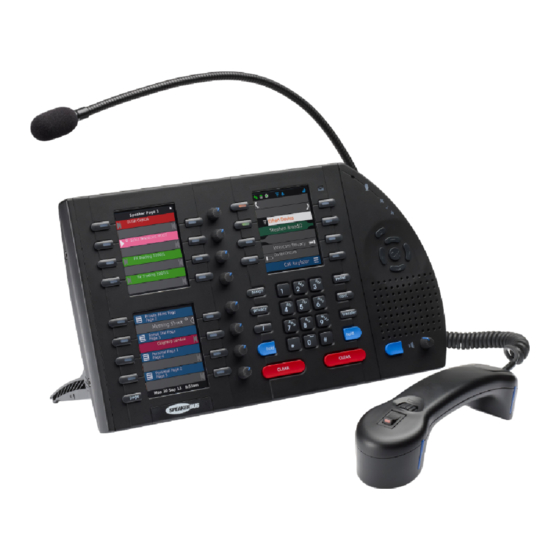
User Guide iD808 Elements Front View Individual Rotary Handset 2 Handset 1 Voice Message Soft Keys Soft Keys Volume Controls Soft Key Soft Key Waiting Indicator Internal Microphone Gooseneck Microphone Active Indicator Gooseneck Microphone Level Indicators Back Key Navigations Keys... -
Page 21: Rear View
User Guide Key Number Key Description Assign Redial Privacy Conference Intercom Transfer Hold Clear Rear View The above is for illustration purposes only, and may slightly differ from the physical model. Navigation Keys Go to the main menu or to select highlighted items. -
Page 22: Screen Numbers
User Guide Screen Numbers Screen 1 Screen 2 Screen 3 LEDs and Icons Microphone and Audio Level LEDs On when gooseneck microphone is operational. On when talking into microphone too loudly. (top) On when talking into the microphone at the correct level. -
Page 23: Line Key Leds And Icons
User Guide * For more information on the term, finger, see Finger on page 39. Line Key LEDs and Icons Flash Rate Colour State Icon Normal Requesting Private Private SOLID GREEN Connected SOLID GREEN Connected Conference SOLID GREEN Line Seized... -
Page 24: Handset Fixed Function Key Icons
User Guide Privacy modes do not affect LEDs. Handset Fixed Function Key Icons The handset keys share the following common icons. Note, these are reversed for handset 2 if used. Normal Variant Microphone/Handset Mute Variant Handset active and in focus... -
Page 25: Soft Key Icons
1 to 24. Soft Key Icons The soft keys on the iD808 are buttons, located alongside the finger displays, which performs a function dependent on the text/icon shown on the finger at that moment on the display. - Page 26 User Guide Description Icon Description Icon Bridge Call Anonymous Call Appearance Key Appearance Key (Active) (Active) (Inactive) (Inactive) Intercom Dynamic Key: Appearance Key Ringing Only (Active) (Inactive) Dynamic Key: On- Dynamic Key: Hold Only Busy Elsewhere Only Dynamic Key:...
-
Page 27: Directory Icons
User Guide Description Icon Description Icon Immediate Transfer Immediate Speed Dial: Home Transfer Speed Dial: Main Office Immediate Transfer Immediate Speed Dial: DDI Transfer Speed Dial: Mobile Immediate Transfer Speed Dial: General Voice Message Blank MRD Ring Key Temporary Mute... -
Page 28: Led Indicator Schemes
* This includes the situation where the microphone is open as a result of an active group talk. ** LED on scheme two is red when global muting is enabled and microphone is active on an iCS shared line on a speaker channel on another iD808 Deskstation. -
Page 29: Dynamic Speaker Channel Key Icons
User Guide Handset LED is always orange if in focus or red if muted. Dynamic Speaker Channel Key Icons Icon Status Icon Status Idle Seized Connecting Gooseneck Talk Speaker Channel on Handset 1 Speaker Channel Talk and Listen on Handset 2... -
Page 30: Icms Status
User Guide iCMS status State Colour State Description Good The iCMS connection is good. Warning The iCMS connection has some issues. The iCMS connection has serious issues. Unknown iCMS status is unknown. SIP registrar State Colour State Description Explanation... -
Page 31: Main Menu
User Guide Main Menu In idle mode the menu system is displayed by pressing OK. The iD808 consists of the following three main menus: Main, Program and Preferences & Tools. When the menu system is displayed, Main menu is the first menu displayed. -
Page 32: Menu Short Cut Keys
User Guide Menu Short Cut Keys Short cut keys provide an alternative method for accessing the menu system. The table below displays a list of menu short cut keys. The keys required for menu short cuts are the star (*) and numerical keys. These keys are located on the dial pad. -
Page 33: Getting Started
User Guide Getting Started Assembly 1. Insert the handset lead connectors into the ports labelled HS2 and HS1, located at the rear of the unit. 2. If you require a headset instead of a handset, insert the RJ22 adapter into the port labelled HS2 or HS1, located at the rear of the unit. - Page 34 User Guide 4. Insert and screw the microphone into the microphone port. 5. Insert one end of the network lead connector into the port labelled NET 1, located at the rear of the unit. Insert the other end into the main network.
-
Page 35: Turning On Your Id808
User Guide Turning on Your iD808 Your iD808 is turned on when it is plugged into the mains supply. A loading screen is displayed on the unit for approximately 90 seconds before it is fully turned on. Before you turn on your iD808 ensure all the steps in the Assembly section are undertaken. -
Page 36: Making Calls
Please contact your System Administrator for more information. Answering Calls The iD808 announces an incoming call with a ring, illuminating soft key and animated icon on the appearance finger. To answer a call: 1. Press the appropriate illuminating soft key. - Page 37 User Guide This will clear the call on the handset finger in focus. If a handset is being used and the Handset Mode is set to Push-to-answer (for more information, see Handset Mode Settings on page 157), the handset button can be used to clear calls.
-
Page 38: Preliminary Features And Functions
If the iD808 is attached to an iE816 Expansion Module, the page keys on the iE816 work an identical manner to the iD808. The keys paginate from left to right. The page key will only move through pages with configured fingers, and not empty pages. -
Page 39: Sub-Pages
User Guide pages. This can prove to be quick when accessing frequently used ◄ ► pages compared to using the page key and navigation keys. For example, pressing the Commodities page 1 page shortcut key displays the Commodities page 1 instantly. For more information on the page shortcuts, see Shortcut to Page on page 132. -
Page 40: Default Number
User Guide Default Number The default number is the first number highlighted in both the Personal Directory Details and Corporate Directory Details for call purposes. This is shown below: Personal Directory Details Corporate Directory Details Setting the Default Number To set a default address: 1. -
Page 41: Entering Symbols
User Guide in the bottom right hand of the screen), press and hold the key on the dial pad to select letters. 2. Press numbers repeatedly until the required character appears. 3. Press (which is located on the dial pad) to shift between capital and lower-case letters. -
Page 42: Changing Text Box Options
User Guide Changing Text Box Options The most straight forward method used when changing text ◄ box options, is to highlight the text box and use the ► ◄ ► navigation keys. For example, pressing the navigation keys on the Lines edit DISPLAY MODE option will change Two line to One line. -
Page 43: Adjust The Handset/Headset Volume Controls Through User Preferences
User Guide Adjust the Handset/Headset Volume Controls through User Preferences To change the handset/headset volume settings: 1. Press to display Main menu. The right hand screen displays Main menu. ◄ ► 2. Using locate Preferences & Tools menu. ▲... -
Page 44: Making And Answering Calls
1. Ensure the preferred handset is selected. If it is not press the associated soft key to select it. 2. Enter the telephone number, SIP URL (e.g. joe@speakerbus.com, joe@213.175.1.1) or IP address (e.g. 10.9.9.1) using the dial pad. The default or selected outgoing line is used as soon as you start dialling. -
Page 45: Make Call Using Speed Dial
For more information on creating lines, see Adding Lines on page 112. 3. Enter the telephone number, SIP URL (e.g. joe@speakerbus.com, joe@213.175.1.1) or IP address (e.g. 10.9.9.1) using the dial pad. The illustration below on the left is an example of what is displayed on the handset key whilst the call attempts to connect. -
Page 46: Make Call Using Private Lines
User Guide 1. Ensure the preferred handset is selected. If it is not press the associated soft key to select it. ▲ ▼ ◄ ► 2. If required, locate the page of the speed dial using navigation keys, or page shortcut keys. -
Page 47: Ringing An Mrd Channel
User Guide For information on how to ring a connected MRD channel, see Ringing an MRD Channel in the section below. Ringing an MRD Channel To ring an MRD Channel connected to a handset: 1. Press the Signal soft key. The Signal key will appear as the first available soft key. -
Page 48: Make Call Using Directories
User Guide from the list, and press OK. The illustration below on the left is an example of what is displayed on the handset key whilst the call attempts to connect. The illustration below on the right is an example of what is displayed on the outgoing line whilst the call attempts to connect. -
Page 49: Make Call To Default Number Using Corporate Directory
User Guide The illustration below on the left is an example of what is displayed on the handset key whilst the call attempts to connect. The illustration below on the right is an example of what is displayed on the outgoing line whilst the call attempts to connect. -
Page 50: Making Call To Default Number Using Personal Directory
User Guide 2. Press to display Main menu. The right hand screen displays Main menu. ▲ ▼ ensure Directories is highlighted and press OK. 3. Using The screen displays Directories. ▲ ▼ 4. Using highlight Personal Directory and press OK. -
Page 51: Make Call Using Call Register
User Guide page 85. The screen displays a list of all users. 5. Locate the appropriate name, highlight it and press the redial key (which is located near the dial pad), to dial the default number. For more information on default numbers, see Default Numbers on page 40. -
Page 52: Make Call Using Sip Url
They may appear greyed out if no missed or incoming calls have been received, or no outgoing calls have been made. The call register also appears greyed out when one logs off the iD808 unit, and then logs back on. This action clears all the records within the call register. -
Page 53: Answering Calls
User Guide Answering Calls The iD808 announces an incoming call with a ring, illuminating soft key and animated icon on the finger. To answer a call: To answer an incoming appearance call: 1. Press the appropriate illuminating soft key. -
Page 54: Call Pickup On Line Appearance
Dynamic Key Auto Refresh is set using iManager. For more information, see the iManager Administrator’s Guide. Screen Saver The iD808 Screen Saver Auto-Exit feature is controlled in iManager. When it is enabled the screen saver is active after the time set in the Screen Saver Timeout option (for example, after 10 minutes). -
Page 55: Call Handling
User Guide Call Handling Making a Call whilst on an existing one To make a call whilst on an existing one: 1. Select a handset currently not in use by pressing the associated soft key. 2. If required press an outgoing line otherwise one will be selected automatically. -
Page 56: Conferences
● Meet Me Conference - page 57) ● Cisco (Server Side) Conferences - (page 58) ● Mixing Cisco (Server Side) and iD808 (Client Side) Conferences - (page iD808 (Client Side) Conferences iD808 (Client Side) Conferences are hosted locally on the iD808 Deskstation. -
Page 57: Meet Me Conference
The conference creator is the only person able to add participants to the conference. ● An iD808 (Client Side) conference can accommodate a maximum of eleven members including the conference initiator. ● iD808 (Client Side) Conferences allows Hoots, manual ring downs and automatic ring downs to be conference participants. -
Page 58: Cisco (Server Side) Conferences
User Guide Joining a Meet Me Conference You can only join a Meet Me Conference after it has been set up. For more information on setting up a Meet Me Conference, see Setting up a Meet Me Conference in previous section. -
Page 59: Mixing Cisco (Server Side) And Id808 (Client Side) Conferences
(including Hoot, MRD and ARD participants). When the participant answers, press 5. Repeat the above step to add more participants. 6. To add a conference participant hosted on the iD808 (not including a Hoot, MRD or ARD participant), press to place the conference on hold. -
Page 60: Fast Conference
User Guide number. Use the * key on the dial pad to insert the front slash (/). When the participant answers, press conf.. 7. Repeat the above step to add more participants (hosted on the iD808) to the mixed conference. ●... - Page 61 User Guide line appearance 3. Call the second participant. In our example below the called participant is ‘Tiger Woods’. handset appearance line appearance 4. Place the second participant on hold by pressing the hold key for the appropriate handset. In our example ’Tiger Woods’ is placed on hold.
- Page 62 User Guide line appearances 9. Add the second and third participants to the conference by simply pressing their line appearances’ soft key. In our example Tiger Woods and Roger Federer’s soft keys are pressed. line appearances 10. When you have finished adding the participants to the conference press conf..
-
Page 63: Ad-Hoc Conferencing (Avaya)
User Guide the appearance on the handset has been added to the conference. The handset’s state will also change from displaying Lewis Hamilton to the Conference appearance which was previously in an on hold state. All participants can now talk and listen in the conference. -
Page 64: Ending An Ad-Hoc Conference
User Guide handset appearance call appearance conf. 4. To add a third participant, press and call the next participant. When the participant answers, press conf.. 5. Repeat the above step to add more participants. Ending an Ad-Hoc Conference To end an ad-hoc conference: 1. - Page 65 User Guide State: On Hold State: Transfer 2. Do one of the following: ● Dial the required address using the dial pad. ● Locate and press the required speed dial. ▼ ● Press to highlight Directories in the right hand screen ● Press to enter the Directories.
-
Page 66: Immediate Transfer Speed Dial
User Guide Immediate Transfer Speed Dial An Immediate Transfer Speed Dial when pressed allows one to perform an unattended call transfer during a call. The call is transferred to the destination mapped on the Immediate Transfer Speed Dial. By simply pressing an Immediate Transfer Speed Dial’s soft key performs an unattended transfer. -
Page 67: Muting A Call
User Guide Muting a Call To mute a call: 1. Press the appropriate handset soft key once on the unit or press the button on the appropriate handset (if enabled). A red circle is displayed on the selected handset icon. -
Page 68: Privacy
User Guide Privacy A telephony, manual ringdown (MRD) or automatic ring down (ARD) call can be made private when two parties are engaged on a call. When activated no other party can join the call. If a call was made between two parties and a third party barges into the call, it will not be possible to activate the privacy function. -
Page 69: Hold
User Guide is displayed on. If the icon below is displayed whilst attempting to barge in, it means the line has privacy enabled. You will therefore not be able to barge into the line. The icon below is only displayed for a few seconds. -
Page 70: Removing A Call On Hold
User Guide Removing a Call on Hold To remove a call on hold: 1. Ensure the appropriate handset is selected. 2. Press the illuminating soft key associated with the call on hold. Moving Calls Between Handsets To successfully perform this function, please ensure the Move To Idle Handset option (within Call Preferences) is set to Move Call. - Page 71 User Guide handset appearance). 2. Press the idle handset’s soft key twice. Press the idle handset soft key followed by pressing the active appearance key. The call will now be present on both handsets. In the illustration below the...
-
Page 72: Speakers
User Guide Speakers Open Speaker Open speaker allows you to listen to calls in a hands-free manner. It can be activated both during a call and in idle mode. Turning on Open Speaker To turn on open speaker: 1. Ensure the appropriate handset is selected by pressing the left or right handset soft key. -
Page 73: Assigning A Call/Line, Ard, Vpw Or Intercom Appearance To A Speaker Channel
User Guide Assigning a Call/Line, ARD, VPW or Intercom Appearance to a Speaker Channel To assign a call/line, ARD, VPW or Intercom Appearance to a speaker channel key: 1. Ensure the appropriate handset is selected by pressing the left or right handset soft key. -
Page 74: Assigning A Hoot To A Speaker Channel
User Guide An occupied speaker channel has an (a) idle call/line, ARD, VPW or Intercom appearance, or (b) MRD or Hoot attached to it. With the exception of MRDs and Hoots, an occupied idle speaker channel will be over written and lost when a new call/line, ARD, MRD, Hoot, VPW or Intercom is assigned to it. -
Page 75: Speaking On Speaker Channels
User Guide 1. Press the appropriate speaker channel’s soft key twice in quick succession. Press the assign key which is located near the dial pad, followed by pressing the associated speaker’s soft key. Speaking on Speaker Channels One can speak on a speaker channel using either the latched or push to talk method. -
Page 76: Hoot/Mrd Appearances
User Guide Hoot/MRD Appearances To speak on a speaker channel using push-to-latch on a Hoot/MRD appearance: 1. Locate the appropriate speaker channel. The speaker channel will contain the icon displayed below. Please note the appearance name, John Smith, in the illustration below is used for example purposes only. -
Page 77: Hoot/Mrd Appearances
User Guide 3. Talk into microphone. Remember that you have to be in close proximity to the microphone to be heard clearly. 4. Press and release the associated soft key when finished talking. The speaker channel’s state changes back from active to mute. -
Page 78: Hoot/Mrd Appearances
User Guide The icon in the above illustration indicates the microphone is muted. 2. Press and hold down the soft key associated with the speaker channel. The icon in the above illustration changes to the icon displayed in the illustration below, indicating the microphone is now active. -
Page 79: Ending An Active Appearance (Call/Line, Vpw, Ard Or Intercom) On A Speaker Channel
● one logs off the unit and then logs back on, and ● the iSeries centralised management system (the platform the iD808 performs on) is updated. The method explained in this section is also required for clearing MRD and Hoot appearances off speaker channels. -
Page 80: Persistence Of Speaker Channels
ARDs and VPWs. Appearances remain on speakers channels after an iD808 Deskstation is re-powered, iCMS server update and when one logs off and then logs back onto an iD808. -
Page 81: Speaking On A Group Talk Key
Persistent speaker channel appearances save time when one locates frequently used appearances. Rather than searching for particular appearances using the paging method (described in the iD808 Deskstation User Guide), one can access appearances very quickly if they are assigned to speaker channels. -
Page 82: Tap-Latch
User Guide ● If when pressing the group talk soft key the message, Key not programmed, is displayed add speaker channels to the group key. For more information, see Adding Speaker Channels to a Group Talk Key on page 140. -
Page 83: Push To Talk
User Guide 2. Press and hold down the soft key associated with the group talk key. The icon changes as shown in the illustrations below, indicating the microphone is now active. Please note the appearance name, John Smith, in the illustration below is used for example purposes only. -
Page 84: Speaker Channel Auto Answer
User Guide the microphone to be heard clearly. 4. Release the group talk’s associated soft key when finished talking. The speaker channel’s state changes back from active to mute (in the case of calls/lines, ARDs and VPWs) or from active to idle (in the case of MRDs and Hoots). -
Page 85: Directories And Contacts
The Edit, Add, Delete and Copy options in the Personal Directory Options are greyed out when the Allow Personal Directory Editing option in iManager (the management application used to manage iD808 Deskstations) is not selected. Please contact your System Administrator for more information. -
Page 86: Personal Directory Properties
User Guide Change the settings as required. For more information on the settings, see the next section Personal Directories Properties. 6. When you have finished highlight Save and press OK. Personal Directory Properties Below is an illustrative example image of the Add Personal Entry screen with descriptions and explanations of the settings. -
Page 87: Adding Corporate Directory Users/Group Calls To Personal Directory
The Copy option in the Corporate Directory Options are greyed out when the Allow Personal Directory Editing option in iManager (the management application used to manage iD808 Deskstations) is not selected. Please contact your System Administrator for more information. Adding Call List Numbers to Personal Directory A call list number is a number available from the call register. -
Page 88: Copy An Address To Personal Directory
The Copy option in the Call Register Options are greyed out when the Allow Personal Directory Editing option in iManager (the management application used to manage iD808 Deskstations) is not selected. Please contact your System Administrator for more information. Copy an Address to Personal Directory It is possible to copy an address from an existing contact located in the personal directory. -
Page 89: Editing Personal Directory Contacts
The Copy option in the Personal Directory Options are greyed out when the Allow Personal Directory Editing option in iManager (the management application used to manage iD808 Deskstations) is not selected. Please contact your System Administrator for more information. Editing Personal Directory Contacts To edit a personal directory contact: 1. -
Page 90: Removing Contacts From Personal Directory
The Edit option in the Personal Directory Options are greyed out when the Allow Personal Directory Editing option in iManager (the management application used to manage iD808 Deskstations) is not selected. Please contact your System Administrator for more information. Removing Contacts from Personal Directory To remove a contact from your personal directory: 1. -
Page 91: Programming
User Guide Programming This section describes how to create, edit, view and delete keys on the iD808 Deskstation. It firstly describes commen key properties and items for all key types in the section below. Key Properties This section describes the properties and items that are common to all keys regardless of their type. -
Page 92: Pagination And Non Pagination Keys
User Guide Pagination and Non Pagination Keys A non paginating key has a fixed location and is always visible regardless of what page is displayed. A non pagination key is added when a pagination key is deleted. Adding a Pagination Key To add a pagination key: 1. -
Page 93: Dynamic Keys
User Guide 5. Highlight Paginating Key and press OK. This displays Key Finder. 6. Locate the required key (highlighted in purple), and press its associated soft key. To access keys on screen one (see Screen Numbers on page 22) whilst Key Finder is displayed, press OK. -
Page 94: Moving A Dynamic Key
User Guide ● Ringing only - Displays incoming call alerts on a dynamic key. ● On-hold only - Displays calls in an on-hold state (including calls on- hold elsewhere) on a dynamic key. ● Busy-elsewhere only - Displays a shared line that is busy elsewhere on a dynamic key. -
Page 95: Editing A Dynamic Key
User Guide ▲ ▼ 3. Using highlight Special Keys and press OK. This displays Program Options. Highlight Move and press OK. This displays Key Finder. 5. Locate the key that needs to be moved, and press its associated soft key. -
Page 96: Viewing A Dynamic Key
User Guide 6. Change the settings as required. For more information on the settings, see Dynamic Keys Properties on page 93. 7. When you have finished highlight Save, and press OK. 8. If you need to edit more dynamic keys locate the required dynamic key, and press its associated soft key. -
Page 97: Alerts
Alerts Alerts are used to indicate incoming calls through ring tones and visual alarms. The iD808 contains 16 different ring tones. Different ring tones can be set on different keys. Additionally, the unit accommodates visual ring alerts on the screens. -
Page 98: Setting The Default Alert Profile
User Guide incoming ringing is heard regardless if it is not set in the profile. The default alert profile and priority is used when the appearance has alerting turned off. When set to Disabled, nothing happens. For more information on alert profiles and status, see Editing an Alert Profile on page 98 and Alert status on page 30. - Page 99 User Guide The Edit Alert Profile screen contains the following options: ● SELECT ALERT PROFILE - Profiles are used to distinguish incoming alerts from one another. Profiles make it possible for a virtual private wires, for example, to ring with one ringtone and another with a different tone.
-
Page 100: Alert Page
User Guide ● When the above properties are set as desired, highlight Save and press ● The Edit Alert Profile menu option within the Program Alerts menu is greyed out when the Allow Alert Profile Editing privilege is not selected within iManager. -
Page 101: Setting An Alert Key
6. Set the Ringing option to Off for no ringing, On for ringing or No change. Refer to the table at the end of this section to determine how the iD808 works, when the Ringing option is set with the Alert Profile Settings. -
Page 102: Speed Dials
A speed dial allows one to make a call by simply pressing a single soft key which is associated with the speed dial appearance. This facility is particularly useful for iD808 users who dial certain numbers on a regular basis. In most circumstances, users store regularly used numbers/contacts in the their Personal Directory. -
Page 103: Speed Dial Types
User Guide speed dial. Speed Dial Types The iD808 supports several speed dial types. The different speed dials and their icons are listed and briefly described below. Speed Dial: General Speed Dial: Mobile Speed Dial: Group Speed Dial: Call Number... -
Page 104: Adding Corporate Directory Contacts To Speed Dials
User Guide This displays Speed Dial Edit. 6. Change the settings as required. For more information on the settings, see Speed Dial Key Properties on page 106. 7. When you have finished highlight Save, and press OK. 8. If you need to add more speed dials locate an available key, and press its associated soft key. -
Page 105: Adding Personal Directory Contacts To Speed Dials
User Guide This displays Speed dial Edit. 8. Change the settings as required. For more information on the settings, see Speed Dial Key Properties on page 106. 9. When you have finished highlight Save, and press OK. Adding Personal Directory Contacts to Speed Dials To add a personal directory contact to a speed dial: 1. -
Page 106: Speed Dial Key Properties
User Guide 8. Change the settings as required. For more information on the settings, see Speed Dial Key Properties on page 106. 9. When you have finished highlight Save, and press OK. Speed Dial Key Properties Below is an illustrative example image of the Speed Dial Key screen with descriptions and explanations of the settings. -
Page 107: Editing Speed Dials
User Guide DISPLAY MODE is set to Two line. ● CALL TYPE - This option is used to set the speed dial type and contains the following: General, Main Office, DDI, Mobile, Home, Intercom, Tone To Line and Group. -
Page 108: Viewing Speed Dials
User Guide This displays Speed dial Edit. Please note that the speed dial icon in the above illustration is one of seven speed dial icons. Please refer to the Soft Key Icons section on page 25 for more information on all the speed dial icons. -
Page 109: Moving Speed Dials
User Guide above illustration is one of seven speed dial icons. Please refer to the Soft Key Icons section on page 25 for more information on all the speed dial icons. ▲ ▼ 6. Use to view the speed dial options. -
Page 110: Inserting Speed Dials
User Guide press its associated soft key. Locate a new key and press the associated soft key. When you have moved the required number of speed dials press and hold the back (Q) key until screen one returns to an idle state. -
Page 111: Pause Feature
User Guide The right hand screen displays Main menu. ◄ ► 2. Using the locate the Program menu. ▲ ▼ 3. Using the highlight Speed Dials and press OK. This displays the Program Options menu options. 4. Highlight Delete and press OK. -
Page 112: Lines
User Guide information on how to use speed dials, see Speed Dials on page 102. Lines Line Types The lines menu option is used to define the following: line appearance, bridge line appearance, call line appearance, ARD appearance, MRD appearance, Hoot appearance and Intercom appearance. -
Page 113: Line Key Properties
User Guide This displays Line Edit. 6. Change the settings as required. For more information on the settings, see the next section, Line Key Properties. 7. When you have finished highlight Save, and press OK. 8. If you need to add more lines locate an available line key, and press its associated soft key. -
Page 114: Editing Lines
User Guide ● PROFILE - This option is used to set an alert profile. In total there are thirty two profiles. Each profile can be customised in the Edit Alert Profile screen. Settings such as the ringtone can be set for each profile. It is essentail that the alert profile is customised as all of the profiles are set to the same ringtone by default. -
Page 115: Viewing Lines
User Guide press and hold the back (Q) key until screen one returns to an idle state. Viewing Lines To view a line key: 1. Press to display Main menu. The right hand screen displays Main menu. ◄ ►... -
Page 116: Inserting Lines
User Guide ◄ ► 2. Using locate Program menu. ▲ ▼ highlight Lines and press OK. 3. Using This displays Program Options. 4. Highlight Move and press OK. This displays Key Finder. 5. Locate the key that needs to be viewed and press its associated soft key. -
Page 117: Deleting Lines
User Guide 6. Change the settings as required. For more information on the settings, see Line Key Properties on page 113. 7. When you have finished highlight Save, and press OK. 8. If you need to insert more lines locate the required line, and press its associated soft key. -
Page 118: Speaker Channels
Adding Speaker Channels It is possible to define eight of the sixteen channels as speaker channels on iD808 screens two and three (four channels on each screen). For more information on screen numbers, see Screen Numbers on page 22. Speaker channels can only be created on non paginating keys. -
Page 119: Speaker Channel Key Properties
User Guide The Add option for speakers are greyed out when the Allow Fixed Key Editing privilege in iManager is not selected. For more information, contact your System Administrator. Speaker Channel Key Properties Below is an illustrative example image of the Speaker Channel Key screen with descriptions and explanations of the settings. -
Page 120: Editing Speaker Channels
User Guide Selecting Yes enables the speaker paging facility. For more information on speaker paging, see Speaker Page on page 177. ● PRIORITY (PAGE X) - This option contains the values 1 to 4. 1 is the highest priority, and 4 is the lowest. The same priority level can also be set for different channels, for example, channels one and two can be both set to priority level 1. -
Page 121: Moving Speaker Channels
User Guide 6. Highlight Save and press OK. 7. If you need to edit more speaker channels locate the required speaker channel, and press its associated soft key. When you have edited the required number of speaker channels press and hold the back (Q) key until screen one returns to an idle state. -
Page 122: Deleting Speaker Channels
User Guide The right hand screen displays Main menu. ◄ ► 2. Using locate Program menu. ▲ ▼ 3. Using highlight Speakers and press OK. This displays Program Options. 4. Highlight View and press OK. This displays Key Finder. -
Page 123: Virtual Private Wires
● Two line - This option displays the text label in large text. ● STYLE - This option contains sixteen different colours for the virtual private wire key. ● SHORT LABEL - This is a read only label originally set in iManager the application used to manage iD808 Deskstations. -
Page 124: Moving Virtual Private Wires
User Guide ● ALERT - This setting contains the options On and Off. Alerts provide audio and visual alarms when incoming calls are received. Alerts need to be set beforehand in the Alerts menu. For more information, see Alerts on page 104. -
Page 125: Viewing Virtual Private Wires
User Guide ◄ ► 2. Using locate Program menu. ▲ ▼ highlight Virtual Private Wires and press OK. 3. Using This displays Program Options. 4. Highlight Edit and press OK. This displays Key Finder. 5. Locate the key that requires editing and press its associated soft key. The key will have the icon displayed below in the finger. -
Page 126: Shortcut To Menu
User Guide 4. Highlight View and press OK. This displays Key Finder. 5. Locate the key that needs to be viewed and press its associated soft key. The key will have the icon displayed below in the finger. The key will have the icon displayed below in the finger. -
Page 127: Shortcut To Menu Properties
User Guide This displays Add Key. 5. Highlight Shortcut to Menu and press OK. This displays Key Finder. 6. Locate a key and press its associated soft key. If required use the Page ▲ ▼ key (located in the bottom left corner of unit) or navigation keys ( ◄... -
Page 128: Editing A Shortcut To Menu Key
User Guide ● Two line - This option displays the text label in large text. ● STYLE - This option contains sixteen different colours for the shortcut to menu key. ● MENU SHORTCUT - Contains the following menus and allows one to be selected as the shortcut: Directories Menu, Call Register, Call Forward Menu, Speaker Page Menu and Missed Calls. -
Page 129: Moving A Shortcut To Menu Key
User Guide the above section, Shorcut to Menu Properties. 7. Highlight Save and press OK. 8. If you need to edit more shortcut to menu keys locate the required key, and press its associated soft key. When you have edited the required number of shortcut to menu keys press and hold the back (Q) key until screen one returns to an idle state. -
Page 130: Viewing A Shortcut To Menu Key
User Guide key. The feature is only available for paged key entries. To insert a shortcut to menu key: 1. Press to display Main menu. The right hand screen displays Main menu. ◄ ► 2. Using locate Program menu. -
Page 131: Deleting A Shortcut To Menu Key
User Guide ▲ ▼ 3. Using highlight Special Keys and press OK. This displays Program Options. 4. Highlight View and press OK. This displays Key Finder. 5. Locate the key that needs to be viewed and press its associated soft key. -
Page 132: Shortcut To Page
User Guide This displays Program Options. 4. Highlight Delete and press OK. This displays Delete Key. 5. Highlight Shortcut to Menu and press OK. This displays Key Finder. 6. Locate the key that needs to be deleted and press the associated soft key. -
Page 133: Shortcut To Page Key Properties
User Guide 5. Highlight Shortcut to Page and press OK. This displays Key Finder. 6. Locate a key and press the associated soft key. If required use the Page ▲ ▼ key (located in the bottom left corner of unit) or navigation keys ( ◄... -
Page 134: Editing A Shortcut To Page Key
User Guide Editing a Shortcut to Page Key To edit a shortcut to page key: 1. Press to display Main menu. The right hand screen displays Main menu. ◄ ► 2. Using locate Program menu. ▲ ▼ 3. Using highlight Special Keys and press OK. -
Page 135: Inserting A Shortcut To Page Key
User Guide ◄ ► 2. Using locate Program menu. ▲ ▼ highlight Special Keys and press OK. 3. Using This displays Program Options. 4. Highlight Move and press OK. This displays Key Finder. 5. Locate the key that needs to be moved and press its associated soft key. -
Page 136: Viewing A Shortcut To Page Key
User Guide 7. Change the settings as required. For more information on the settings, see Shortcut to Page Key Properties on page 133 8. Highlight Save and press OK. 9. If you need to insert more shortcut to page keys locate the required shortcut to page key, and press its associated soft key. -
Page 137: Deleting A Shortcut To Page Key
User Guide ▲ ▼ 6. Use the navigation keys to view the options. 7. To view another shortcut to page key press the back (Q) key to display Key Finder. Then press the required shortcut to page key’s associated soft key. -
Page 138: Float Keys
If a non paginating key cannot be relocated from the iE816 Expansion Module to iD808 Deskstation (for example, due to there not being enough float keys), a yellow status icon is displayed on the iD808 screen. For more information on status icons, see Status Icons on page 29. -
Page 139: Inserting Float Keys
User Guide This displays Add Key. 5. Highlight Float Key and press OK. This displays Key Finder. 6. Locate a key and press its associated soft key. If required use the Page ▲ ▼ key (located in the bottom left corner of unit) or navigation keys ( ◄... -
Page 140: Deleting Float Keys
User Guide Deleting Float Keys To delete a float key: 1. Press to display Main menu. The right hand screen displays Main menu. ◄ ► 2. Using locate Program menu. ▲ ▼ 3. Using highlight Special Keys and press OK. -
Page 141: Adding A Group Talk Key
User Guide displayed it means no speaker channels are linked to the group talk key. Group talk keys will not answer PBX appearances (for example calls/lines), VPWs and ARDs. They need to be answered before one can use the group talk function. -
Page 142: Group Talk Key Properties
User Guide 7. Change the settings as required. For more information on the settings, see the next section, Group Talk Key Properties. 8. When you have finished highlight Save, and press OK. 9. If you need to add more group talk keys locate an available key, and press its associated soft key. -
Page 143: Viewing A Group Talk Key
User Guide ▲ ▼ 3. Using highlight Special Keys and press OK. This displays Program Options. 4. Highlight Edit and press OK. This displays Key Finder. 5. Locate a key and press its associated soft key. If required use the Page ▲... -
Page 144: Moving A Group Talk Key
User Guide ▲ ▼ key (located in the bottom left corner of unit) or navigation keys ( ◄ ► and/or ) for alternative pages. To access keys on screen one (see Screen Numbers on page 22) whilst Key Finder is displayed, press OK. -
Page 145: Inserting A Group Talk Key
User Guide 7. If you need to move more group talk keys locate the required group talk key, and press its associated soft key. Locate a new key and press the associated soft key. When you have moved the required number of group talk keys press and hold the back (Q) key until screen one returns to an idle state. -
Page 146: Deleting A Group Talk Key
User Guide Deleting a Group Talk Key To delete a group talk key: 1. Press to display Main menu. The right hand screen displays Main menu. ◄ ► 2. Using locate Program menu. ▲ ▼ 3. Using highlight Special Keys and press OK. -
Page 147: Removing Speaker Channels From A Group Key
The Program Group menu is disabled when an iE801 Speaker Module is attached to the iD808 Deskstation. In these circumstances speaker channels on the iD808 need to be programmed using the F2 key on the iE801. For more information, see the iE801 User Guide. -
Page 148: Function Keys
User Guide 5. Locate a speaker channel and press its associated soft key. The soft key LED is turned off when the speaker channel soft key is pressed. 6. Repeat the previous step to remove more speaker channels from the group talk key. -
Page 149: Function Key Properties
User Guide 7. Change the settings as required. For more information on the settings, see the next section, Function Key Properties. 8. When you have finished highlight Save, and press OK. 9. If you need to add more function keys locate an available key, and press its associated soft key. -
Page 150: Editing Function Keys
User Guide Intercom Privacy Enabled ● Do Not Disturb - This option when enabled displays a visual alert of incoming telephony calls with the alert tone muted. Do Not Disturb Disabled Do Not Disturb Enabled ● Recording Tone - This option, when enabled transmits an audible... -
Page 151: Moving Function Keys
User Guide 5. Highlight Function Key and press OK. This displays Key Finder. 6. Locate an available key and press its associated soft key. If required use the Page key (located in the bottom left corner of unit) or navigation keys ▲... -
Page 152: Inserting Function Keys
User Guide Screen Numbers on page 22) whilst Key Finder is displayed, press OK. 6. Locate a new key and press the associated soft key. 7. If you need to move more function keys locate the required group talk key, and press its associated soft key. -
Page 153: Viewing Function Keys
User Guide its associated soft key. When you have inserted the required number of function keys press and hold the back (Q) key until screen one returns to an idle state. Viewing Function Keys To view a function key: 1. - Page 154 User Guide ▲ ▼ 3. Using highlight Special Keys and press OK. This displays Program Options. 4. Highlight Delete and press OK. This displays Delete Key. 5. Highlight Function Key menu and press OK. This displays Key Finder. 6. Locate the key that needs to be deleted and press the associated soft key.
-
Page 155: Preferences
User Guide Preferences Views The details contained in the Directories and Call Register menu options, can be change visually. There are three settings: Big Text, Small Text and Detail View. ● Big Text - This view setting displays user names in large text. -
Page 156: Key Press Tones
User Guide ▲ ▼ 5. Using the select one of the options and press OK. Press one of the corresponding numbers on the dial pad, for example, press 1 for Big Text or 2 for Small Text. Key Press Tones To turn on key press tones: 1. -
Page 157: Handset Mode Settings
User Guide Handset Mode Settings This section describes each handset mode: ● Push-to-mute - When this option is enabled the handset button needs to be pressed and held down to mute the handset. The handsets are also immediately placed in an un-muted state when this option is set. - Page 158 User Guide hidden / locked menu icon The auto hide feature can be temporarily disabled by pressing when an incoming alert is present. When pressed the screen will change from displaying the incoming alert back to showing the previously displayed menu.
-
Page 159: Turning On/Off Auto Hide
User Guide Turning on/off Auto Hide To turn on/off auto hide: 1. Press to display Main menu. The right hand screen displays Main menu. ◄ ► 2. Using locate Preferences & Tools menu. ▲ ▼ 3. Using highlight User Settings and press OK. -
Page 160: Method 2
User Guide 7. Highlight Save and press OK. If the Do not disturb option is read only this means the setting has been disabled. Please contact your System Administrator to enable it. Method 2 To activate the do not disturb feature: 1. -
Page 161: Method 2
User Guide 1. Press to display Main menu. The right hand screen displays Main menu. ◄ ► 2. Using locate Preferences & Tools menu. ▲ ▼ 3. Using highlight Call Settings and press OK. This displays Call Settings. 4. Highlight Call Preferences and press OK. -
Page 162: Quiet Office
User Guide To the default handset: 1. Press to display Main menu. The right hand screen displays Main menu. ◄ ► 2. Using locate Preferences & Tools menu. ▲ ▼ 3. Using highlight Call Settings and press OK. This displays Call Settings. -
Page 163: Activate Loud Listen
User Guide allows another party (other than the party on the handset/headset) to hear the received audio discreetly. Activate Loud Listen Method 1 To activate loud listen: 1. Press to display Main menu. The right hand screen displays Main menu. -
Page 164: Audio Device
User Guide Audio Device This option sets the audio ports to either handset or headset. To set the audio ports: 1. Press to display Main menu. The right hand screen displays Main menu. ◄ ► 2. Using locate Preferences & Tools menu. -
Page 165: Hands-Free Microphone
User Guide To turn on/off Intercom Talk Latching: Press to display Main menu. The right hand screen displays Main menu. ◄ ► 2. Using locate Preferences & Tools menu. ▲ ▼ 3. Using highlight User Settings and press OK. -
Page 166: Environment
● Trader 2 - This setting does not remove background sound during a call at the far end when an iD808 caller is not talking. The far end caller will hear all background noise when the iD808 caller stops talking. -
Page 167: Logging Into The Engineering Tools
Engineering Tools and press OK. This displays Engineering Tools. 4. Highlight Log out and press OK. Acoustic Shock Protection The acoustic shock protection setting must always be turned on, in order to comply with standard BS6317 for Speakerbus approved handsets/headsets. -
Page 168: Transmit Gain Offset
User Guide The setting is turned on by default, and therefore, should not require one to alter it. To ensure the acoustic shock protection setting is turned on: 1. Press to display Main menu. The right hand screen displays Main menu. -
Page 169: Call Forward
User Guide ◄ ► 6. Highlight TRANSMIT GAIN OFFSET and alter the levels using The level range is -5 to 5. 7. Highlight Save and press OK. Call Forward To access call forward settings: 1. Press to display Main menu. -
Page 170: Call Preferences
For iCS calls, calls are forwarded to the call forward address when the called unit is not answered after ten seconds. ● Call forward on busy - An iD808 is busy when all the appearances are in use. The option can be set to On or Off. - Page 171 User Guide ◄ ► 2. Using locate Preferences & Tools menu. ▲ ▼ highlight Call Settings and press OK. 3. Using This displays Call Settings. 4. Highlight Call Preferences and press OK. This displays Call Preferences. The Call preferences screen contains the following settings: ●...
-
Page 172: Local And Global Muting
170), and comprises of two options: Duplex and Simplex. Duplex Duplex muting is used to mute iD808 speaker channels in monitor mode when, another speaker channel is set to talk mode. Take for example the scenario below which illustrates three speaker channels on an iD808 in monitor mode. -
Page 173: Simplex
Take, for example, a speaker channel that is monitored by several local and remote iD808 units. If a local iD808 changes the channel state from monitor to talk the speaker channel is muted on the other local iD808s. Remote units are still able monitor the same speaker channel. -
Page 174: Speaker Settings
User Guide Speaker Settings The Speaker Settings menu contains options to set the latching type and speaker source. It is located within the Speaker Actions menu. The Speaker Actions menu is located within the Main menu. Latch Mode A speaker channel is latched when the latch setting on the speaker channel key is set to On. -
Page 175: Ie801#1/(2) Settings
These menu options cannot be used when no iE801 is connected to the iD808. For more information on these menu options please refer to the iE801 User Guide. -
Page 176: Speaker Source
User Guide ● Dual - When this option is set audio for the speaker channels on the right hand side are sounded through both the right speaker and left speaker (refer to the illustration on opposite page). Audio for the speaker channels on the left hand side are also sounded through both the left and right speaker (refer to illustration on the opposite page). -
Page 177: Speaker Page
● Handset 1 - This option refers to port HS1 which is located at the back of the iD808. When its is selected audio is transmitted and received on port HS1. ● Handset 2 - This option refers to port HS2 which is located at the back of the iD808. - Page 178 Fig. 1 Fig. 4, Speaker Page 3 The illustration on the previous page represents an iD808 screen. Fig. 1 represents four speaker channels with speaker paging turned on, on each channel. For more information on, turning on the speaker paging feature, see Editing Speaker Channels on page 120.
-
Page 179: Changing A Speaker Page
User Guide Changing a Speaker Page To change a speaker page: 1. Press to display Main menu. The right hand screen displays Main menu. ▲ ▼ highlight Speaker Actions and press OK. 2. Using This displays Speaker Actions. ▲... -
Page 180: Using Other Features
When the Playback feature is enabled in iManager a Playback soft function key is displayed on the iD808 Deskstation screen. This is providing there is an unoccupied soft function key. If the Playback soft function key is not visible on your iD808 Deskstation contact your System Administrator. -
Page 181: Call Register
Playback screen. Call Register The iD808 contains a call register to record Missed Calls, Received Calls and Placed Calls. Pressing the redial key when the deskstation is idle displays a list of placed calls or a warning if no calls have been dialled. Each log can contain a maximum of 40 entries with the oldest entry being removed if a new one is added. -
Page 182: Checking Missed Calls
Logging On/Out Logging On To logon to your iD808: 1. Ensure User ID is highlighted on the Logon screen and press activate the text box. 2. Type your user identification in USER ID using the alpha numeric keys and press to de-activate USER ID. -
Page 183: Voicemail
User Guide 1. Press to display Main menu. The right hand screen displays Main menu. ◄ ► 2. Using locate Preferences & Tools menu. ▲ ▼ 3. Using highlight User Settings and press OK. This displays User Settings. 4. Highlight Logout and press OK. -
Page 184: Resync Device
(for example, network issues between the iCMS server and deskstation or deskstation is in an un-powered state). Device synchronisation is normally undertaken by the system administrator. For this reason Speakerbus recommends only using this option when instructed by a system administrator. Resync Device To resync device: 1. -
Page 185: Device Ip Address Settings
User Guide Device IP Address Settings The device IP address settings consists of the following: ● Enable DHCP - This option can be set to either On or Off. When set to On the following options will not be active: IP address, Netmask, Gateway, DNS server IP address, Local host name and Local domain name. -
Page 186: Icms Server Settings
User Guide 4. Enter the password in PASSWORD, and select Logon. This displays Configure Network. 5. Highlight iCMS server and press OK. This displays the iCMS server settings. For more information on the actual settings, see iCMS Server Settings in the section below. -
Page 187: Device Ethernet
Device Ethernet Properties The ethernet properties refer to the network ports located at the back of the iD808 Deskstation. The options described below beginning with Net 1 ... refer to network port NET 1, and Net 2 ..., network port NET 2. - Page 188 ● Net 2 Auto-Negotiate - This option can be set to either YES (to turn on auto-negotiate), or NO (to turn off auto-negotiate). It is essential that this setting matches the setting used on the network equipment the iD808 is connecting to.
-
Page 189: Ie801#1 Ethernet
Speaker Module. The first iE801 is the unit located closest to the iD808 Deskstation when looking at the units from the front. The options described below beginning with Net 3 ... refer to network port NET 1, and Net 4 ..., network port NET 2. -
Page 190: Ie801#2 Ethernet
User Guide setting used on the network equipment the iE801 is connecting to. ● Net 3 Speed - This option is read only if the Net 3 Auto-Negotiate option is set to ON. The option can be changed if Net 3 Auto-Negotiate is set to OFF. -
Page 191: The Ie801#2 Ethernet Settings
Speaker Module. The first iE801 is the unit located closest to the iD808 Deskstation when looking at the units from the front. The options described below beginning with Net 5 ... refer to network port NET 1, and Net 6 ..., network port NET 2. -
Page 192: Vlans
254 addresses. In the case of this example the total number of addresses accommodated using three VLANs are 762. If you set the VLAN settings from the iD808 deskstation, please ensure it matches the settings on the network switch. Failure to do this results in the deskstation not working. -
Page 193: Vlan Properties
User Guide VLAN Properties The VLAN properties consists of the following: ● VLAN Enable - This option can be set to ON or OFF. When set to OFF the remaining VLAN options are read only. When set to ON the remaining VLAN options can be changed. -
Page 194: Send Logs
User Guide 6. Highlight Start, and press OK. If at this point the screen displays, Unknown host, it means you have entered either an incorrect IP address or domain name. The main text box will start to display data. -
Page 195: Setting The Send Logs Tftp Server Ip Address
User Guide This displays Engineering Tools menu options. ▲ ▼ 4. Using highlight Send Logs and press OK. This displays Send Logs. 5. Highlight the Send button and select OK. An information box will state it is creating and sending logs to an IP address (the TFTP Server). -
Page 196: Advanced Settings
User Guide 5. Ensure the TFTP SEVER IP ADDRESS text box is highlighted and press The text box can now be edited. 6. Set the IP address and select press OK. Advanced Settings This option contains various log settings for diagnostic purposes. The logs are sent to a TFTP server when the Send Logs option is used. -
Page 197: Trace Route
User Guide Tools menu. This displays Engineering Tools menu options. ▲ ▼ highlight Log Settings and press OK. 4. Using This displays Log Settings. 5. If the NETWORK TRACE ROUTE text box is set to Off, ensure it is ►... -
Page 198: On-Line Help
The right hand screen displays Help Topics. The Help Topics contains the options below: ● Key Definitions - This option describes keys used in the iD808. ● Customer Help - This option is reserved for future functionality. ● Show Versions - This option display the unit software versions. For more information, see Checking the Software Versions on page 38. -
Page 199: Device Info
Show iCMS and Show SIP Server. These options are briefly described below. ● Key Definitions - Contains descriptions for the iD808 keys. ● Show Versions - Displays current version information for the iD808, Auto Discovery and iManager (the software tool used to configure and manage iD808). - Page 200 User Guide menu). ● Customer Help (available in Help Topics, in the Main menu).
-
Page 201: Speaker And Expansion Modules
Expansion Modules and/or iE801 Speaker Modules can be attached to an iD808 to provide additional screens, speakers channels and keys. A maximum of three units can be attached to the iD808 Deskstation. This is providing no more than two of the attached units are of the same type. The order of the attached units does not matter. -
Page 202: Automatic Ringdown Tone Generation
User Guide Automatic Ringdown Tone Generation When an automatic ringdown (ARD) line is called a ring tone is generated locally. This tone is generated by either the Deskstation itself or by an iG330 Gateway. The setting to select if the tone is generated either by the Deskstation or iG330 Gateway is in the iManager Web Portal. -
Page 203: Pbx Failover
SIP icon will changed from red to yellow. The yellow icon indicates the iD808 is connected to a non primary PBX server. If an iD808 is unable to connect to a Seconday or Tertiary PBX server (for Cisco PBXs), it will attempt to connect to a Survival Remote Site Telephony (SRST) Switch as a last resort. -
Page 204: Id808 Intercom
The iD808 can support up to two intercom appearances. If only one intercom appearance is set up, the iD808 will only support one active or on hold intercom call (either a point to point or group call). With two intercom appearances, the iD808 will support up to two simultaneous calls. -
Page 205: User Busy
User Guide One simply needs to talk when the call is connected. Please note that the voice path is automatically open when the call is connected. User Busy The message “User Busy” and “Call Failed” is displayed on an intercom screen, when the party it is attempting to connect to is engaged on another call. -
Page 206: Adjust Volume
User Guide Adjust Volume Adjust Volume (Hands Free) To adjust the volume in hands free: 1. Turn rotary control (located by the hands free key) to the right to increase the volume or to the left to lower it. -
Page 207: Activate Privacy Mode
User Guide answered with an audible beep. In contrast when intercom privacy is enabled the user needs to press the appropriate intercom key in order to answer the call. Activate Privacy Mode Method 1 To activate privacy: 1. Press to display Main menu. -
Page 208: Accept Call In Privacy Mode
Accept Call in Privacy Mode To accept a call whilst privacy mode is activated: A screen similar to the one below is displayed when an iD808 in intercom mode receives an inbound intercom call when privacy is turned on. Press the hands free key to accept the incoming call. -
Page 209: Hiding The Intercom Screen
User Guide Hiding the Intercom Screen To hide the intercom screen in idle mode or during an intercom call. 1. Press the i key. 2. Repeat above to un-hide the intercom screen. Point to Point Making Point to Point Calls... -
Page 210: Directory
User Guide 2. Dial the number using the key pad. 3. Talk when the call is connected. Directory Handset / Headset To make a handset / headset intercom call: 1. Press the soft key associated with the intercom appearance. The intercom appearance will look similar to the illustration below. -
Page 211: Using A Speed Dial
User Guide 7. Talk when the call is connected. Hands Free (Main Speaker) To make a hands free intercom call: 1. Press the hands free key. The hands free LED is lit solid orange. 2. Press the i key to change the deskstation handset / headset to hands-free mode. -
Page 212: Placing A Point To Point / Group Call On Hold
User Guide 2. Locate the required point to point speed dial key and press its associated ▲ ▼ ◄ soft key. If the key is on a page not currently displayed, use the ► navigation keys to locate it. The point to point speed dial key will look similar to the illustration below. -
Page 213: Hands Free
User Guide 2. Press the Dynamic Key’s soft key to remove hold. Hands Free To place a hands free point to point / group call on hold: 1. Press the key. The on hold dymanic key’s LED will flash orange indicating the intercom call is on hold. -
Page 214: Moving A Call From Speaker Channel To Main Speaker / Headset / Handset
User Guide Moving a Call from Speaker Channel to Main Speaker / Headset / Handset Please refer to Moving an active Appearance from Speaker Channel to Handset / Main Speaker on page 74. Group Calls There are three types of group calls: Standard Group Call, Mixing Group Call and Answerback to Owner Group Call. -
Page 215: Standard Group Call
User Guide ● Mixing Group Call - In a mixing group call both the chairperson (the person who initiates the group call) and remaining members can talk within the conference. The chairperson can talk without having to press the * key. -
Page 216: Making A Standard Group Call Using The Directories
User Guide 2. Dial the appropriate standard group number using the key pad. 3. Make an announcement when group call is connected. 4. When finished press the hands free key to end the group Making a Standard Group Call using the Directories... -
Page 217: Making A Standard Group Call Using Speed Dials
User Guide 6. Ensure the group number is highlighted and press OK. Making a Standard Group Call using Speed Dials A speed dial needs to be set up prior to using it for call purposes. For more information, see Adding Speed Dials on page 103. -
Page 218: Making An Answerback To Owner Group Call Using The Key Pad
User Guide Making an Answerback to Owner Group Call using the Key Pad Handset / Headset To make an answerback to owner group call using the key pad 1. Press the soft key associated with the intercom appearance. The intercom appearance will look similar to the illustration below. -
Page 219: Making An Answerback To Owner Group Call Using The Directories
User Guide Make request when the group call has connected. 4. Press the * (star) key when finished making request and wait for answer. Making an Answerback to Owner Group Call using the Directories Handset / Headset To make an answerback to owner group call using Directories: 1. - Page 220 User Guide The screen displays and highlights the selected group’s number. 6. Press OK. The screen similar to the illustration below is displayed when the call is connected. To make a hands-free mixing group call: 1. Press the key to change the deskstation from handset to hands-free mode.
- Page 221 User Guide Hands Free (Main Speaker) To make an answerback to owner group using Directories: 1. Press the hands free key. The hands free LED is lit solid orange. 2. Press the i key to change the deskstation handset / headset to hands-free mode.
-
Page 222: Making An Answerback To Owner Group Call Using Speed Dials
User Guide Make request when the group call has connected. 9. Press the * (star) key when finished making request and wait for answer. Making an Answerback to Owner Group Call using Speed Dials A speed dial needs to be set up prior to using it for call purposes. For more information, see Adding Speed Dials on page 103. - Page 223 User Guide The screen similar to the illustration below is displayed when the call is connected. 3. Make request when the group call has connected. 4. Press the * (star) key when finished making request and wait for answer.
-
Page 224: Respond To Group Call Initiator
User Guide Make request when the group call has connected. 3. Press the * (star) key when finished making request and wait for answer. Respond to Group Call Initiator To respond to a group call initiator: 1. Press the * key to establish point to point connection. -
Page 225: Making A Mixing Group Call Using The Directories
User Guide Hands Free (Main Speaker) To make a hands-free mixing group call: 1. Press the key to change the deskstation from handset to hands-free mode. The intercom hands-free screen is displayed. 2. Dial the number using the key pad. -
Page 226: Making A Mixing Group Call Using Speed Dials
User Guide ▼ or alpha keys on the dial pad to quickly locate the appropriate group. The screen displays and highlights the selected group’s number. 6. Press OK. 7. Talk when the call is connected. Hands Free (Main Speaker) To make a hands free mixing group call: 1. - Page 227 User Guide Handset / Headset To make a mixing group call using speed dials: 1. Locate an intercom appearance key and press its associated soft key. If ▲ ▼ ◄ ► the key is on a page not currently displayed, use the navigation keys to locate it.
-
Page 228: Talking On A Group Call
User Guide Talking on a Group Call To talk to on a group call: 1. Simply talk if you initiated the group call Press and hold down the * key if set for non latching and talk. Press the * key once to (latch the key and microphone) and talk. - Page 229 User Guide 6. Highlight Save and press OK.
-
Page 230: Default Styles For Keys
User Guide Default Styles for Keys When adding keys using the Deskstation the default key style is key dependent. For example, the default style and display mode are 1 and Dual respectively. The table below displays the default style and display mode for each key type. -
Page 231: Technical Specifications
User Guide Technical Specifications Dimensions ● Height: 200mm ● Width: 340mm ● Depth: 50mm ● Weight: 2kg Environmental Performance Operational Environmental ● Temperature: 0ºC – 35ºC ● Humidity: 10% - 90 % RH (non condensing) Storage Environmental ● Temperature: 0ºC – 60ºC... -
Page 232: Safety And Compliance
LVD-73/23/EEC-EN60950. Class I Pluggable Equipment Type A The iD808 has been certified to meet IEC 60950-1 and is provided with a Class 1 pluggable desk top PSU as part of this approval. This type of PSU requires an earthed mains socket-outlet. -
Page 233: Abbreviations
IP - Internet Protocol MRD - Manual Ring-down RH - Relative Humidity RTP - Real Time Protocol SbRTP - Speakerbus Real Time Protocol SIP - Session Initiation Protocol SNMP - Simple Network Management Protocol TFTP - Trivial File Transfer Protocol... -
Page 234: Index
User Guide Index acoustic shock protection 167 device info 199 address 39 device resync 183 advanced settings 196 do not disturb 159 alerts dynamic keys alert key 101 dynamic key properties 93 default alert profile 98 editing a dynamic key 95... - Page 235 198 adding a pagination key 92 deleting a pagination key 92 private iE816 making a line private 68 expanding an iD808 201 turning off line privacy 68 iE816’s primary function 19 push-to-latch 75, 174 intercom 204 push to talk 77...
- Page 236 User Guide iCMS status 30 network status 29, 30 SIP registrar status 30 tap-latch 76, 174 technical specifications dimensions 204, 209, 214, 228, 231 environmental performance 231 trace route 197 transfer immediate transfer 66 transfer call 64 transmit gain offset 168...
- Page 238 © Speakerbus Technology Limited 2017 Registered Office: Ground Floor, Hanover House, Britannia Road, Queens Gate, Waltham Cross, Hertfordshire, EN8 7TF Registered in England No: 04415859...
Need help?
Do you have a question about the iD808 and is the answer not in the manual?
Questions and answers