Table of Contents
Advertisement
QQ
3 7 63 1515 0
CD RECEIVER
DEH-P700BT
DEH-P7000BT
DEH-P7050BT
TE
L 13942296513
This service manual should be used together with the following manual(s):
Model No.
CX-3240
CRT4050
www
For details, refer to "Important Check Points for Good Servicing".
.
PIONEER CORPORATION
PIONEER ELECTRONICS (USA) INC. P.O. Box 1760, Long Beach, CA 90801-1760, U.S.A.
PIONEER EUROPE NV Haven 1087, Keetberglaan 1, 9120 Melsele, Belgium
PIONEER ELECTRONICS ASIACENTRE PTE. LTD. 253 Alexandra Road, #04-01, Singapore 159936
PIONEER CORPORATION 2008
http://www.xiaoyu163.com
Order No.
Mech.Module
S10.5COMP2-
iPod-C2
x
ao
y
i
4-1, Meguro 1-chome, Meguro-ku, Tokyo 153-8654, Japan
http://www.xiaoyu163.com
8
DEH-P700BT/XN/UC
/XN/UC
/XN/ES
Q Q
3
6 7
1 3
CD Mech. Module : Circuit Descriptions, Mech. Descriptions, Disassembly
u163
.
2 9
9 4
2 8
1 5
0 5
8
2 9
9 4
Remarks
m
co
K-ZZY FEB. 2008 Printed in Japan
9 9
ORDER NO.
CRT4114
/XN/UC
2 8
9 9
Advertisement
Table of Contents

Related Manuals for Pioneer DEH-P700BT XN


Summary of Contents for Pioneer DEH-P700BT XN
- Page 1 PIONEER CORPORATION 4-1, Meguro 1-chome, Meguro-ku, Tokyo 153-8654, Japan PIONEER ELECTRONICS (USA) INC. P.O. Box 1760, Long Beach, CA 90801-1760, U.S.A. PIONEER EUROPE NV Haven 1087, Keetberglaan 1, 9120 Melsele, Belgium PIONEER ELECTRONICS ASIACENTRE PTE. LTD. 253 Alexandra Road, #04-01, Singapore 159936 PIONEER CORPORATION 2008 K-ZZY FEB.
-
Page 2: Safety Information
http://www.xiaoyu163.com SAFETY INFORMATION 3 7 63 1515 0 CAUTION This service manual is intended for qualified service technicians; it is not meant for the casual do-it-yourselfer. Qualified technicians have the necessary test equipment and tools, and have been trained to properly and safely repair complex products such as those covered by this manual. - Page 3 http://www.xiaoyu163.com 3 7 63 1515 0 [Important Check Points for Good Servicing] In this manual, procedures that must be performed during repairs are marked with the below symbol. Please be sure to confirm and follow these procedures. 1. Product safety Please conform to product regulations (such as safety and radiation regulations), and maintain a safe servicing environment by following the safety instructions described in this manual.
-
Page 4: Table Of Contents
http://www.xiaoyu163.com CONTENTS 3 7 63 1515 0 SAFETY INFORMATION ............................. 2 1. SERVICE PRECAUTIONS ..........................5 1.1 SERVICE PRECAUTIONS......................... 5 1.2 NOTES ON SOLDERING .......................... 5 2. SPECIFICATIONS ............................6 2.1 SPECIFICATIONS............................6 2.2 DISC/CONTENT FORMAT ........................8 2.3 PANEL FACILITIES ............................ 9 2.4 CONNECTION DIAGRAM ........................ -
Page 5: Service Precautions
http://www.xiaoyu163.com 1. SERVICE PRECAUTIONS 3 7 63 1515 0 1.1 SERVICE PRECAUTIONS 1. You should conform to the regulations governing the product (safety, radio and noise, and other regulations), and should keep the safety during servicing by following the safety instructions described in this manual. -
Page 6: Specifications
http://www.xiaoyu163.com 2. SPECIFICATIONS 3 7 63 1515 0 2.1 SPECIFICATIONS DEH-P700BT/XN/UC, DEH-P7000BT/XN/UC General Slope ........–18 dB/oct Gain ........+6 dB to –24 dB Power source......14.4 V DC (10.8 V to 15.1 V Phase ........Normal/Reverse allowable) Bass boost: Grounding system.... - Page 7 http://www.xiaoyu163.com 3 7 63 1515 0 DEH-P7050BT/XN/ES General Usable discs ......Compact disc Rated power source....14.4 V DC Signal-to-noise ratio..... 94 dB (1 kHz) (IEC-A net- (allowable voltage range: work) 12.0 V to 14.4 V DC) Number of channels .... 2 (stereo) Grounding system....Negative type MP3 decoding format ..MPEG-1 &...
-
Page 8: Disc/Content Format
3 7 63 1515 0 The Bluetooth word mark and logos are owned by the Bluetooth SIG, Inc. and any use of such marks by Pioneer Corporation is under license. Other trademarks and trade names are those of their respective owners. -
Page 9: Panel Facilities
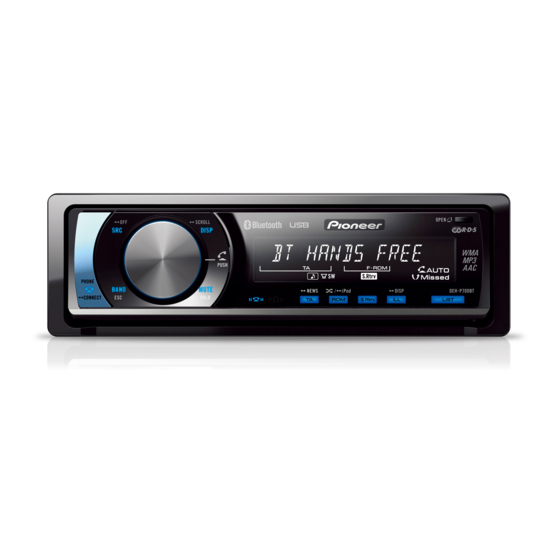
http://www.xiaoyu163.com 2.3 PANEL FACILITIES 3 7 63 1515 0 DEH-P700BT/XN/UC, DEH-P7000BT/XN/UC c c f f n n n n l l l l c c b b What ’s What RDM/ /iPod button Press to turn random function on or off while using CD or USB. - Page 10 http://www.xiaoyu163.com 3 7 63 1515 0 e VOLUME buttons Press to increase or decrease the volume. f FUNCTION button Press to select functions. g Thumb pad Move to perform manual seek tuning, fast forward, reverse and track search controls. Also used for controlling functions. Functions are the same as MULTI-CONTROL except for volume con- trol.
- Page 11 http://www.xiaoyu163.com 3 7 63 1515 0 When a lower tier folder or menu exists, d Display indication appears. Main display section Displays band, frequency, elapsed playback (artist) indicator time and other settings. Appears when the disc (track) artist name is •...
- Page 12 http://www.xiaoyu163.com 3 7 63 1515 0 DEH-P7050BT/XN/ES c c f f n n n n l l l l c c b b (CD-IB100 — ), press to switch the shuffle What ’s What function. CLOCK/DISP OFF button Head unit Press to change to the clock display.
- Page 13 http://www.xiaoyu163.com 3 7 63 1515 0 Functions are the same as MULTI-CONTROL except for volume con- trol. DIRECT button Press to directly select the desired track. CLEAR button Press to cancel the input number when 0 to 9 are used. 0 to 9 buttons Press to directly select the desired track, preset tuning or disc.
- Page 14 http://www.xiaoyu163.com 3 7 63 1515 0 2 LOC indicator (disc) indicator Appears when local seek tuning is on. Appears when the disc (album) name is dis- played on the main display section. (stereo) indicator Appears when album search refinement on Appears when the selected frequency is the iPod browsing function is in use.
- Page 15 http://www.xiaoyu163.com 3 7 63 1515 0 Fastening the front panel If you do not plan to detach the front panel, the front panel can be fastened with supplied screws and holders. Holder(L) CND2699(UC) CXX2239(Service)(ES) Holder(R) CND1250(UC) CXX1645(Service)(ES) 1. Attach the holders to both sides of the 3.
-
Page 16: Connection Diagram
http://www.xiaoyu163.com 2.4 CONNECTION DIAGRAM 3 7 63 1515 0 DEH-P700BT/XN/UC, DEH-P7000BT/XN/UC L 13942296513 u163 DEH-P700BT/XN/UC http://www.xiaoyu163.com... - Page 17 http://www.xiaoyu163.com 3 7 63 1515 0 DEH-P7050BT/XN/ES L 13942296513 u163 DEH-P700BT/XN/UC http://www.xiaoyu163.com...
-
Page 18: Basic Items For Service
http://www.xiaoyu163.com 3. BASIC ITEMS FOR SERVICE 3 7 63 1515 0 3.1 CHECK POINTS AFTER SERVICING To keep the product quality after servicing, please confirm following check points. r i f Confirm whether the customer complain has The customer complain must not be been solved. -
Page 19: Jigs List
http://www.xiaoyu163.com 3.3 JIGS LIST 3 7 63 1515 0 - Jigs List Name Name Jig No. Jig No. Remarks Remarks Test Disc TCD-782 Checking the grating L.P.F. Checking the grating (Two pieces) GGF1539 Removing the cord assy (BT antenna cable) - Grease List Name Name... -
Page 20: Block Diagram
http://www.xiaoyu163.com 4. BLOCK DIAGRAM 3 7 63 1515 0 TUNER AMP UNIT IP-BUS 10 9 8 18 19 20 21 FM/AM TUNER UNIT JA151(1/ MUTE IC 5 IC 3 EEPROM 5V -> 3.3V 5.0V MUTE Q563 JA401 AM ANT FMRF ANTENNA PHONE MIXING IC561... - Page 21 http://www.xiaoyu163.com 3 7 63 1515 0 JA101 Q101 JA151(2/2) KEYD KEYD KEYAD WIRED KEYAD REMOTE IP-BUS ASENBO JA301 MUTE IP-BUS DRIVER IC101 Q303 HA12241FP JA151(1/2) SYSTEM CONTROLLER BUS- IC601(2/2) BUS- DIN1 BUS+ PEG441B8 BUS+ ROUT RCA OUT STBY Q302 MUTE IPPW IPPW MUTE...
- Page 22 http://www.xiaoyu163.com 3 7 63 1515 0 BLUETOOTH UNIT BLUETOOTH MODULE IC56 PCM1742KE CN76 DATAO DATA SIOF_TXD IC66 AUDIOL SIOF_SCK BCKIN VoutL NJM4558V LRCK SIOF_SYNC LRCKIN DACDT DACCK DACCS CWX3619 MCLK CODEC TELOUT BCLK IC51 MICIN ANTENNA UNIT VFTN AN6123MS DATAI IC36 SIOF_RXD AK2301A...
- Page 23 http://www.xiaoyu163.com 3 7 63 1515 0 FM/AM Tuner Unit 10 9 8 18 19 20 21 IC 5 IC 3 EEPROM 5 V -> 3.3 V 5.0 V AM ANT FMRF IC 2 2.5 V IC 1 FM ANT 3.3 V FMRF MIXER, IF AM P DET, FM MPX...
- Page 24 http://www.xiaoyu163.com 3 7 63 1515 0 -LCD(CAW1952 / CAW1956) L 13942296513 u163 DEH-P700BT/XN/UC http://www.xiaoyu163.com...
- Page 25 http://www.xiaoyu163.com 3 7 63 1515 0 L 13942296513 u163 DEH-P700BT/XN/UC http://www.xiaoyu163.com...
-
Page 26: Diagnosis
http://www.xiaoyu163.com 5. DIAGNOSIS 3 7 63 1515 0 5.1 OPERATIONAL FLOWCHART Power ON Vcc1 = 5 V Pin 14 BSENS Pin 73 BSENS = L ASENS Pin 72 ASENS = L DSENS Pin 58 DSENS = L ASENBO <- H Pin 80 L 13942296513 CSENS... -
Page 27: Error Code List
http://www.xiaoyu163.com 5.2 ERROR CODE LIST 3 7 63 1515 0 - Error Messages If a CD is not operative or stopped during operation due to an error, the error mode is turned on and cause(s) of the error is indicated with a corresponding number. This arrangement is intended at reducing nonsense calls from the users and also for facilitating trouble analysis and repair work in servicing. - Page 28 http://www.xiaoyu163.com 3 7 63 1515 0 iPod error Message Cause Action NO SONGS No songs in the iPod Transfer the songs to the iPod. STOP No songs in the current list Select a list that contains the songs. Disconnect the cable from the iPod. Once the Communication failure iPod main menu is displayed, connect the cable ERROR-19...
-
Page 29: Connector Function Description
http://www.xiaoyu163.com 5.3 CONNECTOR FUNCTION DESCRIPTION 3 7 63 1515 0 L 13942296513 u163 DEH-P700BT/XN/UC http://www.xiaoyu163.com... -
Page 30: Service Mode
http://www.xiaoyu163.com 6. SERVICE MODE 3 7 63 1515 0 6.1 DISPLAY TEST MODE Display test mode The ACC and back up turn off and turn on while pushing the RDM+S.Rtrv key. To the display test mode. The ACC and back up turn off and turn on while pushing the RDM+S.Rtrv key. -
Page 31: Cd Test Mode
http://www.xiaoyu163.com 6.2 CD TEST MODE 3 7 63 1515 0 - Flow Chart [Key] [LIST] + [RDM] + BU + ACC Contents Test Mode In Display [1] to [6] keys : Remote Control Uni [CD] or [SOURCE] Source On [BAND] Power On Power On RF AMP... -
Page 32: Bluetooth Test Mode
http://www.xiaoyu163.com 6.3 BLUETOOTH TEST MODE 3 7 63 1515 0 - About Memory Clear When resetting the microprocessor, the memory is initialized except for the following five items. This enables user to avoid the task of registering phones and transfering phone directory again even after resetting system at the time of battery exchange, etc. - Page 33 http://www.xiaoyu163.com - Bluetooth Test Mode (when using BT-compliant mobile phone) 3 7 63 1515 0 Specifications for BT Built-in mobile phone The mobile phone compliant to Bluetooth Ver 1.1 requires at least *HFP and *OPP to be mounted. The model having validly accomplished connecting verification is desirable. [CDMA A5504T(TOSHIBA), 6230(Nokia)etc.)] The model capable of being in standby state is desirable.
- Page 34 http://www.xiaoyu163.com - Bluetooth Test Mode (when using 2.4 GHz-compliant spectrum analyzer) 3 7 63 1515 0 1. Cautions * When the service site has a 2.4 GHz-compliant spectrum analyzer, the peripheral facilities shown below are also required. Also, the antenna terminal on BT unit must be directly connected to the cable. A gray coaxial cable connected to the antenna connector on BT unit is removed by taking out the upper case and CD mechanics of the product.
- Page 35 http://www.xiaoyu163.com 4. How to Start-up the Test Mode 3 7 63 1515 0 Specifications for Operation Operation method After the ACC and back up turn off and turn on while pressing LIST+RDM keys simultaneously, start BT Test Mode by PHONE key. <Source OFF screen>...
-
Page 36: Disassembly
http://www.xiaoyu163.com 7. DISASSEMBLY 3 7 63 1515 0 Removing the Keyboard Unit (Fig.1,2) Knob Unit Remove the Knob Unit.(Fig.1) Remove the six screws.(Fig.2) Cover Detach Grille Assy Fig.1 Remove the Cover and then remove the Keyboard Unit. Fig.2 Removing the Holder, Panel and Case (Fig.3) Take off the pick of left and right and then a Holder slide to the arrow course. - Page 37 http://www.xiaoyu163.com When unplugging the cord assy, make sure to use jig GGF1539. 3 7 63 1515 0 If the antenna cable is directly unplugged without using jig GGF1539, you might damage your fingertip or fingernail. - How to Remove the Cord Assy When unplugging cord assy, hook the point of jig GGF1539 on the lid of cord assy and vertically draw out along with the engagement axis of connector.
- Page 38 http://www.xiaoyu163.com 3 7 63 1515 0 Removing the Panel Unit and Antenna Unit (Fig.8,9) Remove the two screws.(Fig.8) Remove the Holder and then remove the Panel Unit.(Fig.9) Fig.8 Sub Panel Unit Disconnect the Cord Assy using GGF1539. (Fig.9) Arm Assy (L) Remove the screw.
- Page 39 http://www.xiaoyu163.com 3 7 63 1515 0 -How from grille to remove plate button. While the photograph shown is slightly different from this model in shape, the disassembly procedure is the same. There are six hooks to remove. L 13942296513 u163 The hook in six places in total is removed by the thin one such as tweezers.
- Page 40 http://www.xiaoyu163.com - How to hold the Mechanism Unit 3 7 63 1515 0 1. Hold the Upper and Lower Frames. 2. Do not hold the front portion of the Upper Frame, because it is not very solid. Do not squeeze this area. - Removing the Upper and Lower Frames 1.
- Page 41 http://www.xiaoyu163.com - How to remove the CD Core Unit 3 7 63 1515 0 1. Apply Shorting Solder to the flexible cable of the Pickup, and disconnect it from the Shorting Solder connector. 2. Unsolder the four leads, and loosen the Screw.
-
Page 42: Each Setting And Adjustment
http://www.xiaoyu163.com 8. EACH SETTING AND ADJUSTMENT 3 7 63 1515 0 8.1 CD ADJUSTMENT 1) Cautions on adjustments 2) Test mode In this product the single voltage (3.3 V) is used for the This mode is used to adjust the CD mechanism module. regulator. -
Page 43: Checking The Grating After Changing The Pickup Unit
http://www.xiaoyu163.com 8.2 CHECKING THE GRATING AFTER CHANGING THE PICKUP UNIT 3 7 63 1515 0 Note : The grating angle of the PU unit cannot be adjusted after the PU unit is changed. The PU unit in the CD mechanism module is adjusted on the production line to match the CD mechanism module and is thus the best adjusted PU unit for the CD mechanism module. - Page 44 http://www.xiaoyu163.com 3 7 63 1515 0 Grating waveform Ech -> Xch 20 mV/div, AC Fch -> Ych 20 mV/div, AC 0 degrees 30 degrees 45 degrees 60 degrees L 13942296513 75 degrees 90 degrees u163 DEH-P700BT/XN/UC http://www.xiaoyu163.com...
-
Page 45: Pcl Output Confirmation
http://www.xiaoyu163.com 8.3 PCL OUTPUT CONFIRMATION 3 7 63 1515 0 - PCL output In the normal operation mode (with the detachable panel installed, the ACC switched ON, the standby mode cancelled), shift the STEST (IC601 Pin 86) terminal to H.The clock signal is output from the PCL (IC601 Pin 41). The frequency of the clock signal is 625.0 KHz that is one 32th of the fundamental frequency. -
Page 46: Exploded Views And Parts List
http://www.xiaoyu163.com 9. EXPLODED VIEWS AND PARTS LIST 3 7 63 1515 0 OTES : Parts marked by " * " are generally unavailable because they are not in our Master Spare Parts List. The > mark found on some component parts indicates the importance of the safety factor of the part. Therefore, when replacing, be sure to use parts of identical designation. - Page 47 http://www.xiaoyu163.com Mark No. Description Part No. Mark No. Description Part No. Protector CHP3520 33-1 Installation Manual See Contrast table(2) 3 7 63 1515 0 CD-ROM(Operation Manual) See Contrast table(2) 33-2 Caution Card CRP1310 33-3 Caution Card See Contrast table(2) Microphone Assy CPM1064 Clip Holder CZN5471...
-
Page 48: Exterior(1)
http://www.xiaoyu163.com 9.2 EXTERIOR(1) 3 7 63 1515 0 L 13942296513 u163 DEH-P700BT/XN/UC http://www.xiaoyu163.com... - Page 49 http://www.xiaoyu163.com (1) EXTERIOR(1) SECTION PARTS LIST Mark No. Description Part No. 3 7 63 1515 0 Mark No. Description Part No. Lighting Conductor CNV9900 Cord Assy CDP1118 > Holder CNV9906 Fuse(10 A) CEK1136 See Contrast table(2) CNS1472 Connector(CN1101) CKS5207 Case CNB3377 Holder CND3598...
-
Page 50: Exterior(2)
http://www.xiaoyu163.com 9.3 EXTERIOR(2) 3 7 63 1515 0 L 13942296513 u163 DEH-P700BT/XN/UC http://www.xiaoyu163.com... - Page 51 http://www.xiaoyu163.com (1) EXTERIOR(2) SECTION PARTS LIST Mark No. Description Part No. 3 7 63 1515 0 Mark No. Description Part No. Chassis Unit CXC8964 Screw BMZ30P040FTB Screw BSZ26P060FTC Button CAC7752 Screw BSZ30P060FTC Screw(M2 x 4) CBA1649 Screw BSZ30P200FTC Screw(M2 x 4.5) CBA1925 Cable CDE8564...
-
Page 52: Cd Mechanism Module
http://www.xiaoyu163.com 9.4 CD MECHANISM MODULE 3 7 63 1515 0 L 13942296513 43 10 u163 (1) : GEM1024 : GEM1045 DEH-P700BT/XN/UC http://www.xiaoyu163.com... - Page 53 http://www.xiaoyu163.com CD MECHANISM MODULE SECTION PARTS LIST Mark No. Description Part No. 3 7 63 1515 0 Mark No. Description Part No. Rack CNV8342 CD Core Unit(S10.5COMP2-iPod-C2) CWX3624 Connector(CN101) CKS4182 Roller CNV8343 Connector(CN701) CKS4186 Holder CNV8344 Screw BMZ20P025FTC CNV8345 Screw BSZ20P040FTC Guide CNV9498...
-
Page 54: Schematic Diagram
http://www.xiaoyu163.com 10. SCHEMATIC DIAGRAM 3 7 63 1515 0 10.1 OVERALL CONNECTION DIAGRAM(GUIDE PAGE) Note: When ordering service parts, be sure to refer to " EXPLODED VIEWS AND PARTS LIST" or "ELECTRICAL PARTS LIST". Large size SCH diagram MECHA VD Q751 7.4V 2SD2396(K) - Page 55 http://www.xiaoyu163.com 3 7 63 1515 0 : The power supply is shown with the marked box. TUNER AMP UNIT FAN+B Q892 R566 2SD1767(R) 12.0V R894 RCA OUT IC561 Q891 C309 C562 R312 E2 4 OUT1 47p/50 CN891 10u/16 IN-1 OUT2 JA301 MOTOR RMIC...
- Page 56 http://www.xiaoyu163.com 3 7 63 1515 0 L 13942296513 u163 DEH-P700BT/XN/UC http://www.xiaoyu163.com...
- Page 57 http://www.xiaoyu163.com 3 7 63 1515 0 L 13942296513 u163 DEH-P700BT/XN/UC http://www.xiaoyu163.com...
- Page 58 http://www.xiaoyu163.com 3 7 63 1515 0 L 13942296513 u163 DEH-P700BT/XN/UC http://www.xiaoyu163.com...
- Page 59 http://www.xiaoyu163.com 3 7 63 1515 0 L 13942296513 u163 A-a F DEH-P700BT/XN/UC http://www.xiaoyu163.com...
-
Page 60: Keyboard Unit
http://www.xiaoyu163.com 10.2 KEYBOARD UNIT 3 7 63 1515 0 MULT V1101 CAW1952 SEG65 SEG65 SEG64 SEG64 SEG63 SEG63 SEG62 SEG62 SEG61 SEG61 SEG60 SEG60 SEG59 SEG59 SEG58 SEG38 SEG64 SEG58 SEG57 SEG57 SEG56 SEG37 SEG65 SEG56 SEG38 SEG64 SEG55 SEG55 SEG37 SEG65 SEG54... - Page 61 http://www.xiaoyu163.com 3 7 63 1515 0 KEYBOARD UNIT SWVDD 5.0V CN1101 R1109 ILBKGND ILBKGND JOYST R1108 MULTI-CONTROL SWVDD R1114 S1110 Phase_B Phase_A IL+B 8.5V Push Enc_Com DGND ROT1 CN1972 KYDT 5 Com ROT0 CSX1120-A DPDT ILBKGND CSENS R1107 6.8k DGND R1115 R1116 DGND...
-
Page 62: Cd Mechanism Module(Guide Page)
http://www.xiaoyu163.com 10.3 CD MECHANISM MODULE(GUIDE PAGE) 3 7 63 1515 0 PICKUP UNIT(P10.5)(SERVICE) L 13942296513 SWITCHES: CD CORE UNIT(S10.5COMP2-iPod-C2) S901:HOME SWITCH..ON-OFF S903:DSCSNS SWITCH..ON-OFF S904:12EJ SWITCH....ON-OFF S905:8EJ SWITCH....ON-OFF The underlined indicates the switch position. M1 CXC7134 SPINDLE MOTOR M2 CXC4026 LOADING/CARRIAGE MOTOR ACTUATOR/ MOTOR DRIVER u163... - Page 63 http://www.xiaoyu163.com 3 7 63 1515 0 CD CORE UNIT(S10.5COMP2-iPod-C2) SIGNAL LINE FOCUS SERVO LINE TRACKING SERVO LINE CARRIAGE SERVO LINE SPINDLE SERVO LINE L 13942296513 CN701 iPod AUTHENTICATION COPROCESSOR u163 DEH-P700BT/XN/UC http://www.xiaoyu163.com...
- Page 64 http://www.xiaoyu163.com 3 7 63 1515 0 L 13942296513 u163 DEH-P700BT/XN/UC http://www.xiaoyu163.com...
- Page 65 http://www.xiaoyu163.com 3 7 63 1515 0 L 13942296513 u163 DEH-P700BT/XN/UC http://www.xiaoyu163.com...
- Page 66 http://www.xiaoyu163.com 3 7 63 1515 0 L 13942296513 u163 DEH-P700BT/XN/UC http://www.xiaoyu163.com...
- Page 67 http://www.xiaoyu163.com 3 7 63 1515 0 L 13942296513 u163 DEH-P700BT/XN/UC http://www.xiaoyu163.com...
-
Page 68: Bluetooth Unit / Antenna Unit(Guide Page)
http://www.xiaoyu163.com 10.4 BLUETOOTH UNIT / ANTENNA UNIT(GUIDE PAGE) 3 7 63 1515 0 11.2896MHz 12.288MHz 3.3V IC22 IC23 IC21 CTF1379-A CTF1379-A GND2 3 OUT1 GND2 3 OUT1 2Y 4 2Y 4 2 IN1 2 IN1 OUT2 1 GND1 TC7PAU04FU OUT2 1 GND1 TC7PAU04FU UMD2N... - Page 69 http://www.xiaoyu163.com 3 7 63 1515 0 BLUETOOTH UNIT 2.288MHz 3.3V 11MHz 12MHz 512kHz CN552 IC23 HFAV FSCHG 3.3V CN76 7PAU04FU BTRX BTTX BCTS OCTS BTCTS OCTS BRTS ORTS BTRTS ORTS SS1698-A 2.288MHz BTEST BTTEST BOOTE BRST BTRST DACCS BMUTE BTMUTE DACCK BT3V 3.3V...
- Page 70 http://www.xiaoyu163.com 3 7 63 1515 0 L 13942296513 u163 DEH-P700BT/XN/UC http://www.xiaoyu163.com...
- Page 71 http://www.xiaoyu163.com 3 7 63 1515 0 L 13942296513 u163 DEH-P700BT/XN/UC http://www.xiaoyu163.com...
- Page 72 http://www.xiaoyu163.com 3 7 63 1515 0 L 13942296513 u163 DEH-P700BT/XN/UC http://www.xiaoyu163.com...
- Page 73 http://www.xiaoyu163.com 3 7 63 1515 0 L 13942296513 u163 DEH-P700BT/XN/UC http://www.xiaoyu163.com...
-
Page 74: Waveforms
http://www.xiaoyu163.com 10.5 WAVEFORMS 3 7 63 1515 0 - CD CORE UNIT Note : 1. The encircled numbers denote measuring points in the circuit diagram. 2. Reference voltage REFO1(1.65 V) 1DSCSNS 1DSCSNS 1DSCSNS 5 V/div 500 ms/div 5 V/div 500 ms/div 5 V/div 500 ms/div 28SNS... - Page 75 http://www.xiaoyu163.com 3 7 63 1515 0 %RFAGC %RFAGC %RFAGC 1 V/div s/div 1 V/div s/div 1 V/div 2 ms/div µ µ 500 mV/div 500 mV/div 500 mV/div 9TIN 9TIN 9TIN 500 mV/div 500 mV/div 500 mV/div 4 Tracks Jump waveform 10 Tracks Jump waveform 32 Tracks Jump waveform Ref.:...
- Page 76 http://www.xiaoyu163.com 3 7 63 1515 0 )CPRST 2 V/div 50 ms/div 2 V/div 500 ms/div ⁄SDA 2 V/div 2 V/div ¤SCL 2 V/div ACC OFF with USB(iPod) device connecting. iPod Authentication Operation L 13942296513 u163 DEH-P700BT/XN/UC http://www.xiaoyu163.com...
- Page 77 http://www.xiaoyu163.com 3 7 63 1515 0 L 13942296513 u163 DEH-P700BT/XN/UC http://www.xiaoyu163.com...
-
Page 78: Pcb Connection Diagram
http://www.xiaoyu163.com 11. PCB CONNECTION DIAGRAM 3 7 63 1515 0 11.1 TUNER AMP UNIT NOTE FOR PCB DIAGRAMS TUNER AMP UNIT 1.The parts mounted on this PCB include all necessary parts for several destination. For further information for CORD ASSY respective destinations, be sure to check with the schematic dia- CN981... - Page 79 http://www.xiaoyu163.com 3 7 63 1515 0 SIDE A > P 301 (A,127,129) Fuse 3 A CEK1286 IC351 JA301 C941 P301 R317 D981 C361 D942 R301R302 D301 R303 R351 Q301 Q303 C364 Q302 R316 R942 Q304 D941 ANTENNA C314 C943 Q383 JA401 R355 R352...
- Page 80 http://www.xiaoyu163.com 3 7 63 1515 0 TUNER AMP UNIT C363 C360 C359 C304 C357 C355 C311 C303 R941 R311 C356 C312 C358 R310 C944 R314 R306 C353 C352 C351 R315 C308 R312 R304 R313 R309 R307 C307 C942 C354 R308 Q381 R305 R388...
- Page 81 http://www.xiaoyu163.com 3 7 63 1515 0 > SIDE B P 451 (B,9,68) Fuse 1 A CEK1280 D155 D151 C102 C105 C151 D153 C104 R108 R111 D154 R107 D152 R110 C101 R104 R105 R102 R954 D922 C951 D951 D921 R103 R925 R924 R115 C921...
-
Page 82: Keyboard Unit
http://www.xiaoyu163.com 11.2 KEYBOARD UNIT 3 7 63 1515 0 KEYBOARD UNIT SIDE A L 13942296513 u163 DEH-P700BT/XN/UC http://www.xiaoyu163.com... - Page 83 http://www.xiaoyu163.com 3 7 63 1515 0 KEYBOARD UNIT SIDE B CN1972 L 13942296513 u163 DEH-P700BT/XN/UC http://www.xiaoyu163.com...
-
Page 84: Cd Core Unit(S10.5Comp2-Ipod-C2)
http://www.xiaoyu163.com 11.3 CD CORE UNIT(S10.5COMP2-iPod-C2) 3 7 63 1515 0 CD CORE UNIT(S10.5COMP2-iPod-C2) SIDE A PICKUP UNIT(P10.5) (SERVICE) CN701 REFO1 L 13942296513 HOME LOADING/CARRIAGE MOTOR SPINDLE MOTOR u163 DEH-P700BT/XN/UC http://www.xiaoyu163.com... - Page 85 http://www.xiaoyu163.com 3 7 63 1515 0 CD CORE UNIT(S10.5COMP2-iPod-C2) SIDE B 12EJ DSCSNS L 13942296513 u163 DEH-P700BT/XN/UC http://www.xiaoyu163.com...
-
Page 86: Bluetooth Unit
http://www.xiaoyu163.com 11.4 BLUETOOTH UNIT 3 7 63 1515 0 BLUETOOTH UNIT SIDE A CN552 IC22 IC21 CN76 IC91 IC51 L 13942296513 IC36 u163 DEH-P700BT/XN/UC http://www.xiaoyu163.com... - Page 87 http://www.xiaoyu163.com 3 7 63 1515 0 BLUETOOTH UNIT SIDE B IC23 L 13942296513 IC66 IC56 u163 ANT1102 DEH-P700BT/XN/UC http://www.xiaoyu163.com...
-
Page 88: Antenna Unit
http://www.xiaoyu163.com 11.5 ANTENNA UNIT 3 7 63 1515 0 ANTENNA UNIT SIDE A ANT1102 L 13942296513 ANTENNA UNIT SIDE B BT ANTENNA ANT1101 u163 DEH-P700BT/XN/UC http://www.xiaoyu163.com... -
Page 89: Panel Unit
http://www.xiaoyu163.com 11.6 PANEL UNIT 3 7 63 1515 0 PANEL UNIT SIDE A CN1101 S1970 EJECT CN1972 D1970 L 13942296513 PANEL UNIT SIDE B D1972 D1974 C1971 CN1971 D1971 D1975 R1970 R1971 D1977 D1976 C1970 R1974 D1973 CN801 u163 DEH-P700BT/XN/UC http://www.xiaoyu163.com... -
Page 90: Electrical Parts List
http://www.xiaoyu163.com 12. ELECTRICAL PARTS LIST 3 7 63 1515 0 NOTE: Parts whose parts numbers are omitted are subject to being not supplied. The part numbers shown below indicate chip components. Chip Resistor RS1/_S___J,RS1/__S___J Chip Capacitor (except for CQS..) CKS.., CCS.., CSZS..The >... - Page 91 http://www.xiaoyu163.com Circuit Symbol and No. Part No. Circuit Symbol and No. Part No. Q 901 (A,6,101) Transistor 2SD2396 3 7 63 1515 0 Q 902 (A,29,98) Transistor RT3T22M BZ601 (A,138,20) Buzzer CPV1062 Q 921 (A,49,111) Transistor UMX1N Q 951 (B,63,114) Transistor 2SA1576A RESISTORS D 151...
-
Page 92: Ao Y U163
http://www.xiaoyu163.com Circuit Symbol and No. Part No. Circuit Symbol and No. Part No. R 356 (B,102,114) RS1/16S272J R 605 (B,128,50) RS1/16S104J 3 7 63 1515 0 R 357 (B,105,114) RS1/16S272J R 606 (B,104,42) RS1/16S101J R 358 (B,109,114) RS1/16S272J R 607 (B,115,45) RS1/16S472J R 359... - Page 93 http://www.xiaoyu163.com Circuit Symbol and No. Part No. Circuit Symbol and No. Part No. R 812 (B,119,29) RS1/16S104J C 220 (A,144,87) CEJQ470M16 3 7 63 1515 0 C 251 (A,115,97) CKSRYB104K16 R 813 (B,127,26) RS1/16S104J C 252 (B,118,88) CKSRYB105K6R3 R 814 (B,119,27) RS1/16S104J R 815...
- Page 94 http://www.xiaoyu163.com Circuit Symbol and No. Part No. Circuit Symbol and No. Part No. C 566 (A,85,103) CKSRYB331K50 3 7 63 1515 0 C 567 (A,83,104) CKSRYB682K50 IC 1101 (B,97,17) IC PD6538A C 568 (A,98,100) CKSQYB225K10 IC 1102 (A,57,8) REMOTE IC GP1UX51RK C 571 (A,99,92)
- Page 95 http://www.xiaoyu163.com Circuit Symbol and No. Part No. Circuit Symbol and No. Part No. R 1128 (A,154,9) RS1/16S471J R 234 (B,22,26) RS1/16SS473J 3 7 63 1515 0 R 235 (A,26,59) RS1/16SS473J R 1129 (A,48,14) RS1/16S0R0J R 237 (A,24,35) RS1/16SS151J R 240 (B,14,26) RS1/16S473J CAPACITORS...
- Page 96 http://www.xiaoyu163.com Circuit Symbol and No. Part No. Circuit Symbol and No. Part No. (A,34,26) RS1/16S473J 3 7 63 1515 0 C 224 (A,44,55) CKSSYB104K10 (A,27,29) RS1/16S103J C 226 (A,42,59) CCSSCH680J50 (A,20,24) RS1/16S103J C 227 (A,42,61) CCSSCH470J50 C 228 (B,41,61) CKSSYB103K16 (A,34,23) RS1/16S103J C 229...
- Page 97 http://www.xiaoyu163.com Circuit Symbol and No. Part No. Circuit Symbol and No. Part No. C 21 (A,28,40) CKSRYB104K16 D 1973 (B,46,17) Diode MALS068X 3 7 63 1515 0 C 22 (A,21,38) CKSRYB105K10 D 1974 (B,56,6) Diode MALS068X C 23 (A,19,37) CCSRCH120J50 D 1975 (B,52,10) Diode MALS068X...
Need help?
Do you have a question about the DEH-P700BT XN and is the answer not in the manual?
Questions and answers