Table of Contents
Advertisement
HT25 - SERVICE
SERIAL NUMBER RECORD
SERIAL NUMBER RECORD
Record serial number and date of purchase in spaces provided.
Tractor serial number is located as shown.
Date of Manufacture:
Date of Purchase:
Tractor Serial Number:
Front Attachment Serial Number:
Engine Serial Number:
Trailer Serial Number:
SERVICE
1
Advertisement
Table of Contents

Related Manuals for Ditch Witch ht25


Summary of Contents for Ditch Witch ht25
-
Page 1: Service
HT25 - SERVICE SERIAL NUMBER RECORD SERVICE SERIAL NUMBER RECORD Record serial number and date of purchase in spaces provided. Tractor serial number is located as shown. Date of Manufacture: Date of Purchase: Tractor Serial Number: Front Attachment Serial Number:... -
Page 2: Support Procedure
Return damaged parts to dealer for inspection and Warranty consideration. Order genuine Ditch Witch replacement or repair parts from your authorized Ditch Witch dealer. Use of another manufacturer's parts may void warranty. -
Page 3: Foreword
If you sell your equipment, be sure to give this manual to the new owner. If you need a replacement copy, contact your Ditch Witch dealer. If you need assistance in locating a dealer, visit our website at www.ditchwitch.com or write to the following address:... - Page 4 Copyright 2000 by The Charles Machine Works, Inc., Perry, Oklahoma , Ditch Witch, Jet Trac, Pro Tech, Fluid Miser, Perma-Soil, Modularmatic, Roto Witch, AutoCrowd, and Subsite are registered trademarks of The Charles Machine Works, Inc. CMW is a trademark of The Charles Machine Works, Inc.
-
Page 5: Table Of Contents
HT25 - CONTENTS CONTENTS SERVICE ........1 Serial Number Record. - Page 6 HT25 - CONTENTS TRACTOR ........35 Daily Inspection .
- Page 7 HT25 ........93...
- Page 8 HT25 - CONTENTS...
-
Page 9: Overview
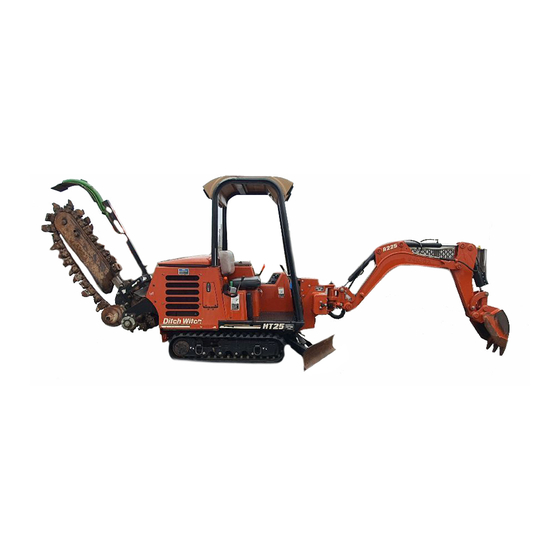
HT25 - OVERVIEW OVERVIEW The HT25 is a 25 hp (18.6 kW) riding tractor that can be fitted with a centerline, wide centerline, or offset digging boom. Optional cab, backfill blade, backhoe, drilling attachment, and mechanical trench cleaner are available. The HT25 is designed to cut trenches up to 36 in (91 cm) deep and 16 in (40 cm) wide. - Page 10 HT25 - OVERVIEW...
-
Page 11: Controls
HT25 - CONTROLS OVERVIEW CONTROLS OVERVIEW 1. Throttle 12. Fuel gauge 2. Accessory socket* 13. Start interlock indicators 3. Backfill blade control* 14. Engine water temperature indicator 4. Dome light switch* 15. Engine oil pressure indicator 5. Windshield wiper switch* 16. -
Page 12: Descriptions
HT25 - CONTROLS DESCRIPTIONS DESCRIPTIONS Throttle This lever controls engine speed. • Push to increase speed. • Pull to reduce speed. ic0128h.eps Accessory Socket This optional outlet can be used to provide power for work lights or other equipment. - Page 13 HT25 - CONTROLS DESCRIPTIONS Backfill Blade Control This optional lever raises, lowers, and swings backfill blade. • Push to lower blade. • Pull to raise blade. • Move right to swing blade right. • Move left to swing blade left.
- Page 14 HT25 - CONTROLS DESCRIPTIONS Windshield Wiper Switch This optional switch controls windshield wipers. • Press right to turn on. • Press left to turn off. Ic0225h.eps Track Controls These levers, used together, control left and right track speed and direction.
- Page 15 HT25 - CONTROLS DESCRIPTIONS Start Interlock Indicators To start machine, these must be lit, indicating the following conditions have been met: • Operator is in seat. • Track controls are in neutral. • Digging chain clutch is not ic0138x.eps engaged.
- Page 16 HT25 - CONTROLS DESCRIPTIONS Glow Plug Button This button helps start cold engine. To operate, first turn ignition switch to first position. • If ambient temperature is below 40° F (4° C), press and hold button for 15 seconds. •...
- Page 17 HT25 - CONTROLS DESCRIPTIONS Fuel Gauge This gauge indicates fuel level in tank. Use only #2 diesel fuel. Engine Temperature Indicator This indicator lights if cooling system water overheats. • Turn off engine and let cool. • Check cooling system fluid level.
- Page 18 HT25 - CONTROLS DESCRIPTIONS Heater Temperature Control This optional knob adjusts heater temperature. • Turn clockwise for warmer. • Turn counterclockwise for cooler. Hourmeter This gauge, located under seat, records engine operating time. Use these times to schedule lubrication and maintenance.
-
Page 19: Safety
Use equipment carefully. Stop operation and investigate anything that does not look or feel right. • Do not operate unit where flammable gas is present. • Contact your Ditch Witch dealer if you have any question about operation, maintenance, or equipment use. -
Page 20: Accessories
It should meet legal and regulatory requirements. Lighting Kit If you need additional light, plug lighting kit into provided outlet. Contact your Ditch Witch dealer for further information. UNDERGROUND HAZARDS Striking underground hazards can cause explosion, electrocution, fire, and exposure to hazardous materials. -
Page 21: Emergency Procedures
HT25 - SAFETY EMERGENCY PROCEDURES EMERGENCY PROCEDURES Before operating any equipment, review emergency procedures and check that all safety precautions have been taken. EMERGENCY SHUTDOWN - Turn ignition switch to stop position or push remote engine stop button. Electric Strike Description When working near electric cables, remember the following: •... - Page 22 HT25 - SAFETY EMERGENCY PROCEDURES If an Electric Line is Damaged On Tractor 1. DO NOT MOVE. Remain on tractor. 2. Warn people nearby that an electric strike has occurred. Instruct them to leave the area and contact utility. 3. Raise attachments and drive from immediate area.
- Page 23 HT25 - SAFETY EMERGENCY PROCEDURES If a Gas Line is Damaged 1. Immediately shut off engine(s) and remove any ignition sources. 2. LEAVE AREA as quickly as possible. 3. Warn others that a gas line has been cut and that they should leave area.
-
Page 24: Jobsite Classification
HT25 - SAFETY JOBSITE CLASSIFICATION JOBSITE CLASSIFICATION Inspecting Jobsite • Follow U.S. Department of Labor regulations on excavating and trenching (Part 1926, Subpart P) and other similar regulations. • Contact One-Call (888-258-0808) and any utility companies which do not subscribe to One-Call. - Page 25 HT25 - SAFETY JOBSITE CLASSIFICATION Selecting a Classification Jobsites are classified according to underground hazards present. If working . . . then classify jobsite as . . . within 10 ft (3 m) of a buried electric electric line within 10 ft (3 m) of a natural...
- Page 26 HT25 - SAFETY JOBSITE CLASSIFICATION Applying Precautions Once classified, precautions appropriate for jobsite must be taken. Electric Jobsite Precautions Use one or both of these methods. • Expose line by careful hand digging or soft excavation. • Have service shut down while work is in progress. Have electric company test lines before returning them to service.
- Page 27 HT25 - SAFETY JOBSITE CLASSIFICATION Crystalline Silica (Quartz) Dust Follow these guidelines when trenching, sawing or drilling through material that might produce dust containing crystalline silica (quartz) dust. 1. Know the work operations where exposure to crystalline silica may occur. Be aware of health effects of crystallline silica and that smoking adds to the damage.
-
Page 28: Safety Alert Classifications
HT25 - SAFETY SAFETY ALERT CLASSIFICATIONS SAFETY ALERT CLASSIFICATIONS These classifications and the icons defined on the following pages work together to alert you to situations which could be harmful to you, jobsite bystanders or your equipment. When you see these words and icons in the book or on the machine, carefully read and follow all instructions. -
Page 29: Safety Alerts
HT25 - SAFETY SAFETY ALERTS SAFETY ALERTS Moving digging teeth will kill you or cut off arm or leg. Stay away. Turning shaft will kill you or crush arm or leg. Stay away. Electric shock. Contacting electric lines will cause death or serious injury. Know location of lines and stay away. - Page 30 HT25 - SAFETY SAFETY ALERTS Jobsite hazards could cause death or serious injury. Use correct equipment and work methods. Use and maintain proper safety equipment. Crushing weight could cause death or serious injury. Use proper procedures and equipment or stay away.
- Page 31 HT25 - SAFETY SAFETY ALERTS Explosion possible. Serious injury or equipment damage could occur. Follow directions carefully. Incorrect procedures could result in death, injury, or property damage. Learn to use equipment correctly. Looking into fiber optic cable could result in permanent vision damage. Do not look into ends of fiber optic or unidentified cable.
- Page 32 HT25 - SAFETY SAFETY ALERTS Fire or explosion possible. Fumes could ignite and cause burns. No smoking, no flame, no spark. Moving traffic - hazardous situation. Death or serious injury could result. Avoid moving vehicles, wear high visibility clothing, post appropriate warning signs.
- Page 33 HT25 - SAFETY SAFETY ALERTS Flying objects may cause injury. Wear hard hat and safety glasses. Hot parts may cause burns. Do not touch until cool. Exposure to high noise levels may cause hearing loss. Wear hearing protection. Fall possible. Slips or trips may result in injury.
- Page 34 HT25 - SAFETY SAFETY ALERTS...
-
Page 35: Tractor
NOTICES: • Read operator's manual before operating equipment. Follow instructions carefully. Contact your Ditch Witch dealer for operation information or demonstration. • Wear hard hat, safety glasses, and other protective gear required by job. Do not wear jewelry or loose clothing that can... -
Page 36: Startup
HT25 - TRACTOR STARTUP STARTUP Before operating tractor, read engine manufacturer’s starting and operating instructions. Follow instructions for new engine break- 1. Fasten seatbelt. 2. Check that track controls and digging chain control are in neutral position. 3. Move hand throttle to 1/2 open. - Page 37 HT25 - TRACTOR STARTUP 5. Turn key. Indicators will light. If engine does not turn, check start interlock display. See CONTROLS. If engine turns but does not start within 10 seconds, allow starter to cool before trying to start again.
-
Page 38: Operation
HT25 - TRACTOR OPERATION OPERATION 1. Raise backfill blade and digging boom. 2. Adjust throttle. 3. Move track controls to forward or reverse. Moving traffic – hazardous situation. Death or serious injury could result. Avoid moving vehicles, wear high visibility clothing, post appropriate warning signs. -
Page 39: Transportation
HT25 - TRANSPORTATION LIFT TRANSPORTATION LIFT Lifting Points Lifting points are identified by lifting decals. Lifting at any other point can be unsafe and can damage machinery. Lifting Unit Before lifting, check SPECIFICATIONS. Use a hoist capable of supporting equipment’s size and weight. -
Page 40: Tiedown
HT25 - TRANSPORTATION TIEDOWN TIEDOWN Tiedown Points Tiedown points are identified by tiedown decals. Securing unit to trailer at any other points may be unsafe and can damage machinery. Tie Down Unit Attach tiedowns at front and rear tiedown points. Make sure... -
Page 41: Haul
HT25 - TRANSPORTATION HAUL HAUL Crushing weight could cause death or serious injury. Use proper procedures and equipment or stay away. sf1014 NOTICES: • Read trailer operator’s manual before loading or transporting your machine. Incorrectly loaded machine can slip or cause trailer sway. - Page 42 HT25 - TRANSPORTATION HAUL Loading 1. Fasten seatbelt and start engine. See TRACTOR for startup procedures. 2. Raise backfill blade and digging boom, but keep them low. NOTICE: Stability is reduced if digging boom is offset. 3. Slowly drive tractor onto trailer until tiedown position is reached.
- Page 43 HT25 - TRANSPORTATION HAUL Unloading 1. Check that track drive controls are in neutral. 2. Remove tiedowns. 3. Fasten seatbelt and start engine. Rollover possible. If machine rolls over, you could be thrown from seat and killed or crushed. Wear seat belt.
-
Page 44: Tow
HT25 - TRANSPORTATION Incorrect procedures could result in death, injury, or property damage. Learn to use equipment correctly. sf1027 Under normal conditions, unit should not be towed. If unit becomes disabled and towing is necessary: • tow for short distances at less than 1 mph (1.6 km/h), •... -
Page 45: Trenching
HT25 - TRENCHING CONTROL OVERVIEW TRENCHING CONTROL OVERVIEW 1. Boom lift control 2. Digging chain control... -
Page 46: Control Descriptions
HT25 - TRENCHING CONTROL DESCRIPTIONS CONTROL DESCRIPTIONS Boom Lift Control This lever raises or lowers digging boom. • Push to lower. • Pull to raise. ic0127h.eps Digging Chain Control This switch starts the digging chain. • Slide orange tab down and press top of switch to start digging chain. -
Page 47: Setup
HT25 - TRENCHING SETUP SETUP Jobsite hazards could cause death or serious injury. Use correct equipment and work methods. Use and maintain proper safety equipment. NOTICE: Know and comply with regulations covering One-Call service and utility notification before digging or drilling. - Page 48 HT25 - TRENCHING SETUP 1. Fasten and adjust seat belt. 2. Start tractor and adjust throttle. 3. Raise boom and backfill blade. 4. Adjust throttle and drive to starting point. Move in line with planned trench. 5. Lower backfill blade.
-
Page 49: Operation
HT25 - TRENCHING OPERATION OPERATION 1. Lower backfill blade to reduce shock when trenching begins. 2. Adjust throttle. 3. Engage digging chain control. DIGGING CHAIN WILL MOVE. Moving digging teeth will cause death or serious injury. Stay away. NOTICES: •... - Page 50 HT25 - TRENCHING OPERATION 4. Increase engine speed to full throttle. 5. Slowly lower digging boom to desired trench depth. 6. Raise backfill blade. 7. Push track controls forward to trenching speed. 8. When trench is complete, move track controls to neutral.
-
Page 51: Operating Tips
For more information, contact your Ditch Witch dealer. Trench Cleaner Trench cleaners remove spoils from the trench floor. For more information about the mechanical trench cleaner available for use on the HT25, contact your Ditch Witch dealer. - Page 52 HT25 - TRENCHING...
-
Page 53: Backhoe
HT25 - BACKHOE CONTROL OVERVIEW BACKHOE CONTROL OVERVIEW 1. Bucket/dipper control 2. Boom/swing control 3. Position adjustment sleeves 4. Stow lock... -
Page 54: Control Descriptions
HT25 - BACKHOE CONTROL DESCRIPTIONS CONTROL DESCRIPTIONS Position Adjustment Sleeves These sleeves allow movement of boom/swing control and bucket/ dipper control between stowed position and operating position. • Lift sleeve (1) and pull control (2) to operating position. Release sleeve before operating. - Page 55 HT25 - BACKHOE CONTROL DESCRIPTIONS Boom/Swing Control This control moves boom left or right and raises or lowers boom. • Move left to swing left. • Move right to swing right. • Pull to raise. ic0042c.eps • Push to lower.
-
Page 56: Setup
HT25 - BACKHOE SETUP SETUP 1. Move track controls to neutral position. 2. Lower rear attachment to 6 in (152 mm) above ground. 3. Check that backfill blade is straight and lower it to ground. 4. Adjust throttle. NOTICE: Engine speed affects speed of backhoe operation. -
Page 57: Operation
HT25 - BACKHOE OPERATION OPERATION 1. Use boom/swing control and bucket/dipper control to dig hole or trench. • Keep dipper and boom at right angles as much as possible for maximum power. • Keep bucket in line with dipper as... - Page 58 HT25 - BACKHOE...
-
Page 59: Lubrication
HT25 - LUBRICATION LUBRICATION Proper lubrication and maintenance protects Ditch Witch equipment from damage and failure. In extreme conditions, lubricate more frequently. Use only recommended lubricants. Fill to capacities listed in SPECIFICATIONS. Recommended Lubricants Diesel engine oil (SAE 10W40) meeting API engine service classification SF/CD or CE... -
Page 60: Overview
HT25 - LUBRICATION OVERVIEW OVERVIEW (DEO) 10W40 diesel engine oil (THF) Tractor hydraulic fluid (MPL) 80W90 Multipurpose lubricant (EPG) Extreme pressure grease Filter Check... -
Page 61: Schedule
HT25 - LUBRICATION SCHEDULE SCHEDULE Interval Task Page 10 hours Check engine oil Check hydraulic oil Lube trencher pivot Lube trencher tail roller Lube trencher outboard bearing (centerline attachments only) Lube backfill blade pivot 50 hours Change engine oil and filter (initial) -
Page 62: Engine
HT25 - LUBRICATION ENGINE ENGINE Ref. Task Hours Lubricant Check engine oil 1,3,4 Change engine oil and filter (initial) 1,3,4 Change engine oil and filter... -
Page 63: Engine Oil And Filter
HT25 - LUBRICATION ENGINE Engine Oil and Filter Check Check engine oil at dipstick (1) before operation and every 10 hours thereafter. Add DEO at fill (2) as necessary to keep oil level at highest line on dipstick. om0448h.eps Change... -
Page 64: Ground Drive
HT25 - LUBRICATION GROUND DRIVE GROUND DRIVE Task Hours Lubricant Check track planetary oil Change track planetary oil (initial) Change track planetary oil 1000... - Page 65 HT25 - LUBRICATION GROUND DRIVE Track Planetary Oil Check Check oil level every 100 hours. Position gearbox as shown. Oil should be level with plugs. Fill at one plug and use the other to check oil level. om0450h.eps Change Change oil after first 100 hours of operation and every 1000 hours thereafter.
-
Page 66: Hydraulics
HT25 - LUBRICATION HYDRAULICS HYDRAULICS Ref. Task Hours Lubricant Check hydraulic oil Change hydraulic oil filter (initial) Change hydraulic oil filter 1,3,4 Change hydraulic oil 1000... -
Page 67: Hydraulic Oil
HT25 - LUBRICATION HYDRAULICS Hydraulic Oil Check With frame level and digging boom fully raised, check oil at sight glass (2) every 10 hours. Add THF at fill (3) as necessary. Clean dust from cap by blowing with low-pressure air. -
Page 68: Trencher
HT25 - LUBRICATION TRENCHER TRENCHER Ref. Task Hours Lubricant Lube tail roller Lube pivot Lube outboard bearing (centerline attachments only) Check trencher gearbox oil Change trencher gearbox oil (initial) Change trencher gearbox oil... - Page 69 HT25 - LUBRICATION TRENCHER Pivot Wipe zerk clean and lube every 10 hours with EPG. Tail Roller Wipe zerk clean and lube every 10 hours with EPG. Outboard Bearing On centerline attachments, wipe zerk clean and lube every 10 hours with EPG. Offset attachment...
- Page 70 HT25 - LUBRICATION TRENCHER Gearbox Check Check oil at fill plug (1) every 50 hours. Keep oil level at plug. If necessary, add MPL at fill plug. Change Change oil after 50 hours and every 500 hours thereafter. Drain at drain plug (2). Replace drain...
-
Page 71: Backfill Blade
HT25 - LUBRICATION BACKFILL BLADE BACKFILL BLADE Pivot Wipe zerk clean and lube every 10 hours with EPG. - Page 72 HT25 - LUBRICATION...
-
Page 73: Maintenance
HT25 - MAINTENANCE MAINTENANCE Incorrect procedures could result in death, injury, or property damage. Learn to use equipment correctly. NOTICES: • Unless otherwise instructed, all service should be performed with engine shut off. • Refer to engine manufacturer’s manual for engine maintenance instructions. -
Page 74: Overview
HT25 - MAINTENANCE OVERVIEW OVERVIEW Interval Task Page 10 hours Check coolant level Check track tension Check hydraulic hoses Check fuel filter Check digging chain teeth Check digging chain Check/adjust digging chain tension Check boom mounting bolts Check attachment mounting bolts... -
Page 75: Engine
HT25 - MAINTENANCE ENGINE ENGINE Ref. Task Hours Check coolant level Check fan belt Check air filter Change fuel filter Change in-line fuel filter Change air filter Replace fan belt Change coolant 2000... -
Page 76: Fuel Filters
HT25 - MAINTENANCE ENGINE Fuel Filters To access fuel filters, remove rear engine access panel. Change Change fuel filter and inline fuel filter every 100 hours. To change: • Remove filter. • Install new filter. Apply fuel oil thinly over the gasket and hand-tighten. -
Page 77: Fan Belt
HT25 - MAINTENANCE ENGINE Fan Belt Check Check belt every 50 hours for damage or wear. Replace worn belt. Adjust • Turn off engine and remove key. • Apply moderate thumb pressure to belt between pulleys, as shown. • Belt is properly tensioned when deflection is about 0.28... -
Page 78: Cooling System
HT25 - MAINTENANCE ENGINE Cooling System Check Check coolant level in overflow tank every 10 hours. Coolant should be between LOW and FULL marks on tank. Fill as needed with only Ditch Witch approved coolant (p/n 255- 006), or other fully formulated om0462h.eps... - Page 79 HT25 - MAINTENANCE ENGINE Air Filter To better access air filter, slide out overflow tank. Check Check filter and suction hose every 50 hours for wear or holes. Check more often if working in dusty conditions. Change Change air filter every 250 hours or when yellow band in air filter service indicator reaches red line.
-
Page 80: Ground Drive
HT25 - MAINTENANCE GROUND DRIVE GROUND DRIVE Ref. Task Hours Check track tension Check sprocket bolts (initial) Check sprocket bolts Check front idler roller 2, 3 Adjust track tension As needed... - Page 81 HT25 - MAINTENANCE GROUND DRIVE Track Tension Check Check track tension every 10 hours. Measure length of spring as shown. When tracks are correctly tensioned, spring should measure 9 1/2 in (241 mm). Adjust To increase track tension, turn screw clockwise. To reduce track...
- Page 82 HT25 - MAINTENANCE GROUND DRIVE Track Sprocket Bolts Check sprocket bolts after first 50 hours and every 100 hours thereafter. Torque bolts to 70 ft•lb (95 N•m). Front Idler Roller Check front idler roller for wear every 100 hours. Replace if...
-
Page 83: Hydraulics
HT25 - MAINTENANCE HYDRAULICS HYDRAULICS NOTICE: Before disconnecting any hydraulic line, turn engine off and operate all controls to relieve pressure. Lower, block or support any raised component. Cover connection with heavy cloth and loosen connector nut slightly to relieve residual pressure. -
Page 84: Electrical
HT25 - MAINTENANCE ELECTRICAL ELECTRICAL Battery and fuses are located under seat. Battery Check battery connections for wear or corrosion. Keep connections clean and tight. Batteries supplied by factory are maintenance-free. Service replacement batteries according to manufacturer’s instructions. om0464h.eps Fuses Change fuses as needed. -
Page 85: Trencher
HT25 - MAINTENANCE TRENCHER TRENCHER Ref. Task Hours Check digging chain teeth Check digging chain Check/adjust digging chain tension Check boom mounting bolts Check attachment mounting bolts Check personnel restraint bar bolts Replace digging chain As needed... - Page 86 Ditch Witch replacement parts and maintaining original tooth pattern. For more efficient digging, contact your Ditch Witch dealer for information about the tooth pattern best suited to your jobsite. If using rock chain bits, check that bits rotate freely. Clean chain and check bits after each use.
- Page 87 HT25 - MAINTENANCE TRENCHER Chain Tension Adjust digging chain tension every 10 hours. With boom horizontal, pull up on chain until it is taut. Measure distance (2) from top of boom to chain. Correct distance is 1.5 to 2 in (40 to 50 mm).
- Page 88 HT25 - MAINTENANCE TRENCHER Boom Mounting Bolts Check 4 bolts every 10 hours for looseness or wear. Torque as necessary to keep bolts and nuts tight. Attachment Mounting Bolts Check two upper and two lower bolts every 10 hours for looseness or wear.
- Page 89 HT25 - MAINTENANCE TRENCHER Chain Replacement Visually check digging chains for wear on rollers and sidebars. Check pins and bushing wear by measuring distance between chain pins and comparing it with a new chain. Replace sprockets when a new chain is installed.
- Page 90 HT25 - MAINTENANCE TRENCHER Fluid pressure could pierce skin and cause injury or death. Stay away. NOTICE: Service digging boom grease cylinder only while standing on opposite side of boom. Wear gloves and safety glasses and cover fitting with cloth when relieving pressure in cylinder.
- Page 91 HT25 - MAINTENANCE TRENCHER To install chain: 1. Lay chain on ground with teeth down and pointed toward unit. 2. Start unit. 3. Back unit up until chain extends past head shaft about 1 ft (30.5 cm). 4. Lower backfill blade to ground.
- Page 92 HT25 - MAINTENANCE...
-
Page 93: Specifications
HT25 - SPECIFICATIONS HT25 SPECIFICATIONS HT25 DIMENSIONS*: U.S. METRIC Max. trench depth 39 in 99 cm Angle of approach 19° 19° Angle of departure 18° 18° Max. trench width 16 in 40.6 cm Boom angle down 53° 53° Boom angle up 50°... - Page 94 HT25 - SPECIFICATIONS HT25 Backfill blade: 4-way hydraulic lift angle U.S. METRIC Blade width 35.5 in 90.2 cm Blade height 9.9 in 25.1 cm Lift lift above ground 30° 30° Blade drop below ground 20° 20° Maximum swing angle (left/right) 28°...
- Page 95 HT25 - SPECIFICATIONS HT25 POWER U.S. METRIC Engine: Kubota D1105-E diesel Cooling medium 50/50 antifreeze, see MAINTENANCE for more information Injection 1991 lbw/in 140 kgf/cm Number of cylinders Displacement 68.53 in 1123 cm Bore 3.07 in 7.70 cm Stroke 3.09 in 7.86 cm...
- Page 96 HT25 - SPECIFICATIONS HT25 HYDRAULIC SYSTEM: U.S. METRIC Ground drive pump Pump capacity per track @ 11.8 gpm 44.9 L/min 3000 rpm Pump relief track slip Auxiliary pump Pump capacity @ 3000 rpm 6.7 gpm 25.2 L/min Pump relief 2320 psi...
-
Page 97: A225 Backhoe
HT25 - SPECIFICATIONS A225 BACKHOE A225 BACKHOE DIMENSIONS: U.S. METRIC Transport height 77.25 in 1.96 m Ground clearance 20 in 50.8 cm Backhoe length, stowed 62 in 1.58 m Digging depth, max. 68 in 1.73 m Digging depth, 2 ft (0.6 m) flat bottom 64 in 1.63 m... - Page 98 HT25 - SPECIFICATIONS GENERAL: U.S. METRIC Bucket Width 12 in 30.5 cm Capacity 1 ft .027 m Backhoe weight with bucket 780 lb 353.8 kg Lift capacity, boom over end and swing arc, SAE at 36 in (.9 m) 154 lb...
- Page 99 (1) year of first commercial use. Free labor will be provided at any authorized Ditch Witch dealership for installation of parts under this warranty during the first year following initial commercial use of the serial-numbered Ditch Witch equipment on which it is installed.
- Page 100 For information regarding this limited warranty, contact CMW’s Product Support department, P.O. Box 66, Perry, OK 73077-0066, or contact your local Ditch Witch dealer. First version: 1/91; Latest version: 4/00...
- Page 103 HT25 -...
Need help?
Do you have a question about the ht25 and is the answer not in the manual?
Questions and answers
How can I roll a disabled ht25 trencher
To roll a disabled Ditch Witch HT25 trencher, refer to towing procedures. Incorrect towing procedures could result in death, so proper methods must be followed. Specific towing steps are not detailed in the provided context, but the manual includes a "TOW" section, indicating that towing is the method used to move a disabled unit. For exact procedures, refer to the towing instructions in the HT25 manual.
This answer is automatically generated