Table of Contents
Advertisement
Quick Links
Advertisement
Table of Contents

Related Manuals for BSL ZEUS

Summary of Contents for BSL ZEUS
- Page 1 BSL ZEUS USERS GUIDE...
-
Page 2: Product Introduction
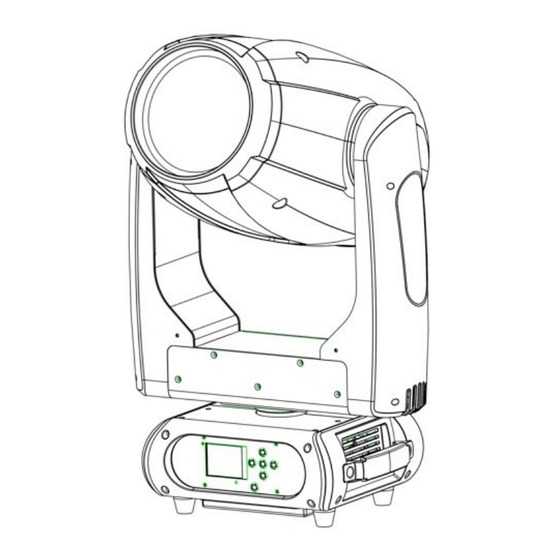
1. Product Introduction: 1.1 Before unpack the fixture, pls make sure that the packing is in good condition, following items will be found in the box: -The fixture -This users guide -3m DMX cable -1.5m power cable with powercon -Omega bracket for hanging installation -Safety chain 1.2 Specification Source Light source: Osram Sirius HRI 440W Led life: 2.000 hours Luminous Flux: 24000lumen, 260000lux@10m@beam, 109000lux@10m@spot Control: Remote on/off via DMX Ballast: switching mode power supply Optical System Beam angle: 2°-40° beam, 3°-45°spot X/Y Pan: 630° (4.0 sec) or 540°(3.58 sec), Tilt: 265° (2.8 sec) 3 phase motor 16-bit resolution Auto repositioning Colors three color wheels with CMY fading + 15 color filters Bidirectional rainbow effect Color bounce effect for sequential colors on the wheel Gobos Rotating gobo wheel: 6 dichroic, indexable and interchangeable rotating gobos Static gobo wheel: 18 metallic fixed Gobos (6 beam reducer) Animation wheel Real indexable and gobo shaking Distinctive gobo animation effect Features DMX channels: 31/32/18/20 Color wheel: CMY+15 colors Rotating gobo wheel: 6+1 gobos Static gobo wheel:18+open Zoom: 2°-40° beam, 3°-45°spot Motorized focus Full range 0-100% dimmer... - Page 3 RDM read voltage, current and power consumption of lamp Software upgrade via DMX Hibernation when lost DMX for preset time Indicate temperature info of base, arm and lamp Fan speed auto change according to temperature Artnet control Display 2.4inch super nice LCD display with friendly English/ Chinese/French/Spanish menu Auto lock Flip Back-up communicating IC 1.3 Description of the Device 1. Project lens 2. Head 3. Arm 4. Base 5. Display 6. Foot stand 7. Operation button 8. Handle 9. Wireless indicator 10. Mic 11. Left button 12. Battery indicator 13. Up button 14. Down button 15. Enter button 16. Right button 17. Ethernet out 18. 5-pin DMX in 19. Ethernet in 20. 5-pin DMX out 21. Powercon in 22. Fuse...
- Page 4 1.4 Colors and Gobos Open Blue 3 Dark pink 4 Light bule 5 Sky bule 6 Linear Cyan 7 Red 8 Light orange 9 Orange 10 Brown 11 Dark red 12 Linear Magenta 13 Green 14 Megenta 15 Light orange 16 Dark Green 17 Grass green 18 Linear Yellow...
-
Page 5: Safety And Maintenance Information
Static gobo wheel Rotating gobo wheel (slot-in-out gobos) 2. Safety and maintenance Information 2.1 Safety Info Before operate this unit, please carefully read this users guide and keep if needed in future. It’s necessary to respect following rules. The disposal of the device after lifecycle could damage the environment, need to take it to special company for recycling or return to authorized dealer. The products referred to in this manual conform to the European Community Directives and are therefore marked with CE logo. Keep this device away from children and unauthorized users, the manufacturer will not take responsibility for the damage due to any disregard of the information provided in this manual and wrong operation. Before operate the device, pls make sure the fixture is in good housing, ensure pan and tilt can rotate in its complete range. Pls make sure minimal 0.5m distance need to kept between the fixture to any flammable material. --0.5m The device can only run with 100-240v voltage, 50/60Hz power, don’t connect to any other wrong power. Disconnect the device from main power before open the shield or maintenance. The device is designed only for indoor usage, pls keep it away from moisture. Do not expose the device under the sun or directly to any other lighting source. Never look directly into the projecting lens when the fixture is power on, the light may trigger epileptic seizures in photosensitive persons or persons with epilepsy. Especially at beam effect, extreme caution and observance of these safety instructions is mandatory. -
Page 6: Troubleshooting
Don’t put or install the device on a surface that subject to vibration or bumps. The device is supposed to work in the temperate range -15° C and +45° C, do not use the device Ta=4 when the temperate exceed this range. The lens, shield need to be replaced when obviously broken, never use the device when the shield is not completed closed. Safety I class device, need to be earth connected. When the fixture is hanged overhead, the safety rope must be fixed to the bottom of the device to the appropriate fixing point. Always carry the device by the handles, do not take the head or arm directly for transportation. 2.2 Maintenance 2.2.1 Operation only allowed to qualified person, damages due to unprofessional operation or remove of any parts inside will not be considered in warranty service. There are no serviceable parts inside the device or package, service only leaves to authorized dealers. 2.2.3 Never allow the optical components contact with oil, fat or any other liquid. 2.2.4 A regular clearance of the device is needed for long-term usage, this is very helpful to maintain the lifetime and brightness need to use a soft and lint-free cloth to clean the optical system, fan and air flowing tunnel. 2.2.5. Trouble Shooting Problems Possible reasons Checking or solutions Device not power up Powercon or power cable damaged Change a good power cable to try Faulty power supply Replace new power supply Pan/Tilt error or vibrate Faulty Pan/Tilt PCB Replace PT001 PCB Faulty opto sensor Replace opto sensor OP001 Cable loosen Check the cable connect to OP001 Lamp off Temperature protection Check the temperature from menu Fan not working Check the fan speed info from menu Faulty Lamp... -
Page 7: Installation
3. Installation 3.1 The device could be either put on a solid and even urface, or mounted upside down or sideways like left picture. 3.2 The mounting place must be sufficient stable and be able to support a weight of 10 times of the unit’s weight. When the fixture is hanged, always additionally secure the device with the safety chain, fasten the safety rope at a suitable position so that the maximum fall of the projector will be 20 cm 3.3 How to do mounting installation. Step one: Installation the clamp onto the omega bracket; Step two: Install the clamp and bracket on the bottom of panel, fasten the quick-locks; Step three: Install the whole device onto appropriate truss and fasten the clamps, tight the safety rope with the truss or other fixing point at a suitable position that drop down distance not exceed 20 cm. 4. Control menu 4.1 Meaning of the icon in menu CONNECT LIGHT INFOMATION SET PROGRAM... - Page 8 4.2 Menu tree Default setting shadowed. Mark with can be basic reloaded, be program reloaded, can be private reloaded. DMX Address XXX DMX address setting Wireless (Wireless Module) Wireless Enabled Artnet (Only Artnet Module) Artnet Enabled ON/OFF Turn On/Off Turn On the lamp Automatic Lamp On/off when ON/OFF DMX Control ON/OFF power on (Only HID Lamp) DMX control or not (HID Lamp) Max Temperature 80~139 /176~282 Lamp off if temperature continuously over for 2minutes Lamp Adjust PAN…… Adjust value of channel Time Info. Current XXXX(Hours) Fixture boot time Fixture Life XXXX(Hours) Fixture total run time...
- Page 9 UI Set Mic Sens. 0~99%,60% Sensitivity of Mic No Signal Close/Hold/Auto/Music Mode when no signal Temperature. C/F Fahrenheit /Celsius Temperature at Fans Mode Auto Speed /High Speed Fans mode Hibernation OFF, 01M~99M 15M Sleeping mode 02~60m 02m Backlight Show backlight time Flip Display ON/OFF Display 180 reverse Display Bright Display Brightness 00~31 10 Brand Show Show brand or not ON/OFF Key Lock Key lock on/off ON/OFF Language Language Select En/Fr/Sp/ / ON/OFF Fixture Set Theater Mode Theater Mode (Only Led Lamp) Dimmer Curve...
- Page 10 Edit Chase Chase 1 Chase Test Test : Step 01 =SCxxx Beginning scene Chase 8 Step 64 Ending scene =SCxxx =xxx Edit Scenes Edit Scene 001 Pan,Tilt,…… Input manual scene ~ Edit Scene --Fade Time-- =xxx Modify manually fading 250 --Secne Time-- time =xxx DMX Input Modify manually scene time Input scene from exterior controller Scenes Record ScXX=>ScXX Auto Input scenes 5. DMX connection and DMX protocol 5.1 DMX addressing: 5.1.1 The device is controlled by universal DMX 512 protocol, DMX address is the start channel used to receive instructions from the external controller. For independent control, each fixture must be assigned its unique address control channels. For example, this device has four channel modes: 31/32/18/20, if we set the mode at standard 31 channels mode, and there are several models need to be independently controlled, we just simply address first fixture at 1, and second fixture at 32, third one at 63, etc. If the devices have the same address, they will behave synchronically.
- Page 11 5.2 DMX chart Channel Min Max name function DMX DMX St Ex Ba1 Ba2 Pan Pan Coarse 255 Pan fine Pan Fine 255 Tilt Tilt Coarse 255 Tilt fine Tilt Fine 255 Movment fastest to Slowest 255 Speed Normal Movment 6 Movement With Backout Function TBD 255 Normal Shutter Functions Pulse-effect Forward Shutter Pulse-effect Reverse Function Random Strobe TBD 255...
- Page 12 Shutter closed No function (shutter open) Strobe effect slow to fast No function (shutter open) 127 4 Shutter Pulse-effect in sequences 128 159 No function (shutter open) 160 191 Random strobe effect slow to fast 192 223 No function (shutter open) 224 255 Dimmer Dimmer(Close to Open) 255 Indexed Indexed With BackOut Forward Spin Color1 9 10 Reverse Spin Function Continuous Color Bounce 111 TBD 112 255 Indexed & Indexed With BackOut&Color Bounce Position 1 (Open) Position 2 Position 3 Position 4 Position 5 104...
- Page 13 Position 10 146 147 Position 11 148 149 Indexed With Bounce Position 1 150 159 Position 2 160 169 Position 3 170 179 Position 4 180 189 Position 5 190 199 Position 6 200 209 Position 7 210 223 Forward Wheel Spin Stop to fastest 224 239 Reverse Wheel Spin Stop to fastest 240 255 Indexed Indexed With BackOut Forward Spin Color2 11 12 Reverse Spin Function...
- Page 14 Position 5 136 137 Position 6 138 139 Position 7 140 141 Position 8 142 143 Position 9 144 145 Position 10 146 147 Position 11 148 149 Indexed With Bounce Position 1 150 159 Position 2 160 169 Position 3 170 179 Position 4 180 189 Position 5 190 199 Position 6 200 209 Position 7 210 223...
- Page 15 Yellow Yellow 0->100% 127 Position 1 128 129 Position 2 130 131 Position 3 132 133 Position 4 134 135 Position 5 136 137 Position 6 138 139 Position 7 140 141 Position 8 142 143 Position 9 144 145 Position 10 146 147 Position 11 148 149 Indexed With Bounce Position 1 150 159 Position 2 160 169...
- Page 16 Position 7 216 255 Forward Wheel Spin Stop to fastest 255 Reverse Wheel Spin Stop to fastest 255 Continuous Positioning from 0-360 degrees 255 Indexed Position 1 (Open) Position 2 Position 3 Position 4 Position 5 Position 6 Position 7 Indexed With Backout Position 1 (Open) Position 2 Position 3 9 11 Rot Gobo Position 4 Position 5 Position 6 Position 7 Indexed With Shake Position 2 118 Position 3 119 139 Position 4 140 160 Position 5 161 181...
- Page 17 Position 7 203 223 Forward Wheel Spin Stop to fastest 224 239 Reverse Wheel Spin Stop to fastest 240 255 Continuous Forward Spin Reverse Spin Gobo Rot Forward Animate Rotate 20 21 Function Forward Animate Rotate With Backout Reverse Animate Rotate Reverse Animate Rotate With Backout 111 TBD 112 255 Continuous Positioning from 0-360 degrees 255 Forward Spin Stop to fastest 255 Reverse Spin Stop to fastest 255 21 22 Gobo Rot Forward Animate Rotate & Forward Animate Rotate With Backout Stop to fastest 255 Reverse Animate Rotate & Reverse Animate Rotate With...
- Page 18 Position 2 Position 3 Position 4 Position 5 Position 6 Position 7 Position 8 103 Position 9 104 116 Position 10 117 129 Position 11 130 142 Position 12 143 155 Position 13 156 168 Position 14 169 181 Position 15 182 194 Position 16 195 207 Position 17 208 220 Position 18 221 233 Position 19 234 255 Forward Wheel Spin Stop to fastest...
- Page 19 Position 4 Position 5 Position 6 Position 7 Position 8 Position 9 Position 10 Position 11 Position 12 Position 13 Position 14 Position 15 Position 16 Position 17 Position 18 Position 19 Indexed With Backout Position 1 (Open) Position 2 Position 3 Position 4 Position 5 Position 6 Position 7 Position 8...
- Page 20 Position 9 Position 10 Position 11 Position 12 Position 13 Position 14 Position 15 Position 16 Position 17 Position 18 ~ Position 19 Indexed With Shake Position 2 Position 3 Position 4 Position 5 100 107 Position 6 108 115 Position 7 116 123 Position 8 124 131 Position 9 132 139 Position 10 140 147 Position 11 148 155 Position 12 156 163 Position 13 164 171 Position 14...
- Page 21 Position 15 180 187 Position 16 188 195 Position 17 196 203 Position 18 204 211 Position 19 212 223 Forward Wheel Spin Stop to fastest 224 239 Reverse Wheel Spin Stop to fastest 240 255 Indexed & Indexed With Backout Position 1 (Open) 24 25 12 14 Prism Position 2 171 Position 3 172 255 Continuous Positioning from 0-360 degrees 191 Forward Spin 25 26 13 15 Prism Rot Stop to fastest 192...
-
Page 22: Unique Features
Pan&Tilt Reset Color Reset Gobo Reset TBD Other Reset Display Off Display On Lamp Off Lamp On Hibernation TBD 255 6. Unique Features 6.1 RDM, stand for “Remote Device Management”, with this function, users can realize remote control of the device, such as remotely changing DMX address, reverse pan/tilt setting, check a lot of useful information such as temperature, power consumption, fan speed. Etc. Every single device has a unique RDM code before left factory to distinguish from each other, usually not suggest users change this code freely. 6.2 Software upgrade function via DMX cable, if there is any new firmware for this device come out, it can be upgraded simply via a software upgrade box, no need to change any mechanical parts. The upgrade box is not included in the package, if need any further assistance pls just contact authorized dealers. 6.3 Hibernation, the device will enter sleeping mode if activated after a period of disconnecting DMX signal to save the power consumption, and will return immediately as soon as the DMX signal is sent again. 6.4 Display battery, this function is prepaid in the display PCB, users just need to install a normal 10440 600mAh 3.7V rechargeable lithium battery, then users could power on the display and do setting without connect to main power. 6.5 Display back-up communication IC, there is a back-up communication IC installed in the display PCB, so users could replace at once if the working one is broken, no need to wait long time from service. 6.6 Display flip, by press up and down button for more than 3 seconds, the display will flip automatically, this function is useful to read menu conveniently when device is hanged. 8. Dimensions Drawing... -
Page 23: Technical Specification
9. Technical specification Power supply 100-240 V AC, 50/60 Hz ~ Power consumption 700W LED Osram Sirius HRI 440W discharge lamp DMX channels 31/32/18/20 modes Beam angle 2°-34° beam Luminous flux 24000lumen Fuse T 8 A, 250 V Device dimensions 428x324x718mm Net Weight 25KG...
Need help?
Do you have a question about the ZEUS and is the answer not in the manual?
Questions and answers