
Related Manuals for Märklin Central Station 3


Summary of Contents for Märklin Central Station 3
- Page 1 Central Station 3 deutsch Seite français page italiano pagina english page nederlands español página...
- Page 2 Central Station 3...
-
Page 3: Table Of Contents
Schaltnetzteil 60061 (60 VA; für Märklin H0, Trix H0 und Minitrix) oder Schaltnetzteile 60101 bzw. 51095 (100 Bedienung | Schnelleinstieg VA; für Märklin Spur 1 bzw. LGB), Central Station 3, Gleisanschlusskabel, Gleisanlage, Rollmaterial und/oder Import von CS2-Daten | Aktualisierung der CS3 Magnetartikel. - Page 4 Anschluss an eine Anlage Sprache wählen / Einführungsassistent Auf richtige Polarität achten: Rot = Bahnstrom (B), Braun/Blau = Masse (0) Anschluss C-Gleis Anschluss K-Gleis Anschluss Spur 1 Anschluss LGB Anschluss an Programmiergleis Nach dem Einschalten begrüßt die CS3 Sie Das Programmiergleis darf keinen direkten elektrischen Kontakt zur Anlage haben und es dürfen keine weiteren mit dem Sprachauswahl-Dialog (Bild oben).
-
Page 5: Grundfunktionen Und Anschlüsse
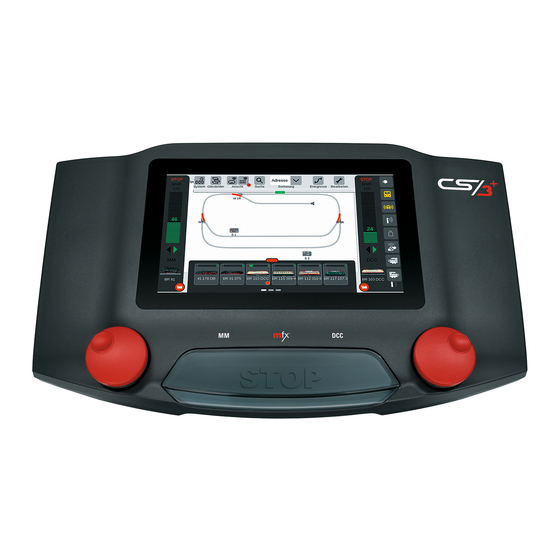
Über den Drehregler lässt sich die Geschwindigkeit Die zentrale Stop-Taste dient gleichzeitig als ebenfalls steuern. Optisch wird die Änderung im „Not-Aus“ – in kritischen Fahrsituationen wohl Balkendiagramm (grün) angezeigt. die wichtigste Funktion der Central Station 3. Steckplatz für Chip- Anschluss USB-Anschlüsse Märklin CAN- Anschluss Steckplatz für Chip-... -
Page 6: Bedienung | Schnelleinstieg
Bedienung | Schnelleinstieg Antippen und Wischen: Arbeiten mit dem Touchscreen Einfacher Zugriff auf Lok- und Artikelliste Lokliste aufziehen: Die Lokliste lässt sich mit- hilfe des roten Querbalkens an ihrem oberen Rand nach Bedarf vergrößern. Einfach den Querbalken berühren und nach oben ziehen. Ziehen in die Gegenrichtung verkleinert die Lokliste oder blendet sie sogar ganz aus. -
Page 7: Import Von Cs2-Daten | Aktualisierung Der Cs3
Märklin entwickelt die Betriebssoftware der CS3 kontinuierlich weiter. Sobald eine neuere Version verfügbar Lok-, Magnetartikel- und Gleisdaten von dort in wenigen Schritten in die Central Station 3 übernehmen. ist, signalisiert dies ein kleiner roten Punkt am Fuß des „System“-Symbols auf dem CS3-Startbildschirm. -
Page 8: Einleitung | Technische Daten
Speicherstick wahlweise direkt oder über Erstmals bietet Märklin mit der Central Station 3 zwei Versionen der Steuereinheit an: die Central Station 3 plus (Art. 60216) und die Central Station 3 (Art. 60226). Wichtig: Die Bedienung beider Geräte ist identisch. Die einen USB-Hub eingesteckt werden. -
Page 9: Fahren
Fahren Lokliste . Funktionen schalten . Loks bearbeiten... -
Page 10: Auswählen Und Fahren
Auswählen und fahren Loks in Lokliste aufnehmen: Automatische Anmeldung der mfx-Loks Funktionen einblenden Funktionen schalten Ziehen Sie den roten Durch Antippen der Kreis mit kleiner wei- Funktionssymbole ßer Lok in Richtung werden die Funk- Bildschirmmitte: tionen geschaltet. Im Bild links sind Die Lok-Funktionen werden sichtbar, beispielsweise... -
Page 11: Lokliste: Loks Sortieren Und Suchen
Lokliste: Loks sortieren und suchen Anzeige der angemeldeten Loks abhängig von der Antriebsart Bestimmte Loks suchen / Live-Suche Um Ihnen größere Über- Sie wollen eine sicht zu geben, lässt sich bestimmte Lok finden? die Lokliste anhand der Tippen Sie auf die mit Antriebsart filtern. -
Page 12: Loks Manuell Hinzufügen
Loks manuell hinzufügen So fügen Sie weitere Loks hinzu: Im Suchdialog tippen Sie auf das Lupensymbol und blenden damit eine Tastatur ein. Auf dieser geben Sie die Artikelnummer oder den Loknamen ein: Das System beginnt sofort mit der Suche. Jedes weitere eingegebene Zeichen macht die Suchergebnisse genauer (Live-Suche). -
Page 13: Lokeinstellungen Bearbeiten | Lokkarte
Lokeinstellungen bearbeiten | Lokkarte In Bearbeitungsmodus wechseln Registerkarte „Einrichten“: Wichtige Einstellungen und Funktionen ändern Den Bearbeitungsmodus aktivieren Sie zunächst mit Finger- Zu den Lok-Einstellungen gelangen Sie, indem Sie zunächst in der Lokliste den Bearbeitungs- tipp auf das Werkzeugsymbol und dann auf „Loks bearbeiten“ modus aktivieren und die zu bearbeitende Lok wählen (siehe Abschnitt „In Bearbeitungsmo- (Bild links). -
Page 14: Konfigurieren | Cv-Werte Ändern
Konfigurieren | CV-Werte ändern Funktionen einrichten So bearbeiten Sie einzelne CV-Werte Um der Lok eine Funktion zuzuwei- Nach Aktivieren des Bearbeitungsmodus und der Auswahl der zu bearbeitenden Lok (siehe Abschnitt „Einrich- sen, tippen Sie auf ein Funkti- ten“ auf Seite 12) tippen Sie auf den Reiter „Konfigurieren“. Bei einer Lok mit DCC-Decoder erscheint folgende onsfeld auf der linken Seite, zum Oberfläche;... - Page 15 mfx-Loks konfigurieren Loks zu einer Traktion zusammenfügen Sobald Sie in den Lok-Ein- stellungen einer mfx-Lok die Eine Doppel- oder Mehrfachtraktion legen Registerkarte „Konfigurieren“ Sie mit dem Menüpunkt „Traktion erstellen“ an öffnen, werden alle Detail-Ein- (Bild links). Das Aufklappmenü öffnen Sie mit stellungen des Lokdecoders Fingertipp auf das Werkzeugsymbol in der geladen.
-
Page 16: Artikelliste Bearbeiten
Artikelliste bearbeiten Magnetartikel anlegen . sortieren . schalten... -
Page 17: Magnetartikel Hinzufügen
In der nun eingeblendeten Eingabemaske können alle Details der neuen Weiche eingestellt werden: Im Auslieferungszustand ist in der Central Station 3 die Märklin Startpackung abgebildet – mit einer wenige Magnetartikel umfassenden Artikelliste und einem einfachen Gleisbild. Sollten Sie das Gleisbild und die Artikel Fingertipp auf „Ok“... - Page 18 Signal hinzufügen Licht hinzufügen Für das Anlegen eines neuen Signalartikels tippen Sie in der Artikel- Ein neuer Lichtartikel ist zügig angelegt: Mit Fingertipp auf das liste auf das Werkzeug-Symbol und wählen im folgenden Aufklapp- Werkzeug-Symbol der Artikelliste („Bearbeiten“) öffnet sich menü...
- Page 19 Sonstige Artikel hinzufügen Nun sind Sie im Einstellungen-Menü. Hier stellen Sie die Details des neuen S88-Kontakts ein: Verschiedenste Artikel lassen sich über diese Option hinzufügen: Auf das Werkzeug-Symbol der Artikelliste Fingertipp auf „Ok“ fügt tippen und im Aufklapp-Menü „Artikel hinzufügen“ den Kontakt hinzu.
-
Page 20: Mfx-Artikel Suchen
Magnetartikel suchen / Live-Suche Tastenmatrix: Sie können den Link S88 für eine Tastenmatrix, beispielsweise für ein Gleisstellpult verwenden. Bis zu 64 Tasten (32 Magnetartikel oder 64 Fahr- straßen) werden unterstützt. Die zugehörigen Schaltpunkte geben Sie im Feld „Kontaktnr.“ ein. Art des S88-Rückmeldekontakts auswählen: Mit der Suchfunktion suchen Sie gezielt nach dem Namen oder dem Teil des Namens einzelner oder Im Ausklapp-Menü... -
Page 21: Gleisstellbild Bearbeiten
Gleisstellbild bearbeiten Gleisartikel positionieren . drehen . verbinden... -
Page 22: Gleisstellbild Aufbauen
In diesem Abschnitt lernen Sie alle nötigen Schritte kennen, die für den Aufbau eines Gleisstellbilds in der Central Station 3 nötig sind. Als Beispiel dient das einfache Gleisbild der Märklin Startpackung (siehe Seite 24), das wir auf den folgenden Seiten Schritt für Schritt modellieren. - Page 23 Magnetartikel drehen: Der Drehmodus Hinzufügen von Gleisbauartikeln Für das geplante Gleisstellbild benötigen Um ein optisch ansprechendes Gleisbild zu erstellen, wir die Weiche in horizontaler Ausrichtung. benötigen wir Gleisverlauf-Artikel. Das sind reine Ge- Daher drehen wir sie um 90 Grad: Zunächst staltungselemente ohne weitere Funktion.
- Page 24 90 Grad (Bilder links; siehe „Drehmodus“ auf Seite 22). Sobald die beiden Andockstellen sich über- lappen, lösen Sie den Finger vom Display. Die Central Station 3 stellt automatisch eine Gleis- verbindung zwischen den Verbindungsstellen Nun werden beide Gleisbauartikel wie her (Bild links).
-
Page 25: Drehmodus
Gleisstellbild vervollständigen Signale einfügen Nun folgen die Signale: Zunächst ziehen wir die Signale in Position: Sobald sie sich über dem richtigen Gleisabschnitt befinden, lösen Sie den Finger vom Display. Das Signal dockt jeweils automatisch an das Gleis an. Die Hälfte des Gleisbildes steht bereits. Nun folgt der Bahnhof und der Rest des Ovals: Wir ziehen die Falls notwendig, kann die Ausrichtung des Signals von Hand angepasst werden. - Page 26 Ansichtsoptionen Auswahl einzelner und mehrerer Artikel Tippen Sie auf die Schalt- fläche „Ansicht“ in der oberen Symbolleiste, um zahlreiche Filteroptionen angezeigt zu bekommen. In der Standardeinstellung ist die Option „Alles zeigen“ markiert. Mit Fingertipp auf die einzelnen Artikel-Ka- Für verschiedene Aktionen ist es notwendig, zuvor tegorien können Sie sich einen oder mehrere Artikel auszuwählen.
-
Page 27: Weichen Und Signale Schalten
Areal aus Auswahl erstellen Auswahl auf Platte verschieben und kopieren Größere Übersicht gerade bei komplexeren Anlagen errei- chen Sie mit der Funktion, eine Auswahl auf eine neue Platte zu kopieren (Bild rechts oben) oder Sobald Sie mehrere Artikel (Bild links) oder eine Fläche (Bild rechts) ausgewählt haben, wie auf der zu verschieben (Bild rechts). -
Page 28: Ereignisse Erstellen Und Bearbeiten
Ereignisse erstellen und bearbeiten Fahrstraßen anlegen . Abläufe programmieren und schalten... -
Page 29: Ereignisse Hinzufügen | Automatisieren Von Abläufen
Die Automatisierung von Abläufen ist für viele Modelleisenbahner die Krönung ihres Hobbys. Mit der Nach dem Öffnen des Menüpunkts „Er- Central Station 3 wird das Anlegen von Fahrstraßen, Lokabläufen und die automatische Steuerung eignis hinzufügen“ einfach die entspre- gesamter Anlagen nochmals deutlich vereinfacht. Dank Drag & Drop müssen die einzelnen Elemente nur chenden Artikel in die Zeitleiste ziehen mehr in die Ablaufleiste gezogen werden. -
Page 30: Sortieren | Aufnahmefunktion Benutzen
Einstellungen bearbeiten / Geschwindigkeit Sortieren der Ereignisse So funktioniert die Anpassung von Einstel- lungen: Den Punkt „Ereignis bearbeiten“ Überblick: Alle erstellten Fahr- aufrufen und den entsprechenden Ablauf straßen und Abläufe lassen antippen. Das Ereignis wechselt in den sich ganz einfach nach Name Bearbeitungsmodus, erkennbar an kleinen oder den Rückmeldekontakten Kreuzen in den Quadraten oben rechts. -
Page 31: Lokabläufe Programmieren | Steuerung Über Rückmeldekontakte
Weichenstraßen anlegen Ablaufsteuerung über Rückmeldekontakte So einfach wie noch nie lassen sich mit der CS3 Weichenstraßen anlegen: die einzelnen Weichen aus der Artikelliste in die Zeitachse ziehen und die Fahrstraße steht. Über das Menü „Bearbeiten“ lassen sich alle einzelnen Weichen individuell einstellen Sollen Kontakte als Auslöser für Fahr- (Bild ganz links). -
Page 32: Systemeinstellungen
Systemeinstellungen Anpassung des Systems · Systeminformationen... -
Page 33: Systemeinstellungen Aufrufen Und Ändern
Systemeinstellungen aufrufen und ändern Aufruf des System-Menüs Zugriff auf Basisfunktionen der Central Station 3 Auf die Einstiegsseite der Systemeinstellungen (Bild Um die CS3-Systemeinstellungen zu öffnen, tippen Sie in der Netzwerkübersicht oder in der Menüspalte am rechts) gelangen Sie, indem Sie in der Symbolleiste der linken Rand auf das CS3-Symbol. - Page 34 Aktuell an Haupt- und Programmiergleis Diese Option steht zur Verfügung, wenn Sie anliegende Stromstärke. Ihre Central Station 3 per LAN-Kabel mit Ihrem Router verbinden. Sie haben hier die Wahl, ob sich die CS3 die notwendigen Netzwerkadres- sen automatisch vom Router besorgen soll oder ob Sie die Daten von Hand eintragen.
- Page 35 USB-Anschluss & Speicher verwalten Konfigurieren von Booster-Anschlüssen In den Booster-Einstellungen können Sie die Zeitspanne zwischen zwei Statusabfragen ändern. Standard: alle fünf Sekunden. Zudem können Sie die Bezeichnung des Boosters In diesem Abschnitt sehen Sie die ange- sowie den verwendeten Trafo schlossenen USB-Geräte.
-
Page 36: Update Per Usb-Stick
Update per USB-Stick Importieren von Lokbildern per Webbrowser Falls Ihnen kein Netzwerkanschluss zur Verfügung steht, um die CS3 zu aktualisieren, können Sie auch mithilfe Die CS3 wird bereits mit einer Vielzahl von Lokbildern ausgeliefert, die in den allermeisten Fällen den Anforde- eines USB-Sticks ein Update auf die neueste Softwareversion aufspielen. -
Page 37: Cs3 Bildschirm Server
CS3 Bildschirm Server Starten des CS3 Bildschirm Servers Starten der Betrachtungs-Software Bedienen Sie Ihre CS3 von den unterschiedlichsten Geräten aus – von PC und Mac bis hin zur drahtlosen Steu- Die Installation des RealVNC-Viewers unterscheidet sich zwischen den verschiedenen Plattformen system- erung mit Tablet oder Smartphone unter Android und iOS. -
Page 38: Verfügbare Funktions-Piktogramme
Symbole Verfügbare Funktions-Piktogramme Alle auf der CS3 verfügbaren Piktogramme auf einen Blick – das bietet Ihnen diese Seite. Es sind dieselben Funktionssymbole, aus denen Sie beim Einrichten der Funktionen in den Lok-Einstellungen auswählen können (siehe Seite 13) – unterteilt in die Abschnitte Licht, Ton und Mechanik. Diese Gesamtübersicht soll Ihnen die ohne Betriebs- Bremsenq. -
Page 39: Systemarchitektur: Cs3 Und Cs3 Plus
Systemarchitektur: CS3 und CS3 plus 60128 Märklin CAN-Bus ->6021 Weitere CS2 Booster 60175 60215 Anbindung Adapterkabel 60124 Terminal 60125 60881 Verbindungskabel 60123 60883 WLAN-Router (z. B. TP-Link TL-WR802N mit USB-Anschluss) CS3 plus WLAN- Anbindung Schematische Darstellung. Die genaue Anschlussbelegung entnehmen Sie bitte den Bedienungsanleitungen der jeweiligen Geräte. - Page 40 Systemarchitektur: CS3 WLAN-Anbindung 60128 Märklin CAN-Bus ->6021 Weitere CS2 Booster 60175 60215 Anbindung Adapterkabel 60124 Terminal 60125 60883 WLAN-Router (z. B. TP-Link TL-WR802N mit USB-Anschluss) WLAN-Anbindung Schematische Darstellung. Die genaue Anschlussbelegung entnehmen Sie bitte den Bedienungsanleitungen der jeweiligen Geräte.
- Page 41 Central Station 3...
- Page 42 60061/60065 switched mode power pack (60 VA; for Märklin H0, Trix H0, and Minitrix) or 60101 or 51095 switched Operating | Getting Started Quickly mode power packs (100 VA; for Märklin 1 Gauge and LGB), Central Station 3, track feeder wires, track layout, Importing CS2 Data | Updating the CS3 locomotives and cars, and/or solenoid items.
-
Page 43: English
Connections to a Layout Selecting the Language / Introduction Assistant Make sure you have the correct polarity: red = track current (B), brown/blue = ground (0) C Track connection K Track connection 1 Gauge connection LGB connection Connections to the Programming Track After you turn it on, the CS3 will greet you The programming track must not have direct electrical contact with the layout and no other users (example: with the language selection dialog (upper... -
Page 44: Basic Functions And Connections
The change is displayed visually in the as „Emergency Off“ – in critical train operating vertical bar chart (green). situations probably the most important function on the Central Station 3. Slot for a chip card Connection for USB connections Märklin CAN... -
Page 45: Operating | Getting Started Quickly
Operating | Getting Started Quickly Tapping and Wiping: Working with the Touchscreen Simple Access to the Locomotive and Item List Pulling up the Locomotive List: The loco- motive list can be enlarged as required with the help of the red horizontal bar on its upper edge. - Page 46 Märklin continues to develop the operating software for the CS3. As soon as a newer version is available, a locomotive, solenoid item, and track data from there in a few steps and put it into the Central Station 3. small red dot at the foot of the „System“ symbol on the CS3 start screen is the signal that this newer version All you require for this is a USB stick with the backup of your CS2 data.
- Page 47 USB hub. For the first time Märklin is offering two versions of the control unit with the Central Station 3: the Central Station 3 plus (item number 60216) and the Central Station 3 (item number 60226). Important: Operating both •...
-
Page 48: Running Locomotives
Running Locomotives Locomotive List . Switching Functions . Editing Locomotives... -
Page 49: Selecting And Running Locomotives
Selecting and Running Locomotives Taking Locomotives into the Locomotive List: Automatic Registration of mfx Locomotives Turning Functions On Switching Functions Pull the red circle The functions are with a small white switched by tapping locomotive in the di- on the function sym- rection of the center bols. -
Page 50: Locomotive List: Sorting And Searching For Locomotives
Locomotive List: Sorting and Searching for Locomotives Displaying Registered Locomotives Independently of the Mode of Propulsion Searching for Particular Locomotives / Live Search The locomotive list can be Do you want to find a filtered with the help of particular locomotive? the mode of propulsion in Tap on the magnifica- order to give you a larger... -
Page 51: Adding Locomotives Manually
Adding Locomotives Manually This is the way you add more locomotives A keyboard is turned on with a tap of your finger on the magnification lens. Here you enter the item number or the locomotive name: The system immediately begins the search (Live Search). Each additional symbol makes the search results more exact. -
Page 52: Editing Locomotive Settings | Locomotive Card
Editing Locomotive Settings | Locomotive Card Changing to the Editing Mode „Setting Up“ the Tab: Changing Important Settings and Functions You activate the editing mode with a tap of your finger on the You get to the locomotive settings by first activating the editing mode in the locomotive list tool symbol and then on „Edit Locos“... -
Page 53: Configuration | Changing Cv Values
Configuration | Changing CV Values Setting up Functions This is the way to edit individual CV values Tap on a function field on the left Tap on the tab „Configuration“ after you have activated the editing mode and after selecting the locomotive to side in order to assign a function to be edited (see Section „Set Up“... - Page 54 Configuring mfx Locomotives Putting Locomotives into a Multiple Unit (m.u.) Combination All detail settings for a locomotive decoder are You create a double or multiple unit (m.u.) loaded as soon as you open combination of locomotives with the menu item the tab „Configuration“...
-
Page 55: Editing The Item List
Editing the Item List Setting Up . Sorting . Switching Solenoid Items... -
Page 56: Adding Solenoid Items
All of the details of the new turnout can be set in the entry template now opened: As delivered from the factory the Märklin starter set is shown in the Central Station 3 – with an item list includ- ing a few solenoid items and a simple track diagram. If you do not require the track diagram and the items, Tap of your finger on you should delete the items in any event. - Page 57 Adding a Signal Adding a Light Tap in the item list on the tool symbol and select „Add Article“ (left A new light item is quickly set up: A drop-down menu opens image) in the drop-down menu that opens in order to set up a signal. with a tap of your finger on the tool symbol for the item list Then tap on „Signals“...
- Page 58 Adding Other Items Now you are in the settings menu. Here you set the details for the new S88 contact: All kinds of items can be added by means of this op- tion: Tap on the tool symbol for the item list and select A tap of your finger on „Add Article“...
-
Page 59: Discover For Mfx Items
Searching for Solenoid Items / Live Search Button Matrix: You can use the L88 for a button matrix, such as for a track diagram control screen. Up to 64 buttons (32 solenoid items or 64 routes) are supported. You enter the switching points belonging to them in the field „Contact No.“. -
Page 60: Editing The Track Diagram Control Screen
Editing the Track Diagram Control Screen Positioning . Rotating . Connecting Track Items... -
Page 61: Setting Up The Track Diagram Control Screen
In this section, you will become familiar with all of the necessary steps for setting up a track diagram control screen in the Central Station 3. The simple track diagram of a Märklin starter set (see Page 24) will serve as an example that we will model step-by-step on the following pages. -
Page 62: Rotation Mode
Rotating Solenoid Items: The Rotation Mode Adding Track Laying Items We need the turnout in a horizontal We need track path items in order to generate a visually alignment for the planned track diagram appealing track diagram. These are purely decorative control screen. - Page 63 Connecting Items: The Connection Mode Pull the now horizontal track path item to the Now you have the opportunity to left next to the turnout „W 1R”. You will see two practice more connections: Make black symbols to the left and right on the edge of the connection to the turnout „W 2L“...
- Page 64 Completing the Track Diagram Control Screen Adding Signals Now come the signals: First, we pull the signals into position: As soon as they are above the right track section, we lift our finger from the display. The signal docks automatically at the track in question. If necessary, we activate the rotation mode and adjust the angle.
- Page 65 View Options Selecting Individual and Multiple Items Tap on the button „View“ in the upper toolbar in or- der to have numerous filter options shown. The option „Show all“ is marked in the standard setting. You can get a marvelous overview of your board with a tap of your finger on the individu- It is necessary for various actions to have se-...
-
Page 66: Switching Turnouts And Signals
Creating an Area from Selection Moving and Copying a Selection onto a TDCB Section With this function, you can get a larger overview on more com- plex layouts, copy a selection to a new board (upper right image), or move a selection to a new As soon as you have selected several items (left image) or an area (right image) as described on the pre- board (right image). -
Page 67: Creating And Editing Events
Creating and Editing Events Creating Routes . Programming and Switching Procedures... -
Page 68: Adding Events | Automating Procedures
Automating procedures is the crowning achievement of their hobby for many model railroaders. With After opening the menu item „Add event”, the Central Station 3, creating routes, locomotive procedures, and the automatic control of entire layouts simply pull the corresponding items into has once again been significantly simplified. - Page 69 Editing Settings / Speed Sorting Events This is the way adjusting settings works: Call up the item „Edit event” and tap on Overview: All of the routes and the corresponding procedure. The event procedures created can be changes to the editing mode, recognizable sorted quite easily by name or from small „x”...
- Page 70 Creating Turnout Arrangements Procedure Control by Means of Feedback Contacts It has never been so easy to create turnout arrangements with the CS3: Pull the indi- vidual turnouts from the item list into the timeline, and the route is done. All of the different turnouts can be set individually by means of the menu „Edit”...
-
Page 71: System Settings
System Settings Adjusting the System · System Data... -
Page 72: Calling Up And Changing System Settings
Calling up and Changing System Settings Calling up the System Menu Access to Basic Functions for the Central Station 3 Tap in the network overview or in the menu column on the left edge on the CS3 symbol in order to open the CS3 You get to the startup page for the system settings (right system settings. - Page 73 This option is available when you connect your Central Station 3 to your router with an LAN cable. Here you have the choice whether the CS3 is to obtain the necessary network Defines the time after...
- Page 74 Managing the USB Connections and Memory Configuring Booster Connections You can change the interval between two status queries in the Boost- er settings. Standard: every five seconds. In addition, you can set individually the designation as well In this section, you will see the USB devices as the transformer being used and connected to the CS3.
-
Page 75: Update By Usb Stick
Update by USB Stick Importing Locomotive Images Using the Web Browser If you do not have a network connection available to update the CS3, you can also download an update to the The CS3 comes with a variety of locomotive images that may satisfy the requirements in most cases of many newest software version with the help of a USB sticks. -
Page 76: Cs3 Screen Server
CS3 Screen Server Starting the CS3 Screen Server Starting the Viewing Software Operate your CS3 from all kinds of devices – from a PC and a Mac right up to wireless control with a Tablet or The installation of the RealVNC viewer differs considerably by system among the different platforms. Please a Smartphone using Android and iOS. -
Page 77: Available Function Pictograms
Symbols Available Function Pictograms Sound All of the pictograms available on the CS3 at a glance. This page offers you this overview. They are the same function symbols from which you can choose when setting up the functions in the locomotive settings (see Page 13) –... -
Page 78: System Architecture: Cs3 And Cs3 Plus
System Architecture: CS3 and CS3 plus 60128 Märklin CAN Bus ->6021 Other 60215 Booster 60175 CS2 Units Connection Adapter Cable 60124 Terminal 60125 60881 Connecting Cable 60123 60883 WLAN router (ex. TP-Link TL- WR802N with USB connection) CS3 plus WLAN Connection Schematic representation. - Page 79 System Architecture: CS3 WLAN-Anbindung 60128 Märklin CAN Bus ->6021 Other 60215 Booster 60175 CS2 Units Connection Adapter Cable 60124 Terminal 60125 60883 WLAN router (ex. TP-Link TL-WR802N with USB connection) WLAN Connection Schematic representation. The exact position for connections can be found in the operating instructions for the devices in question.
- Page 80 Central Station 3...
- Page 81 Convertisseur 60061 (60 VA; pour Märklin H0, Trix H0 et Minitrix) ou convertisseurs 60101 resp. 51095 (100 VA; Utilisation | Accès rapide pour Märklin échelle 1 resp. LGB), Central Station 3, câble de raccordement à la voie, réseau de voie, matériel Importer des données à partir de la CS2 | Actualiser la CS3 roulant et/ou articles électromagnétiques.
- Page 82 Raccordement à un réseau Sélection de la langue / Assistant de départ Veillez à ce que la polarité soit correcte : rouge = courant traction (B), marron/bleu = masse (0) Raccordement voie C Raccordement voie K Raccordement échelle 1 Raccordement LGB Raccordement à...
-
Page 83: Fonctions De Base Et Connexions
La touche Stop centrale sert également pour l’ « Arrêt vitesse. La modification apparaît alors (en vert) dans d’urgence » – certainement la fonction la plus importantes le diagramme à barres. de la Central Station 3 dans des situations critiques. Fente pour carte à Branchement Ports USB pour le Entrée Bus CAN... -
Page 84: Utilisation | Accès Rapide
Utilisation | Accès rapide Taper et balayer : Travailler avec l’écran tactile Accès simple à la liste des locos et des articles électromagnétiques Déployer la liste des locos : La liste des locos peut être agrandie selon les besoins à l’aide de la barre transversale rouge située sur le bord supérieur. -
Page 85: Importer Des Données À Partir De La Cs2 | Actualiser La Cs3
Märklin continue à développer le logiciel d’exploitation de la CS3 qui évolue donc en permanence. La vous pouvez alors reprendre dans la Central Station 3 vos précieuses données concernant locomotives, disponibilité d’une version plus récente est signalée par un petit point rouge au pied du symbole « Système » sur articles électromagnétiques et voie. - Page 86 Avec la Central Station 3, Märklin propose pour la première fois deux versions de l’unité de commande : la • Les deux ports USB peuvent servir à raccorder Central Station 3 plus (réf. 60216) et la Central Station 3 (réf. 60226). Important : Les deux appareils s’utilisent de souris, clavier ou clé USB, au choix directement ou la même manière.
-
Page 87: Conduite
Conduite Liste des locomotives . Activer des fonctions . Modifier des locomotives... -
Page 88: Sélectionner Et Conduire
Sélectionner et conduire Intégrer des locomotives à la liste : Enregistrement automatique des locomotives mfx Afficher les fonctions Activer les fonctions Déplacez le cercle Pour activer rouge avec une les différentes petite loco blanche fonctions, il vers le milieu suffit de taper sur les symboles de l’écran : Les fonctions de la... - Page 89 Liste des locos : Trier et rechercher des locos Afficher les locomotives enregistrées en fonction du mode de traction Rechercher des locomotives précises / Recherche Live Afin de vous offrir une Vous chercher une meilleure vue d’ensemble, locomotive précise ? la liste des locomotives Tapez du doigt sur peut être filtrée en fonction...
- Page 90 Ajouter une locomotive manuellement Pour ajouter d’autres locomotives, procédez de la manière suivante : Tapez du doigt sur le symbole de la loupe. Apparaît alors un clavier sur lequel vous pouvez saisir la référence ou le nom de la locomotive : Le système lance immédiatement la recherche. Tout caractère supplémentaire permet d’affiner la recherche.
- Page 91 Modifier les paramètres loco | Carte loco Passer en mode Modification Fiche « Installation » : Modifier des fonctions et des paramètres importants Commencez par activer le mode Modification en tapant Pour accéder aux paramètres de la loco, commencez par activer le mode Modification dans du doigt sur le symbole outil, puis sur «...
-
Page 92: Configurer | Modifier Des Valeurs Cv
Configurer | Modifier des CV Etablir des fonctions Pour modifier les différentes CV, procédez de la manière suivante : Pour attribuer une fonction à la Après avoir activé le mode Modification et la sélection des locomotives à traiter (voir section « Installation » à locomotive, appuyez sur un champ la page 12), appuyez sur l’onglet «... - Page 93 Configurer des locomotives mfx Réunir des locomotives en traction L’ouverture de la fiche « Configuration » dans les Pour créer une double traction ou une traction paramètres loco d’une locomotive multiple, appuyez sur le point de menu « Créer mfx entraîne automatiquement traction »...
- Page 94 Modifier la liste des articles Créer . trier . commuter des articles électromagnétiques...
- Page 95 Le masque de saisie qui s’ouvre alors vous permet de définir tous les détails relatifs à la nouvelle aiguille : A la livraison, la Central Station 3 propose la représentation d’un coffret de départ Märklin – avec une liste d’articles comprenant peu d’articles électromagnétiques et un schéma des voies très simple. Si vous n’avez pas En tapant sur «...
- Page 96 Ajouter un signal Ajouter un éclairage Pour créer un nouvel article de signalisation, appuyez dans la liste Créer un nouvel article d’éclairage est très simple : Tapez du des articles sur le symbole outil et sélectionnez « Ajouter article » doigt sur le symbole outil de la liste des articles («...
- Page 97 Ajouter d’autres articles Vous vous trouvez à présent dans le menu « Paramétrages ». Vous pouvez y définir tous les détails concernant le nouveau contact S88 : Cette option permet d’ajouter les articles les plus divers : Tapez sur le symbole outil dans la liste des En tapant sur «...
- Page 98 Rechercher des articles électromagnétiques/Recherche live Matrice de touches : Vous pouvez utiliser le L88 pour une matrice de touches, par exemple pour un TCO. Jusqu’à 64 touches (32 articles électromagnétiques ou 64 itinéraires) peuvent être prises en charge. Entrez les points de commutation correspondants dans le champ «...
- Page 99 Modifier le TCO Positionner . faire pivoter . relier des articles de voie...
-
Page 100: Elaborer Le Tco
Dans ce paragraphe, vous découvrirez toutes les étapes nécessaires à la création d’un TCO (tableau de commande optique) dans la Central Station 3. L’exemple choisi est le schéma des voies, simple, du coffret de départ Märklin (voir page 24), que nous « modelons » pas à pas sur les pages suivantes. - Page 101 Faire pivoter un article électromagnétique : Le mode Rotation Ajouter des articles pour la construction de la voie Pour le TCO prévu, nous avons besoin de Pour créer un schéma des voies plaisant, nous avons l’aiguille à l’horizontale. besoin d’articles pour le tracé de la voie. Il s’agit d’éléments Nous la faisons donc pivoter de 90 degrés.
- Page 102 « mode Rotation » page 22). Dès que les deux points d’ancrage se chevauchent, relâchez la pression de votre doigt sur l’écran. La Central Station 3 raccorde automatiquement la voie entre les points de Les deux articles pour le tracé de la voie raccord (illustration de gauche).
-
Page 103: Mode Rotation
Compléter le TCO Ajouter des signaux Suivent alors les signaux : Commençons par faire glisser les signaux en position. Dès qu’ils se trouvent sur la bonne section de voie, relâchez la pression de votre doigt sur l’écran. Le signal s’arrime automatiquement à... - Page 104 Options d’affichage Sélection d’un et de plusieurs articles Tapez sur le bouton de commande « Vue » dans la barre de symboles afin d’afficher les nombreuses options de filtre. Dans la configuration standard, c’est l’option « Tout montrer » qui est sélectionnée.
-
Page 105: Commuter Aiguilles Et Signaux
Créer une zone à partir d’une sélection Reporter et copier la sélection sur le plateau Pour obtenir une meilleure vue d’ensemble dans le cas de réseaux complexes, utilisez la fonction « Copier (illustration en haut à droite) ou reporter (illustration A partir du moment où... - Page 106 Créer et modifier des évènements Créer des itinéraires . Programmer et commander des déroulements...
-
Page 107: Ajouter Des Évènements | Automatiser Des Déroulements
Pour de nombreux modélistes, l’automatisation de déroulements est le nec plus ultra de leur hobby. Après ouverture du point de menu « Ajouter Avec la Central Station 3, la création d’itinéraires, de circulations de locos et la commande automatique évènement », faites simplement glisser de réseaux entiers sont encore sensiblement simplifiés. -
Page 108: De Rétrosignalisation
Modifier des paramètres / la vitesse Trier des évènements L’adaptation de paramètres fonctionne Vue d’ensemble : Tous les de la manière suivante : Ouvrez le point itinéraires et déroulements « Modifier évènement » et tapez du créés peuvent être triés doigt sur le déroulement correspondant. - Page 109 Créer des batteries de cisailles Commande de déroulements via contacts de rétrosignalisation La CS3 permet de créer des batteries de cisailles plus simplement que jamais : il vous suffit de faire glisser les différentes aiguilles depuis la liste des articles dans l’axe temporel et l’itinéraire est créé.
-
Page 110: Paramètres Système
Paramètres système Adaptation du système · Informations système... -
Page 111: Appeler Et Modifier Des Paramètres Système
Appeler et modifier des paramètres système Appeler le menu Système Accéder aux fonctions de base de la Central Station 3 Pour accéder à la page d’accueil des paramètres système Pour ouvrir les paramètres système de la CS3, tapez du doigt sur le symbole de la CS3 dans l’aperçu réseau ou (illustration de droite), tapez du doigt sur le bouton de dans la colonne de menu située sur le bord gauche de l’écran. - Page 112 Intensité du courant actuellement sur les Cette option est disponible si vous raccordez voies principale et de votre Central Station 3 à votre routeur via programmation. câble RLE. Ici, vous pouvez choisir si la CS3 doit automatiquement récupérer les adresses réseau nécessaires sur le routeur ou si vous...
- Page 113 Gérer connexion USB & mémoire Configurer des connexions booster Dans les paramètres booster, vous pouvez modifier laps de temps s’écoulant entre deux interrogations de statut. Paramètre par défaut : Toutes les cinq secondes. Cette section vous donne un aperçu des Vous pouvez en outre adapter appareils USB raccordés.
-
Page 114: Mise À Jour Via Clé Usb
Mise à jour via clé USB Importer des photos de locomotives via navigateur Internet Si vous ne disposez pas de connexion réseau pour actualiser la CS3, vous pouvez également procéder à une La CS3 est déjà livrée avec un grand nombre de photos de locos qui devraient pouvoir satisfaire aux exigences mise à... -
Page 115: Serveur Écran Cs3
Serveur écran CS3 Lancer le serveur écran de la CS3 Lancement du logiciel d’observation Commandez votre CS3 à partir des appareils les plus divers – PC et Mac jusqu’à la commande sans fil L’installation du viewer RealVNC diffère considérablement d’une plate-forme en fonction du système. avec tablette ou smartphone sous Android ou iOS. -
Page 116: Pictogrammes Fonctions Disponibles
Symboles Pictogrammes fonctions disponibles Cette page vous offre un aperçu complet de tous les pictogrammes disponibles sur la CS3. Il s’agit des mêmes symboles de fonction que vous pouvez sélectionner dans les paramètres Loco lors de l’établissement des fonctions (voir page 13) – classés selon les sections Eclairage, Son et Mécanique. Cette vue d’ensemble vise à Sans Bruit d’ex... -
Page 117: Architecture Système : Cs3 Et Cs3 Plus
Architecture système : CS3 et CS3 plus 60128 Märklin CAN-Bus ->6021 Autre CS2 Connexion Booster 60175 60215 Câble adaptateur 60124 Terminal 60125 60881 Câble de raccordement 60123 60883 Routeur Wifi (par ex. TP-Link TL-WR802N avec connexion USB) CS3 plus Connexion Wifi Représentation schématique. - Page 118 Architecture système: CS3 WLAN-Anbindung 60128 Märklin CAN-Bus ->6021 Autre CS2 Connexion Booster 60175 60215 Câble adaptateur 60124 Terminal 60125 60883 Routeur Wifi (par ex. TP-Link TL-WR802N avec connexion USB) Connexion Wifi Représentation schématique. Pour le raccordement, reportezvous aux notices d’utilisation des différents appareils.
- Page 119 Central Station 3...
- Page 120 Netadapter 60061 (60 VA; voor Märklin H0, Trix H0 en Minitrix) of de netadapter 60101 resp. 51095 (100 VA; Bediening | Snel beginnen voor Märklin spoor 1 reps. LGB), Central Station 3, railaansluitsnoer, rails, rollend materieel en/of Importeren van CS2 gegevens | Actualiseren van het CS3 magneetartikelen.
- Page 121 Aansluiten aan de modelbaan Taal kiezen / Introductieassistent Let op de juiste polariteit: rood - baanstroom (B), bruin/blauw - massa (0) Aansluiting C-rail Aansluiting K-rail Aansluiting spoor 1 Aansluiting LGB Aansluiting aan programmeerspoor Na het inschakelen begroet het CS3 u Het programmeerspoor mag geen directe elektrische verbinding hebben met de modelbaan en er mogen geen met de taalkeuze dialoog (afb.
-
Page 122: Basisfuncties En Aansluitingen
Basisfuncties en aansluitingen Groot display met De omschakelbalk: van hieruit een hoogoplossend komt u in de verschillende kleurenbeeldscherm met basismenu‘s. Een punt aan- touchscreen – alle functies tippen en het nieuwe menu schakelbaar met vingertop. verschijnt. Praktisch: de snelheid laat zich Het seinpaneel staat nu met de vingertop via de Het CS3 beschikt daarnaast aan... -
Page 123: Bediening | Snel Beginnen
Bediening | snel beginnen Aantippen en vegen: het werken met het touchscreen. Eenvoudige toegang tot loc- en artikelenlijst Loclijst uitschuiven: De loclijst laat zich m.b.v. het rode dwarsbalkje aan zijn bovenkant naar wens vergroten. Eenvoudig het rode dwarsbalkje aanraken en naar boven schuiven. Schuiven in tegenovergestelde richting verkleint de loclijst of laat hem geheel verdwijnen. - Page 124 Märklin ontwikkelt voortdurend de besturingssoftware van het CS3. Zodra een nieuwe versie beschikbaar is, magneetartikel en seinbeeldgegevens van daaruit in een paar stappen in het Central Station 3 overnemen. signaliseert een kleine rode stip onderaan de knop „Systeem“ dat op het CS3 startscherm. Tip: Als er geen Alles wat u daarvoor nodig heeft is een USB-stick met een back-up van de CS2 gegevens.
- Page 125 Voor het eerst biedt Märklin met het Central Station 3 twee versies van het besturingsapparaat aan: het Central station 3 plus (art. 60216) en het Central Station 3 (art. 60226). Belangrijk: De bediening van de een geheugenstick, naar keuze direct of via een Aansluitingen beide apparaten is identiek.
-
Page 126: Rijden
Rijden Loclijst . Functies schakelen . Locs bewerken... -
Page 127: Kiezen En Rijden
Kiezen en rijden Locs in de loclijst opnemen; Automatisch aanmelden van mfx locs Functies tonen Functies schakelen Sleep de rode cirkel Door het aantippen met de kleine witte van de functiesym- loc in de richting van bolen worden de het midden van het functies geschakeld. -
Page 128: Loclijst: Locs Sorteren En Zoeken
Loclijst: Locs sorteren en zoeken Toon de aangemelde locs afhankelijk van het aandrijftype Bepaalde locs zoeken / live zoeken Om u een beter overzicht Wilt u een bepaalde loc te geven laat de loclijst vinden? Tip dan op de loep zich filteren aan de hand met de tekst „Zoeken“... -
Page 129: Locs Handmatig Toevoegen
Loc handmatig toevoegen Zo voegt u locs toe Met een vingertip op het loepsymbool wordt een toetsenbord geopend waarmee u het artikelnummer of een locnaam in kunt voeren. Het systeem begint direct met zoeken. Elk verder teken maakt de zoekopdracht nauwkeuriger. -
Page 130: Loc Instellingen Bewerken | Lockaart
Loc instelling bewerken | Lockaart Naar de modus bewerken Tabblad „Installeren“: belangrijke instellingen en functies wijzigen De modus „Bewerken“ activeert u door met de vinger op U komt in de loc instellingen nadat u eerst in de loclijst de modus bewerken heeft geactiveerd het sleutelsymbool te tippen en daarna op „Locs bewerken“... -
Page 131: Configureren | Cv-Waarden Wijzigen
Configureren | CV waarden wijzigen Functies installeren Zo bewerkt u afzonderlijke CV waarden Om aan de loc een functie toe te Na het activeren van de modus bewerken en het kiezen van de te bewerken loc (zie hoofdstuk „Installeren“ op wijzen tipt u op een functieveld pag. - Page 132 mfx-loc configureren Loc‘s in een tractie samenvoegen Zodra u in de loc-instellingen het tabblad „Configureren“ Een dubbel- of meervoudige tractie maakt u opent, worden alle details van met het menupunt „Tractie maken“ (afb. links). de loc-instelling geladen. Het afrolmenu opent u door het aantippen van het sleutelsymbool in de loclijst („Bewerken“).
-
Page 133: Artikelenlijst Bewerken
Artikelenlijst bewerken Magneetartikelen invoeren . sorteren . schakelen... -
Page 134: Magneetartikelen Toevoegen
In het nu getoonde invoermasker kunnen alle details van het nieuwe wissel ingesteld worden. In de uitleveringstoestand is de Märklin startset in het Central Station 3 afgebeeld – met enkele magneet artikelen in de artikelenlijst en een eenvoudig seinpaneel. Heeft u het seinpaneel en de artikelen niet nodig, Aantippen van „Ok“... - Page 135 Sein toevoegen Licht toevoegen Voor het toevoegen van een seinartikel tipt u in de artikelbalk op het Een nieuw lichtartikel is snel ingevoerd: met een vingertip op sleutelsymbool en kies in het daarop volgende afrolmenu „Artikel het sleutelsymbool van de artikellijst („Bewerken“) opent zich toevoegen“...
- Page 136 Ander artikel toevoegen Nu bent u in het instellingsmenu. Hier stelt u de details van het nieuwe S88 contact in. Verschillende artikelen laten zich via deze optie toevoegen: Op het sleutelsymbool in de artikellijst Tippen op „Ok“ voegt tippen en in het afrolmenu „Artikel toevoegen“ het nieuwe contact toe.
-
Page 137: Mfx Artikelen Zoeken
Magneetartikelen zoeken / live zoeken Toetsenmatrix: U kunt de L88 gebruiken voor een toetsenmatrix, bijv. voor een extern seinpaneel. Tot 64 toetsen (32 magneetartikelen of 64 rijwegen) worden ondersteund. De bijbehorende schakelpunten voert u in het veld „Contactnr.“ in. Type van de S88 terugmeldcontacten kiezen: Met de zoekfunctie zoekt u gericht naar een naam of een deel van een naam van enkel of meerdere In het afrolmenu „Type“... -
Page 138: Seinpaneel Bewerken
Seinpaneel bewerken Railartikelen positioneren . draaien . verbinden... -
Page 139: Seinpaneel Opbouwen
In dit hoofdstuk leert u alle noodzakelijke stappen, die voor het opbouwen van een seinpaneel in het Central Station 3 nodig zijn. Als voorbeeld dient het eenvoudige seinpaneel van de Märklin startset (zie pag. 24) dat we op de volgende pagina‘s stap voor stap opbouwen. - Page 140 Magneetartikel draaien: De draaimodus Toevoegen van railbouwartikelen Voor het geplande seinpaneel hebben we Om een optisch gelijkend seinpaneel te maken hebben het wissel in een horizontale stand nodig. we de railbouwartikelen nodig. Dit zijn tekenelementen Daarvoor draaien we hem 90 graden: als eerste zonder verdere functies.
- Page 141 90 graden (afb. links; zie „draaimodus“ op pag. 22). Zodra de beide aankoppelpunten elkaar overlappen , haalt u de vinger van het display. Het Central Station 3 maakt automatisch een railverbinding tussen de beide verbindings- Nu worden de beide spoorverloopar- punten (afb. links).
- Page 142 Seinpaneel volmaken Seinen toevoegen Nu volgen de seinen: als eerste slepen we de seinen naar de juiste plaats: zodra ze zich boven het juiste spoor bevinden, haalt u de vinger van het display. Het sein koppelt zich automatisch aan het spoor. De helft van het seinpaneel is nu gereed.
- Page 143 Weergave opties Kiezen van enkele of meerdere artikelen Tip op de knop „Weer- gave“ in de bovenste symboolbalk om talrijke filteropties weer te geven. In de standaardinstelling is de optie „Alles tonen“ gemarkeerd. Door het aan- tippen van de afzonderlijke artikelcategorieën kunt u Voor de verschillende acties is het noodzakelijk om een beter overzicht krijgen...
-
Page 144: Wissels En Seinen Schakelen
Areaal vanuit de keuze maken Gekozene op de plaat verschuiven en kopiëren Een beter overzicht, juist bij complexe banen, bereikt men met de functie „Gekozene op plaat kopiëren“ (afb. rechtsboven) of „Gekozene op Zodra u meerdere artikelen (afb. links) of een vlak (afb. rechts) gekozen heeft zoals beschreven op de plaat verschuiven“... -
Page 145: Gebeurtenissen Maken En Bewerken
Gebeurtenissen maken en bewerken Rijwegen aanmaken . Aflopen programmeren en schakelen... -
Page 146: Gebeurtenis Toevoegen | Automatiseren Van Aflopen
Het automatiseren van aflopen is voor veel modelbaanliefhebbers de bekroning van hun hobby. Met Na het openen van het menupunt het Central Station 3 wordt het aanmaken van rijwegen, loc aflopen en de automatische besturing van „Gebeurtenis toevoegen“ eenvoudig het de hele modelbaan nogmaals duidelijk vereenvoudigt. - Page 147 Instellingen bewerken / Snelheid Sorteren van de gebeurtenissen Zo werkt het aanpassen van instellingen: Het Overzicht: alle gemaakte punt „Gebeurtenis bewerken“ openen en de rijwegen en aflopen laten betreffende afloop aantippen. De gebeurtenis zich heel eenvoudig op naam wisselt naar de bewerkingsmodus, of terugmeldcontact (S88) herkenbaar aan de kleine kruisjes sorteren.
- Page 148 Rijwegen aanmaken Afloopsturing via terugmeldcontacten Nog nooit was het zo eenvoudig als met het CS3 rijwegen te maken: de losse wissels één voor één uit de artikellijst in de tijdbalk slepen en de rijweg is klaar. Via het menu „Bewerken“ laten alle wissels zich individueel instellen (afb.
-
Page 149: Systeeminstellingen
Systeeminstellingen Aanpassing van het systeem · Systeeminformatie... -
Page 150: Systeeminstellingen Oproepen En Wijzigen
Systeeminstelling oproepen en wijzigen Oproepen van het systeemmenu Toegang tot de basisfuncties van het Central Station 3 U bereikt de instappagina van de systeeminstelling Om de systeeminstellingen van het CS3 te openen, tipt u in het systeemoverzicht of in de menulijst in de (afb. - Page 151 GFP3 gegevens Rail instelling oproepen Stelt na het opstarten alle locs in Via de GFP3 (Rail formaat processor) krijgt u inzicht in de actuele meetgegevens van de modelbaan en van het op de laatst bekende status. CS3. Door met de vinger te vegen ziet u ook het onderste gedeelte inclusief de instelling (afbeeldingen onder). In het afrolmenu legt u de belegging van de draairegelaars vast in de...
- Page 152 USB- aansluitingen & geheugen beheren Configureren van booster aansluitingen Bij de booster instellingen kunt u de tijd tussen twee status afvragen instellen. Standaard alle vijf seconden. Daarnaast kunt u de omschrijving van de boosters, de In dit deel ziet u de aangesloten USB gebruikte trafo en de gewenste mix- apparaten.
-
Page 153: Update Met Usb-Stick
Update met USB stick Importeren van loc afbeeldingen met de webbrowser. Indien u niet over een netwerkaansluiting beschikt om uw CS3 te actualiseren, kunt u ook m.b.v. een USB-stick Het CS3 wordt al geleverd met een groot aantal loc afbeeldingen die in veel gevallen, voor de meeste een update van de nieuwste softwareversie laden. -
Page 154: Cs3 Beeldscherm Server
CS3 Beeldscherm server Starten van de CS3 beeldscherm server Starten van de weergave software Bedien uw CS3 vanaf verschillende apparaten – van PC en Mac tot aan de mobiele besturing met tablet of De installatie procedure van de RealVNC-Viewer onderscheid zich sterk voor de verschillende platform- smartphone onder Android en IOS. -
Page 155: Beschikbare Functie-Pictogrammen
Symbolen Beschikbare functie pictogrammen Geluid Alle in het CS3 beschikbare pictogrammen in één oogopslag, dat vindt u op deze pagina. Het zijn dezelfde functiesymbolen, waaruit u kunt kiezen tijdens het toevoegen van de functies bij het instellen van een loc (zie pag. -
Page 156: Systeemarchitectuur: Cs3 En Cs3 Plus
Systeemarchitectuur: CS3 en CS3 plus 60128 Märklin CAN-bus ->6021 Andere CS2 Booster 60175 60215 koppeling Adapterkabel 60124 Terminal 60125 60881 Verbindingskabel 60123 60883 WLAN-Router (bijv. TP-Link TL-WR802N met USB-aansluiting) CS3 plus WLAN verbinding Schematische weergave. De exacte aansluitgegevens vindt u in de gebruiksaanwijzing van het desbetreffende apparaat. -
Page 157: Systeemarchitectuur: Cs3
Systeemarchitectuur: CS3 WLAN-Anbindung 60128 Märklin CAN-bus ->6021 Andere CS2 Booster 60175 60215 koppeling Adapterkabel 60124 Terminal 60125 60883 WLAN-Router (bijv. TP-Link TL-WR802N met USB-aansluiting) WLAN verbinding Schematische weergave. De exacte aansluitgegevens vindt u in de gebruiksaanwijzing van het desbetreffende apparaat. - Page 158 Central Station 3...
- Page 159 “switching” da rete 60101 o rispettivam. 51095 (100 VA; per Märklin scartamento 1 o rispettivam. LGB), Importazione di dati CS2 | Aggiornamento della CS3 Central Station 3, cavetto di connessione al binario, impianto di binari, materiale rotabile ed/oppure apparati Introduzione | Dati tecnici elettromagnetici.
- Page 160 Connessione ad un impianto Selezione della lingua / Assistente introduttivo Prestare attenzione alla corretta polarità: rosso = corrente di trazione (B), marrone/blu = massa (0) Connessione binario C Connessione binario K Connessione scartamento 1 Connessione LGB Connessione al binario di programmazione Tale binario di programmazione non deve avere alcun contatto elettrico diretto con l’impianto e non deve essere Dopo l’accensione la CS3 Vi saluta con collegato alcun ulteriore utilizzatore (ad es.
-
Page 161: Funzionalità Di Base E Collegamenti
Tale variazione viene quale „Arresto d’emergenza“ – in situazioni di visivamente mostrata nel grafico a colonna (verde). marcia critiche, la funzione di gran lunga più importante della Central Station 3. Punto di innesto per scheda a Connessione Connessioni USB... -
Page 162: Azionamento | Avvio Rapido
Azionamento | Avvio rapido Battere il dito e sfregare: operare con lo schermo tattile Semplice accesso all’elenco di locomotive ed apparati Trascinare l’elenco locomotive: L’elenco locomotive si può ingrandire secondo la necessità, con l’ausilio della barra trasversale rossa sul suo margine superiore. Basta semplicemente toccare la barra trasversale e trascinarla verso l’alto. - Page 163 Märklin sviluppa ulteriormente il Software di esercizio della CS3 in modo continuo. Non appena è disponibile da lì Voi potete prendere in carico nella Central Station 3 i Vostri preziosi dati di locomotive, apparati una versione più nuova, segnala questo un puntino rosso alla base del simbolo „Sistema“ sulla schermata di elettromagnetici e binari.
- Page 164 • Alle due prese USB possono venire innestati tasto di STOP (sino a 10 s) Voi potete forzare la Per la prima volta con la Central Station 3 Märklin propone due versioni dell’unità di comando: la Central mouse, tastiera oppure una penna di memoria a disattivazione della Central Station.
-
Page 165: Viaggiare
Viaggiare Elenco locomotive . Commutare funzioni . Elaborare locomotive... -
Page 166: Selezionare E Viaggiare
Selezionare e viaggiare Includere locomotive nell’elenco loco: registrazione automatica delle locomotive mfx Far comparire le funzioni Commutazione delle funzioni Trascinate il cerchio Tramite un tocco del rosso con la piccola simbolo di funzione locomotiva bianca in le funzioni vengono direzione del centro commutate. -
Page 167: Elenco Locomotive: Ordinare E Ricercare Locomotive
Elenco locomotive: ordinare e ricercare locomotive Indicazione delle locomotive registrate in dipendenza dal tipo di propulsione Ricercare determinate locomotive / Ricerca „Live“ Per darvi una più ampia Desiderate trovare una panoramica, l’elenco determinata locomotiva? locomotive si può filtrare Battete sulla lente con la in base al tipo di propul- iscrizione „Ricerca“... -
Page 168: Inserire Manualmente Le Locomotive
Inserire manualmente le locomotive Così Voi potete inserire ulteriori locomotive: Nel dialogo di ricerca toccate sul simbolo della lente e fate così apparire una tastiera. Su questa introducete il numero di Catalogo oppure il nome della locomotiva: il sistema incomincia subito con tale ricerca. Ciascun ulteriore carattere inserito rende più... -
Page 169: Elaborare Le Impostazioni Delle Locomotive | Scheda Di Locomotiva
Elaborare le impostazioni delle locomotive | Scheda di locomotiva Commutare nella modalità rielaborazione Scheda di registrazioni „Inserimento“: modificare importanti impostazioni e funzioni Vogliate anzitutto attivare la modalità rielaborazione con il tocco Alle impostazioni della locomotiva potete accedere, a condizione che anzitutto attiviate di un dito sul simbolo degli attrezzi e poi su „Rielaborare loco“... -
Page 170: Configurare | Modificare Valori Delle Cv
Configurare | Modificare valori delle CV Inserimento di funzioni Così potete rielaborare i singoli valori delle CV Per assegnare una funzione alla locomo- Dopo l’attivazione della modalità di elaborazione e la scelta della locomotiva da rielaborare (si veda il paragrafo tiva, battete su un campo di funzione sul „Inserimento“... - Page 171 Configurare locomotive mfx Inserire assieme locomotive in una trazione multipla Non appena nelle impostazioni di locomotive di una loco mfx Voi Potete assegnare una doppia o multipla aprite „Configurazione“ della trazione con il punto del menù „Allocare una scheda di registrazione, vengono trazione multipla“...
-
Page 172: Elaborare Un Elenco Di Apparati
Elaborare un elenco di apparati Aggiungere . ordinare . commutare apparati elettromagnetici... -
Page 173: Inserire Apparati Elettromagnetici
Nella maschera di inserimento ora comparsa possono venire impostati tutti i dettagli del nuovo deviatoio: Nelle condizioni di fornitura, nella Central Station 3 è raffigurata la confezione di avvio Märklin – con un elenco di apparati comprendente pochi apparati elettromagnetici ed un semplice schema dei binari. Qualora Voi non Un tocco del dito su „Ok“... - Page 174 Aggiungere un segnale Aggiungere luci Per l’allocazione di un nuovo apparato dei segnali vogliate battere Un nuovo apparato di illuminazione viene prontamente allo- nell’elenco apparati sul simbolo degli attrezzi e nel seguente menù a cato: con un tocco del dito sul simbolo degli attrezzi della lista tendina selezionate „Aggiungere un apparato“...
- Page 175 Aggiungere altri apparati Ora Voi siete nel menù delle impostazioni. Qui potete impostare i dettagli del nuovo contatto S88: I più svariati apparati si possono aggiungere mediante questa opzione: battete sul simbolo degli Un tocco del dito su „Ok“ attrezzi della lista apparati e nel menù a tendina aggiunge il contatto.
- Page 176 Cercare un apparato elettromagnetico / Ricerca „Live” Matrice di tasti: Voi potete utilizzare il Link S88 per una matrice di tasti, ad esempio per un quadro di comando sinottico dei binari. Sino a 64 tasti (32 apparati elettromagnetici oppure 64 itinerari di marcia) vengono supportati.
-
Page 177: Elaborare Un Quadro Sinottico Di Binari
Elaborare un quadro sinottico di comando binari Posizionare . ruotare . collegare apparati di binario... -
Page 178: Installare Un Quadro Sinottico Di Binari
In questo capitolo Voi imparate a conoscere tutti i passaggi occorrenti, che sono necessari per l’installazione di un quadro sinottico di comando binari nella Central Station 3. Quale esempio serve il semplice schema di binari della confezione di avvio Märklin (si veda pagina 24), che noi nelle seguenti Con l’ausilio dei piccoli cerchi neri,... - Page 179 Far ruotare apparati elettromagnetici: la modalità rotazione Inserimento di apparati per la costruzione del binario Per il quadro sinottico dei binari progettato Per costruire uno schema di binario esteticamente abbiamo bisogno di deviatoi in direzione soddisfacente, noi abbiamo bisogno di apparati di orizzontale.
-
Page 180: Modalità Di Rotazione
90 gradi (figure a sinistra; si veda „Modalità rotazione“ a pagina 22). Non appena i due punti di allaccio si sovrappongono, rilasciate il dito dallo schermo. La Central Station 3 realizza automaticamente una connessione di binario tra i punti di congiunzione (figura a sinistra). - Page 181 Completare un quadro sinottico di comando binari Aggiungere dei segnali Ora seguono i segnali: anzitutto noi trasciniamo i segnali in posizione: non appena essi si trovano sopra la corretta sezione di binario, vogliate rilasciare il dito dallo schermo. Il segnale si allaccia automaticamente al rispettivo binario.
- Page 182 Opzioni dell’immagine Selezione di apparati singoli e molteplici Battete sulla superficie di commutazione „Immagine“ nella barra superiore dei simboli, perché nume- rose opzioni di filtraggio divengano indicate. Nella impostazione normale è evidenziata l’opzione „Mostrare tutto“. Con un Per svariati azionamenti è necessario prima tocco del dito sulle singole selezionare uno oppure numerosi apparati.
-
Page 183: Commutare Deviatoi E Segnali
Allestire un’area dalla scelta Spostare e copiare una selezione sul pannello Una più grande visibilità proprio in caso di impianti piuttosto complessi la potete ottenere con la funzione per copiare una selezione su un Non appena Voi avete selezionato molteplici apparati (figura a sinistra) oppure una superficie (figura a nuovo pannello (figura a destra destra), come descritto sulla pagina precedente, nel menù... -
Page 184: Allestire Ed Elaborare Avvenimenti
Allestire ed elaborare avvenimenti Allocare itinerari di marcia . Programmare e commutare avvenimenti... -
Page 185: Inserire Avvenimenti | Automatizzazione Di Procedure
L’automatizzazione di avvenimenti costituisce per molti modellisti ferroviari il coronamento del loro hobby. Con Dopo l’apertura del punto del menù „Aggiungere la Central Station 3 l’allocazione di itinerari di marcia, di eventi di locomotive ed il comando automatico di tutto un evento“ basta semplicemente trascinare quanto l’impianto vengono ancora una volta notevolmente semplificati. - Page 186 Revisionare impostazioni / Velocità Ordinamento degli avvenimenti Panoramica: tutti gli itinerari L’adeguamento delle impostazioni funziona di marcia e gli avvenimenti così: richiamare il punto „Rielaborare un allocati si possono ordinare in evento“ e battere sul corrispondente avveni- modo del tutto semplice in base mento.
- Page 187 Allocare percorsi di deviatoi Comando di avvenimenti tramite contatti di retroazione Tanto facilmente come mai prima d’ora con la CS3 si possono allo- care i percorsi di deviatoi: basta trascinare i singoli deviatoi presi dall’elenco apparati nell’asse dei tempi e l’itinerario di marcia è presente.
-
Page 188: Impostazioni Di Sistema
Impostazioni di sistema Adattamento del sistema · Informazioni sul sistema... -
Page 189: Richiamare E Modificare Impostazioni Di Sistema
Richiamare e modificare impostazioni di sistema Richiamo del menù di sistema Accesso alle funzioni di base della Central Station 3 Alla pagina di accesso delle impostazioni di sistema Per aprire le impostazioni di sistema della CS3, battete nella panoramica della rete oppure nella colonna del (figura a destra) Voi pervenite purché... - Page 190 Questa opzione si trova a disposizione qualora e di programmazione. Voi colleghiate la Vostra Central Station 3 al Vostro Router tramite un cavetto LAN. Qui avete la scelta se la CS3 deve procurarsi i necessari indirizzi della rete automaticamente dal Router oppure se inserite Voi tali dati a mano.
- Page 191 Gestione di connessione USB & memoria Configurazione di connessioni a Booster Nelle impostazioni per il Booster potete modificare il lasso di tempo tra due interrogazioni di stato. Di norma: ogni cinque secondi. Inoltre Voi potete adattare individualmente In questa sezione potete vedere gli apparecchi la denominazione del Booster nonché...
-
Page 192: Aggiornamento Tramite Penna Usb
Aggiornamento tramite penna USB Importazione di immagini di locomotive tramite “browser” del Web Qualora per Voi non si trovi a disposizione alcuna connessione alla rete, per attualizzare la CS3 potete installare La CS3 viene già fornita con una gran quantità di immagini di locomotive, che nell’assoluta maggioranza dei casi un aggiornamento alla più... -
Page 193: Server" Dello Schermo Visore Cs3
„Server” dello schermo visore CS3 Avvio del Server dello schermo visore CS3 Avvio del Software di osservazione Potete azionare la Vostra CS3 a partire dai più svariati apparecchi – da un PC e un Mac sino al comando senza L’installazione del Viewer RealVNC differisce in misura rilevante tra le diverse piattaforme in modo condiziona- fili con un Tablet o uno Smartphone sotto Android ed iOS. -
Page 194: Pittogrammi Disponibili Per Le Funzioni
Simboli Pittogrammi disponibili per le funzioni Suono Tutti i pittogrammi disponibili sulla CS3 in un solo sguardo – questo Vi offre questa pagina. Ci sono gli stessi simboli di funzione tra i quali Voi potete scegliere, durante l’installazione delle funzioni nelle impostazioni della locomotiva (si veda pagina 13) –... -
Page 195: Architettura Del Sistema: Cs3 E Cs3 Plus
Architettura del sistema: CS3 e CS3 plus 60128 Märklin CAN-Bus ->6021 Ulteriore CS2 Allacciamento Booster 60175 60215 Cavetto adattatore 60124 Terminal 60125 60881 Cavetto di collegamento 60123 60883 Router WLAN (ad es. TP-Link TL-WR802N con connessione USB) CS3 plus Allacciamento WLAN Rappresentazione schematica. - Page 196 Architettura del sistema: CS3 WLAN-Anbindung 60128 Märklin CAN-Bus ->6021 Ulteriore CS2 Allacciamento Booster 60175 60215 Cavetto adattatore 60124 Terminal 60125 60883 Router WLAN (ad es. TP-Link TL-WR802N con connessione USB) Allacciamento WLAN Rappresentazione schematica. L’esatta configurazione delle connessioni siete pregati di desumerla dalle istruzioni di azionamento dei rispettivi apparecchi.
- Page 197 Central Station 3...
- Page 198 Fuente de alimentación conmutada 60061 (60 VA; para Märklin H0, Trix H0 y Minitrix) o fuentes de alimentación Manejo | Iniciación rápida conmutadas 60101 o bien 51095 (100 VA; para ancho de vía 1 de Märklin o LGB), Central Station 3, cable de Importación de datos de la CS2 | Actualización de la CS3 conexión a vía, instalación de vías, material rodante y/o artículos magnéticos.
- Page 199 Conexión a una maqueta de trenes Seleccionar idioma / Asistente de introducción Asegurarse de que la polaridad es correcta: Rojo = Corriente de tracción (B), marrón/azul = Masa (0) Conexión vía C Conexión vía K Conexión ancho de vía 1 Conexión LGB Conexión a la vía de programación No está...
-
Page 200: Funciones Básicas Y Conexiones
El cambio se indica ópticamente en el po de “Paro de emergencia” – constituyendo diagrama de barra (verde). la función más importante de todas con que cuenta la Central Station 3 para situaciones de conducción críticas. Slot para tarjeta con Conexión... -
Page 201: Manejo | Iniciación Rápida
Manejo | Iniciación rápida Selección con el dedo: Modo de trabajo en la pantalla táctil Acceso sencillo a la lista de locos y de artículos Abrir la lista de locos: La lista de locos se puede ampliar por su borde superior con ayuda del travesaño rojo. - Page 202 Märklin desarrolla y perfecciona ininterrumpidamente el software del sistema operativo de la CS3. Tan pronto ésta sus valiosos datos de loco, de artículos magnéticos y de vía en pocos pasos a la Central Station 3. como está disponible una nueva versión, esto se señaliza mediante un punto rojo en la base del icono “Sistema”...
- Page 203 Introducción Instrucciones técnicas Más rápida, más cómoda y de uso todavía más fácil: la nueva Central Station 3 brinda a los modelistas • El presente dispositivo es una unidad de control • Altitud de servicio no superior a 2.000 metros.
-
Page 204: Conducción
Conducción Lista de locomotoras . Conmutar funciones . Editar locomotoras... -
Page 205: Seleccionar Y Conducir
Seleccionar y conducir Incorporar las locomotoras a la lista de locomotoras: registro automático de las locos mfx Mostrar funciones Conmutar las funciones Arrastre el círcu- Tocando con el dedo lo rojo con una los iconos de funcio- pequeña loco blanca nes se conmutan hacia el centro las funciones. -
Page 206: Lista De Locos: Ordenar Y Buscar Locomotoras
Lista de locos: ordenar y buscar locomotoras Visualización de las locos mostradas en función del tipo de accionamiento Buscar determinadas locomotoras/búsqueda en directo ¿Desea encontrar una de- Para disponer de una terminada loco? Toque con mayor visibilidad, es el dedo la lupa rotulada con posible filtrar la lista de “Buscar”... -
Page 207: Añadir Manualmente Locomotoras
Añadir manualmente locomotoras Para añadir más locomotoras, hágalo del siguiente modo: En el cuadro de búsqueda, toque con el dedo el icono de lupa y se mostrará un teclado. En éste, introduzca el número de artículo o el nombre de loco: el sistema iniciará inmediatamente la búsqueda. Todo carácter adicional introducido hace que los resultados de búsqueda sean más exactos (búsqueda en directo). -
Page 208: Editar Parámetros De Locomotoras | Tarjeta De Locomotoras
Editar parámetros de locomotoras | Tarjeta de locomotoras Cambiar al modo edición Pestaña “Puesta a punto”: Modificar parámetros y funciones importantes Para activar el modo edición, toque en primer lugar con el Para acceder a la configuración de loco, active en la lista de locos el modo edición y seleccione dedo el icono de herramienta y luego “Editar locomotora”... -
Page 209: Configuración | Modificar Valores De Cvs
Configuración | Modificar valores de CVs Puesta a punto de funciones Modo de configuración de los valores de las distintas CVs Para asignar a la loco una función, Tras activar el modo de edición y seleccionar la loco que desea editar (véase apartado “Puesta a punto” en la toque un campo de función en el lado página 12), toque la pestaña “Configuración”. - Page 210 Configuración de locomotoras mfx Agrupación de locomotoras para crear una tracción Tan pronto como haya abierto en la configuración de una loco mfx Para crear una tracción doble o múltiple, la pestaña “Configuración” se utilice la opción de menú “Crear nueva cargarán todos los parámetros tracción”...
-
Page 211: Editar Lista De Artículos
Editar lista de artículos Crear . ordenar . conmutar artículos magnéticos... -
Page 212: Agregar Artículos Magnéticos
En la máscara de entrada de datos ahora mostrada puede configurar todos los detalles del nuevo desvío: En la Central Station 3, en el estado en que se entrega, se reproduce la caja de iniciación de Märklin, con una lista de artículos que abarca un escaso número de ellos y un esquema de vías sencillo. Si no necesitase el Al tocar con el dedo “Ok”... - Page 213 Agregar señal Agregar luz Para crear un nuevo artículo de señal, toque con el dedo en la lista La creación de un nuevo artículo de luz es ágil: tocar con el de artículos el icono de herramienta y seleccione en el menú desple- dedo el icono de herramienta de la lista de artículos (“Editar”) gable que se muestra a continuación “Agregar los artículos”...
- Page 214 Agregar otros artículos Ahora se encuentra en el menú de configuración. Aquí, configure los detalles del nuevo contacto S88: Esta opción permite agregar los más variados artícu- los: Tocar con el dedo el icono de herramienta de la Al tocar con el dedo “Ok”, lista de artículos y seleccionar en el menú...
-
Page 215: Buscar Artículos Mfx
Buscar artículos magnéticos / Búsqueda en directo Matriz de teclas: Puede utilizar el Link S88 para una matriz de teclas, por ejemplo para un pupitre de mando de agujas. Se soportan hasta 64 teclas (32 artículos magnéticos o 64 itinerarios). Introduzca los puntos de conmu- tación correspondientes en el campo “Número de contacto”. -
Page 216: Editar El Esquema De Mando De Agujas
Editar el esquema de mando de agujas Posicionamiento . giro . conexión de artículos de vía... -
Page 217: Creación De Un Esquema De Mando De Agujas
En este apartado aprenderá los pasos necesarios para crear un esquema de mando de agujas en la Central Station 3. Sirve de ejemplo el esquema de vías sencillo de la caja de iniciación de Märklin (véase página 24), que modelamos paso a paso en las siguientes páginas. - Page 218 Girar artículos magnéticos: El modo giro Agregar artículos para la construcción de vías Para el esquema de vías previsto necesitamos Para crear un esquema de vías estéti- el desvío en dirección horizontal. Por este mo- camente atractivo necesitamos artícu- tivo, gírelo 90 grados: En primer lugar, marque los para el trazado de la vía.
-
Page 219: Modo Giro
“Modo giro” en página 22). Tan pronto como se solapen ambos puntos de acoplamiento, suelte el dedo de la pantalla. La Central Station 3 establece automáticamente una conexión por vía entre los puntos de inter- Ahora, posicionar ambos artículos de cons- conexión (imagen izquierda). - Page 220 Completar el esquema de trazado de vías Insertar señales A continuación vienen las señales: En primer lugar, arrastre las señales a su posición. Tan pronto como se encuentren encima del tramo de vía correcto, retire el dedo de la pantalla. La señal se acopla automática- mente a la vía.
- Page 221 Opciones de Vista Selección de un único o varios artículos Toque el botón de activa- ción “Vista” en la barra de iconos superior para visualizar numerosas opciones de filtro. Por defecto está marcada la opción “Mostrar todos”. Tocando con el dedo las distintas categorías de Para diferentes acciones es preciso seleccionar uno artículo puede obtener...
-
Page 222: Gobernar Desvíos Y Señales
Crear zona a partir de selección Deslizar y copiar la selección a la placa Obtendrá una visión de conjunto más amplia, ideal en el caso de maquetas más complejas, con la función para copiar (imagen derecha, arriba) o des- plazar (imagen derecha) a una nueva Si ha seleccionado varios artículos (imagen izquierda) o una superficie (imagen derecha) como se des- placa (imagen superior derecha). -
Page 223: Crear Y Editar Eventos
Crear y editar eventos Crear itinerarios . programar y conmutar secuencias... -
Page 224: Agregar Eventos | Automatización De Secuencias
La automatización de secuencias constituye para muchos modelistas ferroviarios la culminación de su Tras abrir la opción de menú “Agregar hobby. Con la Central Station 3 se ha simplificado de nuevo considerablemente la creación de itinera- evento”, simplemente arrastrar los rios, secuencias de locomotora y el control automático de todas las instalaciones. - Page 225 Editar ajustes / velocidad Ordenar los eventos Así funciona la adaptación de ajustes: Invocar la opción “Editar evento” y tocar la Sinopsis: Todos los itinerarios secuencia correspondiente. El evento cam- y secuencias creados se bia al modo edición, reconocible por unas pueden crear simplemente pequeñas cruces en los vértices superiores por nombre o por contac-...
- Page 226 Crear itinerarios de desvíos Control secuencial mediante contactos de señalización Con la CS3 nunca ha sido tan fácil crear itinerarios de desvíos: arras- tre los distintos desvíos de la lista de artículos al eje de tiempos y ya está listo el itinerario. Mediante el menú...
-
Page 227: Configuración Del Sistema
Configuración del sistema Adaptación del sistema · Informaciones del sistema... -
Page 228: Invocar Y Modificar La Configuración Del Sistema
Invocar y modificar la configuración del sistema Invocar el menú del sistema Acceso a las funciones básicas de la Central Station 3 El acceso a la página de configuración del sistema Para abrir la configuración del sistema de la CS3, toque en el sinóptico de red o en la columna de menú en el (imagen derecha) se logra tocando con el dedo el bo- borde izquierdo el icono de la CS3. - Page 229 Esta opción está disponible si usted conecta y en la vía de programación. su Central Station 3 vía cable de red LAN al router. Aquí puede elegir si la CS3 debe obtener automáticamente del router las direcciones de red necesarias o si los datos se debe registrar manualmente.
- Page 230 Administrar puerto y memoria SB Configuración de terminales de booster La configuración de booster puede modificar el intervalo de tiempo entre dos interrogaciones de estado. Valor por defecto: cada cinco segundos. Además, puede En esta sección se muestran los dispositivos adaptar de manera individualizada USB conectados.
-
Page 231: Actualización Vía Memoria Usb
Actualización vía memoria USB Importar imágenes de locomotoras vía navegador de Internet Si no dispone de conexión de red para actualizar la CS3, puede actualizar a la versión de software más La CS3 se entrega ya con un gran número de imágenes de locomotoras que en la mayoría de los casos debe- reciente también con ayuda de una memoria USB. -
Page 232: Servidor De Pantallas De La Cs3
Servidor de pantallas de la CS3 Arranque del servidor de pantallas de la CS3 Arranque del software de visualización Maneje su CS3 desde los más distintos dispositivos, desde un PC o un Mac hasta el control inalámbrico desde La instalación del RealVNC Viewer varía considerablemente en función de las distintas plataformas, debido su tableta o teléfono inteligente en Android o iOS. -
Page 233: Iconos
Iconos Pictogramas de funciones disponibles Sonido Encontrará juntos en esta página todos los pictogramas disponibles en la CS3. Se trata de los mismos iconos de funciones que puede seleccionar en la puesta a punto de las funciones en la configuración de locomo- tora (véase página 13), subdivididos en las secciones Luz, sonido y mecánica. -
Page 234: Arquitectura Del Sistema: Cs3 Y Cs3 Plus
Arquitectura del sistema: CS3 y CS3 plus 60128 Bus CAN Märklin ->6021 Otras CS2 Conexión Booster 60175 60215 de CS1 Cable adaptador 60124 Terminal 60125 60881 Cable de interconexión 60123 60883 Router WLAN (p. ej., TP-Link TL-WR802N con puerto USB) CS3 plus Conexión vía WLAN... - Page 235 Arquitectura del sistema: CS3 WLAN-Anbindung 60128 Bus CAN de Märklin ->6021 Otras CS2 Conexión Booster 60175 60215 de CS1 Cable adaptador 60124 Terminal 60125 60883 Router WLAN (p. ej., TP-Link TL-WR802N con puerto USB) Conexión vía WLAN Representación esquemática. La distribución exacta de los pines deberá consultarla en los manuales de instrucciones de empleo de los distintos dispositivos.
Need help?
Do you have a question about the Central Station 3 and is the answer not in the manual?
Questions and answers