Table of Contents
Advertisement
Advertisement
Table of Contents

Related Manuals for YSI 5000


Summary of Contents for YSI 5000
- Page 1 Air-Met Scientific Pty Ltd Air-Met Sales/Service Air-Met Rental P: 1800 000 744 P: 1300 137 067 F: 1800 000 774 E: hire@airmet.com.au E: sales@airmet.com.au W: www.airmet.com.au Work with Confidence YSI Model 5000 YSI Model 5100 Dissolved Oxygen Temperature Operations Manual...
-
Page 2: Table Of Contents
Table of Contents 1. General Description ..........................1 2. Specifications............................3 3. Quick Start .............................5 4. Controls ..............................6 4.1 Front Panel..............................6 4.2 Software Flow Chart ............................7 4.3 Rear Panel............................... 9 5. Setup ..............................11 5.1 Display Setup..............................12 5.2 Report Setup ..............................14 5.3 Autostable Setup ............................ - Page 3 Maintenance..........................52 Batteries ................................ 52 Troubleshooting ...........................54 Error Messages ............................. 54 Warranty & Repair ........................56 Cleaning Instructions ............................ 57 Packing Instructions............................58 Required Notice ..........................59 Accessories and Replacement Parts..................60 Appendix A - Oxygen Solubility Table..................61 Appendix B - Pressures and Altitudes ..................63 Appendix C - Conversion Factors....................64 Appendix D - Remote Command Language................65...
-
Page 4: General Description
Internal memory for storing up to 100 sets of data, and an RS232 port allow you to upload data from the Model 5000 directly to your computer. Or you can use your Model 5000 with YSI BOD Analyst software. - Page 5 Model 5100 Features The YSI Model 5100 has all of the same functionality of the Model 5000 and much more. The YSI Model 5100 is a state-of-the-art, microprocessor-based, dissolved oxygen instrument with many automated and application specific features. The YSI 5100 DO instrument contains built-in application software for the calculation of Oxygen Uptake Rate (OUR) and Specific Oxygen Uptake Rate (SOUR).
-
Page 6: Specifications
2. Specifications Oxygen Measurement mg/L: 0.0 to 60.0 mg/L Ranges: % air saturation: 0.0 to 600.0% air saturation mbar: 0 to 1500 mg/L: ±0.1% plus 1 Least Significant Digit (LSD) Accuracy: % air saturation: ±0.1% plus 1 LSD mbar: ± ± ± ± 1% plus 1 LSD mg/L: 0.1%, or 0.01 mg/L , whichever is greater Resolution: % air saturation: 0.1% air saturation... - Page 7 The Model 5000 and 5100 are designed exclusively for indoor use and are NOT waterproof. Power The Model 5000 & 5100 are powered by an AC adapter or 4 C-size alkaline batteries. A new set of alkaline batteries will power the selected instrument for approximately 30 hours (not including stirring).
-
Page 8: Quick Start
3. Quick Start When you unpack your new Model 5000 or 5100 there are several things you’ll want to do to set the instrument up. 1. Inspect the product to assure that it has not been damaged during shipment. 2. Check the packing list to make sure you have received everything you should have. -
Page 9: Controls
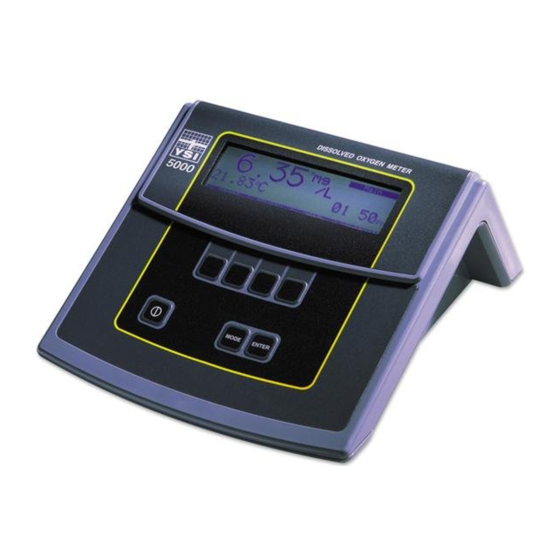
4. Controls 4.1 Front Panel The front panel of the instrument contains the display and keypad as shown below. The front panel display and controls of the 5000 and 5100 are identical. Display Soft-Keys Power ENTER Key ON/OFF MODE Key... -
Page 10: Software Flow Chart
The 5000/5100 has two main operating modes, Main and Application. The current mode is displayed in the dark bar at the top right corner of the display. The following diagram shows the display while the instrument is in the Main mode. - Page 11 5000/5100 Software Flow Chart MAIN APPLICATION Store Start Review Recall Send All Send on/off Clear Setup Delete All Review Send Next Rec. Calibrate Modify Auto Cal Send DO Cal Send Setup SOUR Display Start Size Unit Send on/off Contrast Setup...
-
Page 12: Rear Panel
Be sure to align the arrows when plugging in the probe. YSI 5000 series probes, such as the YSI 5010 BOD probe, will plug directly into the 5000/5100. If you have an older YSI 5700 or 5900 series probe, the YSI 5011 adapter will be required. - Page 13 Bar Code Reader). The bar code connector is also used for attaching an external computer keyboard. Using a keyboard simplifies data entry when using the 5100 in the remote mode, such as with YSI BOD Analyst software (see 7.2 Application Mode, Remote).
-
Page 14: Setup
5. Setup Before operating the 5000/5100 for the first time, you should set the instrument parameters. Once set, these parameters are maintained in memory. These parameters are discussed below. From Main mode, press the [CALIBRATE] soft-key to enter the calibration menu. Notice that the dark bar in the top right corner of the display shows the current mode. -
Page 15: Display Setup
5.1 Display Setup Press the [DISPLAY] soft-key to show the following menu. Display 8.15 24.38°C 11:33 SIZE UNITS CONTRAST LAST DIG. The [SIZE] soft-key cycles among the two possible display arrangements for Main mode. One selection shows as many parameters as possible, the other shows Dissolved Oxygen in large type with temperature and time in small type. - Page 16 DISPLAY UNIT SETUP Units D.O. Barometer in Hg Salinity [ Sal – 78 Temperature Date Format [ MM/DD/YY ] HOUR [12H] DOWN NEXT The [CONTRAST] soft-key allows the user to change the display contrast. The display contrast will change slightly each time the [UP] or [DOWN] soft-key is pressed. The [LAST DIG.] soft-key allows the user to suppress the last digit of the DO reading.
-
Page 17: Report Setup
5.2 Report Setup From the Setup menu, press [REPORT] to display the following soft-keys. [SDF] Space Delimited Format Report [*] SAMPLE ID # [*] DATE [*] DO% [*] TIME [*] DO mg/L [*] BAROMETER [*] TEMPERATURE [*] SALINITY SEND Record from [ 0] to [99] RANGE NEXT The display lists the parameters that can be included in the output string at the RS232 serial port,... - Page 18 Comma Delimited Format "SAMPLE ID","mg/L","%","C","ppt","mmHg","TIME","DATE" "ID: 0", 7.95, 97.3,25.6, 0.0, 786,"15:06:34","01/23/96" "ID: 1", 7.94, 97.1,25.6, 0.0, 786,"15:06:36","01/23/96" "ID: 2", 7.95, 97.2,25.6, 0.0, 785,"15:06:44","01/23/96" The asterisk character in front of each parameter indicates that the parameter will be included in the report. Press the [NEXT] soft-key to select the parameter that you want to change. Then press [ENTER] to turn the asterisk character on or off.
-
Page 19: Autostable Setup
5.3 Autostable Setup The autostable feature indicates when readings are stable by emitting a single beep and displaying an asterisk (*) to the right of the dissolved oxygen reading. The instrument uses criteria that you input to determine what a stable reading is. You select the maximum percent of change that may occur during a selected time duration. -
Page 20: System Setup
5.4 System Setup From the Setup menu, press the [SYSTEM] soft-key to display the following menu. 8.38 System 24.38°C 11:47 AUDIO off TIME / DATE VERSION RS232 The [AUDIO on/off] soft-key allows setting the beeper on or off. The key toggles between an [AUDIO off] soft-key and an [AUDIO on] soft-key. - Page 21 8.38 System 24.38°C 9:59 TIME SETTING SAVED Message AUDIO off TIME / DATE VERSION RS232 If you wish to return to Main mode, press [MODE] three times. The [VERSION] soft-key displays the instrument software version on the message line of the display just above the soft-key descriptions.
-
Page 22: Calibration
AUTO CAL on a Model 5100, you must check the barometric pressure reading and calibrate the barometer, if necessary, as shown under 6.1 Dissolved Oxygen Calibration, Barometer. The Model 5000 does not contain a barometer, therefore, the current barometric pressure must be entered before an AUTO Cal is performed. -
Page 23: Auto Cal
7. Model 5100: Verify that the barometer reading is correct. Calibrate the barometer, if necessary, as shown under 6. Dissolved Oxygen Calibration, Barometer. Model 5000: Enter the current barometric pressure as shown under 6. Dissolved Oxygen Calibration, Barometer. 8. Make sure that the display readings are stable, then press the [AUTO CAL] soft-key to calibrate Dissolved Oxygen. -
Page 24: Do Cal (Manual)
DO Cal (manual) 1. Prepare the probe according to the probe instructions. 2. Connect the probe to the meter. 3. Place the probe in a known oxygen environment, such as a BOD bottle containing about 1″ of water to provide a 100% relative humidity environment or a Winkler-titrated sample. 4. -
Page 25: Barometer
(±10°C), the barometer calibration should be accurate for approximately 30 days. The Model 5000 does not contain a barometer, therefore, the current barometric pressure must be entered before an AUTO Cal is performed. The pressure value displayed is the setting that was entered and stored during the previous calibration. -
Page 26: Salinity
NOTE: You may estimate the standard pressure at your altitude by using Appendix B - Pressures and Altitudes. Press [ENTER] to confirm. The message will be displayed, on “PRESSURE CALIBRATION SAVED” the model 5100, as shown below. The model 5000 will display “PRESSURE SETTING SAVED” since it does not contain an internal barometer. mg/L 98.0 8.15... -
Page 27: Zero Calibration
All oxygen probes have a small background current, even in the absence of oxygen. Model 5000/5100 compensation is based on the average background current of YSI probes. This is the default zero value. Using this average will result in errors with probes whose background current differs from the average. - Page 28 D.O. ”. CALIBRATION SAVED The Model 5000/5100 is calibrated at two points: the calibration value you select, and its default zero. NOTE: When you change the zero calibration point, you offset the other value, so that after zeroing the probe for zero oxygen, you must recalibrate in an oxygen environment.
-
Page 29: Operation
7. Operation 7.1 Main Mode When the instrument is turned on it is in the Main mode. The following chart shows the display during Main mode operation. 8.15 Main 24.38°C 12:13 STORE REVIEW SEND CALIBRATE The bottom row of the display shows the functions of the four soft-keys used during Main mode. Main mode is used to make measurements, store or review readings and send the current readings to a computer or serial printer. -
Page 30: Store
Store Press the [STORE] soft-key to enter Store mode and display the following menu. Store 8.15 Record number Record: 01 24.38°C 11:33 DOWN DIGIT SAVE The Store menu is used to control the storing of data. The current record number is shown in the display on the right side. -
Page 31: Review
If the current memory location already contains data and you press [SAVE], the current readings will be stored and the previous readings will be erased. NOTE: There is NO way to restore previous data once it has been deleted. When you have finished storing records, press [MODE] to return to Main mode. Review Press the [REVIEW] soft-key to enter Review mode and display the following menu. - Page 32 Send All From the Review menu, you may send ALL stored data to a computer or serial printer by pressing the [SEND ALL] soft-key. See 5.2 Report Setup for format. Clear From the Review menu, press the [CLEAR] soft-key to enter Clear mode and display the following menu.
-
Page 33: Send
Each time you press the [SEND] soft-key, on the model 5100, the current display values are sent, along with the salinity setting, date and barometric pressure reading. The model 5000 prints the same information, however, the barometric pressure is the current setting and not a reading. The output format can be changed under 5.2 Report Setup. - Page 34 Comma Delimited Format "mg/L","%","C","ppt","mmHg","TIME","DATE" 12.19,138.2,21.6, 0.0, 790,"10:20:56","02/06/96" NOTE: If you want to send stored records, you must first enter Recall mode (see 7.1 Main Mode, Review, Recall).
-
Page 35: Application Mode
From the Main mode, press the [MODE] key to enter the Application mode. The bottom row of the display shows the soft-key menu of the Model 5100. The Model 5000 does not support OUR or SOUR applications. The 5000 does, however, support Remote mode which allows the instrument to be controlled via computer. - Page 36 From the Model 5100 Application mode menu press the [OUR] (Oxygen Uptake Rate) soft-key. The following screen will be displayed. /L /h SEND: off 23.21°C 8.92 0:00 START SETUP REVIEW SEND Press [SETUP] to change the OUR parameters. The following screen shows the default parameters.
- Page 37 /L /h SEND: off RS232 status 23.21°C 8.92 0:00 Elapsed Time OUR SETTING SAVED START SETUP REVIEW SEND Once the parameters have been set, you are ready to begin. Place the probe in the prepared sample and make certain no air bubbles are trapped, then turn on the stirring and wait a few seconds for the temperature readings to stabilize.
- Page 38 If you want to stop the OUR measurement before the maximum time or minimum ending DO (entered in OUR setup) is reached, press [END]. The final OUR reading will be displayed on the screen. 50.5 /L /h SEND: on 21.21°C 0.54 14:20 PROCESS COMPLETE...
- Page 39 If you want to save these values press the [STORE] soft-key. A record number will then show up under the REVIEW menu. If the record slot contains a set of data, an indicator saying FULL will appear beside the test number. If the record slot does not contain a set of data, the indicator will say EMPTY.
-
Page 40: Sour
SOUR The 5100 uses the following formula to calculate the SOUR value: - DO 3600 Sec Total Volume mg/L/h START 1 Hour Sample Volume ELAPSED Where: = Dissolved oxygen level at start of test START = Dissolved oxygen level at end of test = Elapsed time of test in seconds ELAPSED Total Volume... - Page 41 Press [SETUP] to change the SOUR parameters. The following screen shows the default parameters. Sample / Total 1 / [ SOUR Min. Time 1] min. Max. Time 15] min. [*]SOUR@20 Min. Beginning DO 5.00] mg/L SEND: off Min. Ending DO 2.00] mg/L Solids Weight [ 1.000] g/L...
- Page 42 SOUR /h /g SEND: off RS232 status 25.35°C 8.09 0:00 SOUR SETTING SAVED START SETUP REVIEW SEND Once the parameters have been set, you are ready to begin. Place the probe in the prepared sample and make certain no air bubbles are trapped, then turn on the stirring and wait a few seconds for the temperature readings to stabilize.
- Page 43 If you want to stop the SOUR measurement before the maximum time or minimum ending DO (entered in SOUR setup) is reached, press the [END] soft-key. The final SOUR reading will be displayed on the screen. 20.07 SOUR /h /g SEND on 25.33°C 1.29...
- Page 44 20.1 mg /h /g @20 6.8 mg /L REVIEW Record Number REC:1 EMPTY FULL or EMPTY indicator 10:32 AM 09/21/98 NEXT REC. MODIFY SAVE SEND Press the [NEXT REC.] soft-key to change the record number to find an empty slot, or pick a slot to overwrite (you cannot delete results, you must overwrite).
-
Page 45: Remote
Analyst software. The YSI 5015 has a 6-Pin Mini DIN connector that connects to the rear of the 5100 (see section 4.3 for the location of the socket). The model 5000 does not support a bar code reader. Before using the 5015 bar code reader for the first time, it must be programmed as follows: Plug the bar code reader into the connector labeled “BAR CODE”... - Page 46 1. Prepare the scanner by installing the ferrite bead on the scanner’s cable near to where it plugs into the 5100 meter as shown in the following diagram: 2. Turn to page 1-7 and scan the “Keyboard Wedge Interface for IBM PC AT and compatibles” bar code label.
-
Page 47: Diagnostics
An external computer keyboard may be connected to the Model 5100 while in the Remote mode. This greatly improves data entry when entering sample ID numbers used with YSI BOD Analyst software (when a bar code reader is not available). The computer keyboard must be PC compatible and have a 6-Pin Mini DIN connector. -
Page 48: History
12. Troubleshooting for additional information on error codes. From the Main mode, press the [CALIBRATE] soft-key to enter Calibration mode, then press the [Diagnosis] soft-key to enter Diagnosis mode. The following screen will be displayed. Diagnosis HISTORY SENSOR HELP RESET Ps History Press the [HISTORY] soft-key to display the following information. -
Page 49: Sensor
7.3 %/uA @ 20°C. If the probe slope (1 mil membrane) is greater than 12.6 %/uA or lower than 5.9 %/uA, the membrane/probe may need service. See 12. Troubleshooting, Error Codes, E3 and E4. The temperature at the time of calibration in °C. Sensor Press the [SENSOR] soft-key to display the following sensor diagnostics screen: System Parameters... -
Page 50: Reset Ps
Reset Ps The [RESET Ps] soft-key (Reset Parameters) is used to reset all instrument parameters to the factory default values. This is useful when the parameters have been changed or corrupted, such as when new software is loaded. Press the [RESET Ps] soft-key to display the following: Reset Press ENTER to RESET Parameters HISTORY... -
Page 51: Principles Of Operation
This current is read and interpreted by the YSI dissolved oxygen meter utilizing customized electronics and software to assure the highest possible accuracy and reliability. -
Page 52: Understanding Dissolved Oxygen Error Factors
10. Understanding Dissolved Oxygen Error Factors The major sources of error in DO measurement are the accuracy of the instrument components, the accuracy of the probe, and the user’s ability to calibrate the system precisely. Most errors can be reduced substantially by calibrating at DO levels and probe temperatures as close as possible to the expected measurement DO levels and temperatures. - Page 53 c. Temperature compensation error: The variation from nominal response to sample temperature is ±0.2% of the DO reading per degree C of the temperature difference between the temperature of the sample and the temperature at which the probe was calibrated. Type 3 Errors: Calibration a.
- Page 54 Calculation Type Description Calculation Error (mg/L) instrument accuracy (±0.001 x 7.26) + 0.01 ±0.017 probe background ±0.01 x (1- (8.24/9.09)) x 7.26 ±0.007 probe nonlinearity ±0.003 x 7.26 ±0.021 temp. compensation ±(24-20) x 0.002 x 7.26 ±0.058 temp. uncertainty ±0.01 x 7.26 ±0.073 pressure ±0.012 x 7.26...
-
Page 55: Maintenance
11. Maintenance Batteries Low batteries are indicated on the display by “LOW BATT” as shown here. 8.20 Main Low battery LOW BATT warning 24.38°C 11:33 STORE REVIEW SEND CALIBRATE When this happens, replace the batteries with 4 fresh alkaline C-size batteries as soon as possible. - Page 56 • Remove the old batteries and install fresh alkaline batteries. NOTE: Always observe the correct polarity when installing the batteries. • Replace the battery cover and slide it to the left to lock it into place. NOTE: The instrument parameters are stored in nonvolatile memory and will not be lost during battery replacement.
-
Page 57: Troubleshooting
12. Troubleshooting Error Messages The instrument performs a Power On Self Test each time it is turned on. The following error codes are provided to facilitate troubleshooting. Code/Problem Error Possible Cause Correction Blank Display Dead/low batteries Replace batteries or connect power supply 5011 adapter Unplug 5011 from improperly connected... - Page 58 Code/Problem Error Possible Cause Correction DO High Current Membrane too thin Try another membrane E4: Check Membrane Electrodes need Repair or replace resurfacing Internal leakage in Repair or replace probe or cable connector Short circuit in probe or Repair or replace cable DO unstable Membrane damaged...
-
Page 59: Warranty & Repair
Endeco/YSI Inc. • 13 Atlantis Drive • Marion, MA • 02738 • Phone: 508 748-0366 • Fax: 508 748-2543 Europe YSI LTD • Lynchford House • Lynchford Lane • Farnborough, Hampshire • GU14 GLT • Phone: 441 252 514711 • Fax: 441 252 511855 YSI Authorized Service Centers California EviroServices &... -
Page 60: Cleaning Instructions
Disposition costs will be the responsibility of the sender. When service is required, either at the user's facility or at YSI, the following steps must be taken to insure the safety of our service personnel. -
Page 61: Packing Instructions
Packing Instructions 1. Clean and decontaminate items to insure the safety of the handler. 2. Complete and include the Cleaning Certificate. 3. Place the product in a plastic bag to keep out dirt and packing material. 4. Use a large carton, preferably the original, and surround the product completely with packing material. -
Page 62: Required Notice
14. Required Notice This equipment generates and uses radio frequency energy and if not installed and used properly, may cause interference to radio and television reception. There is no guarantee that interference will not occur in a particular installation. If this equipment does cause interference to radio or television reception, which can be determined by turning the equipment off and on, the user is encouraged to try to correct the interference by one or more of the following measures: •... -
Page 63: Accessories And Replacement Parts
RS232 Cable, DB9 5000, 5100 YSI Model 5015 Bar code reader 5100 only YSI Model 5011 Probe adapter (converts from probe 5000, 5100 MS connector to meter DIN) * Instruments with serial numbers starting with 96L or lower, contact YSI. -
Page 64: Appendix A - Oxygen Solubility Table
16. Appendix A - Oxygen Solubility Table Solubility of Oxygen in mg/l in Water Exposed to Water-Saturated Air at 760 mm Hg Pressure as a function of temperature. Salinity = Measure of quantity of dissolved salts in water. Chlorinity = Measure of chloride content, by mass, of water. ) = 1.80655 x Chlorinity ( Temp Chlorinity:0... - Page 65 Temp Chlorinity:0 5.0 ppt 10.0 ppt 15.0 ppt 20.0 ppt 25.0 ppt Salinity:0 9.0 ppt 18.1 ppt 27.1 ppt 36.1 ppt 45.2 ppt 21.0 8.92 8.46 8.02 7.61 7.21 6.84 22.0 8.74 8.30 7.87 7.47 7.09 6.72 23.0 8.58 8.14 7.73 7.34 6.96...
-
Page 66: Appendix B - Pressures And Altitudes
17. Appendix B - Pressures and Altitudes Calibration Values for Various Atmospheric Pressures and Altitudes PRESSURE ALTITUDE CALIBRATION inches Hg mm Hg millibars Feet meters VALUE (%) 30.23 1023 -276 29.92 1013 29.61 1003 29.33 29.02 28.74 1126 28.43 1413 28.11 1703 27.83... -
Page 67: Appendix C - Conversion Factors
18. Appendix C - Conversion Factors TO CONVERT FROM EQUATION Feet Meters Multiply by 0.3048 Meters Feet Multiply by 3.2808399 Degrees Celsius Degrees Fahrenheit 9/5×( C)+32 Degrees Fahrenheit Degrees Celsius 5/9×( F-32) Milligrams per liter (mg/l) Parts per million (ppm) Multiply by 1 Conversion Factors for Common Units of Pressure kilo Pascals... -
Page 68: Appendix D - Remote Command Language
19. Appendix D - Remote Command Language Remote commands and data output are available only when the instrument is in the Remote mode. Command Format: <Prefix><Command Type><Parameter><Suffix> Prefix: The prefix consists of the two character sequence <ESC>&. In HEX this is 1B 26. Suffix: The suffix consists of the two character sequence <CR><LF>. - Page 69 The P commands are for requesting system information. Command type parameter description none Request calibration parameters none Request solubility table dump none Request raw A/D none Request System status The system Setup commands. Command type parameter description nn.n set salinity to nn.n hh:mm:ss set time of day, 24 hour clock mm/dd/yy...
- Page 70 1725 Brannum Lane Yellow Springs, Ohio 45387 USA 051029 937 767-7241 • 800 765-4974 • Fax 937 767-9353 A51029H Info@ysi.com • www.YSI.com September 02 1998 YSI Incorporated...
Need help?
Do you have a question about the 5000 and is the answer not in the manual?
Questions and answers