
Related Manuals for Rac RAC-HP009


Summary of Contents for Rac RAC-HP009
- Page 1 1650W Pressure Washer RAC-HP009 Waste electrical products should not be disposed of with household waste. Please recycle where facilities exist. Check with your local authority or retailer for recycling advice.
-
Page 2: Safety And Warning Information
Safety and Warning Information General safety rules Warning: Read the instructions fully before using this equipment for the first time. Failure to follow the instructions may result in fire, electrical shock and/or serious injury. We recommend that you use safety equipment during use. Please retain these instructions for future use and referral. -
Page 3: Warning Symbols
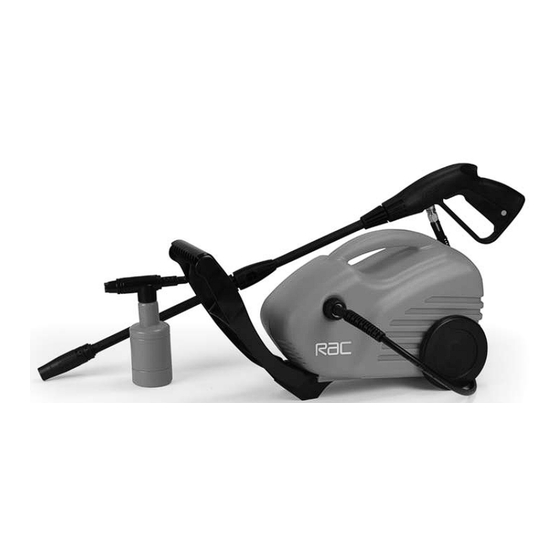
Safety and Warning Information Hose: Water supply hose must be at least 1/ 2” in diameter with a minimum recommended length of 5 metres. • Use only original spare parts from the manufacturer or approved by the manufacturer. • WARNING: High pressure hoses, fittings and couplings are important for the safety of the appliance. Use only hoses, fittings and couplings recommended by the manufacturer. - Page 4 COMPONENTS Component List 1. High pressure hose 2. Soap/detergent dispenser 3. On / Off switch 4. High pressure lance 5. Male quick fit connector 6. Trigger gun 7. Lance extension 8. Cleaning needle Technical specification Rated voltage: 240V AC Cable length: Rated power: 1650W Hose length:...
- Page 5 ASSEMBLY Before carrying out any assembly or disassembly of the unit, please ensure that the unit is not connected to the electrical supply. Assembling your machine Connect the high pressure hose (1) to the high pressure outlet as shown in Fig 1 Connect the high pressure hose (1) to the trigger gun (6) as in Fig 3 Fit the lance extension (7) into the trigger gun (6) by pushing the lance extension into the trigger gun and locating the lugs at the same time.
- Page 6 OPERATING INSTRUCTIONS Note: Helpful Hints Before connecting to the mains power supply please ensure that the ON / OFF switch is in Before using remove any objects the OFF position (Fig 5), the water supply is which could create a hazard. connected and is turned on.
- Page 7 Pre-operation ADJUSTING FAN PATTERN The angle of spray may be adjusted on some lances by rotating the nozzle. This will vary the spray pattern from approximately a 0° narrow high impact stream to a 60° wide fan Fig 10 spray. (See Fig 8) Figure 10 –...
- Page 8 HOW TO AVOID SURFACE DAMAGE Detergent Applicator Damage to surfaces can occur when Only use detergents that are specifically the impact force of the water exceeds made for pressure washers or you could the durability of the surface. Never use damage the seals/ components inside a narrow high impact stream or a turbo/ the pressure washer.
-
Page 9: Operation
DETERGENTS 1. Preparation The use of detergents can dramatically reduce It is important to prepare the surface that is to cleaning time and assist in the removal of difficult be cleaned. This is done by clearing the area of stains. Some detergents have been customised furniture and making sure that all windows and for pressure washer use. - Page 10 TIPS FOR EXTENDING THE LIFE OF YOUR PRESSURE WASHER Never operate the unit without water. This pressure washer is not designed to pump hot water. Never connect it to the hot water supply – this will significantly reduce the life of the pump.
-
Page 11: Troubleshooting Chart
Troubleshooting chart Symptom Possible cause (s) Corrective Action(s) Pressure washer does Unit is pressurized Squeeze trigger on gun not start Poor plug connection or faulty Check plug, socket outlet socket Remove extension cord Extension cord too long or Check that main supply voltage is undersized adequate Main voltage supply too low... - Page 13 If faults cannot be remedied, contact the Helpline on 020 8391 6767 Helpline@hilka.co.uk Produced under license for Halco Products Ltd Booths Hall, Booths Park, Chelford Road, Knutsford, Cheshire WA16 8QZ England RAC-HP009 - Issue1 - R.W. 18-02-09...
Need help?
Do you have a question about the RAC-HP009 and is the answer not in the manual?
Questions and answers