Table of Contents
Advertisement
Limited Warranty Statements
1. Warranty
The manufacturer warrants the Product to be free
from defects in material and workmanship for a period of 12 months
from the original date of purchase.
If you discover a defect in the Product covered by this warranty, we will repair or
replace the item at our option using new or refurbished components.
2. Exclusions
This warranty covers defects in manufacturing discovered while using the
Products as recommended by The manufacturer rather than occurred by the act
of God, and damages caused by misuse, abuse, and unauthorized modification.
3. Limited of Liability
The manufacturer will not be held liable for incidental or consequential losses or
damages to any act of God.
4. Reminder
Service requirement shall subject to the presentation of this warranty card
and defective parts to the manufacturer.
The warranty card will not be reissued if lost.
Product :
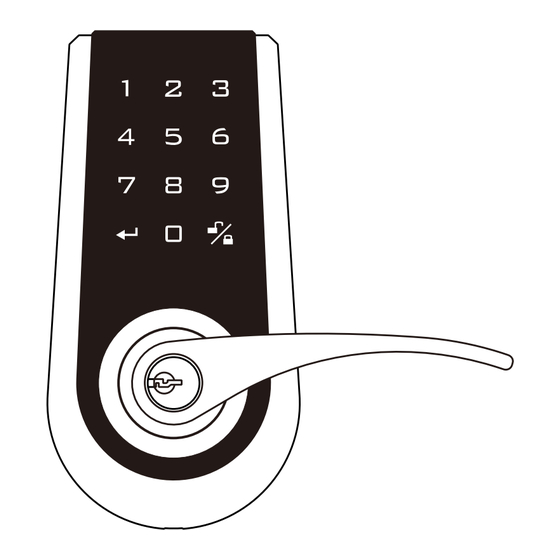
DIGITAL TOUCHPAD LEVER LOCK
Purchase Date :
This device complies with Part 15 of the FCC Rules.
Operation is subject to the following two conditions :
(1) this device may not cause harmful interference, and
(2) this device must accept any interference received, including interference
that may cause undesired operation.
ELECTRONIC
KEYPAD LOCK
USER MANUAL
Attention : Please do not use the "electronic" screwdriver for installation.
120x165(mm)
Advertisement
Table of Contents

Subscribe to Our Youtube Channel
Related Manuals for Ezset PT2Q0S10


Summary of Contents for Ezset PT2Q0S10
- Page 1 120x165(mm) Limited Warranty Statements ELECTRONIC 1. Warranty The manufacturer warrants the Product to be free from defects in material and workmanship for a period of 12 months KEYPAD LOCK from the original date of purchase. If you discover a defect in the Product covered by this warranty, we will repair or replace the item at our option using new or refurbished components.
-
Page 2: Table Of Contents
Table of Contents ■ Installation Instructions ........P.1 ˙ Replace the old lock with the new one ˙ Install the new lock on the new door ˙ Indentifying the door handing ■ Starting the installation ........P.4 ■ Operation Interface .........P.7 ■ Specifications and Functions ......P.8 ˙... -
Page 3: Installation Instructions
■Installation Instructions Install new lock on the new door To install this product on a new door, please go through the Replace the old lock with the new one following steps to drill the hole. To replace the old lock with this product on the same door, please confirm the backset for the latch and the specifications for the face plate match. -
Page 4: Starting The Installation
Change Lever Handing ■Start the installation a. Make sure that the lock is unlocked. (The spindle is perpendicular.) Remove the 1. Install latch protection sleeve of the exterior lock unit. Rotate the exterior lever by 180 degrees and return the protection sleeve to its original position. b. - Page 5 3. Install the exterior lock body 5. Install the interior lock body a. Fit the spindle vertically through the square cam of the latch. a. Push the battery cover upward. b. Fit the cable through the cross bore above the latch. b.
-
Page 6: Operation Interface
■Operational interface ■Specifications and Functions 1. Power supply DC6V, 4 AA, 1.5V Alkaline batteries. (not included) 2. Low battery indication 2-1 During operation, if the red light on the battery cover blinks and 10 short beeps are heard, it means that the battery is low. The batteries need to be replaced immediately. -
Page 7: User Code (Uc)
6. User Code (UC) 11. Restore the default PC & UC 6-1 The default user code is “1234”. During initial installation, delete the default user Use this function when forgetting the programming code or to delete all settings. code, and then set the new user code. 6-2 A total of 6 user codes can be saved. -
Page 8: Delete All User Codes At Once
■Code setup ■Function setup ■ PC (Programming code) ■ UC (User code) 1. During initial installation, it is recommended to change the default Confirm button programming code (0000), delete the default user code (1234), and add All setup should be done when the system is unlocked. the new personal user code prior to setting up other functions. -
Page 9: Troubleshooting
■ ■Troubleshooting PC (Programming code) ■ UC (User code) Confirm button Scenario 1 After the installation is complete and the batteries are in Automatic lockup timer place, none of the buttons are responsive. (No sound, and no backlight) Enter a two-digit Enter PC number (10~99) Cause : Issues with batteries or the wiring.
Need help?
Do you have a question about the PT2Q0S10 and is the answer not in the manual?
Questions and answers
Program the lock now it only lock with code not unlocking
To program the Ezset PT2Q0S10 lock to unlock with a code:
1. Ensure the system is unlocked.
2. Turn on the keypad backlight by placing your hand near it or pressing a button.
3. Enter the Programming Code (default is 0000 unless changed).
4. Press 1 to add a new User Code.
5. Enter the new User Code.
Two long beeps confirm a correct input. The new User Code can now be used to unlock the door.
This answer is automatically generated