DriveCam DC3 Installation Instructions Manual
Video event recorder with pushbutton
Hide thumbs
Also See for DC3:
- Installation instruction (9 pages) ,
- Installation instructions manual (28 pages)
Advertisement
DC3 Video Event Recorder
with Pushbutton Installation Instructions
Installation of the event recorder is not complicated, but care must be taken to ensure successful
operation. Follow these instructions carefully to ensure proper orientation and operation.
1.
Check the contents of the installation kit
Page
1
DRC232-A 2007-08-07
DC3 with Pushbutton Installation Instructions
Advertisement
Table of Contents

Related Manuals for DriveCam DC3


Summary of Contents for DriveCam DC3
- Page 1 Installation of the event recorder is not complicated, but care must be taken to ensure successful operation. Follow these instructions carefully to ensure proper orientation and operation. Check the contents of the installation kit Page DRC232-A 2007-08-07 DC3 with Pushbutton Installation Instructions...
-
Page 2: Thoroughly Clean And Dry The Glass
Step 2 Using the alcohol prep pad provided, thoroughly clean the mounting area. Step 3 Using a clean, dry cloth, thoroughly dry the mounting area. Page DRC232-A 2007-08-07 DC3 with Pushbutton Installation Instructions... - Page 3 Step 3 Position the assembly behind the mirror, about one inch to the right of the post to allow easy access to the Torx screw and power connection. Page DRC232-A 2007-08-07 DC3 with Pushbutton Installation Instructions...
- Page 4 Remove the event recorder from the mounting bracket. Step 4 Check the fit of the bracket against the windshield. If the windshield is curved, gently bend the bracket so that it will lie flush against the glass. Page DRC232-A 2007-08-07 DC3 with Pushbutton Installation Instructions...
- Page 5 You may need to (carefully) apply additional pressure to the bracket and remove any large air bubbles. Use a small pin to create an escape path for the air if the problem is persistent. Page DRC232-A 2007-08-07 DC3 with Pushbutton Installation Instructions...
- Page 6 You may need to remove the trim to route the cable. When reinstalling, be careful not to damage the trim clips or the cable. Keep the cable clear from sharp edges and moving parts. Page DRC232-A 2007-08-07 DC3 with Pushbutton Installation Instructions...
- Page 7 Wiring Diagram (DC3 with Pushbutton Installation) The RJ45 Interconnect Cable is 14 feet long with connectors (similar to telephone connectors) at each end. One end of the cable plugs into the event recorder. It is then routed to a secure location under the dashboard and plugged into the middle port of the Cable Access Terminal (CAT).
-
Page 8: Electrical Connections
(1-3 Amp) between the extended wire and the power connection. The gauge of wire used for any extension must be the same gauge (18 gauge) as the DriveCam power cable wires or larger. If the extended wire length must exceed 20 feet, contact DriveCam for the recommended wire gauge. -
Page 9: Mount The Event Recorder In The Bracket
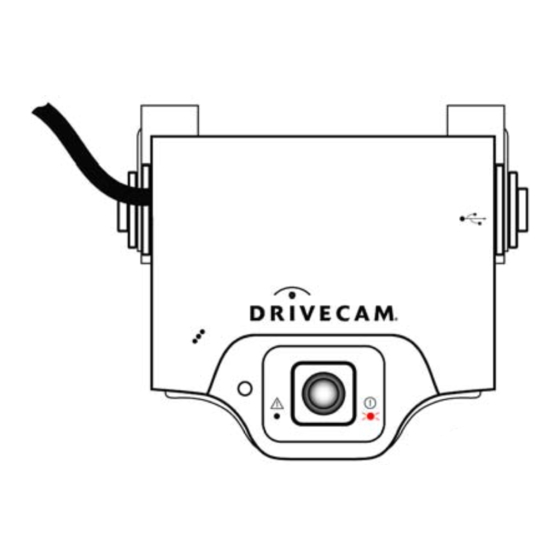
Step 12. To avoid having to extend wires, locate the CAT within 4½ feet of the Pushbutton mounting location. Following installation, secure the CAT in a safe location using a screw or zip-tie through its mounting hole. Page DRC232-A 2007-08-07 DC3 with Pushbutton Installation Instructions... - Page 10 The LED on the left of the lens will light (solid green) for about 30 seconds after power is first applied. If the left LED does not turn off or if it begins flashing (either red or green), please call DriveCam Technical Support for instructions.
- Page 11 If the test did not work as described, repeat the test in a darker area. The lights are difficult to see in bright light. If still not lit, check with the key in a different position and then recheck the wiring. Page DRC232-A 2007-08-07 DC3 with Pushbutton Installation Instructions...
-
Page 12: Installing The Pushbutton
The Pushbutton is an optional device that enables the driver to trigger the event recorder by pressing a button. It is used as an alternative to the standard DriveCam Button (located on the bottom of the event recorder) when the event recorder is not located within the driver’s reach or to provide the option of triggering the event recorder discretely. -
Page 13: Frequently Asked Questions
How does the event recorder work? The DriveCam Event Recorder is mounted on the windshield behind the rearview mirror and captures sights and sounds inside and outside the vehicle. The forward facing lens (outside view) captures the viewing area in the front of the vehicle. The inside lens captures what is happening inside the vehicle plus whatever is visible through the side and rear windows. - Page 14 Contact DriveCam Technical Support. Both LEDs blinking Both LEDs blinking Internal error. red alternating red alternating Contact DriveCam Technical Support. Copyright 2007 DriveCam, Inc. All rights reserved. DriveCam Technical Support is available 24 hours / 7 days at (866) 910-0403.
- Page 15 Security screws used to seal unit: Full coverage Block to prevent power disconnection: Memory format: Disk on chip (non-removable) Mounting bracket: Non-removable Copyright 2007 DriveCam Inc. All rights reserved. DriveCam Technical Support is available 24 hours / 7 days at (866) 910-0403.
Need help?
Do you have a question about the DC3 and is the answer not in the manual?
Questions and answers