
Related Manuals for WISEUPSHOP P6000


Summary of Contents for WISEUPSHOP P6000
-
Page 1: User Guide
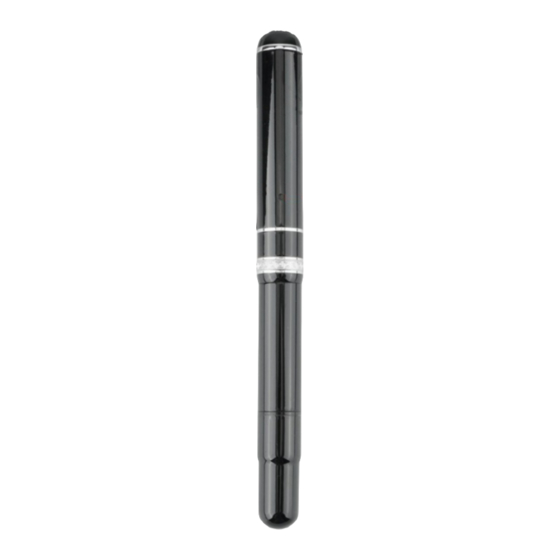
P6000 User Guide I. Product Overview 1. Power Button 2. Camera Lens 3. Mode Switch 4. USB Port 5. Red/Blue Indicator Light II. What’s in the Box -1× Pen Camera -1× USB Cable... -
Page 2: Operation
-1× AC110-230V to DC 5V Charging Adapter -3× Backup Ink Refills III. Operation >> Before using, make sure your pen camera is fully charged and there is enough space in the built in memory. 3.1. POWER ON/OFF 3.1.1. Power on the camera by pressing the Power Button for 2 seconds. The red and blue indicator lights will stay illuminated for 9 seconds, then the red indicator light will stay illuminated while the blue one will turn off, indicating the camera has entered into standby mode. - Page 3 You will see the red indicator light flash for 10 seconds and then turn off. 3.3. AUDIO RECORDING& CAMERA/STILLPHOTOGRAPHY 3.3.1. Slide the Mode Switch to the position R, power on the camera by pressing the Power Button for 2 seconds. Both red and blue indicator lights will stay illuminated for 9 seconds, then the blue indicator light will stay illuminated while the red one will turn off, indicating the camera has entered into standby mode.
- Page 4 “time.txt” file (For example: 20160412142432 N). Save this file. 5.6. Restart the camera and the system will upgrade the program automatically. VI. Charging 6.1. Power off the camera and unscrew the pen to reveal a USB port 6.2. Connect the camera to a proper PC computer USB port by using the USB cable provided.
- Page 5 P6000 Benutzerhandbuch I. Produktübersicht 1. Netzschalter 2. Kameraobjektiv 3. Modusschalter 4. USB-Anschluss 5. Rote / blaue Anzeigelampe II. Was ist in der Box -1 × Stift-Kamera -1 × USB-Kabel...
-
Page 6: Betrieb
-1 × AC110-230V zu DC 5V aufladenadapter -3 × Backup Tinten Nachfüllungen III. Betrieb >> Stellen Sie vor der Verwendung sicher, dass Ihre Stiftskamera voll aufgeladen ist und genügend Platz im eingebauten Speicher vorhanden ist. 3.1. EINSCHALTEN / AUSSCHALTEN 3.1.1. Schalten Sie die Kamera ein, indem Sie den Netzschalter 2 Sekunden lang drücken. - Page 7 Aufladung aufzeichnen. 3) .Video-Entschließung: 1920x1080P Video-Format: AVI 4). Wenn die Batterie leer ist, speichert die Kamera alle Videodateien und schaltet sich automatisch ab. Die rote Anzeigelampe blinkt für 10 Sekunden und schaltet sich dann aus. 3.3. AUDIOAUFNAHME & KAMERA / FOTOGRAFIE 3.3.1.
- Page 8 geeigneten USB-Anschluss des PC-Computers an. 5.3. Wechseldatenträgerordner wird angezeigt. 5.4. Klicken Sie auf das Laufwerk im Stammverzeichnis und im Stammverzeichnis, erstellen Sie eine txt-Datei mit dem Namen "time.txt". 5.5. Schreiben Sie das aktuelle Datum und die Uhrzeit in der Datei "time.txt" mit dem richtigen Format: YYYYMMDDHHMMSS Y (Beispiel:20160412142432 Y).
-
Page 9: Aperçu Du Produit
P6000 Mode d'emploi I. Aperçu du produit 1. Bouton d'Alimentation 2. Lentille de la caméra 3. Commutateur de mode 4. Port USB 5. Voyant rouge / bleu II. Qu'y a-t-il dans la boite -1 × caméra stylo -1 × câble USB... -
Page 10: Opération
-1 × AC110-230V à DC 5V Adaptateur de charge -3 × Recharges d'encre de sauvegarde III. Opération >> Avant l'utilisation, assurez-vous que votre appareil photo à plume est complètement chargé et qu'il ya suffisamment d'espace dans la mémoire intégrée. 3.1. MARCHE / ARRÊT 3.1.1. - Page 11 charge complète. 3) .Vidéosolution: 1920x1080P Format vidéo: AVI 4). Si la batterie est faible, l'appareil enregistre tous les fichiers vidéo et s'arrête automatiquement. Le voyant rouge clignotera pendant 10 secondes, puis s'éteindra. 3.3. ENREGISTREMENT AUDIO ET CAMERA / PHOTOGRAPHIE STILL 3.3.1.
- Page 12 5.3. Le dossier du lecteur de disque amovible s'affiche. 5.4. Cliquez sur le lecteur dans le répertoire racine et à l'intérieur du répertoire racine, créez un fichier txt nommé "time.txt". 5.5. Ecrivez la date et l'heure actuelles dans le fichier "time.txt" avec le format correct: YYYYMMDDHHMMSS Y (par exemple: 20160412142432 Y).
- Page 13 P6000 Guida Utente I. Descrizione del Prodotto 1. Pulsante Alimentazione 2. Camera Lens 3. Interruttore Modalità 4. Porta USB 5. Rosso / Blu Spia II. Cosa c'è nella Scatola -1 × macchina fotografica della penna -1 × Cavo USB...
-
Page 14: Operazione
-1 × AC110-230V a CC 5V adattatore di carico -3 × backup Ricariche dell'inchiostro III. Operazione >> Prima di utilizzare, assicurarsi che la fotocamera penna è completamente carica e c'è abbastanza spazio nella memoria integrata. 3.1. ACCENSIONE / SPEGNIMENTO 3.1.1. Accendere la fotocamera premendo il pulsante di accensione per 2 secondi. L'indicatore rosso e blu rimarranno illuminati per 9 secondi, quindi la spia rossa rimarrà... - Page 15 3) .Video Risoluzione: 1920x1080P Formato video: AVI 4). Se la batteria è scarica, la fotocamera salvare tutti i file video e spegne automaticamente. Si vedrà il rosso lampo spia per 10 secondi e poi si spegne. 3.3. AUDIO REGISTRAZIONE E CAMERA / la fotografia 3.3.1.
- Page 16 5.5. Scrivere la data e l'ora correnti nel file "time.txt" con il formato corretto: YYYYMMDDHHMMSS Y (per esempio: 20160412142432 Y). Se non è necessario il data e ora sul video riprese, è possibile modificare la "Y" in "N" nel file "time.txt" (per esempio: 20160412142432 N).
-
Page 17: Descripción Del Producto
P6000 Guía del Usuario I. Descripción del Producto 1. Botón de Potencia 2. Lente de la Cámara 3. Interruptor de Modo 4. Puerto USB 5. Luz Indicadora Roja / Azul II. Qué hay en la Caja -1 × Cámara de Pluma... -
Page 18: Grabación De Vídeo
-1 × AC110-230V a DC 5V Adaptador de Carga -3 × Recambios de Tinta de Respaldo III. Operación >> Antes de usar, asegúrese de que la cámara de pluma está completamente cargada y hay suficiente espacio en la memoria incorporada. 3.1. - Page 19 carga completa. 3) . Resolución de Vídeo: 1920x1080P Formato de Vídeo: AVI 4). Si la batería está baja, la cámara guardará todos los archivos de vídeo y se apagará automáticamente. Verá que la luz indicadora roja parpadea durante 10 segundos y luego se apaga.
- Page 20 5.3. Aparece la carpeta de la unidad de disco extraíble. 5.4. Haga clic en la unidad en el directorio raíz y dentro del directorio raíz, cree un archivo txt llamado "time.txt". 5.5. Escriba la fecha y la hora actuales en el archivo "time.txt" con el formato correcto: AAAAMMDDHHMMSS Y (Por ejemplo: 20160412142432 Y).
- Page 21 P6000 ユーザーガイド I. 製品の概要 1.電源ボタン 2.カメラのレンズ 3.モードスイッチ 4. USBポート 5.レッ ド/ブルーインジケータライト II. ボッ クスの内容 -1×ペンカメラ -1×USBケーブル...
- Page 22 -1×AC110-230V∼DC 5V充電アダプタ -3×バックアップインクリフィル III. 操作 >>使用する前に、 ペンカメラが完全に充電され、 内蔵メモリに十分なスペースがあ ることを確認してください。 3.1. 電源ON / OFF 3.1.1. 電源ボタンを2秒間押してカメラの電源を入れます。 赤と青のインジケータラン プは9秒間点灯したままになり、 赤色のインジケータランプは点灯したままになり、 青 色のインジケータランプは消灯し、 カメラがスタンバイモードに入ったことを示しま す。 3.1.2. スタンバイモードで、 もう一度電源ボタンを2秒間押してカメラの電源を切って ください。 赤のインジケータランプが消灯します。 [注意] : スタンバイ状態で3分以上操作しないと自動的にシャッ トダウンします。 青色と赤色 の両方のインジケータライトが一度点滅してから消灯します。 3.2. ビデオ録画 3.2.1. モードスイッチをMの位置にスライドさせ、 電源ボタンを2秒間押してカメラの 電源を入れます。 赤色と青色の両方のインジケータランプは9秒間点灯したままにな り、...
- Page 23 3.3. オーディオ録画&カメラ/静止画撮影 3.3.1.モードスイッチをRの位置にスライドさせ、 電源ボタンを2秒間押してカメラの 電源を入れます。 赤と青の両方のインジケータライトは9秒間点灯したままになり、 赤 色のインジケータライトは点灯したままになり、 赤色のインジケータランプは消灯し、 カメラがスタンバイモードに入ったことを示します。 3.3.2.もう一度電源ボタンを2秒間押して、 オーディオ録音を開始します。 青のインジ ケータランプがゆっく り点滅し始めます。 3.3.3.オーディオ録音を停止するには、 電源ボタンを1回押します。 青色のインジケー タランプが点灯したままになり、 カメラがスタンバイモードに戻ったことを示します。 3.3.4.スタンバイモードでは、 電源ボタンを1回押して写真を撮影します。 写真を撮る たびに青色のインジケータランプが点滅します。 [注意] : オーディオフォーマッ ト : WAV IV. ビデオ/画像ファイルのアップロード 4.1. カメラの電源を切り、 ペンのネジを緩めてUSBポートを表示させます。 4.2.付属のUSBケーブルを使用して、 カメラを適切なPCコンピュータのUSBポートに 接続します。 4.3. マイクロSDカードはリムーバブルディスクドライブとして認識されます。 4.4.
- Page 24 VI. 充電 6.1.カメラの電源を切り、 ペンのネジを緩めてUSBポートを表示させます 6.2.付属のUSBケーブルを使用して、 カメラを適切なPCコンピュータのUSBポートに 接続します。 6.3.充電中は、 赤いインジケータランプは点滅し続けますが、 青色のインジケータラン プは点灯したままになります。 6.4.フル充電をするには3時間かかります。 6.5.ペンのカメラが完全に充電されると、 青と赤の両方のインジケータライトが点灯 したままになります。 VII. リセッ ト 何らかの理由でペンのカメラが応答しなくなった場合、 または正常に動作していない 場合は、 クイックリセッ トを行うと元の状態に戻ります。 操作 : ペン ・ カメラの電源を入れたときにモードスイッチをLにスライドさせると、 自動 的にシャッ トダウンします。 その後、 カメラを出荷時のデフォルト設定に戻すことがで きます。...
Need help?
Do you have a question about the P6000 and is the answer not in the manual?
Questions and answers