
Related Manuals for Charnwood W575


Summary of Contents for Charnwood W575
- Page 1 13” PORTABLE THICKNESSER OPERATING INSTRUCTIONS MODEL: W575 Charnwood, Cedar Court, Walker Road, Bardon, Leicestershire, LE67 1TU Tel. 01530 516 926 Fax. 01530 516 929 Email; sales@charnwood.net website; www.charnwood.net...
-
Page 2: Technical Data
Introduction To get the most out of your new portable thicknesser, please read through this manual and safety instructions before use. Please also save the instructions in case you need to refer to them at a later date. Technical data Voltage/frequency 230 V ~ 50 Hz Power rating... -
Page 3: Special Safety Instructions
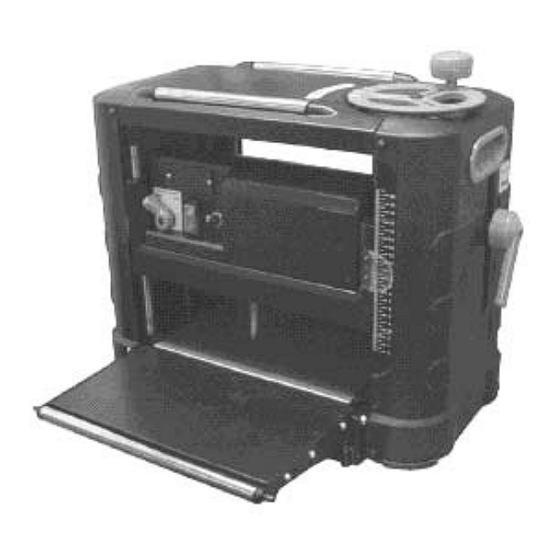
Accessories A. Extraction port E. M6 x 30mm allen bolt B. Height adjust wheel F. M6 x 20mm cross head screw , washer & spring washer C. Height locking handle G. 3mm & 5mm allen key Rubber foot H. Blade setting device Special safety instructions - For planing wood only. - Page 4 Fit the two M4 x 12mm cross head screws at the back of the extraction port to secure in place Always ensure a suitable extractor is used when the extraction port is fitted to avoid blockages, we recommend the Charnwood W690 or W790 1hp extractors.
-
Page 5: Operating Instructions
Operating Instructions Adjusting the depth of cut The height of the cutter on the scale is the size of the workpiece after it has passed through the thicknesser. This height can also be viewed on the digital display Firstly ensure that the height locking handle (part#17) is unlocked Measure the size of your workpiece, then set the height to 1mm below the size of the workpiece using the height adjustment wheel (part#24) Lock the cutter block in place using the height locking handle (part#17) -
Page 6: Maintenance
Setting the digital display The W575 thicknesser is fitted with a digital display to give an accurate height reading. Once you have passed your first workpiece through the thicknesser you should... - Page 7 There are 6 different lockable positions. Press the locking lever and turn the block until it is in the correct position Loosen the seven blade screws (part#74) Remove the blade from the cutter block taking note of the direction the blade is facing to ensure it is replaced the same way Place the new blade into the cutter block seating it on the two springs (part#75) and making sure it is positioned centrally...
-
Page 8: General Cleaning
Replacing the drive belt (Part#95) Remove the height locking handle (part#17) and height adjustment wheel (part#2) Unscrew the four allen bolts that hold the right hand side panel in place Slide the panel upwards and remove Unscrew the two screws that hold the belt cover (part#96) in place and remove the cover Rotate the cutter block pulley using the belt whilst slowly pulling the belt towards you. -
Page 9: Troubleshooting
Troubleshooting Problem Possible cause Possible solution Motor is slow or weak - voltage from source is - Request a voltage check from local power company - Windings are burned - Have the motor out or open checked, repaired or replaced - NVR switch is defective - Have the NVR checked, repaired or... - Page 10 Charnwood W575 Parts List Part no. Description Part no. Description Flat washer Steel Ball Pressure plate Positioning spring Locking shaft Hex bolt Speed adjustment shaft Screw Speed adjustment knob Bush Hex bolt Upper cover Hex bolt Locking bar Spring washer...
- Page 11 Hex bolt 147. Hex bolt Cross head screw 148. Flat washer Drive belt 149. Transmission shaft Belt cover 150. Rubber foot Motor fixture bar 151. Oiled bearing Indicator 152. Bag keep plate Cross head screw 153. 100. Bearing 154. Bearing 101.
- Page 12 Charnwood W575 Exploded View Diagram...
Need help?
Do you have a question about the W575 and is the answer not in the manual?
Questions and answers