Table of Contents
Advertisement
Quick Links
Advertisement
Table of Contents

Related Manuals for RIDGID CountPlus


Summary of Contents for RIDGID CountPlus
- Page 1 CountPlus Operator’s Manual Plus Count Cable Counter WARNING! Read this operator’s manual carefully before using this tool. Failure to understand and follow the contents of this manual may result in electrical shock, fire and/or serious personal injury.
-
Page 2: Table Of Contents
EASURE ..........................8 ETTING LIDES COUNTPLUS OPERATING INSTRUCTIONS .................... 10 ............................. 10 ASIC PERATION HOW THE COUNTPLUS MEASURES DISTANCE ................... 11 ...................... 12 ETTING ONSISTENT EASUREMENTS ............................ 12 RROR ESSAGES ..........................12 HANGING THE ATTERY ... - Page 3 SeeSnake CountPlus Cable Counter Plus Count Cable Counter SeeSnake CountPlus Record the Serial Number of your unit below and retain for your records. See Information screen for serial number and software version. Serial Number Ridge Tool Company...
-
Page 4: Safety Symbols
SeeSnake CountPlus Cable Counter General Safety Information Safety Symbols In this operator’s manual safety symbols and signal WARNING words are used to communicate important safety information. This section is provided to improve understanding of these signal words and symbols. This is the safety alert symbol. It is used to alert you to potential personal injury hazards. -
Page 5: Description, Specifications And Standard Equipment
Dust mask, non-skid to any SeeSnake® Standard or Mini camera reel. safety shoes, hardhat, or hearing The CountPlus is installed under the axle on the protection must be used for appropriate closed face of the drum. It measures distance by conditions. -
Page 6: Standard Equipment
CountPlus Installation damage. If you are retro-fitting the CountPlus to an existing 1. Check work area for adequate lighting. SeeSnake unit, you will need to install it. Detailed instructions are included in Appendix A 2. -
Page 7: Countplus Keys
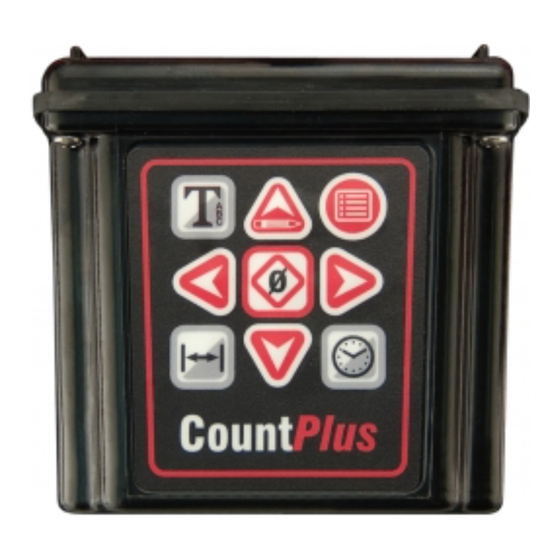
SeeSnake CountPlus Cable Counter CountPlus Keys Up / Edit Arrow Text Key Menu / Back Key Left Arrow Right Arrow Zero / Select Time Key Distance Key Down Arrow Figure 1: CountPlus Keypad Keypad Description Left and Right Arrows Move through The names of the keys are shown in Figure 1. -
Page 8: System Settings
Tools icon , and press the Zero/Select Key version installed in the CountPlus, the video type (NTSC or PAL) it is configured for, and the total . In the sub-menu that appears, highlight the distance reading since the unit was programmed. -
Page 9: System Date
CountPlus to measure your particular SeeSnake correctly. When CountPlus is first installed, it has to be configured for the reel size and cable type your SeeSnake system is using (Mini or Standard). 1. Select the Tools Menu 2. Select the Reel icon 3. -
Page 10: Units Of Measure
Units of Measure frames. A set of default slides for your use is pre- installed. They can be changed, deleted or added to The CountPlus can be set to report in feet and at will. inches, or in meters. Several formats are available in either measurement system. - Page 11 Note: If you do not create a Title for the slide, the CountPlus will use the first ten characters of text from the body of the slide as a title. This only occurs if the Title area is blank.
-
Page 12: Countplus Operating Instructions
SeeSnake CountPlus Cable Counter a. To move to a different place in the To Turn Slide Display On or Off slide, toggle back to the layout 1) Pressing the Text Key will toggle the slide screen by pressing the Text Key display off or on. -
Page 13: How The Countplus Measures Distance
The counter, as shown in Figure 15, starts from zero zero-point accidentally). when the system is powered on. This is called the 2) The CountPlus will continue to count the distance system zero-point. You can change the physical point the cable is extended and display the current total... -
Page 14: Getting Consistent Measurements
The CountPlus has its own 3-volt CR2450 battery, check. For most accurate results the cable should which is exposed in a clip holder when the CountPlus be fully in the drum and the camera in the guide is opened by removing the four screws holding the hoop when powering up. -
Page 15: Service And Repair
If product does not operate normally by following the operating instructions; 6. Test the CountPlus by plugging the reel into the camera control unit. When the camera o If the product has been dropped or view appears it should have the date/time damaged in any way;... -
Page 16: Icons And Symbols
SeeSnake CountPlus Cable Counter Icons and Symbols Key Pad Menus Measurement Display Menu Icon On/Off Menu Key Slide Edit Screen Zero/Select Key Information Screen Time/Date Display Tools Menu On/Off Down Arrow Time Settings Up Arrow/Edit Key Date Settings Measurement Unit... -
Page 17: Trouble Shooting
Check orientation, seating, and pin condition in the CountPlus connection per Appendix A. CountPlus battery low. Replace 3-volt battery in the CountPlus (CR2450). Settings incorrect for reel or Verify the settings are correct for the SeeSnake cable length, cable being used. -
Page 18: Appendix A: Installing The Countplus
The CountPlus is easily installed to an existing SeeSnake unit following these steps. 1. Install Magnet Plate The magnet plate is a plastic template with two magnets installed on its inner side. - Page 19 Ensure the gasket is uniform along the outer edge on all connect firmly. The CountPlus will not work correctly if of the four sides. Ensure each screw is firmly seated.
-
Page 20: Limited Warranty
RIDGID® tools are warranted to be free of defects in workmanship and material. How long coverage lasts This warranty lasts for the lifetime of the RIDGID® tool. Warranty coverage ends when the product becomes unusable for reasons other than defects in workmanship or material.
Need help?
Do you have a question about the CountPlus and is the answer not in the manual?
Questions and answers