Solatube 160DS Installation Manual
Hide thumbs
Also See for 160DS:
- Installation instructions manual (17 pages) ,
- Installation manual (2 pages)
Advertisement
Quick Links
Brighten Up
Solatube 160DS (250mm
©SolaLighting Limited 2007
Series installation guide
®
ø
) and Solatube 290DS (350mm
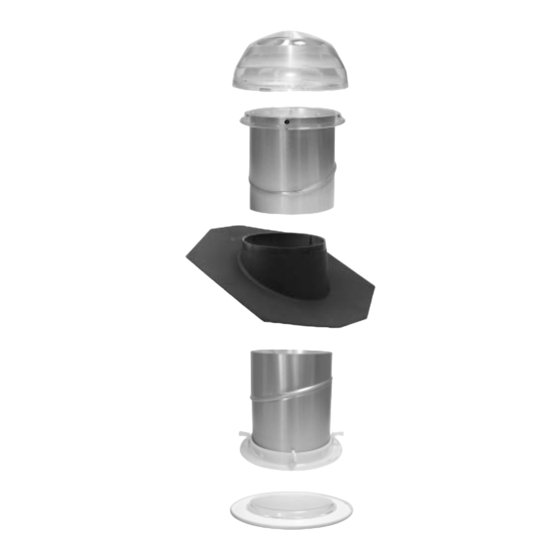
Parts List
Roof dome with patented
Raybender
3000
®
technology
Top tube assembly
(305mm long) incorporating
0-30º adjustable angle and
dome ring
Roof flashing to suit
specified roof type
(Solatube 160DS
slate/plain tile roof flashing
shown)
Bottom tube assembly
(305mm long) incorporating
0-30º adjustable angle and
ceiling ring with integrated
twist lock mechanism– see
note right re additional
extension tubes
Double glazed diffuser
Seal & fastener kit
LightTracker
dome reflector
™
Flashing sealant - if required
Aluminium tape roll
Flashing screws (50mm)
Dome ring screws (25mm)
Tube screws (10mm)
Expansion joint seal
Please read
these
instructions fully
before beginning
installation
Additional extension tubes?
You will receive a top tube and bottom
tube assembly in your Solatube kit.
Together these assemblies give an install
distance (roof to ceiling) of up to 400mm
(16"). This is generally sufficient for flat
roofs, vaulted ceilings, or very shallow
pitch roofs. For greater install distances
please
check
you
have
sufficient extension tubes to meet your
required install distance:
Up to:
Ext Tubes:
400mm (16")
960mm (38")
1520mm (60")
2080mm (82")
2640mm (104")
3200mm (126")
3760mm (148")
4320mm (170")
Important notice
Please ensure that all components have
arrived in perfect condition before starting
the installation.
If any components are damaged in
transit, the complete, unused system
should be returned for replacement.
We do not accept return of individual
system components.
Please note that top & bottom tube
assemblies are delivered one inside the
other.
ø
)
purchased
0
1
2
3
4
5
6
7
Advertisement

Related Manuals for Solatube 160DS


Summary of Contents for Solatube 160DS
- Page 1 Additional extension tubes? You will receive a top tube and bottom Roof flashing to suit tube assembly in your Solatube kit. specified roof type Together these assemblies give an install (Solatube 160DS distance (roof to ceiling) of up to 400mm slate/plain tile roof flashing (16").
- Page 2 These instructions are a step-by-step guide for the installation of a Solatube 160DS and 290DS. In general, a Solatube 160DS can provide enough daylight to illuminate a dark area of up to 13 sq m (150 sq ft). A Solatube 290DS can provide enough daylight to illuminate a dark area of up to 22 sq m (250 sq ft).
-
Page 3: Suggested Tools
Solatube optional accessories If you have purchased any of the following optional Solatube accessories, please read the instructions supplied with the accessory before proceeding with the Solatube installation as some accessories cannot be installed as a retrofit. Optiview diffuser ®... - Page 4 Mark a 275mm circle for the 160DS or a 375mm circle for the 290DS cut 275mm Ø hole for 160DS using your centre mark (from Step 1) as a centre point for the hole. Cut the hole in the ceiling as marked (diagram C).
- Page 5 Step 7 Installing the top tube assembly Unscrew the holding dome screw and remove the top tube assembly from the roof flashing. Tape the angle adaptor joint and tube seams of the top tube assembly with the foil tape provided (diagram F). Remove the protective lining film from the inside of the tube and place the top tube assembly back into the roof flashing, aligning it again with the bottom tube assembly.
- Page 6 Step 12 Applying the expansion joint seal For short installations with no extension tubes the expansion joint seal is applied 25mm from the top edge of the bottom tube assembly. expansion joint seal For installations using extension tubes, the expansion joint seal is applied 25mm from the top edge of the uppermost extension tube.
- Page 7 These instructions cover typical applications. In some instances, roof tiles may need to be trimmed and roof structures may be different to those described. Please contact your Solatube supplier before proceeding if you have any questions regarding the installation of these roof flashings.
- Page 8 These flashing instructions cover a retrofit installation onto a felt roof. If the flat roof covering is being installed at the same time as the Solatube, it is possible to install the Solatube roof flashing to the decking, underneath the roofing material. Please refer to your Solatube supplier for more information.
- Page 9 - note you may need to trim the tiles to achieve this. Ensure all tiles are firmly in position and the roof is fully watertight (diagram 4). Please now continue to Step 6 of the Solatube 160DS or 290DS installation instructions...
- Page 10 Ensure all tiles are firmly in position and the roof is fully watertight (diagram 3). Please now continue to Step 6 of the Solatube 160DS or 290DS installation instructions...
- Page 11 (diagram 4). Ensure the flashing and tiles are firmly in position and the roof is fully watertight. Please now continue to Step 6 of the Solatube 160DS or 290DS installation instructions...
- Page 12 With the flashing screws provided, secure the sides of the flashing into the curb upstand. Ensure the flashing is firmly in position and the roof is fully watertight. Please now continue to Step 6 of the Solatube 160DS or 290DS installation instructions Turret extension Parts list...
Need help?
Do you have a question about the 160DS and is the answer not in the manual?
Questions and answers