Table of Contents
Advertisement
Quick Links
1
1a
2
3
4
5
6
For the most current Installation Instructions, please visit www.solatube.com/instructions
Solatube International, Inc. | 2210 Oak Ridge Way | Vista, CA 92081-8341 | www.solatube.com | T: 888.SOLATUBE
© 2014 Solatube International, Inc.
Solatube
Solatube
Solatube
Installation Instructions
8a
8b
8c
8d
8e
8f
8g
8h
7
®
Brighten Up
®
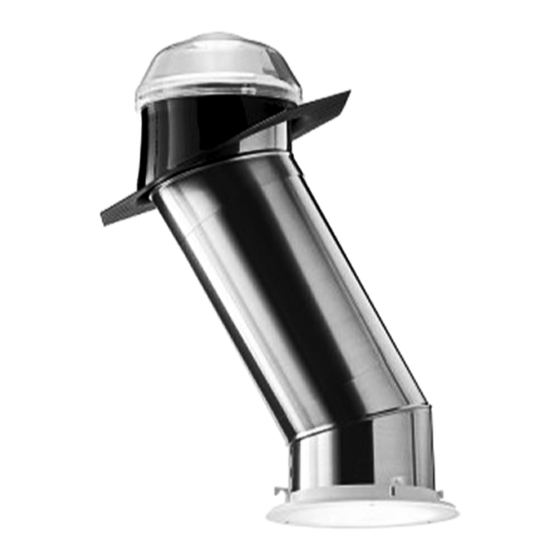
160 DS Daylighting System
®
290 DS Daylighting System
Parts List *
Dome with Raybender® 3000 Technology
1
†
a. Shock Inner Dome*
2
Roof Flashing (pitched or no pitch)
Top Tube Assembly including: Dome Ring, Dome
3
Ring Seal, Spectralight® Infinity Top Tube with
Angle Adapter.
Spectralight® Infinity 16 in (400 mm) Extension
4
Tube (not included in some kits, see label on box)
Bottom Tube Assembly including: Spectralight®
5
Infinity Bottom Tube with Angle Adapter, Ceiling
Ring
6
Effect Lens
7
Diffuser
Seal and Fasteners
a. Dome Ring Screws - #8 X 1 in (25 mm)
b. LightTracker™ Reflector
c. Flashing Screws - #10 X 2 in (51 mm)
d. Roof Sealant
8
e. Expansion Joint Seal
f. Tube Screws - #8 X 9/16 in (14 mm)
g. Foil Tape - 2 in (51 mm) X 18 ft (5.5 m) roll
h. Drywall Screws - #6 X 1 5/8 in (40 mm)
Required Tools:
Keyhole Saw
Saber or Reciprocating Saw
Hammer
Flat Bar
Utility Knife
Tape Measure
Caulking Gun
Screw Gun with Phillips Head
Lumber Crayon
Magnetic Compass
Required Safety Equipment
*Components shown not included in all kits, see label on box.
†
*
High Velocity Hurricane Zones: Shock Inner Dome must be installed
with dome. To meet HVHZ requirements, use a six inch no pitch
flashing or a pitched flashing with a four inch turret extension.
®
Series
Quantity
(1)
(1)
(1)
(2)
(1)
(1)
(1)
(5)
(1)
(8)
(1)
(1)
(10)
(1)
(4)
1
Part No. 951780 v2.7
Advertisement
Table of Contents

Related Manuals for Solatube 160 DS


Summary of Contents for Solatube 160 DS
- Page 1 For the most current Installation Instructions, please visit www.solatube.com/instructions Solatube International, Inc. | 2210 Oak Ridge Way | Vista, CA 92081-8341 | www.solatube.com | T: 888.SOLATUBE © 2014 Solatube International, Inc.
- Page 2 Solatube products are not designed to withstand the weight of a person, tools or other objects. Walking or placing objects on the system could cause personal injury and property damage. If the product is damaged, the structural capacity may be weakened; therefore the system should be repaired immediately.
- Page 3 During the day, turn off all the lights in the room to see how much natural light comes in through the windows, and determine the best position for the Solatube Daylighting System. To light a specific area, place the system over the area, not in the center of the room. This will prevent the desired area from being shaded by tall objects in the room.
- Page 4 Mark Ceiling and Roof Location Between Joists and Rafters Using Nails. Cut Ceiling Hole. Minimum clearance of 5 3/8 in (140 mm) for 160 DS and 7 3/8 in (190 mm) for 290 DS between nail hole center and joist.
- Page 5 *For HVHZ dip screw threads in sealant For the most current Installation Instructions, please visit www.solatube.com/instructions Solatube International, Inc. | 2210 Oak Ridge Way | Vista, CA 92081-8341 | www.solatube.com | T: 888.SOLATUBE © 2014 Solatube International, Inc. Part No. 951780 v2.7...
- Page 6 *Tape seam for commercial install with suspended ceiling. For the most current Installation Instructions, please visit www.solatube.com/instructions Solatube International, Inc. | 2210 Oak Ridge Way | Vista, CA 92081-8341 | www.solatube.com | T: 888.SOLATUBE © 2014 Solatube International, Inc. Part No. 951780 v2.7...
- Page 7 Please refer to the following section for a list of alternative flashings and accessories. For the most current Installation Instructions, please visit www.solatube.com/instructions Solatube International, Inc. | 2210 Oak Ridge Way | Vista, CA 92081-8341 | www.solatube.com | T: 888.SOLATUBE © 2014 Solatube International, Inc. Part No. 951780 v2.7...
- Page 8 *For HVHZ apply 4 more screws to curb cap. For the most current Installation Instructions, please visit www.solatube.com/instructions Solatube International, Inc. | 2210 Oak Ridge Way | Vista, CA 92081-8341 | www.solatube.com | T: 888.SOLATUBE © 2014 Solatube International, Inc.
- Page 9 Apply Foil Tape to Seams For the most current Installation Instructions, please visit www.solatube.com/instructions Solatube International, Inc. | 2210 Oak Ridge Way | Vista, CA 92081-8341 | www.solatube.com | T: 888.SOLATUBE © 2014 Solatube International, Inc. Part No. 951780 v2.7...
- Page 10 (3/8 in (10 mm) thick) For the most current Installation Instructions, please visit www.solatube.com/instructions Solatube International, Inc. | 2210 Oak Ridge Way | Vista, CA 92081-8341 | www.solatube.com | T: 888.SOLATUBE © 2014 Solatube International, Inc. Part No. 951780 v2.7...
- Page 11 #8 X 1/4 in (6 mm) Screw For the most current Installation Instructions, please visit www.solatube.com/instructions Solatube International, Inc. | 2210 Oak Ridge Way | Vista, CA 92081-8341 | www.solatube.com | T: 888.SOLATUBE © 2014 Solatube International, Inc. Part No. 951780 v2.7...
- Page 12 Roof Sealant 3/4 in (20 mm) thick For the most current Installation Instructions, please visit www.solatube.com/instructions Solatube International, Inc. | 2210 Oak Ridge Way | Vista, CA 92081-8341 | www.solatube.com | T: 888.SOLATUBE © 2014 Solatube International, Inc. Part No. 951780 v2.7...
- Page 13 Return to main instruction set to complete flashing installation. For the most current Installation Instructions, please visit www.solatube.com/instructions Solatube International, Inc. | 2210 Oak Ridge Way | Vista, CA 92081-8341 | www.solatube.com | T: 888.SOLATUBE © 2014 Solatube International, Inc.
- Page 14 Bend tabs up prior to installation For the most current Installation Instructions, please visit www.solatube.com/instructions Solatube International, Inc. | 2210 Oak Ridge Way | Vista, CA 92081-8341 | www.solatube.com | T: 888.SOLATUBE © 2014 Solatube International, Inc. Part No. 951780 v2.7...
- Page 15 Consult local building code. For the most current Installation Instructions, please visit www.solatube.com/instructions Solatube International, Inc. | 2210 Oak Ridge Way | Vista, CA 92081-8341 | www.solatube.com | T: 888.SOLATUBE © 2014 Solatube International, Inc. Part No. 951780 v2.7...
- Page 16 The insulator is affixed to the flashing base and the top tube slips through the opening, which provides a seal between the interior and metal flashing. Metal Roof Installation Kit Order this kit for installation of a Solatube 160 DS or 290 DS flashing onto a standing seam metal roof. Universal Tile Flashing (for applications without base flashing) The Universal Tile Flashing integrates seamlessly with most tile profiles.
Need help?
Do you have a question about the 160 DS and is the answer not in the manual?
Questions and answers