Logitech C910 Getting Started With
Pro
Hide thumbs
Also See for C910:
- User manual ,
- Getting started (144 pages) ,
- Getting started manual (96 pages)
Advertisement
Available languages
Available languages
Quick Links
Advertisement

Subscribe to Our Youtube Channel
Related Manuals for Logitech C910


Summary of Contents for Logitech C910
- Page 1 Getting started with Logitech HD Pro Webcam C910 ®...
- Page 2 Logitech HD Pro Webcam C910 Contents English 繁體中文 简体中文 한국어...
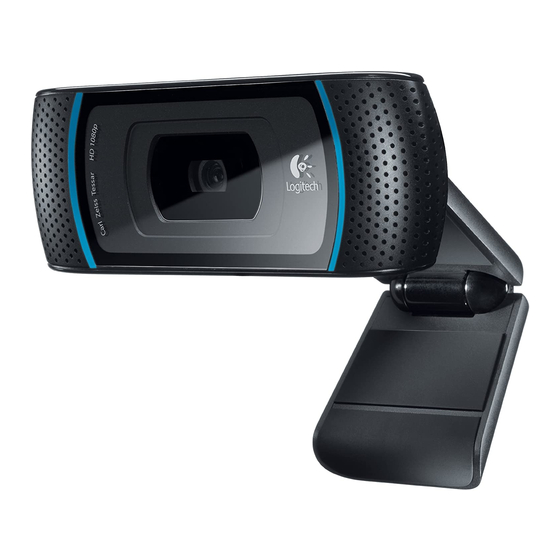
- Page 3 Getting started with Features 1. Carl Zeiss® autofocus HD 1080p lens 2. Microphones 3. Activity light 4. Flexible clip/base 5. Logitech Webcam Software 6. Product documentation Getting started with Logitech HD Pro Webcam C910 ® English...
- Page 4 Logitech HD Pro Webcam C910 Thank you for buying a Logitech webcam! Use this guide to set up your Logitech webcam and to begin making video calls If you have questions before you start, please visit the websites listed below to learn more about...
- Page 5 When prompted, connect Install the software your webcam Getting started with video calling Your webcam comes with Logitech Vid HD With Logitech Vid HD, video calling live over the Internet takes only a few, easy steps: • Install Logitech Vid HD •...
- Page 6 Learn more: http://www.logitech.com/webcam_howto Create an account Follow the on-screen instructions to create your Logitech Vid HD account and to set up your web- cam for video calling To make video calls with any application, both you and the person you call must have: •...
- Page 7 Double-click the icons to launch your applications 1. Logitech Webcam Software 2. Logitech Vid HD Tip: The Logitech Vid HD icon is only present if you chose to install Logitech Vid HD To learn about third-party video calling, please visit: www.logitech.com/webcam_howto...
- Page 8 Logitech HD Pro Webcam C910 Navigating the Logitech Webcam Software 1. Capture pictures and 5. Capture videos triggered 9. Change webcams (when videos by detected motion you have more than one) 2. View captured images and 6. Create your own custom 10.
- Page 9 Getting started with Capturing video and snapping pictures Quick Capture allows you to take photos or record videos easily You have easy access to webcam controls and settings as well as video effects to personalize your images and recordings 1. Preview window support this feature) 2.
- Page 10 Logitech HD Pro Webcam C910 Using motion detection • Set up your webcam to record video when it detects movement • Adjust captured video duration and detection sensitivity • Captured video is automatically saved to your computer • View content in the Gallery or upload it...
- Page 11 Getting started with Fine tuning your webcam during a video call 1. Launch the webcam controller when on a video call 2. Hide your video image with a photo while your webcam stays connected 3. Use pan and tilt to find the best angle. 4. Use Face Tracking so you’re always in the picture 5.
-
Page 12: Getting Help
Click on the help icon to access a complete user manual, or watch how-to videos that show you how to get the most out of your Logitech webcam and software Tip: If you are not sure about a feature, click the... - Page 13 Getting started with 功能 1. 卡爾蔡司自動對焦 HD 1080p 鏡頭 2. 麥克風 3. 動作指示燈 4. 可調式腳架/底座 5. 羅技網路攝影機軟體 6. 產品文件 Getting started with Logitech HD Pro Webcam C910 ® 繁體中文...
- Page 14 Logitech HD Pro Webcam C910 感謝您購買羅技的網路攝影機! 使用本指南設定您的羅技網路攝影機,開始使 用視訊通話。 開始之前若遇到任何問題,請瀏覽下列網站, 以深入瞭解羅技網路攝影機和視訊通話。 安裝網路攝影機 放置網路攝影機 繁體中文...
- Page 15 Getting started with 出現提示時,請連接您的網 安裝軟體 路攝影機 視訊通話輕鬆起步 您的網路攝影機附有 Logitech Vid HD Logitech Vid HD 讓您只要透過幾個簡單步 驟,即可透過網際網路使用視訊通話: • 安裝 Logitech Vid HD • 建立帳戶 • 加入好友並執行視訊通話 深入瞭解: http://www.logitech.com/whatisvid 繁體中文...
- Page 16 Logitech HD Pro Webcam C910 設定 Logitech Vid HD 安裝 Logitech Vid HD 我們建議您同時安裝羅技網路攝影機和 Logitech Vid HD 軟體。 秘訣:若您偏好使用其他視訊通話應用程式,則 必須下載和安裝第三方軟體。 深入瞭解: http://www.logitech.com/webcam_howto 建立帳戶 依照螢幕上的指示建立您的 Logitech Vid HD 帳 戶,並設定視訊通話用的網路攝影機。 若要使用任何應用程式使用視訊通話,則您和通 話方皆必須具備以下項目: • 網路攝影機 • 寬頻網際網路連線 (例如 DSL、T1 或 Cable) • 配備音箱和麥克風的電腦 (或耳麥;...
- Page 17 Getting started with 加入好友或測試通話 按一下「測試通話」方塊即可測試您的 設定。 秘訣:「測試通話」方塊會永遠顯示於 「聯絡人清單」,方便讓您測試 設定。 若要加入好友,請按一下「新增好友」方 塊,然後依提示輸入好友的電子郵件。 您的好友接受邀請後,只要按一下好友的 圖片便可輕鬆通話。 存取帳戶設定和啟動應用程式 羅技會自動偵測並為您的網路攝影機調 整最佳的設定。如果您要重新拍攝個人 相片或更新任何設定,請按一下「設 定」圖示。 連按兩下圖示即可啟動應用程式。 1. 羅技網路攝影機軟體 2. Logitech Vid HD 秘訣: Logitech Vid HD 圖示只有在您安裝 Logitech Vid HD 之後才會出現。若要瞭解第 三方視訊通話的資訊,請瀏覽: www.logitech.com/webcam_howto 繁體中文...
- Page 18 Logitech HD Pro Webcam C910 瀏覽羅技網路攝影機軟體 1. 擷取圖片和視訊 5. 偵測到動作時會觸發擷 9. 變更網路攝影機 (若您擁 取視訊 有一個以上的網路攝 2. 檢視擷取的影像並透過 影機) 電子郵件、Facebook® 或 6. 建立專屬的自訂影像面 YouTube® 分享 具 (針對支援此功能的網 10. 開啟「羅技網路攝影機 路攝影機) 軟體」設定 3. 讓您輕鬆從特定區域存 取已安裝的網路攝影機 7. 進行視訊通話時可控制 11. 開啟說明 (手冊與解 相關應用程式 視訊特效和網路攝影機...
- Page 19 Getting started with 擷取視訊和照相 「快速擷取」可讓您輕鬆照相或錄影。 讓您輕鬆存取網路攝影機控制功能與設 定,以及各種視訊特效,打造個人化的 影像與錄影內容。 1. 預覽視窗 對支援此功能的 網路攝影機) 2. 擷取模式: 相片/影片 6. 相片縮圖 3. 擷取按鈕 7. 影片縮圖 4. 網路攝影機控 8. 按一下縮圖以進 制功能 入藝廊 5. 視訊特效與情 境變換特效 (針 藝廊:檢視與共享 按一下藝廊 (1) 中的影像縮圖,以在檢閱視窗 (2) 中開啟影片或相片。 • 將影片或圖片檔案附加至電子郵件 (3) • 編輯相片或剪輯影片...
- Page 20 Logitech HD Pro Webcam C910 使用動作偵測 • 設定網路攝影機在偵測到動作時執行 錄影。 • 調整擷取影片的長度和偵測靈敏度。 • 擷取的影片會自動儲存至電腦。 • 在「藝廊」中檢視內容,或是使用「單 按式上傳」視窗來上傳內容。 個人化影片與圖片 網路攝影機提供各種視訊特效, 包括虛擬人物、影像面具 (鬍 鬚、眼鏡、帽子等)、情境變換特 效和影像面具。 想要建立專屬影像面具嗎?只要 開啟「主選單」上的「影像面具 製作工具」,然後遵循螢幕指示 即可。 繁體中文...
- Page 21 Getting started with 進行視訊通話時微調網路攝影機 1. 進行視訊通話時啟動網路攝影機控制器。 2. 在網路攝影機保持連線狀態時使用相片隱藏影片 圖像。 3. 使用鏡頭位移功能尋找最佳角度。 4. 使用「臉部追蹤」功能讓您永遠位於圖片範圍 中。 5. 使用 RightLight 修正照明不良的環境。 6. 選擇自動或手動對焦 (針對支援此功能的網路攝 影機)。 7. 指定網路攝影機操作特性。 秘訣:並非所有網路攝影機型號皆提供上述所有網 路攝影機控制功能。 繁體中文...
- Page 22 Logitech HD Pro Webcam C910 取得更多網路攝影機應用程式 按下此按鈕取得更多網路攝影機應 用程式。 下載並安裝其他網路攝影機應用程 式,例如視訊通話、相片與影片編 輯,以及其他超值程式。 取得協助 按一下說明圖示可存取完整的使用者手冊,或 是觀賞解說影片,瞭解如何善用羅技網路攝影 機和軟體功能。 秘訣:若您不確定某個功能,請按一下說明圖 示,我們的手冊便會在適當位置開啟。 繁體中文...
- Page 23 Getting started with 功能 1. 卡尔•蔡司自动对焦 1080P 高清镜头 2. 麦克风 3. 活动指示灯 4. 可调式通用夹/底座 5. 罗技网络摄像头软件 6. 产品文档 Getting started with Logitech HD Pro Webcam C910 ® 简体中文...
- Page 24 Logitech HD Pro Webcam C910 感谢您购买罗技网络摄像头! 使用本指南设置网络摄像头,开始进行视频 通话。 如果您在安装前仍有疑问,请访问下列网站以 了解更多有关罗技网络摄像头和视频通话的 信息。 设置网络摄像头 放置网络摄像头 简体中文...
- Page 25 Getting started with 根据提示,连接网络摄像头 安装软件 开始进行视频通话 本网络摄像头带有 Logitech Vid HD 使用 Logitech Vid HD,只需一些简单步骤就 可通过互联网实时进行视频通话: Logitech Vid HD • 安装 • 创建一个账户 • 添加好友并进行视频通话 要了解更多信息,请访问: http://www.logitech.com/whatisvid 简体中文...
- Page 26 Logitech HD Pro Webcam C910 设置 Logitech Vid HD 安装 Logitech Vid HD 我们建议您同时安装罗技网络摄像头和 Logitech Vid HD 软件。 提示:如果您喜欢其他的视频通话应用程序,则 需要下载和安装第三方软件。 要了解更多信息,请访问: http://www.logitech.com/webcam_howto 创建一个账户 请按照屏幕上的指示创建您的 Logitech Vid HD 账 户并为视频电话设置网络摄像头。 要使用任意应用程序进行视频通话,您和与您通 话的人都必须具有: • 一个网络摄像头 • 宽带互联网连接 (例如 DSL、T1 或 专线) • 带有扬声器和麦克风的电脑 (或带有...
- Page 27 请单击 “练习通话” 窗口,对所做设置进 行测试。 提示:此 “练习通话” 窗口始终会出现在联 系人列表之中,供您对所做设置进 行测试。 要添加好友,请单击 “添加一位好友” 窗 口,然后根据提示输入好友的电子邮件。 在朋友接受了您的邀请之后,单击您朋友 的图像即可进行通话。 进入账户设置并启动应用程序 罗技会自动检测并将网络摄像头调整为 最佳设置。如果您希望重新拍摄个人 形象照片或更新任何设置,请单击 “设 置” 图标。 要启动应用程序,请双击图标。 1. 罗技网络摄像头软件 2. Logitech Vid HD 提示:只有您选择安装了 Logitech Vid HD, Logitech Vid HD 的图标才会出现。要了解有 关第三方视频电话的更多信息,请访问: www.logitech.com/webcam_howto 简体中文...
- Page 28 Logitech HD Pro Webcam C910 罗技网络摄像头软件概览 1. 拍摄照片和视频 5. 检测到动作后进行视频 9. 更改网络摄像头 (当您拥 拍摄 有不止一个时) 2. 查看拍摄的图像,通 6. 创建自己的视频面具 10. 打开罗技网络摄像头软件 过电子邮件、Facebook® 或 YouTube® 进行分享 (适用于支持该功能的网 设置 络摄像头) 3. 此区域用于轻松访问已 11. 打开帮助面板 (用户手册 安装的网络摄像头相关 7. 在进行视频通话时控制 和操作说明视频) 应用程序 视频特效和网络摄像头 4. 启动 Logitech Vid HD 8.
- Page 29 Getting started with 拍摄视频和照片 “快速拍摄” 让您可以轻松地拍摄照片或 录制视频。 您可轻松使用网络摄像头的控键,调整 设置,并更改视频特效,让图像和录制 的视频更有个性。 1. 预览窗口 6. 照片缩略图 2. 拍摄模式: 7. 视频缩略图 照片/视频 8. 单击缩略图以进 3. 拍摄按钮 入图库 4. 网络摄像头控键 5. 视频特效和趣味 滤镜 (适用于支 持该功能的网络 摄像头) 图库:查看和分享 点击图库 (1) 中的图像缩略图可在预览窗口 (2) 中打开该视频或照片。 • 将视频或照片文件以附件形式添加至电子 邮件...
- Page 30 Logitech HD Pro Webcam C910 使用运动检测 • 将网络摄像头设置为当其检测到运动时 开始录制视频。 • 调整拍摄的视频时间长度和检测灵敏 度。 • 拍摄的视频将自动储存至电脑。 • 查看 “图库” 中的内容或使用 “一键上传” 窗口将其上传。 让视频和照片更有个性 网络摄像头提供视频特效 (Video Effects),包括虚拟人物、面部道 具 (胡子、眼镜、帽子等等)、趣 味滤镜以及视频面具。 想要创建自己的视频面具吗? 只需在主菜单中打开 Video Mask Maker,然后按照屏幕上的说明 操作。 简体中文...
- Page 31 Getting started with 在视频通话中对网络摄像头进行微调 1. 在视频通话中启动网络摄像头控制器。 2. 在网络摄像头处于连接状态时使用照片隐藏视 频图像。 3. 上下左右移动,找到最佳视角。 4. 使用面部跟踪确保您一直处于画面之中 5. 使用 RightLight 针对较差的光照环境进行校正。 6. 如果网络摄像头支持,在自动对焦和手动对焦 功能之间进行选择。 7. 指定网络摄像头的工作特性。 提示:仅限部分网络摄像头产品提供上述全部功 能。 简体中文...
- Page 32 Logitech HD Pro Webcam C910 获取更多的网络摄像头应用程序 按此按钮以获得更多的网络摄像头 应用程序。 为网络摄像头下载和安装其他的应 用程序,像视频通话、照片和视频 编辑,以及其他增值程序。 获取帮助 请单击帮助图标查看完整版用户手册,或观看 如何让您充分享用罗技网络摄像头和软件的操 作说明视频。 提示:如果您不了解某一项功能,请单击帮助 图标,手册将打开至所需的地方。 简体中文...
- Page 33 Getting started with 기능 1. Carl Zeiss® autofocus HD 1080p 렌즈 2. 마이크 3. 작동 표시등 4. 플렉서블 클립/베이스 5. Logitech 웹캠 소프트웨어 6. 제품 설명서 Getting started with Logitech HD Pro Webcam C910 ® 한국어...
- Page 34 Logitech HD Pro Webcam C910 Logitech 웹캠을 구입해 주셔서 감사합니다. 이 설명서를 이용하여 Logitech 웹캠을 설치하 고 화상 통화를 시작하십시오 시작하기 전에 궁금한 점이 있으시면 아래의 웹 사이트에서 Logitech 웹캠과 화상 통화에 대 해 자세히 알아보십시오 웹캠 설정 웹캠을 올려 놓습니다. 한국어...
- Page 35 Getting started with 메시지가 나타나면 웹캠을 소프트웨어를 설치합니다. 연결합니다. 화상 통화 시작하기 웹캠과 함께 Logitech Vid HD 제공 Logitech Vid HD 를 이용하여 몇 가지 간단한 조작으로 인터넷을 통한 실시간 화상 통화 를 시작할 수 있습니다 • Logitech Vid HD 설치...
- Page 36 다운로드하여 설치해야 합니다 추가 정보: http://www.logitech.com/webcam_howto 계정 생성 화면에 표시되는 지시 사항에 따라 Logitech Vid HD 계정을 만들고 화상 통화에 맞게 웹캠을 설정합니다 어떤 응용 프로그램을 사용하든 화상 통화를 하 려면 전화를 거는 사람이나 받는 사람 모두 다 음 사항을 갖추고 있어야 합니다...
- Page 37 려면 설정 아이콘을 클릭합니다 아이콘을 더블 클릭하여 응용 프로그램을 시작합 니다 1. Logitech 웹캠 소프트웨어 2. Logitech Vid HD 팁: Logitech Vid HD 아이콘은 Logitech Vid HD 를 설치하도록 선택한 경우에만 나타납니다 타사 화상 통화에 대한 자세한 내용은 다음 웹 페이지를 참조하십시오 www.logitech.com/webcam_howto...
- Page 38 Logitech HD Pro Webcam C910 Logitech 웹캠 소프트웨어 사용 방법 1. 사진 및 비디오를 5. 감지된 동작으로 시작된 9. 웹캠을 변경합니다 (여러 캡처합니다 비디오를 캡처합니다 개를 사용하는 경우) 2. 캡처한 이미지를 보거나 6. 자신만의 사용자 설정 10. Logitech 웹캠 이메일, Facebook®, 비디오...
- Page 39 Getting started with 비디오 캡처 및 사진 촬영 빠른 캡처를 이용하면 간편하게 사진을 찍고 비디오를 녹화할 수 있습니다 웹캠 조정 및 설정은 물론 사진과 비디오 를 개성있게 연출할 수 있는 비디오 효과 를 간편하게 이용할 수 있습니다. 6. 사진 썸네일 1.
- Page 40 Logitech HD Pro Webcam C910 동작 감지 기능 이용 • 동작이 감지되면 비디오를 녹화하도록 웹캠을 설정합니다 • 캡처된 비디오 길이와 감도를 조정합니다 • 캡처된 비디오는 컴퓨터에 자동으로 저장됩니다 • 갤러리의 내용을 보거나 원터치 업로드 창을 이용해 업로드합니다 비디오 및 사진 맞춤 구성...
- Page 41 Getting started with 화상 통화 중 웹캠 미세 조정 1. 화상 통화 중 웹캠 컨트롤러를 시작합니다 2. 웹캠이 연결되어 있는 동안 사진으로 비디오 이미지를 감춥니다 3. 좌우 상하로 움직여 가장 적합한 각도를 잡습니다 4. 얼굴 추적 기능을 사용하여 사진에 자신의 얼굴이 항상...
- Page 42 Logitech HD Pro Webcam C910 다양한 웹캠 응용 프로그램 다운로드 이 버튼을 누르면 다양한 웹캠 응용 프로그램을 구할 수 있습니다 화상 통화, 사진과 비디오 편집, 기타 가치 부가 프로그램과 같이 웹캠에서 사용할 수 있는 다양한 응용 프로그램을 다운로드하여 설치하십시오 도움말 보기...
- Page 43 PC Camera Logitech Inc. Made in China ‘M/N’ (B )
- Page 44 © 2010 Logitech All rights reserved Logitech, the Logitech logo, and other Logitech marks are owned by Logitech and may be registered All other trademarks are the property of their respective owners Logitech assumes no responsibility for any errors that may appear in this manual Information contained herein is subject to change without notice 620-002974.002...
Need help?
Do you have a question about the C910 and is the answer not in the manual?
Questions and answers