Table of Contents
Advertisement
Quick Links
Download this manual
See also:
Instruction Manual
BISCUIT
JOINER
1010W
INSTRUCTION MANUAL
SPECIFICATIONS
Voltage:
230-240V ~ 50Hz
Power:
1010W
No Load Speed:
11,000/min
Blade Bore Diameter: 22mm
Max. Cutting Depth:
14mm
Fence Adjustment:
0 - 90°
Spindle Dimension:
M10
Weight:
3.25kg
ozito.com.au
WHAT'S IN THE BOX
Biscuit Joiner
Pin Spanner
Dust Bag
BJK-1010
Advertisement
Table of Contents

Related Manuals for Ozito BJK-1010


Summary of Contents for Ozito BJK-1010
- Page 1 Biscuit Joiner JOINER 1010W Pin Spanner INSTRUCTION MANUAL SPECIFICATIONS Voltage: 230-240V ~ 50Hz Power: 1010W No Load Speed: 11,000/min Dust Bag Blade Bore Diameter: 22mm Max. Cutting Depth: 14mm Fence Adjustment: 0 - 90° Spindle Dimension: Weight: 3.25kg ozito.com.au BJK-1010...
-
Page 2: Know Your Product
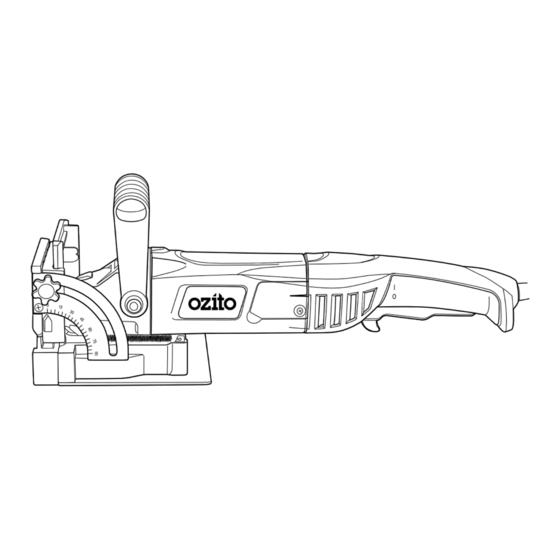
SETUP & PREPARATION KNOW YOUR PRODUCT BIsCUIt JOINER 1. ASSEMBLY 1 Height Locking Knob 8 Centreline Indicator 2 Depth Adjustment Dial 9 Bevel Locking Knob 3 Spindle Lock 10 Bevel Adjustment Scale WARNING! ENsURE thE BIsCUIt JOINER Is sWItChEd 4 Secondary Handle 11 Base Off ANd dIsCONNECtEd fROM thE pOWER sUppLy BEfORE pERfORMING ANy Of thE fOLLOWING tAsks. -
Page 3: Adjusting The Cutting Depth
2. MARKING THE WORKPIECE 3. ADJUSTING THE CUTTING DEPTH Centrelines Adjusting the Cutting depth The centreline of the workpiece and the centreline of the biscuit must The depth adjustment dial controls the depth of the cut made in the be lined up accurately to ensure a successful joint. The centreline workpiece as required for your biscuit. -
Page 4: Pre-Operation Checks
OPERATION 4. ADJUSTING THE ANGLE & HEIGHT 5. PRE-OPERATION CHECKS Adjusting the Cutting Angle WARNING! ENsURE thE BIsCUIt JOINER Is sWItChEd When using your biscuit joiner to make mitred joins, it is necessary to Off ANd dIsCONNECtEd fROM thE pOWER sUppLy BEfORE pERfORMING ANy Of thE fOLLOWING tAsks. -
Page 5: Making A Cut
Note: Refer to the glue manufacturer’s recommended setting times before removing the clamps. 6 Once the cut is complete allow the biscuit joiner blade to retract and then release the on/off trigger. BJk-1010... - Page 6 BISCUIT & JOINT GUIDE 8. BISCUIT SELECTION 9. TYPES OF JOINTS Edge to Edge Joint Below is a table outlining the dimensions of the 3 common biscuits sizes which your biscuit joiner has preset depths for on the depth Edge-to-edge joinery is one of the easiest joints to construct. It is adjustment knob.
-
Page 7: Maintenance
(RCM) Wear eye, breathing, Electrical Emissions Note: Ozito Industries will not be responsible for any ear protection Conformity (EMC) damage or injuries caused by the repair of the joiner by an unauthorised person or by mishandling of the joiner. -
Page 8: Electrical Safety
Note: The supply of 230V and 240V on Ozito tools are interchangeable for Australia and New Zealand. shock. To reduce the risk of electrical shock, we recommend the use of a residual current device (rated 30mA or This tool is double insulated;... -
Page 9: Warranty
• Failure to perform maintenance as set out within the instruction manual. • If the tool is disassembled or tampered with in any way. • Professional, industrial or high frequency use. OZItO Australia/New Zealand (Head Office) 1-23 Letcon Drive, Bangholme, Victoria, Australia 3175. 1015...
Need help?
Do you have a question about the BJK-1010 and is the answer not in the manual?
Questions and answers