Table of Contents
Advertisement
Quick Links
Advertisement
Table of Contents

Subscribe to Our Youtube Channel
Related Manuals for Geemarc SCREENPHONE


Summary of Contents for Geemarc SCREENPHONE
- Page 1 SCREENPHONE USER GUIDE...
-
Page 2: Table Of Contents
CONTENTS CONTENTS CONTENTS CALLER DISPLAY Viewing the Call Log INTRODUCTION Saving a Call Log Record Unpacking the Telephone Deleting a Call Log Record Dialling a Number from a Call Log Record DESCRIPTION Store a Number from a Call Log Record General Description PHONEBOOK INSTALLATION... -
Page 3: Introduction
1 Telephone line cord It is important that you read the instructions below in order to use your • Geemarc telephone to its full potential. Keep this user guide in a safe 1 Mains power adaptor place for future reference. -
Page 4: Description
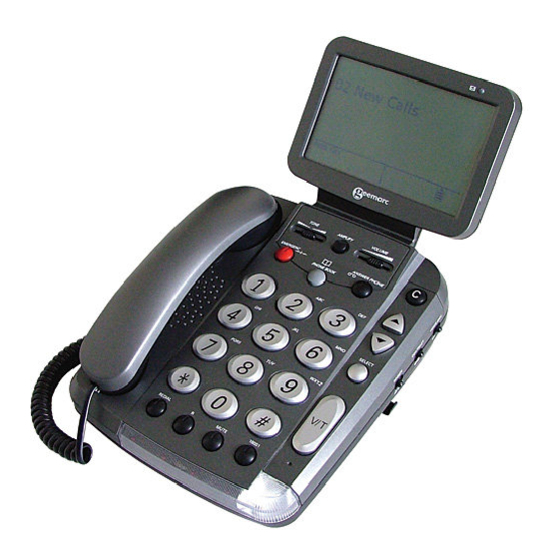
DESCRIPTION DESCRIPTION Left Side Description General Description Front Description LCD Display Additional New Message Amplify Key Indicator Tone Volume Adjustment Adjustment for for Incoming Calls Incoming Calls Phonebook Handset cord Emergency Key Answer Phone Handset clip for wall Handset cord Speaker mounting socket... - Page 5 DESCRIPTION DESCRIPTION Right Side Description Rear Description Screen DC 9V Tilt Ringer Level Screen Contrast Voice Announcement Keyboard Headset Strobe Amplify Mains Adaptor Line Cord Validation Key Adjustment Adjustment Switch Socket Socket Switch Switch Socket** Socket* Base Description Wall Mounting Holes Message Waiting Setting...
- Page 6 30 seconds. Hello it’s Tom, who is this NOTE: speaking? GA The SCREENPHONE menu system cannot be accessed during a voice or text call OK, I will bring the books and I will see you tomorrow Main Area lunchtime at the restaurant.
-
Page 7: Installation
DESCRIPTION INSTALLATION Icons on your screen display Connecting/Setting Up All the icons below are displayed in the ‘Icon Area’ (bottom right hand Connect the handset cord. Insert one end of the cord into the handset, the corner) on the screen. other into the telephone base –... -
Page 8: Wall Mounting
INSTALLATION INSTALLATION Insert the mains adaptor into the socket located at the rear of the Wall Mounting telephone Make 2 holes in the wall, 80mm apart (use the wall mount template, on page 70, as a guide). Insert the wall plugs and the wall mounting screws. The screws should protrude from the wall by 6-7mm. -
Page 9: Settings
SETTINGS SETTINGS Ringer and Alert Settings Amplify A switch located at the rear allows the amplification facility to be switched Ringer Volume ON or OFF. A switch located on right side allows the ringer to be switched OFF, LOW Your telephone is pre-set with the Amplify swith at the OFF Postion. or HIGH. -
Page 10: Maintext Font Size Adjustment
SETTINGS SETTINGS Main text font size adjustment Message Waiting You can adjust the font size while the telephone is in standby mode . A switch located on the base allows the telephone to be switched between different networks to receive message waiting signals. ON SCREEN DISPLAY ACTIONS Position 1 and 2 are used with new services provided on hotel networks. -
Page 11: Using The Telephone
Typetalk Operator will type exactly what is being said. Please follow the Voice call from instructions below to make a combination of voice and text call. SCREENPHONE user carried directly over to Caller X SCREENPHONE Typetalk... - Page 12 USING THE TELEPHONE USING THE TELEPHONE Telephone is now in Voice mode. ON SCREEN DISPLAY ACTIONS You can speak directly to Caller X using the Pre-dial the number, with the handset in the handset. At the end of the piece of cradle.
-
Page 13: Receiving A Call
Combination of Voice and Text call The SCREENPHONE User picks up handset If a hearing person wishes to call a ScreenPhone user they would dial 18002 followed by the full telephone number. Once the call is answered by Press V/T key to enter TEXT mode a Textphone, a Typetalk Operator will join the line to relay the call. -
Page 14: Text Only Calls
SCREENPHONE User awaits response. You can also use this telephone to send typed messages (as well as This will appear in the form of a typed receive them) via the Typetalk operator with an optional Geemarc message on the screen keyboard. - Page 15 Note: GA = Go Ahead Caller X dials the SCREENPHONE User telephone number. This number must be prefixed with 18002. SCREENPHONE User can type text to the The telephone number must include full Operator once you have received GA area code The Operator will relay the text to speech for Caller X.
-
Page 16: Alernative Dialling
SK = Stop Keying Pick up handset. Press V/T key Dial the number on the keypad. SCREENPHONE User can now end the call by replacing the handset To end the call simply place the handset on the cradle Call Time Counter When making a call the call time counter will be displayed 20 seconds after the last digit is dialled. -
Page 17: Mute Function
USING THE TELEPHONE USING THE TELEPHONE Mute Function Emergency Button If you wish, you can speak privately to someone else is the room without The red emergency button on the telephone base can be used to access your caller overhearing. You will still be able to hear the caller but they the 999 emergency services. -
Page 18: Receive Volume And Tone Adjustment
USING THE TELEPHONE USING THE TELEPHONE VOLUME Receiving Volume and Tone Adjustment You can alter the receiving volume and tone according to your hearing requirements. 15 db 30db Use the Volume slide switch on the telephone base to adjust the level according to your hearing requirements. -
Page 19: Standby Mode
USING THE TELEPHONE ANSWERPHONE If you are not available to answer a telephone call, the telephone can Standby Mode receive and save a typed message from the caller (via the Typetalk When the telephone is idle, the display may show the following type of operator), provided they have used the 18002 prefix. -
Page 20: Viewing Answerphone Messages
ANSWERPHONE ANSWERPHONE Viewing Answerphone Messages Saving Answerphone Messages ON SCREEN DISPLAY ON SCREEN DISPLAY ACTIONS ACTIONS 01 New Messages 01 New Messages Select Select Press Press 02 New Calls 02 New Calls > Messages > Messages to scroll through the menu to scroll through the menu Font Size Font Size... -
Page 21: Deleting Answerphone Messages
ANSWERPHONE ANSWERPHONE Deleting Answerphone Messages 02 New Calls Press and hold or do not touch the keypad for 30 seconds to return to standby ON SCREEN DISPLAY ACTIONS 01 New Messages Selected message has been saved. It loses Select Press 02 New Calls the New ‘!’... - Page 22 ANSWERPHONE CALLER DISPLAY The features described in this section are only available if you subscribe to a Caller Display service from your network provider. 02 New Calls Press and hold or do not touch the keypad for 30 seconds to return to standby Caller Display means you can see who is calling on your LCD display (provided the number is not withheld, unavailable or is an international Selected message has been deleted from...
- Page 23 CALLER DISPLAY CALLER DISPLAY When the call log memory is full, a new call will take the place of the oldest Viewing the Call Log call. You can display, save, delete and dial numbers in the log. If the caller has exercised the option to prevent his number from being ON SCREEN DISPLAY ACTIONS displayed, Private Number will be shown on the LCD display.
-
Page 24: Caller Display
CALLER DISPLAY CALLER DISPLAY Saving a Call Log Record 02 New Calls Press and hold or do not touch the keypad for 30 seconds to return to standby ON SCREEN DISPLAY ACTIONS 03 New Calls Select Press >Messages to scroll through the menu Font Size to select‘Messages’... -
Page 25: Deleting A Call Log Record
CALLER DISPLAY CALLER DISPLAY Deleting a Call Log Record Entry deleted Select Press ON SCREEN ACTIONS DISPLAY Selected call log record has been deleted 03 New Calls from the call log Select Press 02 New Calls Press and hold or do not touch the >... - Page 26 CALLER DISPLAY CALLER DISPLAY Dial a Number from a Call Log Record Return as: to scroll through the menu to ON SCREEN DISPLAY ACTIONS > Voice/Text select 03 New Calls Voice only Select Press ‘Voice/Text’ if you want 18001 inserted before the >...
-
Page 27: Store A Number From A Call Log Record
CALLER DISPLAY CALLER DISPLAY Store a Number from a Call Log Record Store with 18001?: to scroll through the menu to > Yes ON SCREEN select ACTIONS DISPLAY ‘Yes’ 03 New Calls Select Press the telephone number wil be saved with 18001 inserted before the number. - Page 28 CALLER DISPLAY CALLER DISPLAY Save as: Save as: To save in Quick dial To save in the Phonebook >Quick Dial >Quick Dial Phonebook Phonebook EITHER EITHER Using the keypad enter a quick dial location Press Phonebook between 0 and 9 Entry added The name and number has been stored in Entry added...
-
Page 29: Phonebook
PHONE BOOK PHONE BOOK Names and phone numbers can be stored in the quick dial memory or wish to store – up to 24 digits. Use phone books available on the telephone. correct any incorrect digits If you have subscribed to a Caller Display service and if the caller name Select Press and number have been stored in the phonebook, the name of the caller... -
Page 30: Create A Phonebook Entry
PHONE BOOK PHONE BOOK Create a Phonebook Entry Lettering on the Numerical Keypad ON SCREEN DISPLAY ACTIONS Characters Characters MNO6 In standby, press and hold Phonebook ABC2 PQRS7 for 3 seconds DEF3 TUV8 GHI4 XYZ9 >Add Entry to scroll through the menu JKL5 Space 0 Edit Entry... -
Page 31: Edit A Quick Dial Or Phonebook Entry
PHONE BOOK PHONE BOOK Edit a Quick Dial or Phonebook Entry Entry added The name and number has been stored in the phonebook ON SCREEN DISPLAY ACTIONS Quick Dial In standby, press and hold Phonebook to scroll through the menu >Phonebook for 2 seconds to select ‘Phonebook’... -
Page 32: Delete A Quick Dial Or Phonebook Entry
PHONE BOOK PHONE BOOK Press Select to Select Press Delete, C to Cancel Entry deleted 0770123456 to correct any incorrect digits. Enter the correct digits using the numerical keypad Press and hold or do not touch the keypad for 20 seconds to return to standby Entry saved Select Press... -
Page 33: Factory Default
VXX will be displayed on the LCD display – this is the software version number Keyboard You can use this telephone as a textphone with an optional Geemarc Release keyboard. This plugs into the keyboard socket at the rear of the telephone. -
Page 34: Troubleshooting
• Make sure that the power adaptor is plugged in correctly and is not General damaged Only use the correct Geemarc authorised power supply with the product. • Make sure the batteries are inserted correctly • Make sure that the batteries are fully charged Do not open the unit (except to replace the batteries). -
Page 35: Guarantee
The product must not be tampered with or apparatus, ensure that the mains power socket is readily accessible. taken apart by anyone who is not an authorized Geemarc representative. The Geemarc guarantee in no way limits your legal rights. -
Page 36: Recycling Directives
- Or, hand the old product to the retailer. If you purchase a new one, they should accept it. Thus if you respect these instructions you ensure human health and environmental protection. For product support and help visit our website at www.geemarc.com Telephone 01707 384438 Or fax 01707 372529 UGSCREENPHONE_UK ED.01...
Need help?
Do you have a question about the SCREENPHONE and is the answer not in the manual?
Questions and answers