Table of Contents
Advertisement
Available languages
Available languages
EASY-DIAL PHONE WITH VOLUME AND TONE ADJUSTMENT
TELEPHONE MULTIFONCTIONS A GRANDES TOUCHES
User guide / Notice d'utilisation
E
CAUTION
:THIS TELEPHONE PRODUCT IS
SPECIFICALLY DESIGNED FOR PEOPLE WITH HEARING
DIFFICULTIES AND IS PROVIDED WITH A HANDSET
EARPIECE VOLUME CONTROL FOR INDIVIDUAL
REQUIREMENTS. DUE CARE MUST BE TAKEN BY ALL
USERS THAT THE HANDSET EARPIECE VOLUME
CONTROL IS SET TO THE LOWEST LEVEL ACCEPTABLE
BY EACH RESPECTIVE USER. CARE SHOULD
THEREFORE BE EXERCISED TO ENSURE THAT ANY
NAIVE USERS ARE ARE FAMILIAR WITH THIS
REQUIREMENT.
CL200+
CL200+
CL200+
CL200+
CL200+
F
ATTENTION:
CE TELEPHONE PEUT ETRE DESTINE
AUX PERSONNES AYANT DES PROBLEMES D'AUDITION.
IL POSSEDE UN ECOUTEUR A VOLUME VARIABLE. A
LA PREMIERE UTILISATION, ASSUREZ VOUS QUE LE
BOUTON DE REGLAGE DU VOLUME SOIT POSITIONNE
SUR LA POSITION VOLUME MINIMUM. LES PERSONNES
MALENTENDANTES POURRONT PAR LA SUITE
AUGMENTER LE VOLUME POUR L'ADAPTER A LEUR
AUDITION.
Advertisement
Table of Contents

Subscribe to Our Youtube Channel
Related Manuals for Geemarc CL200+


Summary of Contents for Geemarc CL200+
- Page 1 EASY-DIAL PHONE WITH VOLUME AND TONE ADJUSTMENT TELEPHONE MULTIFONCTIONS A GRANDES TOUCHES User guide / Notice d’utilisation CAUTION :THIS TELEPHONE PRODUCT IS SPECIFICALLY DESIGNED FOR PEOPLE WITH HEARING DIFFICULTIES AND IS PROVIDED WITH A HANDSET EARPIECE VOLUME CONTROL FOR INDIVIDUAL REQUIREMENTS.
-
Page 2: Table Of Contents
Description Setting up - Connecting the telephone - Alarm and ring options - Ring only - Ring and shaker - Ring and strobe flash - Ringer settings - Tone/Pulse switch (T/P) - Time break recall switch - Hotel message waiting switch... - Page 3 - Mute button - Storing telephone numbers - Dialling stored numbers Options: - Direct Vibe - Shaker - Headset with microphone Guarantee For product support and help visit our website at www.geemarc.com telephone 01707 384438 or fax 01707 372529 handset...
- Page 4 Descriptif Installation - Raccordements - Options d’alarme et de sonnerie - Sonnerie seule - Sonnerie et vibreur - Sonnerie et flash - Réglage de la sonnerie - Fréquence vocale/décimale (interrupteur T/P) - Interrupteur 300ms/100ms - Service messagerie d’hôtel - Position murale Utilsation - Répondre à...
- Page 5 - Vibreur - Casque avec microphone Garantie TEL. SERVICE APRES VENTE : Pour tout renseignement technique ou toute commande visitez notre site web sur www.geemarc.com Parc d’Activités du Basroch 03 28 58 75 99 2, rue Galilée 59760 Grande Synthe...
-
Page 6: Description
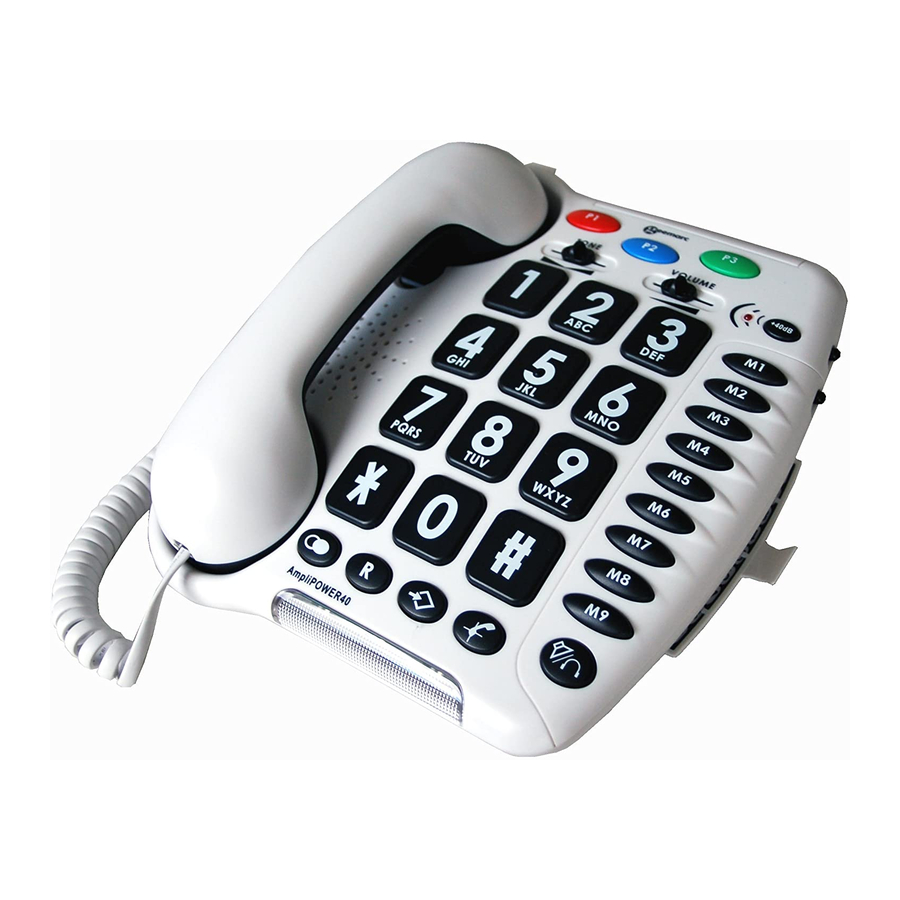
DESCRIPTION Hotel message switch (1) * Only Geemarc references * Shaker socket (2) can be connected to the Only ref: SHAKCL_WH sockets * Headset socket (3) Only ref: HEADSCL_WH Tone reception adjustment (4) Clip for wall mounting (5) Speaker volume adjustment (6) - Page 7 Tone and volume adjustment automatically activated each time you hang-up the phone (24) *12 V DC adaptor socket (23) DC12V Mute button (13) Line socket (22) 3 priority numbers (21) Key to activate tone and volume adjustment function (20) Handsfree / Headset button (15) Micro Hotel message waiting LED (14) Ringer level...
-
Page 8: Connecting The Telephone
Shaker (option) (*) Classified TNV-3 according to EN60950 standard. (**) Classified “hazardous voltage” according to EN60950 standard. 1 - CONNECTING THE TELEPHONE 1 - Connect the handset cord (31). 2 - Open the battery door by unscrewing the retaining screw. Insert 4 x AAA alkaline batter- ies. - Page 9 4 - Connect the headset cord (optional). 5 - Connect the PTT plug to the wall socket. 6 - Connect the 12V DC adaptor cord (27) to the telephone. 7 - Connect the 12V DC adaptor (26) to your wall socket (**).
-
Page 10: Tone/Pulse Switch (T/P)
3 - RINGER SETTINGS A switch (18) located on right side allows the ringer to be switched HI,LOW,OFF: : Off, : Low, Your phone comes with the ringer switched to «High» and the melody set to «6». Melody 1 Melody 2 Melody 3 If you don’t like the ringer melody,you can choose a new one by changing the settings as follow:... -
Page 11: Time Break Recall Switch (300/100)
SETTING UP Tone position (T). In the UK,all telephone exchanges now use Tone dialling.If your phone does not dial out, it is probably being used from an older private switch- board (PBX). In this case,theTone/Pulse switch must be moved to Pulse. -
Page 12: Wall Mounting
SETTINGS 7 - WALL MOUNTING To wall-mount your telephone,slide out the clip (5), turn around and slide back into the wall mounting position (located in the base unit, just below the ear piece).This will ensure that the handset stays firmly in position. Make 2 holes in the wall 80mm apart (use the wall mount template) , insert the wall plugs and the wall mounting screws. -
Page 13: Answering Incoming Calls
USING THE PHONE 1 - ANSWERING INCOMING CALL Without headset: - When an incoming call is received, the phone will ring, to answer the call lift the handset and speak. - On completion of the call, carefully replace the handset in the cradle to release the line. With headset (option): - When an incoming call is received, and if you wish to answer the call with the headset, press the... - Page 14 USING THE PHONE 2-VOLUME ADJUSTMENT You can increase the volume and adjust the receiving tone according to your own hearing requirements.The button receiving and tone functions to be activated or not during the conversation. When the function is activated, the red light of extra receiving and tone function located near the button Is lit.
- Page 15 USING THE PHONE 15dB Note: When the tone (treble), earpiece volume and sending levels are set to the maximum, whistling may occur. If whistling occurs the sending level settings should be decreased (switch When the switch is ON, the extra-receiving and tone functions are automatically activated each time you use the phone.When the switch will need to activate the function by pressing the...
-
Page 16: Making A Call
USING THE PHONE 3 - MAKING A CALL Without headset: - Lift the handset. - Await the dial tone and dial required number. - On completion of the call,carefully replace the handset in the cradle. With headset (option): - Press the / - Await the dial tone and dial required number. - Page 17 USING THE PHONE Note: - To deactivate the handsfree function during a call, lift the handset. To activate the handsfree function during a call, press the / button and place the handset on the cradle. - During a call in handsfree, you can adjust the speaker volume to a desirable level.
-
Page 18: Recall, * & # Buttons
USING THE PHONE 4 - LAST NUMBER REDIAL - Lift the handset. - Await the dial tone and press (9) button. -The previously dialled number will be automatically redialled (not in use for memory numbers). 5 - RECALL, * & # BUTTONS These are used with the new services provided on digital exchanges.For details please contact your network operator. -
Page 19: Storing Telephone Numbers
USING THE PHONE 7 - STORING TELEPHONE NUMBER Your phone can store12 direct memories including 3 priorities numbers (21 digits maximum for each memory). For example, the 3 priority P1, P2, P3 memories (21) allow you to store the 3 numbers below:... -
Page 20: Dialling Stored Numbers
USING THE PHONE 8 - DIALLING STORED NUMBER - Lift the handset and await the dial tone. - Press appropriate button M1, M2, ..., or M9 (16) or one of the 3 priorities P1, P2, P3 numbers ( 21), the stored number will be dialled automatically. To register your stored phone numbers,use the index card located under the base. - Page 21 USING THE PHONE For product support and help visit our website at www.geemarc.com telephone 01707 384438 or fax 01707 372529...
-
Page 22: Direct Vibe R Handset
HSDVCL_WH you may purchase it from your retailer or audiologist. In case of difficulty please visit our website (www.geemarc.com) or phone our HELPLINE 01707 384 438 . To set up the Direct Vibe handset only disconnect the standard handset on the handset socket (31) -
Page 23: Headset With Microphone
To purchase a SHAKER see item 1 above. 3- HEADSET WITH MICROPHONE (OPTIONAL) If you wish to answer or make calls by using a Geemarc headset ref: HEADSCL_BLK, connect the headset plug in the headset socket located behind your phone. -
Page 24: Guarantee
GUARANTEE GUARANTEE From the moment your Geemarc product is purchased, Geemarc guarantee it for the period of one year. During this time, all repairs or replacements (at our option) are free of charge.Should you experience a problem then contact our helpline or visit our website at www.geemarc.com.The guarantee does not cover accidents,... -
Page 25: For Product Support And Help Visit Our Website At
- Or, hand the old product to the retailer. If you purchase a new one, they should accept it. Thus if you respect these instructions you ensure human health and environmental protection. For product support and help visit our website at www.geemarc.com telephone 01707 384438 or fax 01707 372529... -
Page 26: Descriptif
* Ne connecter que les références Geemarc * Connecteur de casque (3) Ref: HEADSCL_BLK seulement Réglage de la tonalité de réception (4) Ergot à retourner pour maintenir le téléphone en position murale (5) Réglage du volume du haut parleur (6) Réglage du volume... - Page 27 Activation automatique de la correction d’écoute au décroché (24) * Connecteur d’adaptateur secteur 12V DC (23) 3 mémoires prioritaires (21) DC12V Indicateur message hôtel (14) Secret d’appel (13) Connecteur de ligne (22) Activation de la correction de tonalité et de volume de réception (20) Mains libres / Casque (15) Micro Réglage du niveau...
-
Page 28: Raccordements
Cordon de ligne (25) (*) Conjoncteur téléphonique (**) Adaptateur secteur 230V Cordon d’adaptateur secteur (27) Répertoire (28) Cordon de vibreur (29) Vibreur (option) (*) Classée TNT-3 selon la norme EN60950 (**) Classé “tension dangereuse” selon la norme EN60950. 1 - RACCORDEMENTS - Branchez le cordon du combiné... -
Page 29: Options D'alarme Et De Sonnerie
INSTALLATION - Branchez le cordon du vibreur si besoin. - Branchez le cordon du casque si besoin. - Branchez le conjoncteur téléphonique dans votre prise téléphonique murale. - Branchez le cordon d’adaptateur secteur (27). - Branchez l’adaptateur secteur au réseau électrique (26). - Page 30 INSTALLATION Si la sonnerie ne vous convient pas,sélectionnez un nouveau réglage parmi les 9 proposés ci-des- sous: Melodie 1 Melodie 2 Melodie 3 Suivez la procédure décrite ci-dessous pour chan- ger le réglage : - Décrochez le combiné. - Appuyez sur la touche - Appuyez sur la touche #.
- Page 31 INSTALLATION 5 - INTERRUPTEUR 300/100ms Cet interrupteur (34) doit être positionné sur 300 pour la France, il peut être positionné sur 100 pour d’autres pays ou utilisation avec un PABX. 6 - SERVICE MESSAGERIE D’HOTEL Ce service, uniquement utilisé sur certains autocommutateurs privés (hôtel par exemple), permet de prévenir de l’arrivée d’un message, fax, colis ...
-
Page 32: Position Murale
INSTALLATION 7 - POSITION MURALE Pour maintenir votre combiné en position verticale, retirez l’ergot situé sur la base (voir descriptif page 26) le tourner et le réinsérer.Percez 2 trous verticaux distants de 80 mm dans votre mur pour y insérer 2 chevilles avec leurs vis (utilisez le gabarit de montage mural fourni) . -
Page 33: Repondre A Un Appel
UTILISATION 1 - REPONDRE A UN APPEL Sans casque: - Lorsque le téléphone sonne, décrochez le com- biné pour parler à votre correspondant. - Raccrochez le combiné pour libérer la ligne. Avec casque (option): - Lorsque le téléphone sonne et si vous avez choisi de répondre aux appels avec votre casque, ap- puyez sur la touche / correspondant. - Page 34 UTILISATION 2 - REGLAGE DU VOLUME ET DE LA TONA- LITE DE RECEPTION Vous pouvez amplifier le volume et la tonalité de réception de votre combiné. La touche (20) permet d’activer ou de désac- tiver le correcteur de réception durant la conver- sation.
- Page 35 UTILISATION 15dB Note:Des sifflements dans l’écouteur peuvent apparaître dans certaines configurations de réglage (tonalité des aigus, volume de réception et volume d’émission au max),dans ce cas diminuez le niveau d’émission (interrupteur Lorsque l’interrupteur l’appareil est sur ON , la fonction est automatique- ment activée à...
-
Page 36: Appeler
UTILISATION 3 - APPELER Sans casque: - Décrochez le combiné. - Composez le numéro de votre correspondant. - La conversation terminée, raccrochez le com- biné pour libérer la ligne. Avec casque: - Appuyez sur la touche / - Composez le numéro de votre correspondant. - La conversation terminée, appuyez sur la touche pour libérer la ligne. - Page 37 UTILISATION Note: - Pour désactiver le mode mains libres durant une conversation, décrochez le combiné. Pour activer le mode mains libres durant une con- versation, appuyez sur la touche / puis rac- crochez le combiné - En mode mains libres, vous pouvez ajuster le volume du haut-parleur à...
-
Page 38: Fonction Secret
UTILISATION 4 - RAPPEL DU DERNIER NUMERO (BIS) - Décrochez le combiné. - Appuyez sur la touche (9), le numéro de vo- tre correspondant se recompose automatiquement (ne fonctionne pas pour les n° en mémoire). 5 - TOUCHES R, * & # Touches d’accès aux Services de France Télécom (Rappel d’enregistreur, Signal d’Appel, Conversa- tion à... - Page 39 UTILISATION 7 - MEMORISER UN NUMERO DE TELEPHONE Votre téléphone possède 12 mémoires directes dont 3 prioritaires (21 chiffres maximum par mémoire).Les 3 mémoires prioritaires P1, P2, P3 (21) permettent de mémoriser par exemple les 3 numéros suivants: - POMPIER : 18...
- Page 40 UTILISATION 8 - APPEL D’UN NUMERO EN MEMOIRE - Décrochez le combiné. - Appuyez sur une des touches M1, M2, ..., ou M9 ou sur une des trois touches P1, P2, P3 le numéro en mémoire se recompose automatiquement. Pour repérer vos numéros enregistrés, utilisez le répertoire situé...
-
Page 41: Combiné Direct Vibe R
OPTIONS 1- COMBINE DIRECT VIBE Si vous avez des problèmes auditifs, placez votre combiné Direct Vibe sur votre boîte crânienne (sur la tampe, autour ou derrière l’oreille) et essayez de trouver la position qui vous semblera la meilleure. En plaçant l’écouteur à un de ces endroits,les vibrations émises par le transducteur stimule votre nerf auditif par conduction osseuse et vous permet d’entendre. -
Page 42: Répondre À Un Appel
RIE (page 29) pour être activée. 3- CASQUE AVEC MICROPHONE Le casque Geemarc ref: HEADSCL_BLK vous permettra de recevoir ou d’effectuer un appel les mains libres. Si vous désirez passez ou répondre à un appel avec le casque, connectez le dans la prise casque (3) située derrière votre téléphone. - Page 43 (6). Parc d’Activités du Basroch 2, rue Galilée 59760 Grande Synthe Pour tout renseignement technique ou toute commande visitez notre site web sur www.geemarc.com TEL. SERVICE APRES VENTE : 03 28 58 75 99...
-
Page 44: Garantie
Parc d’Activités du Basroch 2, rue Galilée 59760 Grande Synthe Pour tout renseignement technique ou toute commande visitez notre site web sur www.geemarc.com Raccordement électrique : l’appareil est prévu pour fonctionner uniquement avec l’adaptateur secteur 230V 50Hz fourni. (Tension classée “dangereuse”... - Page 45 Recommandations pour le recyclage : La directive DEEE (Déchet d'Equipement Electrique et Electronique) a été mise en place dans le but d'assurer la collecte sélective en vue de la valori- sation, réutilisation ou recyclage des produits en fin de vie. Lorsque votre produit ne fonctionne plus, ne le jetez pas dans votre poubelle ménagère.
-
Page 46: Wall Mount Template
GABARIT DE MONTAGE MURAL WALL MOUNT TEMPLATE Use this template to mark the screw hole centres if you wish to wall mount the base unit. GABARIT DE MONTAGE MURAL Utilisez ce gabarit pour marquer la position des trous sur votre mur si vous désirez monter votre téléphone en position murale.
Need help?
Do you have a question about the CL200+ and is the answer not in the manual?
Questions and answers