Motorola CDM1250 User Manual
Hide thumbs
Also See for CDM1250:
- User manual (112 pages) ,
- Detailed service manual (686 pages) ,
- Service manual (178 pages)
Table of Contents
Advertisement
Quick Links
CONTENTS
Computer Software Copyrights . . . . . . . . . . . .ii
Safety . . . . . . . . . . . . . . . . . . . . . . . . . . . . . . 1
Compliance . . . . . . . . . . . . . . . . . . . . . . . . . 1
Radio Overview . . . . . . . . . . . . . . . . . . . . . . 3
Parts of the Radio . . . . . . . . . . . . . . . . . . . . . 3
(RMN4026) . . . . . . . . . . . . . . . . . . . . . . . 4
On/Off/Volume Knob . . . . . . . . . . . . . . . . 5
Channel Selector Buttons . . . . . . . . . . . . 5
LED Indicators . . . . . . . . . . . . . . . . . . . . . 5
Programmable Buttons . . . . . . . . . . . . . . 5
Push-to-Talk (PTT) Button . . . . . . . . . . . . 8
Microphone . . . . . . . . . . . . . . . . . . . . . . . 8
(RMN4026) . . . . . . . . . . . . . . . . . . . . . . . 8
LCD Screen . . . . . . . . . . . . . . . . . . . . . . . 8
Getting Started . . . . . . . . . . . . . . . . . . . . . 11
Turning the Radio On or Off . . . . . . . . . . . . 11
Adjusting the Volume . . . . . . . . . . . . . . . . . 11
Selecting a Zone . . . . . . . . . . . . . . . . . . . . . 12
Selecting a Radio Channel . . . . . . . . . . . . . 12
Sending a Call . . . . . . . . . . . . . . . . . . . . . . .13
Receiving a Call . . . . . . . . . . . . . . . . . . . . . .13
Radio Calls . . . . . . . . . . . . . . . . . . . . . . . . .15
Making a Selective Call . . . . . . . . . . . . . . . .15
Receiving a Selective Call F . . . . . . . . . . . . .16
Sending a Call Alert™ Page. . . . . . . . . . . . .16
Receiving a Call Alert Page . . . . . . . . . . . . .17
Radio Check . . . . . . . . . . . . . . . . . . . . . . . . .19
alerts E . . . . . . . . . . . . . . . . . . . . . . . . . . . .21
Decoding an Emergency Alarm. . . . . . . .21
Multiple Queued Emergencies . . . . . . . .22
Three Minute Timer . . . . . . . . . . . . . . . . .22
After the Timer Expires . . . . . . . . . . . . . .22
Alert E . . . . . . . . . . . . . . . . . . . . . . . . . . . . .23
Sending an Emergency Alert E . . . . . . . . . .24
Selective Radio Inhibit . . . . . . . . . . . . . . . . .24
Repeater or Talkaround J Mode. . . . . . . . .24
Setting the Power Level B . . . . . . . . . . . . . .25
Name and Call Tone Tagging. . . . . . . . . . . .26
Scan . . . . . . . . . . . . . . . . . . . . . . . . . . . . . . .29
Starting or Stopping Scan G . . . . . . . . . . . . .29
Talkback . . . . . . . . . . . . . . . . . . . . . . . . . . . .30
Deleting a Nuisance Channel . . . . . . . . . . . .30
i
English
Advertisement
Table of Contents

Related Manuals for Motorola CDM1250


Summary of Contents for Motorola CDM1250
-
Page 1: Table Of Contents
Sending a Call ..... . .13 CONTENTS Receiving a Call ..... .13 Computer Software Copyrights . -
Page 2: Computer Software Copyrights
Mounting ......45 purchase of Motorola products shall not be Antennas ......46 deemed to grant either directly or by Control Station . -
Page 3: Safety
Product Safety and RF Exposure booklet enclosed with your radio to ensure compliance with RF energy exposure limits. For a list of Motorola-approved antennas, batteries, and other accessories, visit the following web site which lists approved accessories: http://www.motorola.com/cgiss/ index.shtml. - Page 4 Notes English...
-
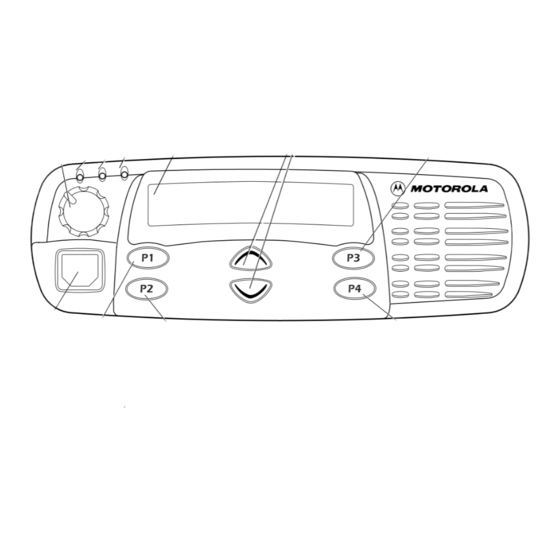
Page 5: Radio Overview
RADIO OVERVIEW PARTS OF THE RADIO Red/Yellow/Green Channel Selector LED Indicators (Up/Down) Programmable LCD Screen On/Off/Volume Button 3 (P3) Knob (Interchangeable) Microphone -DFN Programmable Button 4 (P4) Programmable Programmable (Interchangeable) Button 2 (P2) Button 1 (P1) (Interchangeable) (Interchangeable) MAEPF-26782-O English... -
Page 6: Optional Enhanced Keypad Microphone (Rmn4026)
Optional Enhanced Keypad Microphone By purchasing this enhanced keypad microphone, you will be able to gain access to (RMN4026) menu capabilities and the radio’s user- Your radio may be ordered with an optional selectable features. DTMF (Dual-Tone Multi-Frequency) microphone that has a direct entry keypad. This enhanced keypad microphone has three buttons (A, B, C) below the keypad that can be programmed to conveniently activate select... -
Page 7: On/Off/Volume Knob
On/Off/Volume Knob Some buttons can access up to two features, depending on the type of button press: Turns the radio on or off, and adjusts the radio’s volume. • short press—quickly pressing and releasing the programmable buttons Channel Selector Buttons •... - Page 8 down. Function Indicator Long Press Hold Down Page Button Short Press Sound a tone for adjusting Volume Set — — — your radio’s volume level. Takes you directly to a preprogrammed Home Revert — — † zone/channel combination. Direct Zone †...
- Page 9 Function Indicator Short Press Long Press Hold Down Page Button † This function is activated by EITHER a short OR a long press, but not both. † Speed Dial — Access your phone list directly. — Toggle silent monitor operation (also turn off Turn on open Monitor open squelch monitor...
-
Page 10: Push-To-Talk (Ptt) Button
LCD Screen Push-to-Talk (PTT) Button Press and hold down this button to talk; release it to listen. Microphone Hold the microphone 1 to 2 inches (2.5 to 5 cm) from your mouth, and speak clearly The top screen row displays radio status into it. - Page 11 Symbol Indication Symbol Indication An Emergency Alert is Indicates signal being sent. strength. The more Emergency Signal Strength bars, the stronger the signal. A Selective Call or Call Alert has been received. Option board is enabled. Call Received Option Board The Scan feature is active.
-
Page 12: Audio Indicators For Programmable Buttons
AUDIO INDICATORS FOR PROGRAMMABLE BUTTONS Low-High Tone High-Low Tone In addition to having associated visual indicators, some programmable buttons use tones to indicate one of two modes: Button Low-High Tone High-Low Tone Scan Start scan Stop scan High power Low power Power Level selected selected... -
Page 13: Getting Started
ADJUSTING THE VOLUME GETTING STARTED Turn the On/Off/Volume Control knob TURNING THE RADIO ON OR OFF clockwise to increase the volume, or counterclockwise to decrease the volume. –or – button Hold down the Volume Set (see page 6). You will hear a continuous tone. Turn the On/Off/Volume Control knob to the desired volume level. -
Page 14: Selecting A Zone
SELECTING A ZONE until you see the desired zone name. A zone is a group of up to 16 channels. Before you can access a channel in a zone, you must 5 Press the Menu/Enter button to select the select the zone in one of two ways: zone. -
Page 15: Sending A Call
Method 3 (if programmed by your dealer [see Press the PTT (for priority requests to talk, the pages 6 - 7]. Enhanced keypad microphone PRTT) button and wait for the talk permit tone. required.) Hold the microphone vertically 1 to 2 inches 1 Press the Direct Channel Access button. - Page 16 Notes English...
-
Page 17: Radio Calls
RADIO CALLS Press the PTT to send the call. The radio sounds a continuous tone. MAKING A SELECTIVE CALL Press the PTT to talk; release it to listen. You can make a selective call to a particular radio When finished with the call, press the Radio or group of radios, provided the signalling Call button to exit. -
Page 18: Receiving A Selective Callf
™ SENDING A CALL ALERT PAGE to locate the desired ID in the Radio Call List; You can alert another person by sending a Call Alert page. –or– Note: An enhanced keypad microphone is using the enhanced keypad microphone, enter required to operate this feature. -
Page 19: Receiving A Call Alert Page
you will see Acknowledge to locate the desired ID in the If not, Radio Call List; you will see No Acknowledge – or– Press the Exit button using the enhanced keypad microphone, enter to return to Call Alert the ID number of the radio you want to page. –or–... - Page 20 the F symbol, and the ID of the calling radio alternating with Call Received Press the PTT to answer the page, or press any other key to clear it. Note: Your radio will display only the last Call Alert page received. Also, your radio will not receive any Selective Calls until you clear the page.
-
Page 21: Radio Check
RADIO CHECK to locate the desired ID in the Radio Call List; This feature allows you to determine if a radio is in range without disturbing the user of the – or– radio. Radio Check can also be used when using the enhanced keypad microphone, enter attempts with Selective Call and Call Alert fail. - Page 22 5 Press the PTT. to locate the desired ID in the Radio Call List; You will see Call In Prog – or– 6 If the Radio Check is received, using the enhanced keypad microphone, enter you will see Acknowledge the ID number of the radio you wish to check. No Acknowledge If not, you will see Press the PTT.
-
Page 23: Responding To Emergency
RESPONDING TO EMERGENCY during a normal dispatch, to hear the ALERTS ( situation through your microphone. See page 23 for information about sending a Your radio offers choices for initiating and Remote Monitor. responding to Emergency Alert Note: All the choices listed above are dealer communications. -
Page 24: Multiple Queued Emergencies
Three Minute Timer Responding to an Emergency starts a three- 0 3 : 5 5 minute timer. The radio does not generate another Emergency Alert tone against that Emergency Alias or ID until the three-minute the word Emergency, followed by period expires. -
Page 25: Clearing An Emergency
Note: If the Radio Call List does not include SENDING AN EMERGENCY an alias for the radio ID, the ID displays. REMOTE MONITOR Radios that do not support the signaling As your radio responds to an Emergency Alert, protocol sound the alert tone, activate only the Emergency Queue menu is available. -
Page 26: Sending An Emergency Alert E
SENDING AN EMERGENCY ALERT E SELECTIVE RADIO INHIBIT A priority Emergency Alert can be sent to a Your radio is equipped with a security feature specific radio or dispatch center by pressing: that can temporarily render the unit inoperative when an inhibit signal is sent from the base •... -
Page 27: Setting The Power Level B
SETTING THE POWER LEVEL B within communicating distance of another radio. The J symbol appears on the Each channel in your radio has a predefined display when Talkaround Mode is selected. transmit power level that can be changed. To select either Repeater Mode or Talkaround High power ( S ) •... -
Page 28: Name And Call Tone Tagging
The display shows the current power level. until Audio/Tones until Power High? 3 Press the Menu/Enter button to select Audio/Tones or until Power Low? until Name Tone Tag 7 Press the Menu/Enter button to confirm the selection. 5 Press the Menu/Enter button to select Name Tone Tag NAME AND CALL TONE TAGGING... - Page 29 To tag a type of radio call: 10 Press the Exit button Call Tone Tag to return to Press the Menu/Enter button to enter Menu Mode. –or– Hold down the Exit button to exit Menu Mode. until Audio/Tones Press the Menu/ Audio/Tones Enter button to select until...
- Page 30 Notes English...
-
Page 31: Scan
Method 1 SCAN Press the preprogrammed Scan button (see page 6) to start or stop scanning. Your radio can monitor multiple channels in a –or– scan list. Your dealer can program up to 16 different channels into each scan list. When Method 2 (with the enhanced keypad your radio detects activity on a scan list microphone) -
Page 32: Talkback
TALKBACK Restoring a Channel to the Scan List To restore a previously deleted channel to the The Talkback feature allows you to respond to a scan list, restart the scan operation or turn your transmission while scanning. If a transmission on radio off and on again. -
Page 33: Adding Or Deleting Channels In A Scan List
Adding or Deleting Channels in a Scan List until you see the channel you Note: The enhanced keypad microphone is want to add or delete. required to operate this feature. Note: You cannot delete the last remaining channel in a scan list. To add or delete channels in a scan list: Press the Menu/Enter button to confirm your Press the Menu/Enter button to enter Menu... -
Page 34: Prioritizing A Channel In A Scan List
Prioritizing a Channel in a Scan List Setting Priority Channels Note: The enhanced keypad microphone is Note: You cannot reprioritize a Priority 1 required to operate this feature. channel to Priority 2. You may want to check the activity on one or Press the Menu/Enter button to enter Menu two channels more frequently than others. - Page 35 Press the Menu/Enter button to select the desired priority level. until you see the channel you want to prioritize. 11 Press the Menu/Enter button to prioritize that channel. 12 Press the Exit button to return to Edit Priority? – or– Hold down the Exit button to exit Menu Mode.
- Page 36 Notes English...
-
Page 37: Phone
PHONE y or z until Phone Press the Exit button If your radio has access to a telephone system, to select Phone you can make a phone call. To do this, your radio must send an access code to a station You will hear a series of tones indicating that an that connects it to a phone line. - Page 38 When you hear a dial tone, enter or select a To end a phone call, do one of the following: phone number: If your radio has the deaccess code y or z to select a number from the phone list; preprogrammed, proceed to step 8.
-
Page 39: Audio/Tone Settings
AUDIO/TONE SETTINGS 4 y or z until you see the feature you want to change. (See the table below.) You can customize the audio and tone feature 5 Press the Menu/Enter button to select the settings on your radio. feature. You will see the feature’s current setting. - Page 40 Audio/Tone Settings Feature What it Does Settings Assigns a specific tone to all calls from a specific user Name Tone Tag Standard (see page 26 for details). Alert #1 – #7 Assigns a specific tone when receiving a specific type of Call Tone Tag Standard radio call (see page 27 for details).
-
Page 41: Utilities
UTILITIES y or z until you see the feature you want to change (see table below). You can customize some of your radio’s Press the Menu/Enter button to select the features. feature. You will see the feature’s current setting. Note: The enhanced keypad microphone is required to access this feature. -
Page 42: Selecting The Display Language
Utilities Features Feature What it Does Settings Allows you to select the language displayed on the display. Language English Selection Spanish Portuguese French Activates/deactivates the option board installed in your radio. Option Opt Board On board Opt Board Off Displays the radio’s software version number. Software ——... -
Page 43: Warranty
Product Accessories One (1) Year MOTOROLA which is attached to or used in Motorola, at its option, will at no charge either connection with the Product, or for operation of repair the Product (with new or reconditioned the Product with any ancillary equipment, and all... - Page 44 EXCLUSION OR LIMITATION OF INCIDENTAL Product. Repair, replacement or refund of the OR CONSEQUENTIAL DAMAGES OR purchase price, at MOTOROLA’s option, is the LIMITATION ON HOW LONG AN IMPLIED exclusive remedy. THIS WARRANTY IS GIVEN WARRANTY LASTS, SO THE ABOVE...
- Page 45 VI. PATENT AND SOFTWARE PROVISIONS: workmanship. A Product subjected to unauthorized MOTOROLA will defend, at its own expense, any Product modifications, disassemblies or suit brought against the end user purchaser to repairs (including, without limitation, the...
- Page 46 MOTOROLA. MOTOROLA software is permitted. No license is MOTOROLA will have no liability with respect to granted by implication, estoppel or otherwise any claim of patent infringement which is based under MOTOROLA patent rights or copyrights.
-
Page 47: Accessories
MOUNTING ACCESSORIES GLN7324 Low Profile Trunnion Motorola offers a number of accessories to RLN4780 High Profile Trunnion enhance the productivity of your two-way HLN8097 Removable Slide Mount radio. Many of the available accessories are RLN4779 Key Lock Mount listed below. For a complete list, see your... -
Page 48: Antennas
ANTENNAS RAB4002ARB Lowband 29.7-36 MHz, 1/4 Wave Base HAE4004A UHF 470-512 MHz, 1/4 Wave Roof Load Mount RAB4003ARB Lowband 36-42 MHz, 1/4 Wave Base HAE4012A UHF 470-494 MHz, 3.5dB Gain Roof Load Mount RAB4004ARB Lowband 42-52 MHz, 1/4 Wave Base 09-02105F01 BNC Connector Load... - Page 49 1. Turn radio on and select appropriate zone and channel. 2. Press PTT, hold the microphone 1 to 2 inches (2.5 to 5 cm) from your mouth, ™ CDM1250 Quick Reference Card and speak clearly into it. 3. Release PTT to listen.
-
Page 50: Menu Navigation Chart
Menu Navigation Chart Menu/Enter (Refer to Menu Navigation guidelines— lower, left-hand corner of this page) System Radio Rptr/ Audio/ Program Phone Zone Utilities Scan Call Talkarnd Tones Lists (p. 35) (p. 12) (p. 39) (p. 29) (p. 16) (p. 24) (p.
Need help?
Do you have a question about the CDM1250 and is the answer not in the manual?
Questions and answers