Table of Contents
Advertisement
Advertisement
Table of Contents

Related Manuals for Ivoclar Vivadent Programat P310


Summary of Contents for Ivoclar Vivadent Programat P310
- Page 1 Programat P310 ® Operating Instructions...
-
Page 3: Table Of Contents
Initial start-up Operation and Configuration Introduction to the operation Firing programs and programming options Advanced functions of the furnace Practical Use Firing with an Ivoclar Vivadent program Firing with an individual program Maintenance, Cleaning, Diagnosis Monitoring and maintenance Cleaning Service note... -
Page 4: List Of Parts
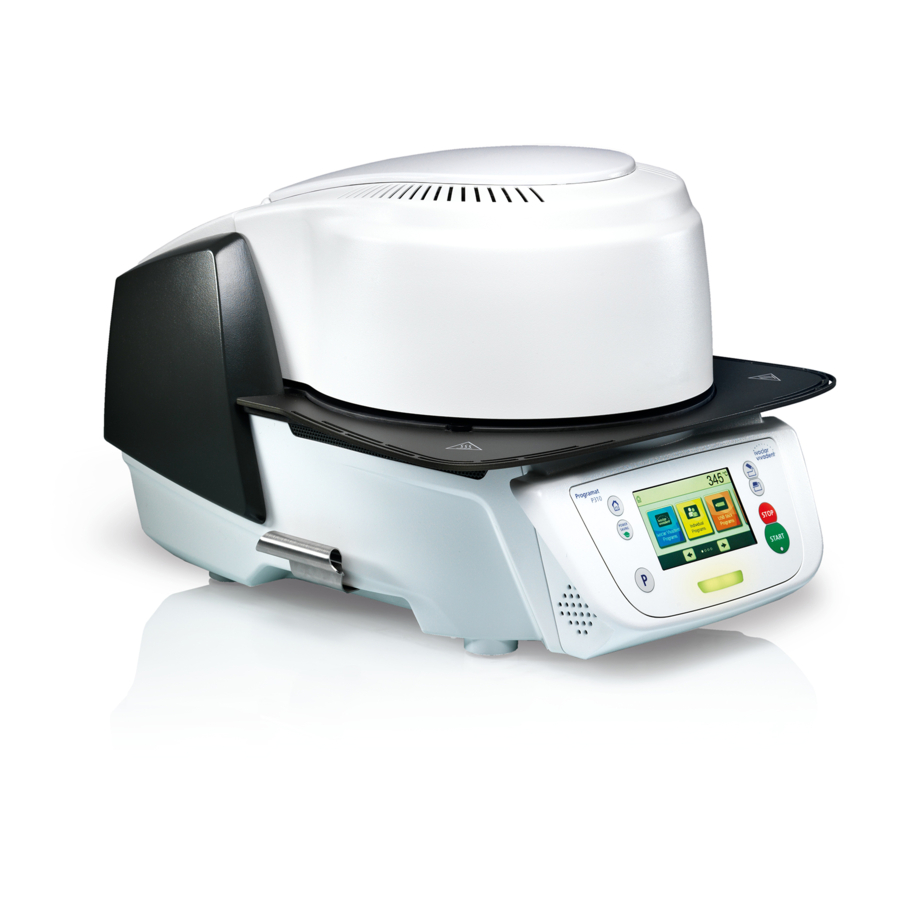
List of parts Air vents furnace head Cooling Tray Furnace head housing Warnings Touch screen Screw for cooling tray Keypad Housing base Optical Status Display (OSD) 10 Furnace feet 11 Cover for head opening mechanism 12 Air vents (base) 13 USB connection 14 USB interface 15 Ethernet connection... - Page 5 List of parts 21 QTK2 heating muffle 22 Furnace head sealing ring 16 Insulation 17 Firing plate 18 Firing plate holder 23 Sealing surface 19 Frame plate 20 Speaker 31 Cover for head opening mechanism 32 Connection cover 33 Screw for connection cover 34 Air vents rear panel 24 On/Off switch...
- Page 6 List of parts 43 Plug fuse 44 Heater plug 45 Heater plug socket 46 Thermocouple plug 38 Furnace head 47 Thermocouple plug socket mounting 48 Furnace head vacuum 39 Furnace head connection release 40 Heater cable 41 Thermocouple cable 42 Furnace head vacuum hose 50 USB download cable 51 Programat Firing Tray Kit 2 52 Programat USB stick...
-
Page 7: Introduction / Signs And Symbols
1.1 Introduction Dear Customer Thank you for having purchased the Programat P310. It is a state-of-the art furnace for dental applications. The furnace has been designed according to the latest industry standards. Inappropriate use may damage the equipment and be harm- ful to personnel. -
Page 8: Notes On The Different Voltage Versions
1. Introduction / Signs and Symbols 1.4 Notes on the different voltage versions The furnace is available with different voltage versions. – 110 – 120 V / 50 – 60 Hz – 200 – 240 V / 50 – 60 Hz In the Operating Instructions, the furnace is described in the 200–240 V voltage version. -
Page 9: Safety First
2.1 Indications The Programat P310 must only be used to fire dental ceramic materials and it should be used for this purpose only. Other uses than the ones stipulated, e.g. cooking of food, firing of other materials, etc., are contraindicated. The manufacturer does not assume any liability for damage resulting from misuse. - Page 10 2. Safety First Do not carry the furnace head by the cables, since the cables and connections may be damaged. The furnace head has an electric drive and must be operated by means of the electronic controls. Never open the furnace head by hand, since the mechanism will be damaged.
- Page 11 2. Safety First Do not touch the thermocouple and the quartz tube in the firing chamber. Avoid contact with the skin (grease contamination), as the parts may be prematurely damaged. Do not insert any foreign objects into the air vents. There is a risk of electrical shock! This product contains ceramic fibres and may release fibre dust.
-
Page 12: Health And Safety Instructions
– The furnace may only be used indoors. – Before leaving the factory, the furnace functions were tested for several hours. It is therefore possible that these tests have caused slight discolouration of the insulation. Nevertheless, your Programat P310 is still a brand new furnace. - Page 13 The furnaces must not be disposed of in the normal domestic waste. Please correctly dispose of old furnaces according to the corresponding EU council directive. Information regarding disposal may also be found on the respective national Ivoclar Vivadent homepage. The packaging may be discarded with the regular household refuse.
-
Page 14: Product Description
3.1 General aspects The Programat P310 is a modern ceramic furnace for dental applications. The firing chamber may be heated up to max. 1200 °C by means of a heating element. Furthermore, the firing chamber has been designed in such a way that a vacuum may be created with a vacuum pump. -
Page 15: Installation And Initial Start-Up
There are no special transportation grips on the furnace. Support the bottom of the furnace to carry it. Check the delivery for completeness (see delivery form in Chapter 9) and transportation damage. If parts are damaged or missing, contact your local Ivoclar Vivadent Service Centre. We recommend keeping the original packaging for future service and transportation purposes. -
Page 16: Assembly
4. Installation and Initial Start-Up 4.3 Assembly Assembling the furnace is very easy and involves only few steps. Before you start assembling the furnace, make sure that the voltage indicated on the rating plate (27) complies with the local power supply. If this is not the case, the furnace must not be connected. - Page 17 4. Installation and Initial Start-Up Step 3: Mounting the furnace head The complete furnace head is best mounted with the rear panel of the furnace pointing towards the user. Lift the furnace head with both hands (see picture) and carefully position it on the furnace head mounting.
- Page 18 4. Installation and Initial Start-Up Step 5: Mounting the hood Once all cables are properly connected to the furnace base, close the hood (11) over the connections. Step 6: Mounting the connection cover Mount the connection cover (32) and secure it with the fastening screw (33).
-
Page 19: Removing The Furnace Head
4. Installation and Initial Start-Up 4.4 Removing the furnace head Before the hood and the connection cover are removed, the furnace has to be switched off and the power cord disconnected from the power socket. 1. Loosen and remove the knurled screw (33) of the connection cover (32). - Page 20 4. Installation and Initial Start-Up Step 2: Select the temperature unit Select the desired temperature unit. The [Next] button is used to reach the next entry screen. Step 3: Select the date format Select the date format. Confirm the entry with the green button. The [Next] button is used to reach the next entry screen. Step 4: Enter the date Set the date (day, month, year).
- Page 21 4. Installation and Initial Start-Up 4.5.2 Start screen and self-test Immediately after switching on, the display shows the start screen for a few seconds. Subsequently, the furnace conducts an automatic self- test. The performance of all furnace components is automatically checked.
-
Page 22: Operation And Configuration
5.1.1 Control unit 3.99 FFR = RAL 6024 Verkehrsgrü The Programat P310 is equipped with a widescreen colour display. The furnace can be intuitively operated by means of the 4.99 FFR = RAL 3020 Verkehrsrot membrane-sealed keypad and the touch screen. The touch buttons can be actuated by slightly tapping the display with the 5.99 FFR = RAL 7035 Lichtgrau... - Page 23 5. Operation and Configuration START (LED Start) Starts the selected program. The green LED indicates that a program is active. If the pro- gram is paused (1x STOP), the Start LED flashes until renewed pressing of START results in the program being resumed. 5.1.3 Explanation of the most important touch buttons Button Function...
- Page 24 5. Operation and Configuration 5.1.5 Explanation of the home screen After the furnace is switched on, the display shows the home screen. All functions of the Programat can be selected from this screen. You can switch back to the home screen with the HOME key. By pressing a selection button, you will reach the corresponding menu (e.g.
-
Page 25: Firing Programs And Programming Options
Programs for Ivoclar Vivadent materials (see enclosed Program Table) When the furnace is delivered ex factory, the Ivoclar Vivadent programs already contain the recommended material para- meter settings and are write-protected. Consequently, it is not possible to accidentally overwrite the programs. - Page 26 5. Operation and Configuration 5.2.2 Program selection The program selection requires only few steps: 1. Select program type. 2. Select program group. 3. Select the program. 4. Start program or edit program parameters. The firing program can now be started or, as an alternative, the program parameters can be changed.
- Page 27 If a program has been selected, the program screen is displayed. The firing programs can be changed or edited in this screen. For Ivoclar Vivadent programs, the write-protection must be deactivated first before any parameters can be changed. The following information is displayed: 1.
- Page 28 5. Operation and Configuration Changing program options Pressing the [Options] button opens the menu for advanced program options: Example 1: Deactivating the write-protection 1. Press the [Options] button. 2. Press the [Deactivate write-protection] button. 3. Press the [Return] button to leave the Options menu. 4.
- Page 29 5. Operation and Configuration Example 2: Changing the predrying temperature 1. Press the [Options] button. 2. Scroll to the next page in the Options menu. 3. Press the [Predrying temperature] button. 4. Enter the desired predrying temperature and confirm with the green button.
- Page 30 5. Operation and Configuration Two-stage programs A two-stage program permits firing procedures on two temperature levels with different parameters (e.g. Holding time Stage 1, Holding time Stage 2) to be conducted. The function “two-stage program” can be selected in the Options menu. If a two-stage program has been activated, switching back and forth between the parameters of the first temperature level and the second temperature level is possible in the program screen.
- Page 31 5. Operation and Configuration 5.2.4 Adjustable parameters in the program screen S – Closing time The closing time controls the duration of the furnace head closing process. Value range: 00:18–30:00 (mm:ss) t – Temperature increase rate (for two-stage programs: t The temperature increase rate defines by how many degrees per minute the furnace heats up.
- Page 32 5. Operation and Configuration 5.2.5 Adjustable parameters in the Options menu In addition to the parameters shown in the firing curve, several other options are available that can be activated by pressing the [Options] button. Active options are shown in the grid next to the [Options] button. The following firing program options are available: Night program If this function is active, the furnace head remains open after the firing process and the heater is switched...
- Page 33 5. Operation and Configuration Thermo Shock Protection (TSP) The TSP function protects your dental-lab work during the closing process. For this purpose, TSP gauges the temperature of the firing chamber in the furnace head upon the start of the firing program. If required, the closing path within the set closing time S is adjusted.
- Page 34 5. Operation and Configuration 5.2.6 Starting and stopping programs / the operating indicator Once the program is started by pressing START, the firing curve display appears. The following information is displayed: – Information bar The information bar in the upper margin of the display, program name and the current furnace temperature are indicated.
- Page 35 5. Operation and Configuration Changing the operating indicator The active firing program can be displayed in two ways: – Operating indicator “firing curve” – Operating indicator “remaining time” If the [Display] button is pressed during an active program, the operating indicator can be switched. If the [Display] button is pressed while the firing curve is displayed, the remaining time will be shown.
- Page 36 5. Operation and Configuration 5.2.7 Pausing the active program – Press STOP once to pause a running program (green LED flashing). Press the STOP key twice to completely stop the program or press START to continue. – If the program is paused, the display shows a flashing “Pause” and the indicator changes back to the program screen. –...
-
Page 37: Advanced Functions Of The Furnace
5. Operation and Configuration 5.3 Advanced functions of the furnace 5.3.1 Settings To reach the Settings menu, scroll to page 2 in the home screen and press the [Settings] touch button. Example: Changing the brightness of the display 1. Open Settings Scroll to page 2 in the home screen and press the [Settings] button. - Page 38 5. Operation and Configuration The following settings can be changed in the Settings menu: Temperature unit You can choose between °C and °F. Setting options: °C / °F Vacuum unit You can choose between mbar and hPa. Setting options: mbar / hpa Vacuum quality Setting the final vacuum value.
- Page 39 5. Operation and Configuration Operating mode Set the desired operating mode. See Chapter 5.3.8 Operating mode for details Setting options: Standard / Protected / Production Protocolling If this function is activated, the program data are saved in a protocol entry after every firing procedure. The following protocol settings are available: Inactive: Protocolling is not active.
- Page 40 5. Operation and Configuration 5.3.2 Information To reach the screen for the furnace information, scroll to page 2 in the home screen and press the [Information] touch button. Example: Displaying information 1. Open information Scroll to page 2 in the home screen and press the [Information] button.
- Page 41 Press the START key on the membrane-sealed keypad to start the calibration. 3. Place the calibration sample Follow the instructions on the display and place the Ivoclar Vivadent sample holder with the silver strip in the centre of the firing plate (without firing tray) and press the START key.
- Page 42 5. Operation and Configuration 4. The status bar shows the duration of the calibration program. 5. Assess the calibration sample and adjust the calibration value Assess the sample after the calibration program has ended. Observe the assistance on the display. Press the input field in the display to adjust the calibration value.
- Page 43 5. Operation and Configuration 5.3.4 Data backup With the data backup function, individual programs and settings can be backed-up on a USB flash drive. We recommend using this feature, e.g. before a software update or before sending in the furnace for maintenance purposes. Moreover, furnace data saved on a USB flash drive can be restored on the furnace.
- Page 44 The furnace has to be switched off and on again by means of the mains switch at the rear of the furnace (24) to complete the software update. Important information Please note that modified Ivoclar Vivadent programs may be overwritten during a software update. Individual programs are not affected and will not be overwritten.
- Page 45 5. Operation and Configuration 5.3.6 Diagnosis Scroll to page 3 in the home screen and press the [Diagnosis] button. The following functions are available in the Diagnosis menu: – tests (e.g. vacuum test, heater test, etc.) – error table (saved error messages) –...
- Page 46 The remote diagnostic function helps you in case of a possible problem with your Programat furnace and facilitates the communication between users and the Ivoclar Vivadent After Sales Service. If the diagnostic function is executed, the furnace generates a diagnostic file, which is automatically saved on the USB stick.
- Page 47 5. Operation and Configuration 5.3.7 Maintenance Programs Scroll to page 3 in the home screen and press the [Maintenance Programs] button. The following programs are available in the Maintenance Programs menu: – Dehumidification program – Cleaning program 5.3.7.1 Dehumidification program The condensation of water in the insulation of the firing chamber and the vacuum pump will result in a lower vacuum and thus in impaired firing results.
- Page 48 5. Operation and Configuration 3. The status bar shows the progress of the dehumidification program. 4. End of dehumidification program The following messages are displayed: Dehumidification program successful Dehumidification program failed During an active dehumidification program, the furnace head is automatically opened and closed. This supports the evaporation process of the condensed water.
- Page 49 5. Operation and Configuration 2. Enter the user code Enter the user code and confirm the entry with the green button. 3. Select the operating mode Select the desired operating mode and confirm the entry with the green button. 4. Program screen in the operating mode “Production” (example) The “Protected”...
-
Page 50: Practical Use
6. Practical Use The operating procedure for the Programat P310 will be explained with the help of two examples: one Ivoclar Vivadent and one individual program. 6.1 Firing with an Ivoclar Vivadent program Step 1: Switch on Switch on the furnace with the mains switch at the rear of the furnace. -
Page 51: Firing With An Individual Program
6. Practical Use 6.2 Firing with an individual program Step 1: Switch on Switch on the furnace with the mains switch at the rear of the furnace. The furnace conducts an automatic self-test. Wait until the furnace has reached the set stand-by temperature. Step 2: Select the program After the self-test, the display shows the home screen. - Page 52 6. Practical Use Step 5: Start the program Press the START key to start the program. The LED lights up in green. You can observe the course of the program on the firing curve display. The furnace head opens automatically at the end of the program. If the Optical Status Display (OSD) lights up green, the furnace is ready for the next program start.
-
Page 53: Maintenance, Cleaning, Diagnosis
7. Maintenance, Cleaning, Diagnosis This chapter describes the user maintenance and cleaning procedures for the Programat P310. Only those tasks are listed that may be performed by dental professionals. All other tasks must be performed by qualified service personnel at a certified Ivoclar Vivadent Service Centre. -
Page 54: Cleaning
When the service note appears for the first time, the furnace has already more than 1500 firing hours. If the service note is acknowledged, it will reappear every 1000 firing hours. Ivoclar Vivadent recommends conducting a heater test after a certain number of firing hours and having the heating muffle examined by the Ivoclar Vivadent After Sales Service if necessary. -
Page 55: What If
The furnace continuously checks all functions during operation. If an error is detected, the respective error message is displayed. The acoustic signal and the error message can be acknowledged with the corresponding buttons. The following error messages may be displayed. If there are any questions, please contact the Ivoclar Vivadent After Sales Service. Error /... - Page 56 8. What If ... The vacuum is not released The vacuum cannot be released. The vacuum valve might be stuck or dirty. Contact a Service Technician. Necessary vacuum (xxxmbar) is The vacuum cannot be built-up. Check the seal of the firing chamber, not reached within 1 min.
-
Page 57: Additional Error Messages
8. What If ... 8.2 Additional error messages Please contact the Ivoclar Vivadent After Sales Service, if one of the following error numbers is being displayed. 25, 29, 43 44, 45, 46, 47, 48, 56, 103, 107, 108, 109, 143, 144, 145, 146, 147... -
Page 58: Technical Malfunctions
Is the furnace connected to the Internet? Connect the furnace to the Internet through an information to the Programat App Ethernet or WLAN connection. (e.g. at the end of a program). *If there are any questions, please contact the Ivoclar Vivadent After Sales Service. -
Page 59: Repair
Repairs may only be carried out by a certified Ivoclar Vivadent Service Centre. Please refer to the addresses on the last page of these Operating Instructions. If repairs during the warranty period are not carried out by a certified Ivoclar Vivadent Service Centre, the warranty will expire immediately. Please also refer to the corresponding warranty regulations. - Page 60 8. What If ... 5. Complete resetting to factory settings The following messages are displayed: Reset to factory settings successful Reset to factory settings failed To return to the home screen, press the HOME key on the membrane-sealed keypad.
-
Page 61: Product Specifications
9. Product Specifications 9.1 Delivery form – Programat P310 – Power cord – Vacuum hose – Programat Firing Tray Set 2 – Temperature Checking Set 2 – USB download cable – Operating Instructions Recommended accessories – Programat Accessories Set – Temperature Checking Set 2 –... -
Page 62: Acceptable Operating Conditions
9. Product Specifications 9.3 Acceptable operating conditions – Acceptable ambient temperature range: +5 °C to +40 °C – Acceptable humidity range: Relative humidity 80% for temperatures up to 31 °C gradually decreasing to 50% relative humidity at 40 °C, condensation excluded. –... -
Page 63: Appendix
10. Appendix 10.1 Program table A program table (°C / °F) is enclosed to these Operating Instructions. If not, please contact your local Ivoclar Vivadent Service Centre. Important information The current program table is also available at: www.ivoclarvivadent.com/downloadcenter The program tables can be downloaded from the internet as PDF files. Please make sure that your program table complies... - Page 64 Fax +91 22 2673 0301 www.ivoclarvivadent.co.nz Leicester LE19 4SD www.ivoclarvivadent.in United Kingdom Ivoclar Vivadent Ltda. Ivoclar Vivadent Polska Sp. z o.o. Tel. +44 116 284 7880 Alameda Caiapós, 723 Ivoclar Vivadent Marketing Ltd. ul. Jana Pawla II 78 Fax +44 116 284 7881 Centro Empresarial Tamboré...
Need help?
Do you have a question about the Programat P310 and is the answer not in the manual?
Questions and answers