TESTO 557 Instruction Manual
Digital manifold
Hide thumbs
Also See for 557:
- Instruction manual (28 pages) ,
- Quick start manual (2 pages) ,
- Instruction manual (22 pages)
Table of Contents
Advertisement
Quick Links
Download this manual
See also:
Instruction Manual
Advertisement
Table of Contents

Related Manuals for TESTO 557


Summary of Contents for TESTO 557
- Page 1 557 · Digital manifold Instruction manual...
-
Page 3: Table Of Contents
1 Contents Contents Contents ....................3 Safety and the environment ..............4 2.1. About this document ................ 4 2.2. Ensure safety ................... 5 2.3. Protecting the environment .............. 5 Specifications ..................6 3.1. Use ....................6 3.2. Technical data ................. 6 Product description ................. -
Page 4: Safety And The Environment
2 Safety and the environment Safety and the environment 2.1. About this document > Please read this documentation through carefully and familiarize yourself with the product before putting it to use. Pay particular attention to the safety instructions and warning advice in order to prevent injuries and damage to the products. -
Page 5: Ensure Safety
Use only original spare parts from Testo. > The testo 330 must be checked before commissioning for any visible damage. Do not commission the testo 330 if there are signs of damage on the housing, mains unit or supply lines. -
Page 6: Specifications
3 Specifications Specifications 3.1. The testo 557 is a digital manifold for maintenance and service work on refrigeration systems and heat pumps. The device is only to be used by qualified expert personnel. With its functions the testo 557 replaces mechanical manifolds, thermometers and pressure/temperature charts. - Page 7 R600, R600a, R718, R744 (only in permissible measurement range up to 50 bar), R1234yf (Display: T8) Measurable media Measurable media: all media that is stored in the testo 557. Not measurable: ammonia (R717) and other refrigerants which contain ammonia Ambient conditions Operating temperature: -4…122 °F / -20…50 °C...
- Page 8 4 x 1.5V type AA / Mignon / LR6 Battery lifetime: approx. 150 h (display illumination off) Display Type: Illuminated LCD Response time: 0.5 s Directives, EC Directive: 2004/108/EC standards and tests Warranty Duration: 2 years Terms of warranty: see website www.testo.com/warranty...
-
Page 9: Product Description
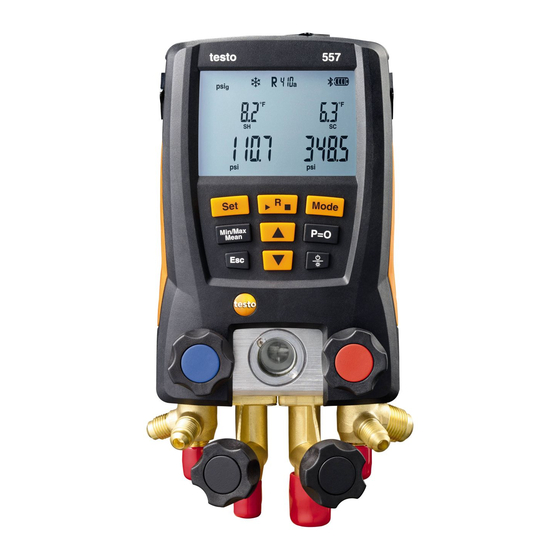
4 Product description Product description 4.1. Overview Display and control elements 1 Sensor socket Mini-DIN for NTC-temperature sensor, with socket cover 2 Suspension attachment, foldable (backside). 3 Display. Instrument status icons: Icon Meaning Battery capacity: >75% / >50% / >25% / <10% Select measuring mode, see Choosing the measuring mode page 15 4 Battery compartment. - Page 10 4 Product description 5 Control keys: Function [Set] Set units [R, Start/Stop] Select refrigerant / Start-Stop leak test [Mode] Switch between measuring modes [Min/Max/Mean] Show min, max, mean values [▲] Up-key: Change display view. [p=0] Pressure zeroing Light key: switches display light on/off. [▼] Down-key: changes display view.
-
Page 11: First Steps
5 First steps First steps Inserting batteries/rechargeable batteries 1. Unfold the suspension attachment and open the battery compartment (clip lock). 2. Insert the batteries (scope of delivery) or rechargeable batteries (4 x 1.5 V, type AA / Mignon / LR6) into the battery compartment. - Page 12 5 First steps Representation Explanation Micron, inHg, Pa, Set pressure unit for vacuum. hPa, Torr, inH2O, mbar Pabs, Prel psia, Depending on the chosen unit for pressure: psig Change between absolute and relative pressure displays in vacuum. Select the measuring mode, see Choosing the measuring mode page 15 −...
-
Page 13: Using The Product
This reduces measuring errors when using surface temperature sensors. If the measuring instrument testo 557 is used in combination with insertion or air temperature sensors (accessories), this factor must be deactivated: >... - Page 14 > For your own safety you should return the measuring instrument to the Testo Service for technical inspection. > You should therefore always replace the refrigerant hoses with new ones after the measuring instrument has dropped down or after any comparable mechanical loading.
-
Page 15: Choosing The Measuring Mode
Heat pump manifold Automatic mode When automatic mode is activated the digital manifold testo 557 automatically reverse the display of high and low pressure. This automatic reversal occurs when the pressure in the low pressure side is 1 bar higher than the pressure in the high pressure side. -
Page 16: Performing The Measurement
6 Using the product 6.2. Performing the measurement WARNING Risk of injury caused by pressurized, hot, cold or toxic refrigerants! > Wear protective goggles and safety gloves. > Before applying pressure to the measuring instrument: Always fasten the measuring instrument on the suspension attachment to prevent it from falling down (danger of breakage) >... - Page 17 6 Using the product Key functions > [▲] or [▼]: Change the readings display. Possible display combinations: Evaporation pressure Condensation pressure Refrigerant evaporation Refrigerant condensation temperature to/Ev temperature tc/Co or (only with inserted temperature sensor) Evaporation pressure Condensation pressure Measured temperature t Measured temperature t or (only with inserted temperature sensor) Evaporation pressure...
- Page 18 6 Using the product Evacuation / vacuum display The measurement takes place in the low pressure side. 5. Press [Mode]. The display shows VAC 6. Press [Mode]. Main menu display. Vacuum measurement In order to achieve optimal measuring accuracy in vacuum measurement, the measuring instrument must be zeroed at ambient pressure.
-
Page 19: Maintaining The Product
> Carefully blow out oil residues in valve block using compressed air. Ensuring the measuring accuracy Testo Customer Service would be glad to further assist you if you so wish. > Check instrument regularly for leaks (recommended: annually). Keep to the permissible pressure range! >... - Page 20 3. Set on and close cover of the battery compartment (clip must engage). 4. Switch the instrument on. Changing the valve or valve positioner handle WARNING Change of the valve positioners and valves by the customer is not permissible. > Send the measuring instrument to the Testo Customer Service.
-
Page 21: Tips And Assistance
8 Tips and assistance Tips and assistance 8.1. Questions and answers Question Possible causes/solution Batteries are almost empty. flashes > Change batteries. The instrument switches Residual capacity of the batteries is off automatically. too low. > Change batteries. uuuu lights up instead of The permissible measuring range has the parameter display been undershot. -
Page 22: Error Reports
> Please contact your dealer or Testo Customer Service If you have any questions, please contact your dealer or Testo Customer Service. The contact details can be found on the back of this document or on the Internet at www.testo.com/service- contact.. - Page 23 8 Tips and assistance...
- Page 24 Компания Энком 454084, г.Челябинск ул.Кирова 7А, оф.506 Телефон: 8 800 775 67 43 8 351 247 28 71 E-mail: encom2009@mail.ru www.testo-kip.ru 0970 5570 en 03 V01.00...
Need help?
Do you have a question about the 557 and is the answer not in the manual?
Questions and answers