Table of Contents
Advertisement
Advertisement
Table of Contents

Related Manuals for Tachosys digidl

Summary of Contents for Tachosys digidl
- Page 2 DigiDL Installation Guide Page - 2...
-
Page 3: Table Of Contents
Installing digiDL Con guration Windows® software Connecting the digiDL to your PC digiDL Con guration - Device Window digiDL Con guration - Con guration Window - WIFI Setting up a new SSID digiDL Con guration - Con guration Window - GPRS digiDL Con guration –... -
Page 4: Checking Compatibility Of Vehicles
Volvo and some Renault that are a ected. Tachosys supply a product called digiDL-E that allows the use of the Tachograph Front Port for Remote download. You would also need our K-Line cable with this solution. - Page 5 DigiDL –Checking compatibility You can access a printed version of the tachograph model number in the printer tray area of most Tachographs. You can also perform a technical printout as shown below. Checking Stoneridge Tachograph Model Numbers using Tacho File Viewer...
-
Page 6: Vehicle Manufacturer Considerations
(see Page 7 and Page 12). From 2012 onwards Mercedes upped the Baud Rate of their Secondary CAN. The digiDL rmware was updated in version 1.18s to cope with this change. You must upgrade earlier versions of the rmware. - Page 7 Both devices cannot share the same CAN address and the truck manufacturers do not provide a way to change their address. If you are running V1.33 rmware or later on your digiDL and our latest digiDL con gurator we allow you to change the CAN2 address.
-
Page 8: Onboard Systems
The simple solution is to remove the Red plug and terminate it with a 120 Ohm resistor. The termination should go between pins 5 and 8 on the manufacturers red plug. Tachosys can supply a plug to go on the end of the manufacturer’s cable with the resistor already in place. -
Page 9: Rear Security Seal
UK after-market tachographs are supplied by default without a seal. A secondary seal box can be used if the installer wishes to use the Tachosys plug and play cable and make tamperproof the A connection. -
Page 10: Digidl Connections And Indicators
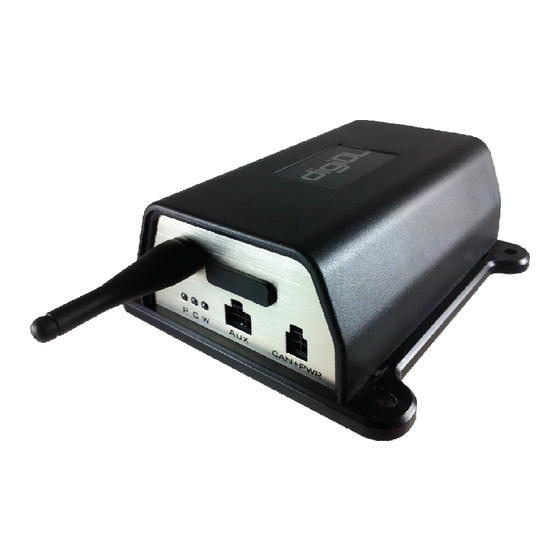
- Installation digiDL Connections and Indicators digiDL connections and indicators Fig 1. 1) Con guration Port Activity LED 2) VU Rear or Auxiliary Input Indicators Connection (C) Vehicle Unit Rear Connections Fig 2. CAN-Bus - A + Power . -
Page 11: Cable Form Supplied With Digidl
Tachograph. socket 2. digiDL with cable form in place Please Note: The Speed sensor connection remains in the Tachograph Socket B, this is not shown. You have to remove the existing plug A from socket A of the Tachograph. The plug you removed from socket A must be placed in the new socket clearly visible at the top of Fig 4.. -
Page 12: Volvo, Mercedes Special Double Plug
(see Fig 5). In this case there is an optional cable with code DDLDP available from your Reseller. This cable is tted in conjunction with the standard digiDL Cable. Fig 5. DigiDL Installation Guide... -
Page 13: Adr Cables
- Installation ADR / Hazchem Vehicles In the case of ADR vehicles the digiDL must be wired to the vehicle’s isolation switch as the unit is not intrinsically safe for hazardous areas and therefore must be powered down. You can use the standard loom by removing the white plug and wiring to the black and white wires as shown in Fig 6. -
Page 14: Installing Digidl Con Guration Windows® Software
Click ‘Install’ to begin the actual installation. This may take several minutes. Finally leave the box labelled ‘Launch digiDL Con guration’ ticked and click ‘Finish’. The application will try and nd a digiDL and fail if one is not connected. A dialogue box will ask you to connect your digidock. -
Page 15: Connecting The Digidl To Your Pc
Insert the oval connector of the digiDL con guration cable provided, into the top of the digidock. Connect the opposite end to the AUX socket (1) of the digiDL (see Fig 1.). There is only one way the cable can be connected. -
Page 16: Digidl Con Guration - Device Window
DigiDL Con guration Windows® Software digiDL Con guration - Device Window Fig 10. Please note that the PWD entry (password) is a unique string which is used by your service provider or on your own digicentral for initial registration of the device. It avoids communication by random devices with digicentral. -
Page 17: Digidl Con Guration - Con Guration Window - Wifi
Fig 11. The WIFI version of the digiDL requires connection to a WIFI router. If the WIFI router is in range of the device you can scan for the router’s SSID. If it is not in range or you wish to add multiple routers then you will need all of the relevant settings to hand. -
Page 18: Digidl Con Guration - Con Guration Window - Gprs
Click the ’Save to Device’ button. If your GPRS settings are correct the “W” BLUE LED should shine solid blue on the digiDL. Please note that if the BLUE LED is not solid then you do not have connection to the server and you should call the provider you are trying to connect to. -
Page 19: Digidl Con Guration - Options
DigiDL Con guration Windows® Software digiDL Con guration - con guration options Fig 13. Collect Tachograph Mode Data: refers to real time data on every change of mode that can be sent back to the server to calculate driving and rest times. By default this is turned OFF as it will use more data if it is not speci cally required. -
Page 20: Digidl Con Guration - Status Window
Only relevant if the optional remote button is connected and is used for Driver Card download requests VU Error Instruction The most recent request made by digiDL resulting in an error. Codes from Annex 1B. VU Error Code Last error code from Vehicle Unit. Codes as de ned in Annex 1B. -
Page 21: Digidl Con Guration - Files
Con guration - Files Fig 14. The digiDL stores the les it downloads from the Vehicle Unit. As the unit nears its memory capacity it overwrites the oldest les. Whilst this storage provides some level of backup it is simply designed to deal with situations where the unit is o ine for whatever reason. -
Page 22: Digidl Indicator Lights
C: CAN-Bus C WIFI Status The digiDL has three indicator LEDs (see Fig 15.) each of which has one of three statuses; ON / OFF or Flashing. See the table below for details on the meaning of each light status. - Page 23 Tachograph was not available until around 2012. Tachosys also manufacture a range of Bluetooth devices to which the digifobpro can connect to provide a Wireless solution. Please have a look at our digiDL-EX and digiblu products at Tachosys.com for more information.
-
Page 24: Authentication Of The Company Card
The introduction of Remote Download makes it possible for the Tachograph to communicate remotely with a Company Card, in this case by using digiDL as a gateway. digiDL will try and authenticate every 18 hours and the status of authentication is shown in the digiDL Con guration Device Window (see page 20). -
Page 25: Troubleshooting
Initially check all of your GPRS settings (see Page 18). If the unit still fails to connect rst try repowering the unit. If the unit still fails then you can view the status of connectivity in the digiDL Con guration Status window. The code displayed will show the stage of connection. -
Page 26: Overview Of Digicentral Web
All of the key UK online analysis providers have their own digicentral servers. Each will have a di erent web address. Digicentral is not just used for digiDL it can receive data from any Tachosys product using di erent communication methods. - Page 27 Digicentral Web DigiDL Installation Guide Page - 27...
- Page 28 Albion House 48 Albert Road North Reigate, Surrey, RH2 9EL United Kingdom Phone: +44 (0) 208 687 3900 Fax: +44 (0) 208 687 3919 E-mail: info@tachosys.com Copyright © Prosys Development Services 2016...
Need help?
Do you have a question about the digidl and is the answer not in the manual?
Questions and answers