Table of Contents
Advertisement
Quick Links
Download this manual
See also:
Quick Manual
APRC90AT manual
Table of contents
1. Safety
o
1.1. Intended use
o
1.2. Labels in this manual
o
1.3. General safety instructions
2. Preparations for use
o
2.1. Unpacking
o
2.2. Package contents
3. Installation
o
3.1. Connecting to the mains
o
3.2. Install batteries
4. Functions
o
4.1. APRC90AT
5. Operation
o
5.1. Quick start
o
5.2. Radio functions
o
5.3. CD functions
o
5.4. USB functions
o
5.5. AUX IN
o
5.6. Auto Power System (APS)
6. Cleaning and maintenance
o
6.1. Handle and care of a disc
7. Technical data
8. Disposal of used electrical and electronic equipment
Advertisement
Table of Contents

Subscribe to Our Youtube Channel
Related Manuals for Akai APRC90AT


Summary of Contents for Akai APRC90AT
- Page 1 APRC90AT manual Table of contents 1. Safety 1.1. Intended use 1.2. Labels in this manual 1.3. General safety instructions 2. Preparations for use 2.1. Unpacking 2.2. Package contents 3. Installation 3.1. Connecting to the mains 3.2. Install batteries ...
-
Page 2: Safety
1.Safety 1.1. Intended use The device functions as a portable radio/CD audio player. The device can play music (MP3) via CD and USB. It is also possible to play music via the AUX port. Read the manual carefully before the first use. 1.2. -
Page 3: Preparations For Use
2.Preparations for use 2.1. Unpacking Unpack the appliance carefully. Check the package contents as described below. If any item is missing, please contact your reseller. Remove the labels from the front panel carefully if present. We recommend that you retain the original carton and packing materials in case it ever becomes necessary to return your product for service. -
Page 4: Installation
3.Installation Put the appliance on a horizontal flat surface. Connect the appliance to the mains. CAUTION Do not put the appliance near a heat source. CAUTION Do not expose the appliance to direct sunlight. This appliance is equipped with rubber feet to prevent it from moving. The feet are made from non-migrating material specially formulated to avoid leaving any marks or stains on furniture. - Page 5 3.2. Install batteries The appliance can also be operated on battery power. For this purpose, the appliance uses six batteries (UM-1 / Please note: these batteries are not included. Batteries are not necessary for normal operation. If you do not use the appliance for an extended period, remove the batteries. Install batteries ...
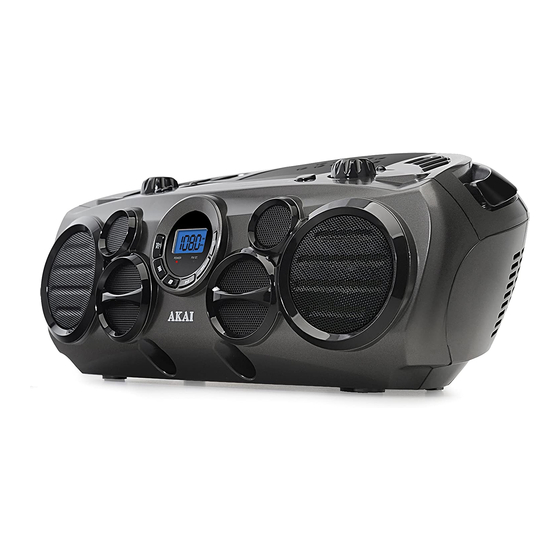
- Page 6 4.Functions 4.1. APRC90AT FUNCTION switch (RADIO-CD/MP3-USB-AUX) Headphone jack USB slot VOLUME dial BASS button CD compartment POWER/STANDBY button TUNING dial AUX IN jack 10. BAND switch (AM/FM/FM ST.) 11. Display 12. 10+/FOLDER button 13. PREV button 14. STOP button 15. PLAY/PAUSE button 16.
-
Page 7: Operation
5.Operation 5.1. Quick start General functions To switch on the appliance, press the STANDBY button . To switch back to the standby mode, press the STANDBY button again. To select the source mode (RADIO-CD/MP3-USB-AUX), slide the FUNCTION switch ((1)) to the desired position. - Page 8 To adjust the frequency, turn the TUNING knob (8) until the desired frequency is reached. For extended instructions, read the paragraph "Radio functions" further on in this manual. CD functions To select the CD function, slide the FUNCTION switch (1) to the CD position. To insert a CD: ...
- Page 9 5.2. Radio functions Slide out the antenna To select the radio function, slide the FUNCTION switch (1) to the radio position. Use the switch BAND (10) to switch between AM, FM and FM Stereo. To adjust the frequency, turn the TUNING knob (8) until the desired frequency is reached. The frequency is shown on the display...
- Page 10 5.3. CD functions To insert a CD: Press the CD compartment (6) to open the appliance Insert the CD with the label upwards Close the CD compartment (6) Playing a CD: To select the CD function, slide the FUNCTION switch (1) to the CD position. ...
- Page 11 Using the REPEAT function To repeat the current number, press the button PROG/REP (17) until the icon (A) appears on the display. To repeat all numbers, press the button PROG/REP (17) until the icon (B) appears on the display. ...
- Page 12 5.4. USB functions Due to the great variety of products with USB ports and their sometimes quite manufacturer-specific functions we can neither guarantee that all devices will be recognised, nor that all operating options that are possible in theory will actually work. ...
-
Page 13: Functions
Using the REPEAT function To repeat the current number, press the button PROG/REP (17) until the icon (A) appears on the display. To repeat all numbers, press the button PROF/REP (17) until the icon (B) appears on the display. ... - Page 14 To select the AUX function, slide the FUNCTION switch (1) to AUX. Connect the external appliance to your APRC90AT (9). AUX (11) appears on the display. 5.6. Auto Power System (APS) The Auto Power System (APS) is intended to save energy. In the following situations, the device will go into Standby mode after 15 minutes: ...
-
Page 15: Cleaning And Maintenance
6.Cleaning and maintenance WARNING Before performing any cleaning or maintenance, switch off and unplug the appliance. Clean the outside of the appliance with a soft cloth. When the appliance is very dirty, dampen the cloth slightly with water and a neutral solution. 6.1. -
Page 16: Technical Data
7.Technical data Specifications Voltage: 230VAC / 50 Hz Speaker output: 4 x 6 Ohms 8 Watt (2 x 3 inch, 2 x 2 inch) 2 x 6 Ohms 5 W (2 x 1.5 inch) Max power: 2 x 5 Watt RMS Battery size: UM-1 / D (8x) Disc types: CD/ CD-R/ CD-RW Maximum USB memory: 16 GB... -
Page 17: Disposal Of Used Electrical And Electronic Equipment
For more detailed information about recycling of this product, please contact your local city office, your household waste disposal service or the shop where you purchased the product. For more information and warranty conditions, please visit: www.akai.eu Do not dispose of batteries as household waste but take them to a battery recycling facility.
Need help?
Do you have a question about the APRC90AT and is the answer not in the manual?
Questions and answers