Table of Contents
Advertisement
Introduction ................................................................. 1-1
Family ..................................................................... 1-1
Introduction ............................................................ 1-1
Index ............................................................... 1-2
Useful Information For Safe Riding .............. 1-2
Plug in Your Scooter's Battery ...................... 1-2
Owner Information ................................................. 1-3
Motor Serial Number ............................................. 1-4
Key Code Number ................................................. 1-4
Vehicle Identification Number (VIN) ...................... 1-4
VIN Location .................................................. 1-4
General Information ............................................... 1-5
VX-1 Technical Specifications ....................... 1-5
Vehicle Range ................................................ 1-8
Frequently Asked Questions .......................... 1-8
Riding Style .................................................. 1-10
Emissions Information .................................. 1-10
Transporting...................................................1-11
Table Of Contents
Safety Information ..................................................... 2-1
General Safety Precautions .................................. 2-1
Important Operating Information .................... 2-2
Location Of Important Labels ........................ 2-3
Controls And Components ....................................... 3-1
Main Components.................................................. 3-1
Front and Rear View ............................................. 3-4
Scooter Controls and Gauges .............................. 3-6
Right Instrument Cluster ....................................... 3-8
Center Instrument Cluster ..................................... 3-9
Left Instrument Cluster ........................................ 3-10
Instrument Cluster Indicator Display ................... 3-12
Instrument Cluster Controls ................................ 3-15
Handlebar Controls .............................................. 3-16
Starting And Operating ............................................. 4-1
General Operation ................................................. 4-1
Pre-Ride Inspection ....................................... 4-1
Key Switch/Steering Lock Positions .............. 4-2
Key Switch/Storage Positions ........................ 4-4
Battery Charging .................................................... 4-7
TOC-1
Advertisement
Table of Contents
Troubleshooting

Related Manuals for Vectrix VX-1


Summary of Contents for Vectrix VX-1
-
Page 1: Table Of Contents
Table Of Contents Introduction ..............1-1 Safety Information ............. 2-1 An Important Message To You From The Vectrix General Safety Precautions ........2-1 Family ..............1-1 Important Operating Information ....2-2 Introduction ............1-1 Location Of Important Labels ......2-3 Index ............... - Page 2 Replacement Tire Size ........5-5 Tire Wear Indicators (TWI) ......5-6 Tire Inflation ........... 5-6 Lights .............. 5-6 Cleaning ............5-7 Parking And Long Term Storage ......5-8 Dealer Inspection ........... 5-9 Maintenance Schedule ........5-10 Vectrix Scooter Accessories ........ 5-11 TOC-2...
-
Page 3: Introduction
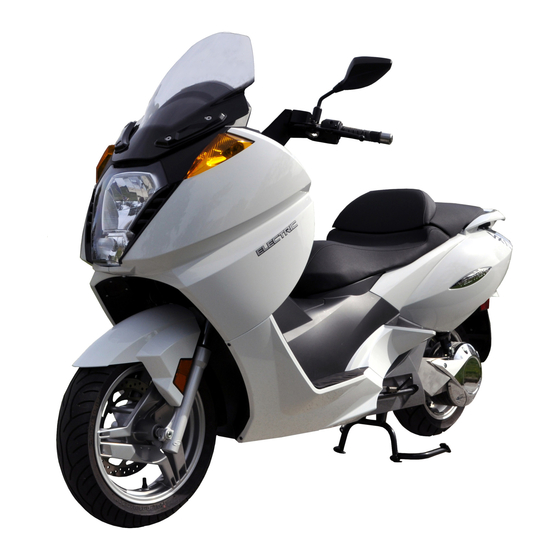
Congratulations and thank you for purchasing the town to across campus. Vectrix VX-1 electric maxi scooter; we welcome you to the community of Vectrix Scooter riders. This manual VX-1 is the perfect machine for urban commuting, as is designed to provide you with a better understanding well as freeway travel. -
Page 4: Index
Index Plug in Your Scooter’s Battery A good place to locate information about the scooter is WARNING: Proper care of the scooter’s battery is in the index in the back of the manual. essential! When not in use, the battery should be left The terms “right”... -
Page 5: Owner Information
Owner Information Record important information pertaining to your scooter here. When contacting your authorized Vectrix dealer, you may need to provide this information. Vehicle Identification Number (VIN) Date of Delivery (Day/Month/Year) Dealer Number Name: Street: City: Dealer Stamp State: Country:... -
Page 6: Motor Serial Number
Motor Serial Number Vehicle Identification Number (VIN) The motor serial number is engraved on the bottom of the swingarm. VIN Location Key Code Number The key code is a number used to create duplicate keys. This number is located on a tag that accompanies the original keys. -
Page 7: General Information
General Information COMPONENTS Braking Front and rear Brembo disc VX-1 Li/Li+ Technical Specifications brakes Tires Pirelli: GTS23 120/70-14 PERFORMANCE (Front) Maximum Speed 110 km/h (68 mph) Pirelli: GTS24 140/60-13 (Rear) Maximum Reverse Speed 3 km/h (2 mph) Front Fork 35 mm Marzocchi... - Page 8 BATTERY ELECTRONICS Capacity Li= 3.7 kWh Controller DSP & IGBT based all- Li+= 5.4 kWh digital electronic control and motor drive system Voltage 125V Instrumentation Central analog display Charger 1.5 kW on-board battery and two side LCDs show charger, 110-220V speed, odometer, battery (50/60Hz) charge, estimated range...
- Page 9 DIMENSIONS EMISSIONS Emissions Pollutants: Zero Weight Li = 193 kg (425 lbs) CO2: Zero Li+ = 209 kg (460 lbs) Exhaust Noise: Zero Wheelbase 1524 mm (60 in) Seat Height 775 mm (30.5 in) WEIGHT Storage Capacity Trunk: 1.41 cu ft (1 full- faced helmet) Gross Vehicle Weight 425 kg (938 lbs)
-
Page 10: Vehicle Range
We suggest that you ride conservatively when you first impact your range. get your Vectrix VX-1 scooter, and get to know your Added Weight = Reduced Range scooter and your commute. Once you become familiar with the range versus performance of your scooter, you can adjust your riding characteristics if you so desire. - Page 11 Why Do I Get Less Range At Higher Speeds? How Does Tire Pressure Affect Range? It takes more power to push a Vectrix faster because As the scooter is ridden, heat is generated in the tires you encounter aerodynamic resistance. The faster from deformation at the contact patch.
-
Page 12: Optimizing Your Range By Adapting Your Riding Style
Since • Hard acceleration will decrease your range. the Vectrix VX-1 runs solely on electricity, it is the only kind of vehicle which actually gets cleaner in terms • of air pollution each year, as the electrical grid gets Coasting whenever possible makes a significant cleaner and more renewable. -
Page 13: Transporting
Transporting Rear: A protective cloth should be wrapped around the motor WARNING: Take special care of the rear brake hose. side swingarm to prevent damage to the ratchet strap. Do not crush or place the ratchet strap over or on the brake hose. - Page 14 Right Side: Carefully install the ratchet strap (C) under the rear brake hose and around the brake side swingarm. Do not pull on the rear brake hose as this could weaken the connection. 1-12...
-
Page 15: Safety Information
Safety Information General Safety Precautions 6. Never permit a guest to ride your electric scooter without proper instruction. These are performance scooters and should be treated with extreme 1. This is a performance scooter and should caution. be treated with extreme caution. 7. -
Page 16: Important Operating Information
14. Failure to follow battery storage and charging 4. Keep your Vectrix VX-1 connected to the battery instructions, as described in this Vectrix VX-1 charger when your scooter is sitting in storage or if Owner’s Manual, may void the warranty of your... -
Page 17: Location Of Important Labels
Vectrix recommends that you Vehicle Identification Number (VIN) plug in your Vectrix scooter after one month even if charged. Please leave your Vectrix scooter plugged The VIN (A) is located on the back lower corner of the in whenever possible. - Page 18 VIN (upper section), manufacturer’s name, type NANJING VMOTO MANUFACTURING CO., LTD. approval mark, the VIN printed again (lower section) e9*2002/24 and the static sound level. VECTRIX ---dB (A) ---rev/min VECTRIX SP Z.O.O. e00*0000*00*0000* OXXXX00000X000000 *db (A) – * 1/min...
- Page 19 Department of Transportation (DOT) Label DOT Label: The DOT certification label (B) is located on the front of the scooter, behind the front wheel well (U.S. markets only). Certification Label...
- Page 20 A. The accessory port notice label is located on the inside of the glove compartment door. NOTICE Accessory Port 12 VDC 0.5 AMPS (6 WATTS) MAXIMUM A. Accessory Port Notice B. Side Stand Warning Label C. High Voltage Warning Label...
- Page 21 C. The high voltage warning label is located under the through area in front of the seat. driver’s seat. WARNING Your Vectrix is equipped with a warning light when the side stand is lowered (on). However, it is the rider’s responsibility to ensure that the side stand is stowed completely before starting out.
- Page 22 NOTES...
-
Page 23: Controls And Components
Controls And Components Main Components A. Planetary Gearbox/ Brushless DC Motor/Encoder B. Motor Controller C. Battery Pack D. Battery Charger... - Page 24 A. Planetary Gearbox/Brushless DC Motor/Encoder Only your authorized Vectrix dealer is qualified to troubleshoot the motor controller. • Planetary Gearbox This single stage gearbox is mounted to the rear WARNING: Removal of the cover and/or wheel and is permanently sealed and lubricated modification of the motor controller by any means so that it requires no maintenance.
- Page 25 125 amp fuse. This fuse during normal operation as well as charging. The is only accessible by your authorized Vectrix dealer. battery pack is an integrated system of temperature/voltage monitoring as well as Occasionally the estimated range and the battery cooling air flow control.
-
Page 26: Front And Rear View
Front and Rear View A. Right Front Turn Signal Light B. Headlight/Daytime Running Light C. Left Front Turn Signal Light D. Left Rear Turn Signal Light E. License Plate Light F. Tail/Brake Light G. Right Rear Turn Signal Light H. Passenger Grab Handle... - Page 27 35 watt halogen bulb and an LED daytime *These are extreme long-life light emitting diode (LED) running light.* lighting systems. See your authorized Vectrix dealer for replacement of these lighting systems. C.,D. Left Side Turn Signal Lights These lights will flash any time the key switch is in the ON position, and the switch is moved to the left.
-
Page 28: Scooter Controls And Gauges
Scooter Controls and Gauges A. Left Handlebar Control B. Instrument Cluster Controls C. Left Instrument Cluster D. Instrument Cluster Indicator Display E. Center Instrument Cluster F. Right Instrument Cluster G. Key Switch H. Right Handlebar Control... - Page 29 Indicators and gauges can signal that something is wrong C. Left Instrument Cluster See Left Instrument Cluster on page 3-10. before it becomes serious enough to cause an expensive repair or replacement. D. Instrument Cluster Indicator Display See Instrument Cluster Indicator Display on Malfunction indicators come on when there is, or may page 3-12.
-
Page 30: Right Instrument Cluster
Right Instrument Cluster A. Battery Level Indicator The battery level indicator is a 17-bar graphic gauge that displays the remaining battery charge. B. Battery Indicator This indicates that the scooter is running on the battery. A. Battery Level Indicator B. Battery Indicator... -
Page 31: Center Instrument Cluster
Center Instrument Cluster A. Speedometer The speedometer displays your current speed. During the charging process, the speedometer indicates the charge current times 10. Example: If the KM/H meter reading is 100 KM/H, the charge current is 10 amps. B. MPH Indicator This indicator displays your current speed in miles per hour. -
Page 32: Left Instrument Cluster
E. Light Sensor A. Ready Indicator The light sensor detects the level of ambient light B. Clock Reading Display and adjusts the liquid crystal display (LCD) C. Battery Charge/Charging Indicator backlighting of the left, center, and right instrument D. Bluetooth Indicator clusters. - Page 33 D. Bluetooth Indicator Odometer/Trip A-B Display Setting Not Used. In place for future enhancements. This indicates the mileage reading currently displayed. Use the instrument cluster control button E. RF Range Indicator marked “S” to switch between Trip A, Trip B or the Not Used.
-
Page 34: Instrument Cluster Indicator Display
Instrument Cluster Indicator Display A. Left Turn Signal B. Parking/Position Lamps C. High Temperature D. Side/Center Stand E. Low Headlight Beam F. High Headlight Beam G. Battery H. Maintenance Required Scooter Reverse J. Right Turn Signal 3-12... - Page 35 A.,J. Turn Signals C. High Temperature An arrow on the indicator This indicator will illuminate display will flash green red in the unlikely event in the same direction you exceed the scooters selected by the turn performance capabilities. signal switch. This will This indicator senses the remain on until the turn battery and other key system...
- Page 36 E. Low Headlight Beam H. Maintenance Required This indicator will illuminate This indicator will illuminate green when the headlight amber. If this indicator low beam is selected is illuminated you should and operational. If the contact your authorized headlight is not functional, dealer.
-
Page 37: Instrument Cluster Controls
Instrument Cluster Controls A. Hour Adjustment This button is labeled with an “H.” It allows you to change the hour on the clock. Push this button in order to change the hour. Pressing down on the button and holding for 3 seconds will allow you to choose from 12 or 24 hour formats. -
Page 38: Handlebar Controls
Handlebar Controls A. Rear Brake Lever B. High Beam Flash-To-Pass Switch C. Headlight High/Low Beam Switch D. Turn Signal Switch E. Horn Button F. Power ON/OFF Switch G. Front Brake Lever H. Throttle Control 3-16... - Page 39 A.,G. Brake Levers C. Headlight High/Low There are two hand operated brake levers, Beam Switch one located on the right handlebar and another When the end of the located on the left handlebar. When squeezed, switch (A) is pushed, the right brake lever controls the front brake. the headlight will The left brake lever controls the rear brake.
- Page 40 To Turn Lights Off in Daytime Running Light: Unlike an automobile, the turn signals must always be cancelled manually on the scooter. Push in on the switch • The scooter must be stationary. and it will return to the center, or, OFF position. •...
- Page 41 F. Power ON/OFF H. Throttle Control Switch Twist the throttle in a counter-clockwise (backward) When the red switch rotation (A) to energize the motor and start the is pressed up (A), scooter in a forward direction. Release the throttle it will stop power to and it will snap back to the neutral position, de- the motor.
- Page 42 By requiring that the throttle returns to neutral before going into reverse, the VX-1 is prevented from going into reverse immediately after using regen braking to stop. Release the throttle control and the reverse drive ceases.
-
Page 43: Starting And Operating
With the key switch in the OFF position, apply the Pre-Ride Inspection throttle and release to verify that the throttle is smooth and returns correctly. Before operating the Vectrix VX-1, check the following • to make sure the scooter is secure and intact: Steering Ensure that the steering movement is smooth and •... -
Page 44: Key Switch/Steering Lock Positions
• Key Switch/Steering Lock Positions Electrical System Check for correct function of the headlight, turn signals, and the brake/tail light. • Horn Check for correct operation of the horn. This is a five (5) position switch that is located in the center of the scooter in front of the step-through. - Page 45 The key should be removed from the scooter when B. OFF parked to prevent theft. The key can be removed in In this position: either the OFF or steering lock position. • All functions are OFF • Steering fork lock is not engaged A.
-
Page 46: Key Switch/Storage Positions
Key Switch/Storage Positions Storage Areas CAUTION: Do not load the scooter any heavier than There are two lockable storage compartments on the the gross vehicle weight rating (GVWR). Exceeding the scooter. One is the trunk located under the seat and GVWR could cause parts on the scooter to break, and the other is the glove compartment located under could change the way in which the scooter handles. - Page 47 Closing the Trunk The trunk features an LED trunk light. This light is controlled by the seat. The light is ON anytime the seat is 1. While holding on to the seat, push the middle up, and turns OFF when the seat is fully closed. of the seat support (B).
- Page 48 Cargo Box (optional) D. Glove Compartment The carrying capacity of the glove compartment is limited The carrying capacity of the cargo box is limited to 9 kg to 2 kg (4 lbs). (20 lbs). To open the glove compartment, start with the key switch in the OFF position, push down and turn the key counter- clockwise.
-
Page 49: Battery Charging
Only charge from a utility supplied voltage source. The appropriate AC voltage should be 120v/60Hz or 220v/50Hz. • Vectrix does not advise the use of extension cords to charge the scooter. If you use an extension cord, it must be of the correct size to avoid excessive voltage drop. - Page 50 The battery charger is integrated into the scooter and The left instrument cluster monitors the following: monitors the status/condition of the battery pack during normal operation as well as charging. The battery pack A. “Total Charge Time” displays the total charge time or is an integrated system of battery management as time remaining during delay mode.
- Page 51 The center instrument cluster monitors the following: It will also display high and low cell voltage (example High 3.45 Low 3.44). D. The speedometer needle indicates the charge current times (X) 10 on the km/h scale (example 100 km/h Display During Charging: indicates 10 amps). E. The odometer field displays the charge mode and the voltage limit. The charge modes are: “CC xx”...
-
Page 52: Charging The Battery
Charging The Battery 3. Plug the charger cord into the AC outlet. The onboard charger will automatically control the If you have been running your scooter for a long period charging process. of time and the battery is hot, you should wait for it to cool down before charging. -
Page 53: Operating Your Scooter
Operating Your Scooter 5. With the key in the ON position the “READY” display (A) on the left instrument cluster should be on. Starting 1. Verify that the charge level on the right instrument cluster is above 4 bars; if less than 4 bars, it is recommended that you charge your scooter. - Page 54 6. With the “READY” display on solid, squeeze and 8. The “GO” display (D) should now be on/enabled. hold the left brake lever (B). The scooter is now ready to go. 7. Then squeeze and release the right brake lever (C). 9.
- Page 55 Release the throttle and it returns to a neutral cause you to lose control of the scooter. We suggest position. progressive use of the brakes to bring the VX-1 scooter to a complete stop without locking the wheels. Your To activate regen braking:...
- Page 56 3. Be sure to charge the battery after each ride. See the scooter is completely stopped. Charging The Battery on page 4-10. The VX-1 will reverse at a slow speed of 3 km/h (2 mph). To activate reverse from a complete stop, return the throttle to the neutral position.
-
Page 57: Rear Shock Adjustment
Rear Shock Adjustment Using a commercially available spanner wrench, adjust the spring preload. Decrease The rear shocks are equipped with a spring preload the pre-load on the spring by turning the adjustment. This allows the spring preload to be spring adjuster to the shortest step on the adjusted for rider comfort and payload. -
Page 58: Center Stand
• During servicing Placing the VX-1 on the center stand: 1. Grasp the left side of the passenger grab handle with your right hand. 2. Hold the scooter level with your left hand on the left handlebar grip. -
Page 59: Side Stand
Side Stand Always check the ground before putting the side stand down to ensure that it is stable. Hot temperatures can cause the stand to sink into the pavement, so it is CAUTION: recommended to have a small metal plate for the stand to • The side stand must be in the upright position rest on in high heat. in order to safely operate the scooter. - Page 60 Placing the VX-1 on the side stand: 1. Set the scooter on a firm surface. Fold out the side stand (A) with the left foot using the side stand bar until it snaps into place. To fold the side stand in: 1. Straddle the scooter. 2. Set the scooter upright.
-
Page 61: Maintaining Your Scooter
2. Perform routine care and maintenance on your electric scooter as detailed in this owner’s manual. 3. Use only Vectrix approved parts and Vectrix scooter accessories. 4. The operator is responsible for learning and obeying all country, federal, state, and local laws... -
Page 62: Battery
71°C (160°F). Do not store in a hot trailer. new DOT 4 brake fluid from a sealed container. 3. Only your authorized Vectrix dealer is qualified to The brake fluid should be flushed out and replaced have access to and troubleshoot the battery. - Page 63 (A), brake fluid rear brake pads are found to be worn, contact your must be added. Clean authorized Vectrix dealer. Do not drive your scooter any dirt or debris from with worn brake pads as this can cause your brakes to the cover (C) before fail resulting in an accident.
-
Page 64: Suspension
Suspension Rear Brake Pads: The rear brake pads should be replaced when Front there is 1 mm (.04 in) friction material remaining. • Visually inspect the front fork seals for any leakage. Gearbox Vent • Visually inspect for scratches or damage on the The gearbox vent (A) is located on the top of the motor inner front fork tubes. -
Page 65: Wheels And Tires
Wheels And Tires If either of the wheels or tires are found to have any of the aforementioned conditions, replace the wheel and tire immediately. Inspect both wheels for the following: • CAUTION: You must replace tires with the standard Bent or cracked rims size recommended. -
Page 66: Tire Wear Indicators (Twi)
FRONT REAR 220 kpa 276 kpa (32 psi) (40 psi) Lights Because body panels need to be removed, all lights must be changed by an authorized Vectrix dealer. -
Page 67: Cleaning
Cleaning Also, thoroughly rinse the area off with water, immediately dry it, and then apply a corrosion protection spray. To prolong the life of your scooter it should be washed periodically. Regular cleaning, using correct methods, WARNING: Improper cleaning can damage electrical is an important factor in maintaining the value of your components, cowlings, panels, and other plastic parts. -
Page 68: Parking And Long Term Storage
1. It is recommended to always leave the battery on water, with a mild detergent. If scratched, polish with the charger when in long term storage. The Vectrix a commercially available plastic polish. Replace the VX-1 charger is designed to maintain a balanced... -
Page 69: Dealer Inspection
Charge Batteries (note Battery Guidelines) and check contacts Check Tire Pressure and correct if necessary Check all Main Screws for the stipulated torque Check Screws, Nuts, and Fastening Points 483 km (300 mile) Inspection Performed at Mileage: Date/Signature/Stamp Dealer VECTRIX... -
Page 70: Maintenance Schedule
The scheduled maintenance must be performed every 3000 km (1,864 mi) or 12 months in accordance with this chart to keep the Vectrix VX-1 scooter in top running condition. The initial maintenance is vitally important and must not be neglected. -
Page 71: Vectrix Scooter Accessories
Batteries Charge battery. See Charging the Battery on page 4-10. Vectrix Scooter Accessories Vectrix accessories are designed to complement and function with other systems on your scooter. Your authorized Vectrix dealer can accessorize the scooter using genuine Vectrix accessories. 5-11... - Page 72 VX-1 Routine Maintenance Record DATE OF SERVICE MILEAGE SERVICE DESCRIPTION COMMENTS 5-12...
-
Page 73: Troubleshooting
If you are unable to solve an issue with your Vectrix • Front tire normal air pressure is 32 psi (220 kpa) scooter, take it to an authorized Vectrix dealer at your •... -
Page 74: General Troubleshooting
Check AC outlet for power, AC source check fuse/voltage Charger and battery Run scooter until battery icon blinks and fuel gauge resets to un-synchronized ‘0’ and charge scooter. Premature charge termination Contact your authorized Vectrix dealer. Technician must Charger firmware out of date determine charger firmware revision and update minimum Rev 2012, or thereafter. - Page 75 General Troubleshooting, cont’d SYMPTOM POTENTIAL CAUSE POTENTIAL SOLUTION Tire pressure Inflate to correct tire pressure. See Tire inflation on page 5-6 Replace/balance front tire with the same tire supplied from the Deformed front tire factory. See Replacement Tire Size on page 5-5. Handlebars wobbly Replace/balance tire with the same tire supplied from the (shimmy) Bald tire (excess wear) factory.
- Page 76 NOTES...
-
Page 77: Warranty/Customer Assistance
Warranty/Customer Assistance Customer Assistance Vectrix USA Corporate Office: Vectrix can be contacted via the contact methods listed 55 Samuel Barnet Blvd. below. Please have the following available as they New Bedford, MA 02745 are essential to effectively and efficiently answer your Phone: 508-717-6510 questions or resolve your concerns. -
Page 78: Warranty Information
Media: ......... media@vectrix.com • Refer to the Vectrix dealer to register your Marketing: ........marketing@vectrix.com VX-1 scooter with Vectrix at time of sale. Service:........service@vectrix.com s Failure to do so may result in Warranty claims Sales:.......... sales@vectrix.com being delayed or not paid. - Page 79 Contact the National Highway Safety Traffic The end user has even one of the VX-1 Administration (NHSTA) if you believe that this vehicle inspections outlined in the Customer Service has a defect that could cause an accident, injury, or book or a repair performed by a workshop death.
- Page 80 NOTES...
- Page 81 Cleaning ............... 5-7 Windshield .............. 5-8 Accessories ............. 5-11 Closing the Trunk............4-5 An Important Message To You From Vectrix ..... 1-1 Controls and Components ........... 3-1 Center Instrument Cluster ........3-9 Front and Rear View ..........3-4 Battery ..............4-1, 5-2 Handlebar Controls ..........
- Page 82 General Operation ............4-1 Key Switch/Steering Lock Positions ..... 4-2 Electrical System ............4-2 Key Switch/Storage Positions ....... 4-4 Emissions Information ..........1-10 Pre-Ride Inspection ..........4-1 General Safety Precautions......... 2-1 General Troubleshooting ..........6-2 Frequently Asked Questions........1-8 Glove Compartment ............. 4-6 Front Suspension ............
- Page 83 Owner’s Responsibilities ........5-1 Cargo Box (optional) ..........4-6 Parking And Long Term Storage ......5-8 Closing the Trunk ..........4-5 Vectrix Scooter Accessories ........ 5-11 Glove Compartment..........4-6 Maintenance Record ..........5-12 Opening the Trunk ..........4-5 Maintenance Schedule ..........5-10 Storage Areas ............
- Page 84 Parking And Long Term Storage ......... 5-8 Safety Information ............2-1 Plug in Your Scooter’s Battery ........1-2 Scooter Controls and Gauges ........3-6 Pre-Ride Inspection ............. 4-1 Side Stand ..............4-17 Battery ..............4-1 Starting ...............4-11 Brakes ..............4-1 Starting And Operating ..........4-1 Electrical System ...........
- Page 85 Storage Areas ............4-4 Suspension ..............5-4 Useful Information For Safe Riding ......1-2 Front ............... 5-4 Rear ............... 5-4 Vehicle Identification Number/(VIN) Location ..2-3, 1-4 Vehicle Range ............1-8 Technical Specifications ..........1-5 Throttle Control ..........4-1, 4-13 Tire Inflation ............... 5-6 Tire Wear Indicators (TWI) ..........
- Page 86 NOTES INDEX-6...
Need help?
Do you have a question about the VX-1 and is the answer not in the manual?
Questions and answers