Table of Contents
Advertisement
Available languages
Available languages
Quick Links
EN
Dear Customer,
Gigaset Communications GmbH is the legal successor to
Siemens Home and Office Communication Devices GmbH &
Co. KG (SHC), which in turn continued the Gigaset business
of Siemens AG. Any statements made by Siemens AG or
SHC that are found in the user guides should therefore be
understood as statements of Gigaset Communications
GmbH.
We hope you enjoy your Gigaset.
DE
Sehr geehrte Kundin, sehr geehrter Kunde,
die Gigaset Communications GmbH ist Rechtsnachfolgerin
der Siemens Home and Office Communication Devices
GmbH & Co. KG (SHC), die ihrerseits das Gigaset-Geschäft
der Siemens AG fortführte. Etwaige Erklärungen der
Siemens AG oder der SHC in den Bedienungsanleitungen
sind daher als Erklärungen der Gigaset Communications
GmbH zu verstehen.
Wir wünschen Ihnen viel Freude mit Ihrem Gigaset.
FR
Chère Cliente, Cher Client,
la société Gigaset Communications GmbH succède en droit
à Siemens Home and Office Communication Devices GmbH
& Co. KG (SHC) qui poursuivait elle-même les activités Giga-
set de Siemens AG. Donc les éventuelles explications de Sie-
mens AG ou de SHC figurant dans les modes d'emploi
doivent être comprises comme des explications de Gigaset
Communications GmbH.
Nous vous souhaitons beaucoup d'agrément avec votre
Gigaset.
IT
Gentile cliente,
la Gigaset Communications GmbH è successore della Sie-
mens Home and Office Communication Devices GmbH &
Co. KG (SHC) che a sua volta ha proseguito l'attività della
Siemens AG. Eventuali dichiarazioni della Siemens AG o
della SHC nei manuali d'istruzione, vanno pertanto intese
come dichiarazioni della Gigaset Communications GmbH.
Le auguriamo tanta soddisfazione con il vostro Gigaset.
NL
Geachte klant,
Gigaset Communications GmbH is de rechtsopvolger van
Siemens Home and Office Communication Devices GmbH &
Co. KG (SHC), de onderneming die de Gigaset-activiteiten
van Siemens AG heeft overgenomen. Eventuele uitspraken
of mededelingen van Siemens AG of SHC in de gebruiksaan-
wijzingen dienen daarom als mededelingen van Gigaset
Communications GmbH te worden gezien.
Wij wensen u veel plezier met uw Gigaset
ES
Estimado cliente,
la Gigaset Communications GmbH es derechohabiente de la
Siemens Home and Office Communication Devices GmbH &
Co. KG (SHC) que por su parte continuó el negocio Gigaset
de la Siemens AG. Las posibles declaraciones de la
Siemens AG o de la SHC en las instrucciones de uso se
deben entender por lo tanto como declaraciones de la Giga-
set Communications GmbH.
Le deseamos que disfrute con su Gigaset.
PT
SCaros clientes,
Gigaset Communications GmbH é a sucessora legal da Sie-
mens Home and Office Communication Devices GmbH &
Co. KG (SHC), que, por sua vez, deu continuidade ao sector
de negócios Gigaset, da Siemens AG. Quaisquer declara-
ções por parte da Siemens AG ou da SHC encontradas nos
manuais de utilização deverão, portanto, ser consideradas
como declarações da Gigaset Communications GmbH.
Desejamos que tenham bons momentos com o seu Gigaset.
Issued by
Gigaset Communications GmbH
Schlavenhorst 66, D-46395 Bocholt
Gigaset Communications GmbH is a trademark
licensee of Siemens AG
DA
FI
SV
NO
EL
HR
.
SL
Kære Kunde,
Gigaset Communications GmbH er retlig efterfølger til Sie-
mens Home and Office Communication Devices GmbH &
Co. KG (SHC), som fra deres side videreførte Siemens AGs
Gigaset-forretninger. Siemens AGs eller SHCs eventuelle
forklaringer i betjeningsvejledningerne skal derfor forstås
som Gigaset Communications GmbHs forklaringer.
Vi håber, du får meget glæde af din Gigaset.
Arvoisa asiakkaamme,
Gigaset Communications GmbH on Siemens Home and
Office Communication Devices GmbH & Co. KG (SHC)-yri-
tyksen oikeudenomistaja, joka jatkoi puolestaan Siemens
AG:n Gigaset-liiketoimintaa. Käyttöoppaissa mahdollisesti
esiintyvät Siemens AG:n tai SHC:n selosteet on tämän
vuoksi ymmärrettävä Gigaset Communications GmbH:n
selosteina.
Toivotamme Teille paljon iloa Gigaset-laitteestanne.
Kära kund,
Gigaset Communications GmbH övertar rättigheterna från
Siemens Home and Office Communication Devices GmbH &
Co. KG (SHC), som bedrev Gigaset-verksamheten efter Sie-
mens AG. Alla förklaringar från Siemens AG eller SHC i
användarhandboken gäller därför som förklaringar från
Gigaset Communications GmbH.
Vi önskar dig mycket nöje med din Gigaset.
Kjære kunde,
Gigaset Communications GmbH er rettslig etterfølger etter
Siemens Home and Office Communication Devices GmbH &
Co. KG (SHC), som i sin tur videreførte Gigaset-geskjeften i
Siemens AG. Eventuelle meddelelser fra Siemens AG eller
SHC i bruksanvisningene er derfor å forstå som meddelelser
fra Gigaset Communications GmbH.
Vi håper du får stor glede av din Gigaset-enhet.
Αγαπητή πελάτισσα, αγαπητέ πελάτη,
η Gigaset Communications GmbH είναι η νομική διάδοχος της
Siemens Home and Office Communication Devices GmbH &
Co. KG (SHC), η οποία έχει αναλάβει την εμπορική
δραστηριότητα Gigaset της Siemens AG. Οι δηλώσεις της
Siemens AG ή της SHC στις οδηγίες χρήσης αποτελούν
επομένως δηλώσεις της Gigaset Communications GmbH.
Σας ευχόμαστε καλή διασκέδαση με τη συσκευή σας Gigaset.
Poštovani korisnici,
Gigaset Communications GmbH pravni je sljednik tvrtke
Siemens Home and Office Communication Devices GmbH &
Co. KG (SHC), koji je nastavio Gigaset poslovanje tvrtke
Siemens AG. Zato sve izjave tvrtke Siemens AG ili SHC koje
se nalaze u uputama za upotrebu treba tumačiti kao izjave
tvrtke Gigaset Communications GmbH.
Nadamo se da sa zadovoljstvom koristite svoj Gigaset
uređaj.
Spoštovani kupec!
Podjetje Gigaset Communications GmbH je pravni naslednik
podjetja Siemens Home and Office Communication Devices
GmbH & Co. KG (SHC), ki nadaljuje dejavnost znamke
Gigaset podjetja Siemens AG. Vse izjave podjetja Siemens
AG ali SHC v priročnikih za uporabnike torej veljajo kot izjave
podjetja Gigaset Communications GmbH.
Želimo vam veliko užitkov ob uporabi naprave Gigaset.
© Gigaset Communications GmbH 2008
All rights reserved.
Subject to availability. Rights of modifications
reserved.
www.gigaset.com
Advertisement
Chapters
Table of Contents

Related Manuals for Siemens gigaset S1


Summary of Contents for Siemens gigaset S1
- Page 1 Nadamo se da sa zadovoljstvom koristite svoj Gigaset de la Siemens AG. Las posibles declaraciones de la uređaj. Siemens AG o de la SHC en las instrucciones de uso se deben entender por lo tanto como declaraciones de la Giga- Spoštovani kupec! set Communications GmbH.
- Page 2 Devices GmbH & Co. KG (SHC), kroz koju je nastavljeno poslovanje kompanije Gigaset kao dela Siemens AG. Stoga sve izjave od strane Siemens AG ili SHC koje se mogu naći u korisničkim uputstvima treba tumačiti kao izjave kompanije Gigaset Communications GmbH.
-
Page 3: Kurzübersicht
Kurzübersicht Kurzübersicht Empfangsfeldstärke Display (Anzeigefeld) Ð 100 % i 75 % Ladezustand Ñ 50 % Ò geringer E. × leer Ú voll | kein Empfang (blinkt) × blinkt: Akku fast leer bzw. Akku wird geladen Abheben-Taste Aktuelle Funktionen und Gespräch annehmen ◆... -
Page 4: Table Of Contents
Inhaltsverzeichnis Inhaltsverzeichnis Kurzübersicht ....... 1 Sicherheitshinweise ......4 Telefon in Betrieb nehmen . - Page 5 Inhaltsverzeichnis Mobilteil einstellen ......19 Automatische Rufannahme aus-/einschalten ....... 19 Farbschema und Kontrast einstellen .
-
Page 6: Sicherheitshinweise
Sicherheitshinweise Sicherheitshinweise Verwenden Sie nur das mitgelieferte Steckernetzgerät, wie auf der Unter- seite des Gerätes gekennzeichnet. Legen Sie nur die empfohlenen, aufladbaren Akkus (S. 23) des gleichen Typs ein! D. h. keine anderen Akkutypen oder nicht wieder aufladbare Batte- rien, da sie zu Gesundheits- und Personenschäden führen können. ‹... -
Page 7: Telefon In Betrieb Nehmen
Mobilteil in die Basis stellen (anmelden) und Akkus laden Wenn Sie das Mobilteil Gigaset S1 colour in die Basis S 100/S 150, C 100/C 150 oder C 200/C 250 stellen, meldet sich das Mobilteil automatisch an der Basis an. Gehen Sie Schritt für Schritt vor:... -
Page 8: Manuelle Anmeldung
Manuelle Anmeldung Sollte die automatische Anmeldung unterbrochen werden oder wollen Sie Ihr Mobilteil Gigaset S1 colour an einer anderen Gigaset-Basis (1000-, 2000-, 3000-oder 4000-Fami- lie) nutzen, müssen Sie es manuell anmelden. Die Anmeldung müssen Sie am Mobilteil und an der Basis einleiten. -
Page 9: Display-Sprache Ändern
Telefon in Betrieb nehmen Display-Sprache ändern Sie können sich die Display-Texte in verschiedenen Sprachen anzeigen lassen. Menü öffnen. ì [______________________________________________] Auswählen und bestätigen. [______________________________________________] Auswählen und bestätigen. Die aktuelle Sprache ist Sprache mit ‰ markiert (Lieferzustand: Englisch). Sprache auswählen und bestätigen. Lang drücken (zurück in den Ruhezustand). -
Page 10: Bedienen Des Telefons Und Menü-Führung
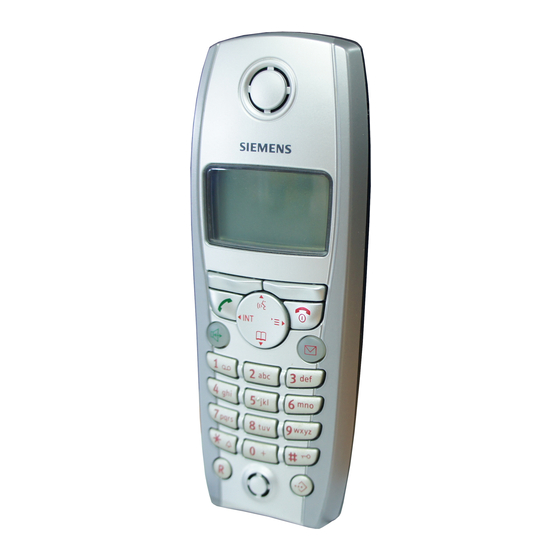
Bedienen des Telefons und Menü-Führung Bedienen des Telefons und Menü-Führung Tasten Steuer-Taste Die Steuer-Taste ist ist mit vier Richtungspfeilen und den dazugehörigen Symbolen ver- sehen. Je nachdem, auf welche Markierung Sie drücken wird eine bestimmte Funktion aufgerufen. In der Bedienungsanleitung ist die jeweilige Seite, auf die Sie drücken müs- sen, schwarz markiert, z. -
Page 11: Grafisches Hauptmenü
Zeitfunktionen Die verschiedenen Symbole haben bei Tastendruck folgende Bedeutung: Þ Wahlwiederholungs-Taste: Die Liste der letzten 10 Rufnummern öffnen. OK-Taste: Menüfunktion bestätigen bzw. Eingabe durch Bestätigung speichern. à Menü-Taste: Im Ruhezustand das Hauptmenü öffnen. Beim Telefonieren ein zustandsabhängiges Menü öffnen. Lösch-Taste: Eingabe zeichenweise von rechts nach links löschen. Ý... -
Page 12: Wecker Einstellen
Zeitfunktionen Wecker einstellen Voraussetzung: Datum und Uhrzeit sind eingestellt (S. 9). Wecker einschalten und einstellen ç v; s ; r (Ein auswählen); Wecker s ~ (Weckzeit eingeben ; a (zurück in den Ruhezustand). Sichern Bei eingestellter 12-Stunden-Anzeige können Sie in der Zeile Zeit: mit der Display-Taste zwischen am und pm wechseln. -
Page 13: Telefonieren
Telefonieren Nicht angenommene Termine, Jahrestage anzeigen und löschen ç v; s ; s Termin/Jahrestag auswählen). Ereignisse Display-Taste drücken. [RRRRRRRRRRRRRRRRRRRRRR] Löschen ... weiter mit Lang drücken (zurück in den Ruhezustand). Ein abgelaufener Termin ist mit ¼, ein abgelaufener Jahrestag mit ‚ markiert. Telefonieren Extern anrufen und Gespräch beenden (Rufnummer eingeben),... -
Page 14: Freisprechen
Telefonbuch und weitere Listen nutzen Freisprechen Freisprechen ein-/ausschalten Vor dem Wählen: (Rufnummer eingeben); (Freisprech-Taste) drücken. Während eines Gesprächs: (Freisprech-Taste) drücken. Zum Ausschalten: (Abheben-Taste) drücken. Möchten Sie das Mobilteil während eines Gesprächs in die Ladeschale stellen, müssen Sie die Freisprech-Taste beim Hineinstellen gedrückt halten. Bevor Sie die Funktion Freisprechen nutzen, sollten Sie dies Ihrem Gesprächspartner sagen. - Page 15 Telefonbuch und weitere Listen nutzen Rufnummer im Telefonbuch speichern s (Telefonbuch öffnen); ~ (Rufnummer eingeben); Neuer Eintrag s (in die nächste Zeile); ~ (Namen eingeben); à Menü öffnen), Speichern (Um zusätzlich einen Jahrestag einzugeben, nach Eingabe des Namens: mit s in die Zeile Jahrestag: springen, Display-Taste drücken und Datum eingeben.
-
Page 16: Telefonbuch- Bzw. Kurzwahllisten-Einträge Verwalten
Telefonbuch und weitere Listen nutzen Telefonbuch- bzw. Kurzwahllisten-Einträge verwalten Um eine der folgenden Menüfunktion zu nutzen, drücken Sie die Telefonbuch-Taste s bzw. die Kurzwahllisten-Taste C. Blättern Sie mit s zu dem Eintrag und drücken Sie anschließend v, um das Menü zu öffnen. Blättern Sie mit s zu der gewünschten Funktion. -
Page 17: Wahlwiederholungsliste
Telefonbuch und weitere Listen nutzen Wahlwiederholungsliste In der Wahlwiederholungsliste stehen die zehn zuletzt gewählten Rufnummern. Manuelle Wahlwiederholung Þ (Wahlwiederholungsliste öffnen); (Eintrag auswählen); Automatische Wahlwiederholung Bei dieser Funktion wird die Rufnummer automatisch alle 20 Sek. gewählt. Der Teilneh- mer meldet sich: c (Abheben-Taste), drücken. Bei Nichtmelden bricht der Ruf nach ca. 30 Sek. -
Page 18: Freien Speicherplatz Anzeigen
Mehrere Mobilteile nutzen Freien Speicherplatz anzeigen Der Speicherplatz wird zwischen dem Telefonbuch, der Kurzwahlliste (S. 12) und dem E-Mail-Verzeichnis (S. 15) aufgeteilt. Es wird der Speicherplatz aller Listen angezeigt. s (Telefonbuch öffnen); s (Eintrag auswählen); v (Menü öffnen); ; a lang drücken (zurück in den Ruhezustand). Speicherplatz Mehrere Mobilteile nutzen Externes Gespräch an ein anderes Mobilteil weitergeben... - Page 19 Mehrere Mobilteile nutzen Der Babyfon-Ruf zu einer externen Rufnummer bricht nach ca. 90 Sek., zu einer ◆ internen Rufnummer (Mobilteil) nach ca. 180 Sek. ab (basisabhängig). Bevor Sie weggehen, sollten Sie unbedingt die Einstellung des Babyfons, z. B. Empfindlichkeit und Verbindungsaufbau, prüfen. Die eingeschaltete Babyfonfunktion verringert die Betriebszeit des Mobilteils erheblich.
-
Page 20: Walkie-Talkie-Modus Einstellen
Mehrere Mobilteile nutzen Walkie-Talkie-Modus einstellen Die Walkie-Talkie-Funktion ermöglicht ein Gespräch zwischen zwei Mobilteilen (max. 300 m Reichweite), unabhängig davon, wie weit diese von der Basis entfernt sind. Voraussetzung: Beide Mobilteile sind an derselben Basis angemeldet worden (für Babyfonfunktion ◆ empfohlen) oder beide Mobilteile sind an verschiedenen Basen angemeldet und beide sind auf Beste ◆... -
Page 21: Mobilteil Einstellen
Mobilteil einstellen Mobilteil einstellen Automatische Rufannahme aus-/einschalten Wenn Sie diese Funktion eingeschaltet haben, nehmen Sie das Mobilteil bei einem Anruf einfach aus der Ladeschale, ohne dafür die Abheben-Taste drücken zu müssen (Lieferzustand: Ein). v (Menü öffnen); s (‰ = Ein); Einstellungen ;... -
Page 22: Hinweistöne Ein-/Ausschalten
Mobilteil einstellen Einstellungen für externe Anrufe, Zeitsteuerung ê v (Menü öffnen); s Klingeltöne ; Für ext. Anrufe r (Lautstärke auswählen); s (in die nächste Zeile) r (Melodie auswählen); Zeitsteuerung aktivieren auswählen; r (Aktivierung: Ein auswählen.); s in die Zeile Von: springen (4- Zeitstrg stellige Eingabe des Zeitraumes);... -
Page 23: Mobilteil In Den Lieferzustand Zurücksetzen
Anhang Mobilteil in den Lieferzustand zurücksetzen Sie können individuelle Einstellungen und Änderungen zurücksetzen. Einträge des Tele- fonbuchs, der Anruferliste, des E-Mail-Verzeichnisses und der Kurzwahlliste, die Anmel- dung des Mobilteils an der Basis sowie Melodien, die Sie geladen haben, bleiben erhal- ten. -
Page 24: Kundenservice (Customer Care)
Kennzeichen bestätigt. Auszug aus der Originalerklärung: „We, Siemens AG, declare, that the above mentioned product is manufactured according to our Full Quality Assurance System certified by CETECOM ICT Services GmbH in compliance with ANNEX V of the R&TTE-Directive 99/5/EC. The presumption of conformity with the essential requirements regarding Council Directive 99/5/EC is ensured.“... -
Page 25: Technische Daten
Anhang Technische Daten Empfohlene Akkus: Nickel-Metall-Hydrid (NiMH) Sanyo Twicell 700; Sanyo Twicell 650; Panasonic 700 mAh; GP 700 mAh; YDT AAA SUPER 700; VARTA PhonePower AAA 700 mAh; GP 850 mAh; Sanyo Ni-MH 800; Yuasa Delta AAA 800. Betriebszeiten/Ladezeiten des Mobilteils Kapazität Bereitschaftszeit Gesprächszeit... -
Page 26: Texteingabehilfe
Anhang Wenn Sie eine Taste lang drücken, werden die Zeichen der entsprechenden Taste in ◆ der untersten Display-Zeile angezeigt und nacheinander markiert. Wenn Sie die Taste loslassen, wird das markierte Zeichen im Eingabefeld eingefügt. – Ob die Groß-, Klein- oder Ziffernschreibung eingestellt ist, wird Ihnen im Display angezeigt: –... -
Page 27: Garantie-Schein Belgien
Eine Änderung der Beweislastregeln zum Nachteil des Kunden ist mit den ◆ vorstehenden Regelungen nicht verbunden. Zur Einlösung dieser Garantie wenden Sie sich bitte an den Siemens Telefonservice. Die Rufnummer entnehmen Sie bitte der Bedienungsanleitung. Garantie Schweiz Die Garantiedauer beträgt 24 Monate. -
Page 28: Stichwortverzeichnis
Stichwortverzeichnis Stichwortverzeichnis Sprache ändern ....Tasten ..... . . Abbrechen (Vorgang) . - Page 29 Stichwortverzeichnis Wechsel zu einer anderen Basis ..In Betrieb nehmen (Telefon) ..Intern rückfragen ....Nachtmodus .
- Page 30 Stichwortverzeichnis Stummschalten (Mobilteil) ..Verbinden ..... Verpackungsinhalt ....VIP (Telefonbuch-Eintrag) .
- Page 31 Brief overview Brief overview Signal strength Display (display screen) Ð 100 % i 75 % Charge status Ñ 50 % Ò poor signal × flat Ú fully | no signal (flashes) charged × flashes: battery is Talk key almost flat or is charging Answer a call ◆...
- Page 32 Contents Contents Brief overview ......1 Safety precautions ......4 Preparing to use your phone .
- Page 33 Contents Using several handsets ..... 16 Internal consultation calls ..........16 Accepting/rejecting call waiting during an internal call .
-
Page 34: Safety Precautions
Safety precautions Safety precautions Only use the power supply unit supplied, as indicated on the underside of the device. Fit only the recommended rechargeable batteries (page 22) of the same type! Use no other types of batteries or non-rechargeable batteries, as they could damage health and cause personal injury. -
Page 35: Preparing To Use Your Phone
Placing the handset into the base (registering) and charging the batteries When you place the Gigaset S1 colour handset into the S 100 colour/S 150 colour, C 100/ C 150 or C 200/C 250 base, it will register to the base automatically. Proceed step by step as follows: 1. -
Page 36: Manual Registration
Manual registration If automatic registration is interrupted or if you wish to use your Gigaset S1 colour handset at a different Gigaset base (1000, 2000, 3000 or 4000 family), then you must register it manually. You must initiate handset registration on the handset and on the base. -
Page 37: Changing The Display Language
Preparing to use your phone Changing the display language You can view the display texts in different languages. Open the menu. ì [______________________________________________] Select the menu item and confirm. [______________________________________________] Select the menu item and confirm. The current Language language is checked ‰ (the default setting is English). -
Page 38: Operating The Telephone, Menu Guidance
Operating the telephone, menu guidance Operating the telephone, menu guidance Keys Control key The control key has four arrows and associated icons. A certain function is activated depending on which side of the key you press. In the operating instructions, the side you must press is highlighted in black, e.g. -
Page 39: Graphic Main Menu
Date and Time The various icons have the following meanings when the keys are pressed: Þ Last number redial key: Open the list of the last 10 numbers you dialled. OK key: Confirm menu function or confirm an input and store. à... -
Page 40: Setting The Alarm Clock
Date and Time Setting the alarm clock Precondition: The date and time have already been set (page 9). Activating and setting the alarm clock ç v; s ; r (select On); Alarm Clock s ~ (enter the wake-up time ; a (return to idle status). Save If you have selected the 12 hour display, on the Time: line you can use the display key to toggle between am and pm. -
Page 41: Making Calls
Making calls Viewing and deleting missed appointments, anniversaries etc. ç v; s ; s select appointment/anniversary). Missed Dates Press the display key. [RRRRRRRRRRRRRRRRRRRRRR] Delete ... then Long press (back to idle status). A missed appointment is indicated by ¼, a missed anniversary by ‚. Making calls Making external calls and ending a call (enter the number) and press... -
Page 42: Handsfree
Using the directory and other lists Handsfree Activating/deactivating handsfree Before you dial: (enter the number); press (the handsfree key). During a call: Press (the handsfree key). To deactivate: Press (the Talk key). If you wish to place the handset in the charger during a call you must press the handsfree key and hold it down as you do so. - Page 43 Using the directory and other lists Storing a telephone number in the directory s (open directory); ; ~ (enter the number); New Entry s (to the next line) ~ (enter name); à (open menu), Save Entry (To enter an anniversary as well, after you have entered the name: press s to go to the );...
-
Page 44: Managing Entries In The Directory And Speed Dial List
Sending a single entry or complete list to a handset You can send individual entries or the entire list to another Gigaset S1 colour or C 2 handset or a Comfort handset in the Gigaset 4000, 3000 or 2000 series that is registered to the same base. -
Page 45: Last Number Redial List
Using the directory and other lists Last number redial list The last number redial list contains the ten last dialled numbers. Manual last number redial Þ (open last number redial list); (select an entry); Automatic redial With this function the number is automatically dialled every 20 seconds. When the other party answers the call, press c (the Talk key). -
Page 46: Display Available Memory
Using several handsets Display available memory The memory space is divided up between the directory, the speed dial list (page 12) and the email directory (page 15). The available memory of all these lists is displayed. s (open directory); s (select entry); v (open menu); ;... -
Page 47: Setting The Walk And Talk Mode
Using several handsets Always check the settings of the room monitor before you leave home, e.g. sensitivity and phone line. The room monitor function severely curtails the handset's operating time. If necessary you should place the handset which is near the baby in the charger to ensure that the battery does not run down. -
Page 48: Handset Settings
Handset settings In Walk and Talk mode the handsets cannot be reached by incoming calls. The handset operating times are greatly curtailed. Activating/deactivating the Walk and Talk mode é v (open menu); s Walk and Talk To deactivate: Press the display key Press c (Talk key) or d (handsfree key) The call will go to all handsets that are in Walk and Talk mode. -
Page 49: Logo Display Screen Picture
Handset settings Logo display Screen Picture You can display a logo instead of the 'idle status display'. You have a choice of 4 pictures. ì v (open menu); s r (activation) Display Screen Picture s (to the next line) r (select logo); Show ;... -
Page 50: Activating/Deactivating Advisory Tones
Handset settings Activating/deactivating the ringer All handsets ring when there is an incoming call. To deactivate the ringer: Press the star key P and hold. The Ú icon appears in the display. To activate the ringer: Press the star key P and hold. To cancel the ringer for the current call, press the display key Silence Activating/deactivating the alert tone... -
Page 51: Appendix
In many cases, you will then be able to use it again. Service (Customer Care) Our online support on the Internet: www.siemens-mobile.com/customercare If you need any repair work, or have a guarantee claim to submit, our Service-Center Ireland 18 50 77 72 77... -
Page 52: Specifications
R&TTE directive. Excerpt from the original declaration "We, Siemens AG, declare that the above mentioned product is manufactured according to our Full Quality Assurance System certified by CETECOM ICT Services GmbH in compliance with ANNEX V of the R&TTE Directive 99/05/EC. -
Page 53: Character Set Chart
Appendix Character set chart Standard characters Press the relevant key repeatedly or hold it down: 4 x 5 x 8 x 9 x 10 x 11 x 12 x 13 x 14 x â £ ¥ ¤ Space ä á à... -
Page 54: Predictive Text
In the case of new devices and their components exhibiting defects resulting from ◆ manufacturing and/or material faults within 24 months of purchase, Siemens shall, at its own option and free of charge, either replace the device with another device reflecting the current state of the art, or repair the said device. -
Page 55: Guarantee Certificate United Kingdom
This Guarantee shall apply to new devices purchased in the European Union. For ◆ Products sold in the Republic of Ireland the Guarantee is issued by Siemens Ireland Limited, Ballymoss Road, Sandyford Industrial Estate, Dublin 18 - The Republic of Ireland. - Page 56 ◆ evidence for invoking the Guarantee. Claims under the Guarantee must be submitted within two months of the Guarantee default becoming evident. Ownership of devices or components replaced by and returned to Siemens shall vest ◆ in Siemens. This Guarantee shall apply to new devices purchased in the European Union. For ◆...
-
Page 57: Index
Index Index Acknowledge tones ....Date and time ....Activate Date setting . - Page 58 Index belt clip ..... . Meno change for best reception ..open .
- Page 59 Index Select (menu option) ... . . Select option (menu) ... . . Send a directory entry ... . Service .
- Page 61 Présentation Présentation Intensité de la réception Ecran (affichage) Ð 100 % i 75 % Niveau de charge Ñ 50 % × vide Ú pleine Ò réception faible × clignotante : batterie | aucune réception presque vide ou batterie (clignotante) en charge Touche «...
- Page 62 Sommaire Sommaire Présentation ....... . 1 Informations concernant la sécurité ... . 4 Mettre le téléphone en service .
- Page 63 Sommaire Réglage du combiné ......20 Désactiver/activer le décroché automatique ....... . 20 Choisir un modèle de couleurs et régler le contraste .
-
Page 64: Informations Concernant La Sécurité
Informations concernant la sécurité Informations concernant la sécurité Utilisez exclusivement le bloc-secteur fourni (comme indiqué sous la base). Utiliser uniquement des batteries homologuées (rechargeables) (p. 25) du même type. Ne jamais utiliser des piles normales (non rechargeables), qui peuvent endommager l'appareil et représenter un risque pour la santé ou occasionner des blessures. -
Page 65: Mettre Le Téléphone En Service
Mettre le téléphone en service Contenu de l'emballage : un combiné Gigaset S1 colour , un chargeur, un clip ceinture pour le combiné, deux batteries, un bloc secteur et son cordon électrique, un manuel d'utilisation. Mettre en service le combiné... -
Page 66: Inscription Manuelle
En cas d'interruption de l'inscription automatique, ou si vous souhaitez utiliser votre combiné Gigaset S1 colour sur une autre base Gigaset (famille 1000, 2000, 3000 ou 4000), vous devez l'inscrire à la main. Vous devez activer l'inscription du combiné au niveau du combiné... -
Page 67: Modifier La Langue D'affichage
Mettre le téléphone en service Modifier la langue d’affichage Le texte peut s'afficher à l'écran dans différentes langues. Ouvrir le menu. ì [______________________________________________] Sélectionner et valider. [______________________________________________] Sélectionner et valider. La langue courante est Langue marquée par ‰ (réglage usine : Anglais). Sélectionner une langue et valider. -
Page 68: Utilisation Du Téléphone Et Commande Par Menus
Utilisation du téléphone et commande par menus Utilisation du téléphone et commande par menus Clavier Touche de navigation La touche de navigation comporte quatre flèches de direction ainsi que les symboles correspondants. En fonction de l'indication sur laquelle vous pressez, la fonction particulière est appelée. -
Page 69: Menu Graphique Principal
Utilisation du téléphone et commande par menus Exemple : • §§§§§§§SMS§§§§§§ Touches écran La signification des icônes est la suivante : Þ Touche de répétition de la numérotation (Bis) : la liste des 10 derniers numéros appelés s'affiche. Touche OK : activer la fonction du menu ou enregistrer l'entrée en la validant. à... -
Page 70: Date / Heure / Réveil / Rdv
Date / Heure / Réveil / RdV Date / Heure / Réveil / RdV Régler la date et l’heure Le réglage de la date et de l’heure est nécessaire pour indiquer précisément l’heure d’arrivée des appels/messages. ç v ; s ~ (entrer le jour, le mois et l'année) ;... -
Page 71: Téléphoner
Téléphoner Un rendez-vous paramétré est marqué par le symbole ¼. La sonnerie rendez-vous ne sonne que si le combiné est à l'état de repos. Elle ne sonne pas si la surveillance de pièce ou si le mode Talkie-Walkie est activé, pendant une conversation ou pendant une opération de rappel automatique. -
Page 72: Accepter Un Appel
Téléphoner Appeler tous les combinés (appel général) ; appuyer sur la touche Etoile Pour mettre fin à la communication : appuyer sur la touche Raccrocher Accepter un appel Votre combiné sonne, l'appel entrant s'affiche à l'écran et la touche d clignote. Presser ou la touche Mains-libres d). -
Page 73: Utilisation Des Répertoires Et Autres Listes
Utilisation des répertoires et autres listes Utilisation des répertoires et autres listes Répertoires principal et secondaire Les répertoires principal et secondaire se partagent une capacité mémoire d'environ 200 fiches. Le répertoire principal est appelé à l'aide de la touche s. Il est possible d'associer à chaque fiche du répertoire un jour anniversaire et l'indication «... -
Page 74: Gérer Les Fiches Des Répertoires
Utilisation des répertoires et autres listes Enregistrer un numéro spécial dans le répertoire secondaire Pour un accès rapide, un raccourci clavier (touches 0, 2 à 9) peut être affecté à neuf des entrées du répertoire secondaire. Maintenir un appui long sur la touche de raccourci puis décrocher avec la touche c pour appeler. -
Page 75: Association De Deux Numéros « Appel Par Appel
Utilisation des répertoires et autres listes Copier une ou toutes les fiches entre combinés Vous pouvez transférer des fiches ou le répertoire complet à un autre combiné Gigaset S1 colour , C2 ou Comfort inscrit sur la même base série Gigaset 4000, 3000 ou 2000. Le paramètre VIP, les modèles vocaux enregistrés ainsi que les raccourcis clavier ne sont pas copiés. -
Page 76: Répertoire D'adresses E-Mail
Utilisation des répertoires et autres listes Gérer les entrées de la liste des numéros Bis Vous pouvez utiliser les fonctions du menu indiquées ci-après : Þ (sélectionner une entrée) ; v (ouvrir le (ouvrir la liste des numéros appelés) ; menu) ;... -
Page 77: Utiliser Plusieurs Combinés
Utiliser plusieurs combinés Utiliser plusieurs combinés Transfert de l’appel vers un autre combiné u (ouvrir la liste des combinés) ; s (sélectionner un combiné ou Appel général) ; Le correspondant interne répond : appuyer sur la touche Raccrocher a. Vous pouvez aussi raccrocher sans attendre la réponse du correspondant interne. Si celui ci ne répond pas ou est occupé, l'appel vous est automatiquement renvoyé... - Page 78 Utiliser plusieurs combinés L’autonomie du combiné est considérablement réduite lorsque la fonction Surveillance de pièce est activée. Placez le combiné dans son chargeur, de manière à éviter que la batterie ne se vide. La fonction surveillance de pièce peut également être réalisée en mode Talkie-Walkie. Activer la fonction de surveillance de pièce et première saisie du numéro à...
-
Page 79: Activer Le Mode Talkie-Walkie
Utiliser plusieurs combinés Activer le mode Talkie-Walkie La fonction Talkie-Walkie permet à deux combinés de communiquer ensemble (avec une portée de 300 m maximale), indépendamment de leur éloignement par rapport à la base. Condition : les deux combinés ont été inscrits sur la même base (recommandé pour la fonction ◆... -
Page 80: Réglage Du Combiné
Réglage du combiné Réglage du combiné Désactiver/activer le décroché automatique Si vous avez activé cette fonction prenez simplement le combiné sur le chargeur lorsque vous recevez un appel, sans presser sur la touche Décrocher (réglage usine : activé). ì v (ouvrir le menu) ; s (‰... -
Page 81: Régler Le Volume D'écoute
Réglage du combiné Régler le volume d'écoute Vous disposez de cinq niveaux de réglage pour le mode Mains-libres, de trois niveaux de réglage pour le volume de l’écouteur – même pendant une communication externe. ê v (ouvrir le menu) ; s ;... -
Page 82: Activer/Désactiver Les Tonalités Ou Bips D'avertissement
Réglage du combiné Qualité audio Vous avez la possibilité d'augmenter la qualité audio des mélodies longues (4-10). ê v (ouvrir le menu) ; s (‰ = activé) ; appuyer sur Sonn. avec echo a de manière prolongée (retour à l'état de repos). Activer/désactiver les tonalités ou bips d'avertissement Votre combiné... -
Page 83: Annexe
Vous trouverez des conseils personnalisés sur nos produits en contactant notre ligne d'assistance Premium : Assistance Premium pour la France 08 99 70 01 85 (1,35 EuroTTC/Appel puis 0,34 EuroTTC/Minute) Des collaborateurs de Siemens qualifiés vous y fourniront des informations produits et des conseils d'installation éclairés. - Page 84 R&TTE est attestée par le label CE. Extrait de la déclaration originale : "We, Siemens AG, declare, that the above mentioned product is manufactured according to our Full Quality Assurance System certified by CETECOM ICT Services GmbH in compliance with ANNEX V of the R&TTE-Directive 99/5/EC.
-
Page 85: Caractéristiques Techniques
Annexe Caractéristiques techniques Batteries recommandées : Nickel-Hydrure métallique (NiMH) Sanyo Twicell 700 ; Sanyo Twicell 650 ; Panasonic 700 mAh ; GP 700 mAh ; YDT AAA SUPER 700 ; VARTA PhonePower AAA 700 mAh; GP 850 mAh; Sanyo Ni-MH 800;... -
Page 86: Aide À La Saisie Du Texte
Annexe Pour la saisie dans les répertoires, la première lettre du nom s'écrit ◆ automatiquement en majuscule et les lettres suivantes en minuscule. Une pression longue sur une touche permet d'afficher successivement puis de ◆ sélectionner les caractères de la touche correspondante sur la ligne inférieure de l'écran. -
Page 87: Certificat De Garantie France
équivalent correspondant à l'état actuel de la technique. La présente garantie n'est valable que pendant une période de 6 mois à compter de sa date d'achat neuf pour les pièces et éléments de ce Produit Siemens qui sont soumis à l'usure (par ex. batteries, claviers et boîtiers). - Page 88 Produit Siemens lorsque le défaut du Produit Siemens n'est pas couvert par la garantie. De même Siemens pourra facturer au Client les frais découlant de ses interventions sur un Produit Siemens remis par le Client et en bon état de fonctionnement.
-
Page 89: Certificat De Garantie Belgique
La durée de garantie ne se prolonge pas par la prestation de services fournis dans le ◆ cadre de la garantie pendant la période de garantie. Pour autant qu'il ne s'agisse pas d'un cas de garantie, Siemens se réserve le droit de ◆ facturer au client les frais de réparation ou de remplacement. -
Page 90: Index
Index Index Clip ceinture ....Inscription sur une autre base ..Activation écouteur ....Liste . - Page 91 Index Espace de stockage ....Numéro Eteindre le combiné ....Enregistrer (répertoire principal) . . . Numéros de services .
- Page 92 Index Surveillance de pièce ... . . Tableau des jeux de caractères ..Talkie-Walkie ....Téléphoner .
- Page 93 Breve descrizione Breve descrizione Intensità del campo di ricezione Display retroilluminato Ð 100 % 75 % (campo di visualizzazione) Ñ Ò 50 % intensità bassa Livello di carica nessun segnale (lampeggia) × Ú scariche cariche × lampeggia: la batteria sta per esaurirsi e/o la batteria è...
- Page 94 Indice Indice Breve descrizione ......1 Norme di sicurezza ......4 Mettere in funzione il telefono .
- Page 95 Indice Impostare il portatile ..... . . 19 Attivare/disattivare la risposta automatica ....... . . 19 Impostazione dell'aspetto colore e del contrasto .
-
Page 96: Norme Di Sicurezza
Norme di sicurezza Norme di sicurezza Utilizzare soltanto l’alimentatore in dotazione, come indicato sul lato inferiore dell’apparecchio. Utilizzare soltanto le batterie raccomandate, ricaricabili (pag. 23) dello stesso tipo! Questo significa nessun altro tipo di batteria o batterie non ricaricabili, in quanto potrebbero causare danni alla salute e alle persone. ‹... -
Page 97: Mettere In Funzione Il Telefono
Mettere in funzione il telefono La confezione contiene: un portatile Gigaset S1 colour , un supporto di ricarica, una clip per cintura per il portatile, due batterie, un alimentatore con cavo della corrente, le istruzioni d’uso. Mettere in funzione il portatile Il display è... -
Page 98: Registrazione Manuale
Se la registrazione automatica è stata interrotta o non è andata a buon fine (situazione che può occasionalmente verificarsi senza indicare alcuna anomalia funzionale) oppure si desidera utilizzare il portatile Gigaset S1 colour su un’altra Base Gigaset (famiglia 1000, 2000, 3000 o 4000), occorre eseguire la registrazione manuale. La registrazione deve essere attivata sul portatile e sulla base. -
Page 99: Modificare La Lingua Del Display
Mettere in funzione il telefono Modificare la lingua del display È possibile visualizzare il testo sul display in diverse lingue. Aprire il menu. ì [______________________________________________] Scegliere e confermare. [______________________________________________] Scegliere e confermare. La lingua attuale presenta il Voce: segno ‰ (impostazione all’acquisto: inglese). Scegliere e confermare la lingua. -
Page 100: Uso Del Telefono E Guida Sul Menu
Uso del telefono e guida sul menu Uso del telefono e guida sul menu Tasti Tasto di navigazione Il tasto di navigazione è provvisto di quattro tasti freccia e dei simboli corrispondenti. A seconda della selezione premuta, viene attivata una determinata funzione. Nelle istruzioni d’uso, il lato da premere è... -
Page 101: Menu Principale Grafico
Funzioni con l’ora Quando vengono premuti i tasti, i diversi simboli hanno il seguente significato: Þ Tasto ripetizione dei numeri selezionati: apre la lista degli ultimi 10 numeri di telefono. Tasto OK: conferma la funzione menu e/o salva l’inserimento confermandolo. à... -
Page 102: Impostare La Sveglia
Funzioni con l’ora Se è stata impostata la visualizzazione a 12 ore, nella riga Ora: è possibile utilizzare il tasto del display per scegliere tra am e pm. AM/PM Impostare la sveglia Presupposto: data e ora sono state impostate (pag. 9). Attivare e impostare la sveglia ç... -
Page 103: Telefonare
Telefonare Promemoria non accettati, visualizzare e cancellare gli anniversari ç v; s ; s scegliere promemoria/anniversario). Appunt.scaduti Premere per inviare un SMS [RRRRRRRRRRRRRRRR ] o ... Cancellare il promemoria/l'anniversario Premere il tasto del display. [RRRRRRRRRRRRRRRRRRRRRR] Cancella ... poi in ogni caso Premere a lungo (si torna in stand-by). -
Page 104: Viva Voce
Utilizzare la rubrica e altre liste Viva voce Attivare/disattivare il viva voce Per chiamare utilizzando il viva voce: (inserire il numero di telefono); premere (tasto viva voce). Durante la conversazione: premere (tasto viva voce). Per disattivare il viva voce: premere (tasto impegno linea). - Page 105 Utilizzare la rubrica e altre liste Salvare numeri di telefono nella rubrica s (aprire la rubrica); ; ~ (inserire il numero di telefono); Nuova voce s (nella riga successiva) ~ (inserire i nomi); à (aprire il menu), Salva (Per inserire anche un anniversario, dopo l’inserimento del nome: utilizzando s à...
-
Page 106: Gestire Le Voci Della Rubrica O Delle Liste Di Selezione Rapida
Inviare a un portatile voci singole o una lista completa È possibile trasmettere voci singole o la lista completa a un altro portatile Gigaset S1 colour , C 2 o Comfort della serie Gigaset 4000, 3000 e 2000 registrato sulla stessa base. -
Page 107: Unire Un Numero Call-By-Call A Un Numero Di Telefono
Utilizzare la rubrica e altre liste Unire un numero Call-by-Call a un numero di telefono Si tratta di una funzione che consente di selezionare un prefisso di un operatore di rete, memorizzato nella lista di selezione rapida, prima del numero di telefono ("congiungimento"). -
Page 108: Visualizzare Lo Spazio Libero In Memoria
Utilizzare più portatili Memorizzare nuovi indirizzi e-mail Fase 1: aprire la cartella e-mail: s (aprire la rubrica) s <rubrica eMail> Fase 2: inserire una voce e-mail: à inserire l’indirizzo). Per inserire ".", "@" premere (aprire il Nuova voce menu) e scorrere con s oppure scegliere la funzione di inserimento testo facilitato Per inserire con l’inserimento testo facilitato attivato, premere 1 volta a lungo "@",... -
Page 109: Utilizzare Il Portatile Come Babycall
Utilizzare più portatili Utilizzare il portatile come Babycall Con questa funzione, viene chiamato un numero interno o esterno memorizzato in precedenza non appena nella stanza viene raggiunto il livello di rumore impostato. Anche dopo la fine della chiamata, la funzione Babycall resta attiva sul portatile. La distanza tra il portatile e il bambino deve essere di almeno 1 –... -
Page 110: Impostare La Modalità Walkie-Talkie
Utilizzare più portatili Disattivare la funzione Babycall È possibile disattivare la funzione Babycall dall’esterno (a seconda della base). Accettare la chiamata avviata dalla funzione Babycall e premere i tasti O R. Trascorsi circa 90 sec. dal termine del collegamento, la funzione è disattivata. Non vi saranno più... -
Page 111: Impostare Il Portatile
Impostare il portatile Utilizzare il portatile come Babycall nella modalità Walkie-Talkie à (aprire il menu); s ; s (nella riga successiva); r (scegliere On); Baby Call s (nella riga successiva); r (scegliere basso o alto); Salva La chiamata Babycall viene inoltrata solo ai portatili che si trovano in modalità Walkie- Talkie. -
Page 112: Modificare Il Volume Del Ricevitore
Impostare il portatile Modificare il volume del ricevitore È possibile impostare il volume del viva voce su 5 livelli e il volume del ricevitore su 3 livelli – anche durante una conversazione esterna. ê v (aprire il menu); s ; r (scegliere il volume del viva ;... -
Page 113: Ripristinare I Parametri Iniziali Del Portatile
Impostare il portatile Attivare/disattivare il tono di attenzione Quando viene disattivata la suoneria, è possibile attivare un tono di attenzione. In caso di chiamata, al posto della suoneria si sente un tono breve ("Beep"). Premere a lungo il tasto asterisco P ed entro 3 sec. premere il tasto del display Beep Sul display si legge º. -
Page 114: Appendice
Se desiderate porre domande tecniche o relative all’uso dell’apparecchio, potete consultare il nostro sito Internet: http://www.siemens-mobile.com/customercare oppure potete rivolgervi al servizio clienti che vi supporterà per ogni esigenza. Italia: Servizio Clienti Siemens Tel. 02-243.64400 Fax 02 -243. 64401 Per informazioni relative all'uso del... -
Page 115: Dati Tecnici
CE. Estratto della dichiarazione originale We, Siemens AG, declare, that the above mentioned product is manufactured according to our Full Quality Assurance System certified by CETECOM ICT Services GmbH in compliance with ANNEX V of the R&TTE-Directive 99/05/EC. The presumption of conformity with the essential requirements regarding Council Directive 99/05/EC is ensured."... -
Page 116: Tabella Della Serie Di Caratteri
Appendice Tabella della serie di caratteri Scrittura standard Premere più volte o a lungo il tasto corrispondente: volte volte volte volte volte volte volte volte volte volte volte volte volte volte â £ ¥ ¤ Spazio ä á à â ã... -
Page 117: Inserimento Di Testo Facilitato
D. Lgs. 02/02/2002 n. 24: In caso dispositivi nuovi e relativi componenti risultassero viziati da un difetto di ◆ fabbricazione e/o di materiale entro 24 mesi dalla data di acquisto, Siemens si impegna, a sua discrezione, a riparare o sostituire gratuitamente il dispositivo con... -
Page 118: Garanzia Svizzera
La presente garanzia è valida per tutti i dispositivi acquistati all'interno dell'Unione ◆ Europea. Garante per i prodotti acquistati in Italia è la Siemens S.p.A., Viale Piero e Alberto Pirelli 10, 20126 Milano. Si escludono ulteriori responsabilità di Siemens, salvo il caso di comportamento ◆... - Page 119 Indice alfabetico Indice alfabetico Contrasto..... . . 19 Cursore ......8 Alimentatore.
- Page 120 Indice alfabetico compleanno/anniversario ..14 ora della sveglia ....10 Pausa di selezione ....11 promemoria .
- Page 121 Indice alfabetico pressione dei tasti (tono di conferma) ....21 tasti del display ....8 tasto di navigazione .
- Page 123 Esquema general Esquema general Campo de la intensidad de Display (indicación) recepción Ð Estado de carga 100 % 75 % × Ú Ñ Ò vacía llena 50 % poca intens. × parpadea: la batería casi intensidad nula (parpadea) está vacía o se está cargando Tecla de descolgar ◆...
- Page 124 Tabla de contenidos Tabla de contenidos Esquema general ......1 Indicaciones de seguridad ..... 4 Puesta en servicio del teléfono .
- Page 125 Tabla de contenidos Utilización de varios terminales ....17 Consulta interna ........... . . 17 Aceptación/rechazo de una llamada en espera durante una comunicación interna .
-
Page 126: Indicaciones De Seguridad
Indicaciones de seguridad Indicaciones de seguridad Utilice exclusivamente el alimentador incluido en el suministro, como indica la parte inferior del equipo. Utilice sólo las baterías recargables recomendadas (p. 23) y del mismo tipo. Es decir, no utilice en ningún caso otro tipo de pilas o baterías no recargables, podrían dañar su salud y el terminal. -
Page 127: Puesta En Servicio Del Teléfono
Puesta en servicio del teléfono El embalaje contiene: un terminal inalámbrico Gigaset S1 colour, un soporte cargador, un clip para el cinturón para el terminal inalámbrico, dos baterías, un alimentador enchufable con cable de red y el manual de usuario. -
Page 128: Registro Manual
Registro manual Si se interrumpe el registro automático o si quiere emplear el terminal inalámbrico Gigaset S1 colour en otra estación base Gigaset (de las familias 1000, 2000, 3000 o 4000) debe registrarlo manualmente. El registro debe iniciarlo en el terminal inalámbrico y en la estación base. -
Page 129: Modificar El Idioma Del Display
Puesta en servicio del teléfono Modificar el idioma del display Puede visualizar los textos del display en varios idiomas. Abrir el menú. ì [______________________________________________] Seleccionar y confirmar. [______________________________________________] Seleccionar y confirmar. El idioma actual está Idioma marcado con ‰ (estado de suministro: inglés). Seleccionar y confirmar el idioma. -
Page 130: Uso Del Teléfono Y Guía A Través Del Menú
Uso del teléfono y guía a través del menú Con el bloqueo del teclado activado tampoco pueden marcarse los números de emergencia. Uso del teléfono y guía a través del menú Teclas Tecla de control La tecla de control está provista de cuatro flechas de dirección con los símbolos correspondientes. -
Page 131: Menú Principal Gráfico
Uso del teléfono y guía a través del menú Ejemplo: • §§§§§§§SMS§§§§§§ Teclas de display Al pulsar las teclas, los diversos símbolos tienen el significado siguiente: Þ Tecla de rellamada: abre la lista de los 10 últimos números marcados. Tecla OK: confirma la función de menú o guarda la entrada confirmándola. à... -
Page 132: Funciones De Indicación Horaria
Funciones de indicación horaria Funciones de indicación horaria Ajuste de la fecha y la hora El ajuste de la fecha y la hora es necesario para que pueda mostrarse correctamente cuándo han entrado llamadas. ç v; s ; ~ (introducir día/mes/año); Fecha/hora s (en la línea siguiente) ~ (introducir hora/min);... -
Page 133: Realizar Llamadas
Realizar llamadas Activación y ajuste de citas ç v; s ; Ajustar cita (ejemplo) Cita 2 r (seleccionar Sí); s ~ (introducir día/mes s ~ (introducir hora/min ~ (introducir nombre a (vuelta al estado de reposo). Cambiar; Guardar; Cuando se ha ajustado una cita se muestra con el símbolo ¼. La alarma correspondiente a la cita suena únicamente si el terminal inalámbrico se encuentra en el estado de reposo y no están activadas las funciones vigilancia de habitación ni "walky-talky";... -
Page 134: Aceptación De Llamadas
Realizar llamadas Llamada a un terminal inalámbrico determinado (seleccionar terminal inalámbrico); pulsar c. O bien: u pulsar 2 (ejemplo). Para Finalizar: pulsar (tecla de colgar). Llamada a todos los terminales inalámbricos ("llamada colectiva"): ; pulsar (tecla de asterisco). Para Finalizar: pulsar (tecla de colgar). -
Page 135: Empleo Del Listín Telefónico Y De Otras Listas
Empleo del listín telefónico y de otras listas Empleo del listín telefónico y de otras listas Listín telefónico y lista de marcación abreviada En el listín telefónico y en la lista de marcación abreviada pueden guardarse hasta 200 números de teléfono. Puede abrir el listín telefónico con la tecla s. - Page 136 Empleo del listín telefónico y de otras listas Guardar un número de teléfono en la lista de marcación abreviada Puede asignar hasta nueve entradas de la lista de marcación abreviada a cada una de las cifras 0, 2–9, respectivamente. Si en el estado de reposo pulsa prolongadamente una de estas cifras y la tecla de descolgar c, se le conecta inmediatamente con el número de teléfono asignado a la cifra.
-
Page 137: Encadenamiento De Un Número Call-By-Call Con Un Número De Teléfono
Puede transmitir entradas individuales o la lista completa a otro terminal inalámbrico Gigaset S1 colour, C2 o terminales inalámbricos Comfort de la serie Gigaset 4000, 3000 y 2000 registrados en la misma estación base. Los ajustes VIP, las muestras de voz guardadas y las cifras de marcación abreviada no se transfieren. -
Page 138: Directorio De Correo Electrónico
Empleo del listín telefónico y de otras listas Administración de las entradas de la lista de rellamada Puede utilizar las funciones de menú siguientes: Þ (seleccionar entrada); v (abrir la lista de rellamada); (abrir el menú); (seleccionar función). Rellam. autom. Utilizar número Guardar en list. -
Page 139: Utilización De Varios Terminales
Utilización de varios terminales Utilización de varios terminales Transferencia de una llamada a otro terminal inalámbrico u (abrir la lista interna); seleccionar s (un terminal inalámbrico determinado o Llam. colectiva); La extensión interna se registra: pulsar a (tecla de colgar). Si no está... -
Page 140: Ajuste Del Modo "Walky-Talky
Utilización de varios terminales La función de vigilancia de habitación activada reduce considerablemente el tiempo de servicio del terminal inalámbrico. Si es necesario, coloque el terminal inalámbrico situado cerca del bebé en el soporte cargador, para asegurar que no se acaba la batería. La función de vigilancia de habitación también es posible en el modo "walky-talky". - Page 141 Utilización de varios terminales uno de los terminales inalámbricos no está registrado en ninguna base y el terminal ◆ inalámbrico registrado está ajustado en la opción Mejor base o ninguno de los dos terminales inalámbricos está registrado en una estación base. ◆...
-
Page 142: Ajuste Del Terminal Inalámbrico
Ajuste del terminal inalámbrico Ajuste del terminal inalámbrico Activación/desactivación de la aceptación automática de llamada Si está activada esta función, basta con retirar el terminal inalámbrico del soporte de carga para contestar una llamada, sin necesidad de pulsar la tecla de descolgar (estado de suministro: activada). -
Page 143: Activación Y Desactivación De Los Tonos De Indicación
Ajuste del terminal inalámbrico Ajustes para las llamadas externas, el control de tiempo v (abrir el menú); s ; Para llam. ext. Ajustes sonido Tonos de llam. r (seleccionar volumen); s (en la línea siguiente) r (seleccionar melodía); Activar el control de tiempo ;... -
Page 144: Anexo
Anexo ê v (abrir el menú); s Tonos de aviso r (activar Clic teclas:); s (en la línea siguiente) r (activar Confirm.:); s (en la línea siguiente) r (para Bat.baja: seleccionar Sí, No o en transf.); ; pulsar a prolongadamente (vuelta al estado de reposo). Guardar Reiniciar el terminal inalámbrico al Puede reiniciar los ajustes y modificaciones individuales. -
Page 145: Servicio Técnico (Servicio De Atención Al Cliente)
Directiva R&TTE. Extracto de la declaración original: "We, Siemens AG, declare, that the above mentioned product is manufactured according to our Full Quality Assurance System certified by CETECOM ICT Services GmbH in compliance with ANNEX V of the R&TTE-Directive 99/5/EC. -
Page 146: Tabla De Símbolos
Anexo Tiempos de servicio/Tiempos de carga del terminal inalámbrico Capacidad Autonomía (horas) Tiempo de conversación Tiempo de carga (mAh) (horas) (horas) aprox. 160 (6 días) aprox. 13 aprox. 7 Los tiempos de servicio y de carga son válidos únicamente si se emplean las baterías recomendadas. -
Page 147: Ayuda Para La Introducción De Textos
Anexo Orden de las entradas del listín telefónico 1. Espacio en blanco (representado aquí con s) 2. Cifras (0 - 9) 3. Letras (por orden alfabético) 4. Otros caracteres Si desea pasar por alto el orden alfabético de los registros, inserte un espacio en blanco antes del nombre. -
Page 148: Certificado De Garantía
La duración de la garantía no se extenderá en virtud de los servicios prestados según ◆ las condiciones de garantía. Siemens se reserva el derecho de cobrarle al cliente el reemplazo o la reparación en ◆ caso de que el defecto no sea cubierto por la garantía, siempre que dicho cliente haya sido informado previamente de esta circunstancia. -
Page 149: Índice Alfabético
Índice alfabético Índice alfabético Abrir Cambio de estación base ... .7 listín telefónico ....8 Campo de la intensidad de recepción. - Page 150 Índice alfabético Logotipo ......20 Finalizar comunicación ... . 11 Función manos libres .
- Page 151 Índice alfabético Tono de confirmación ... . . 21 Tono del timbre ....20 Tabla de símbolos .
- Page 153 Esquema Esquema Intensidadede ligação à base Display (ecrã) Ð 100 % i 75 % Estado das baterias Ñ 50 % Ò recepção mais × Ú vazias cheias reduzida × pisca: baterias quase vazias ou baterias a carre- Tecla Atender/Marcar Atender uma chamada ◆...
- Page 154 Índice Índice Esquema ........1 Indicações de segurança ..... 4 Preparar o terminal móvel .
- Page 155 Índice Configurar o terminal móvel ....19 Activar/desactivar o Atendimento Automático de chamadas ....19 Configurar o esquema de cores e o contraste .
-
Page 156: Indicações De Segurança
Indicações de segurança Indicações de segurança Utilize apenas o alimentador fornecido, o qual está referido no lado inferior do equipamento. Utilize somente baterias recarregáveis recomendadas (pág. 23) do mesmo tipo! Ou seja, não utilize outro tipo de baterias nem baterias não recarregá- veis, pois poderão danos e prejudicar a saúde. -
Page 157: Preparar O Terminal Móvel
Preparar o terminal móvel Preparar o terminal móvel Conteúdo da embalagem: Um terminal móvel Gigaset S1 colour, um carregador, um clip de cinto para o terminal móvel, duas baterias, um alimentador e este manual de instruções. Preparar o terminal móvel O display está... -
Page 158: Registo Manual
Preparar o terminal móvel Quando se carrega pela primeira vez aconselhamos a carregar durante cinco horas sem interrupção – independentemente da indicação do estado das baterias! A capacidade de carga das baterias reduz-se, por razões técnicas, passado algum tempo. O estado de carga da bateria só é correctamente indicado após um carregamento/des- carregamento sem interrupções. -
Page 159: Alterar O Idioma Do Terminal Móvel
Preparar o terminal móvel Alterar o idioma do terminal móvel Pode visualizar os textos do display em vários idiomas. Aceder ao menu. ì [______________________________________________] Seleccionar e confirmar. [______________________________________________] Seleccionar e confirmar. O idioma actual está mar- Idioma cado com ‰ (de fábrica: inglês). Seleccionar o idioma e confirmar. -
Page 160: Utilizar O Terminal Móvel E Explicação Do Menu
Utilizar o terminal móvel e explicação do menu Utilizar o terminal móvel e explicação do menu Teclas Tecla de Navegação A tecla de Navegação tem quatro setas de direcção e os respectivos símbolos. Consoante a marca que premir acede a uma função específica. Nas instruções de funcionamento, o lado que deve premir está... -
Page 161: Menu Gráfico Principal
Utilizar o terminal móvel e explicação do menu Exemplo: • §§§§§§§SMS§§§§§§ Teclas de Display Os diferentes símbolos têm o seguinte significado quando se prime as teclas de Display: Þ Repetição da marcação: aceder à lista das 10 últimas chamadas. OK: Confirmar a função de menu ou gravar o registo através de confirmação. à... -
Page 162: Eventos
Eventos Eventos Programar a data e a hora A programação da data e da hora é importante para que as chamadas possam ser cor- rectamente indicadas quando se recebem as chamadas. ç v; s ; ~ (inserir dia/mês/ano); Data/Hora s (na linha seguinte) ~ (inserir hora/min); s (caso necessário na linha seguinte) r (seleccionar o modo de apresentação de 12 , a (volta ao estado de repouso). -
Page 163: Estabelecer Chamadas
Estabelecer chamadas Com o modo de apresentação de 12 horas configurado pode, na linha Hora: com a tecla de Display comutar entre am e pm. am/pm Para saber como programar o volume e a melodia, ver pág. 20. Desligar a sinalização do Evento Se lhe for sinalizado um evento, pode desligá-lo com N/Tocar Indicar e apagar eventos, aniversários perdidos... -
Page 164: Atender Uma Chamada
Utilizar a lista telefónica e outras listas Atender uma chamada O seu terminal móvel toca, a chamada aparece indicada no display e a tecla Mãos- livres d pisca. Premir a tecla Desligar c ou tecla de Display ou tecla Mãos- Atender livres d). - Page 165 Utilizar a lista telefónica e outras listas O funcionamento da lista de números rápidos é, excepto a gravação de registos, idêntico ao funcionamento da lista telefónica. Quando insere nomes é apoiado pela ajuda na escrita de texto EATONI (pág. 25, ◆...
-
Page 166: Gerir Os Registos Na Lista Telefónica E Na Lista De Números Rápidos
Utilizar a lista telefónica e outras listas Marcar com a lista telefónica/lista de números rápidos s ou C (aceder à lista telefónica/lista de números rápidos); s (seleccionar o registo); Gerir os registos na lista telefónica e na lista de números rápidos Para utilizar uma das seguintes funções do menu, só... -
Page 167: Associar Um Número Rápido A Um Número De Telefone
Utilizar a lista telefónica e outras listas Associar um número rápido a um número de telefone Com esta função, um número rápido, que esteja gravado na lista de números rápidos, pode ser colocado antes do número de telefone. à (aceder à lista de números rápidos); (seleccionar o registo);... -
Page 168: Indicar O Espaço De Memória Livre
Utilizar vários terminais móveis Gravar novo endereço de e-mail Passo 1: Aceder à lista de e-mail: s (aceder à lista telefónica) s Lista de e-mail Passo 2: Inserir o endereço de e-mail: à inserir o endereço); (aceder ao menu); Novo Registo (caso necessário s ou seleccionar a função de ajuda na escrita de texto ".", "@"... -
Page 169: Babyphone
Utilizar vários terminais móveis Babyphone Com este terminal móvel é possível monitorizar ruídos numa sala a partir de outro local. A distância do terminal móvel em relação ao objecto a supervisionar deverá ser de1 a 2 metros. Assim que o nível definido, para a sensibilidade de ruído do terminal móvel, for ultrapassado (por exemplo, pelo choro de uma criança), o terminal marcará... -
Page 170: Walky-Talky
Utilizar vários terminais móveis Desligar a função Babyphone Pode desligar a função Babyphone a partir de um telefone externo (por ex., um telemó- vel). Após atender a chamada iniciada pela função, poderá desligar o Babyphone pre- mindo as teclas O R. Cerca de 90 segundos depois de terminada a ligação a função fica desligada e não será... -
Page 171: Configurar O Terminal Móvel
Configurar o terminal móvel Utilizar o terminal móvel no modo Walky-Talky como Babyphone à (aceder ao menu); s ; s (na linha seguinte); r (seleccionar Babyphone LIG); s (na linha seguinte); r (seleccionar Baixa ou Alta); Gravar A chamada do Babyphone só vai para os terminais móveis que estão no modo Walky- Talky. -
Page 172: Configurar Modo De Iluminação Nocturno
Configurar o terminal móvel Configurar modo de iluminação nocturno Pode configurar o seu terminal móvel de forma a que o display não fique iluminado enquanto o terminal móvel se encontra na base/carregador (modo de iluminação nocturno activado). ì v (Aceder ao menu); s ;... -
Page 173: Activar/Desactivar Os Sinais De Aviso
Configurar o terminal móvel Activar/desactivar o sinal de chamar Quando se recebem chamadas externas tocam todos os terminais móveis. Desligar o sinal de chamar: Premir sem soltar a tecla Asterisco P. No display aparece o símbolo Ú. Ligar o sinal de chamar: Premir sem soltar a tecla Asterisco P. Para desactivar o sinal de chamar da chamada actual, prima a tecla de Display N/Tocar... -
Page 174: Anexo
No caso de ser necessário reparar os equipamentos, que estejam dentro da garantia, poderá obter ajuda rápida e credível em: Serviço de Apoio a Clientes Telefone: 21 417 85 85 E-mail: customer.care@siemens.com Por favor, conserve disponível o recibo da compra. -
Page 175: Dados Técnicos
CE. Extracto da declaração original: "We, Siemens AG, declare, that the above mentioned product is manufactured according to our Full Quality Assurance System certified by CETECOM ICT Services GmbH in compliance with ANNEX V of the R&TTE-Directive 99/5/EC. The presumption of conformity with the essential requirements regarding Council Directive 99/5/EC is ensured"... -
Page 176: Tabela De Caracteres
Anexo Tabela de caracteres Escrita padrão Premir várias vezes, ou premir sem soltar, a tecla correspondente: 4 x 5 x 8 x 9 x 10 x 11 x 12 x 13 x 14 x â £ ¥ ¤ Carácter vazio ä... -
Page 177: Ajuda Na Escrita De Texto
Anexo Ajuda na escrita de texto A ajuda na escrita de texto EATONI ajuda-o a escrever nomes (lista telefónica, lista de números rápidos ou lista de e-mail). A cada tecla entre Q e O são atribuídas várias letras e símbolos, todos ordenados numa linha de selecção directamente acima das teclas de Display (por baixo do campo de entrada), logo que prima uma tecla. -
Page 178: Garantia
Fica ao critério da Siemens reparar ou substituir o equipamento. Para as peças sujei- tas a desgaste (por ex. teclados, baterias, caixas), esta garantia tem validade de seis meses a partir da data da compra. - Page 179 Índice remissivo Índice remissivo Aceder Dados técnicos ....23 Lista telefónica ....8 Desactivar Aceder a protecção do teclado .
- Page 180 Índice remissivo Indicação do estado das baterias ..5 Indicações de segurança... . .4 Número (ver número de Inserir telefone/registo) ..13 aniversário .
- Page 181 Índice remissivo Terminar a chamada ....11 sinal de erro ....21 Toque do sinal (ver sinais de aviso) .
- Page 183 Overzicht van de handset Overzicht van de handset Ontvangstniveau Display Ð 100 % i 75 % Batterij-indicatie Ñ 50 % Ò minder ontv. × leeg Ú vol | geen ontv. (knippert) × knippert: batterij bijna leeg of wordt opge- Verbindingstoets laden Gesprek beantwoorden ◆...
- Page 184 Inhoudsopgave Inhoudsopgave Overzicht van de handset ..... 1 Veiligheidsvoorschriften ..... . 4 Telefoon in gebruik nemen .
- Page 185 Inhoudsopgave Handset instellen ......19 Automatisch opnemen uit-/inschakelen ........19 Kleurenschema en contrast instellen .
-
Page 186: Veiligheidsvoorschriften
Veiligheidsvoorschriften Veiligheidsvoorschriften Gebruik alleen de meegeleverde netvoedingsadapter zoals aangegeven op de achterzijde van het toestel. Plaats uitsluitend de aanbevolen, oplaadbare batterijen (pagina 23) van hetzelfde type! D. w. z. geen andere batterijtypen of niet-oplaadbare batte- rijen, omdat deze de gezondheid kunnen bedreigen of persoonlijk letsel kun- nen veroorzaken. -
Page 187: Telefoon In Gebruik Nemen
Telefoon in gebruik nemen Telefoon in gebruik nemen De verpakking bevat: een handset Gigaset S1 colour, een oplader, een riemclip voor de handset, twee batte- rijen, een netvoedingsadapter met voedingskabel en een gebruiksaanwijzing. Handset in gebruik nemen Het display is afgedekt met folie. De beschermfolie verwijderen a.u.b.! Batterijen plaatsen Batterijen met de polen in de juiste stand plaatsen –... -
Page 188: Handmatige Aanmelding
Handmatige aanmelding Als de automatische aanmelding moet worden onderbroken of wanneer u uw handset Gigaset S1 colour op een ander Gigaset-basisstation (1000-, 2000-, 3000-of 4000- familie) wilt gebruiken, kunt u deze handmatig aanmelden. De aanmelding dient zowel op de handset als op het basisstation plaats te vinden. -
Page 189: Displaytaal Wijzigen
Telefoon in gebruik nemen Displaytaal wijzigen U kunt de displaytekst in verschillende talen laten weergeven. Menu openen. ì [______________________________________________] Selecteren en bevestigen. Selecteren en bevestigen. De huidige taal is met ‰ [______________________________________________] Taal gemarkeerd (bij levering: Nederlands). Taal selecteren en bevestigen. Lang indrukken (terug naar de ruststand). -
Page 190: Bedienen Van De Telefoon En Menu-Structuur
Bedienen van de telefoon en menu-structuur Bedienen van de telefoon en menu-structuur Toetsen Navigatietoets De navigatietoets is van vier rode richtingspijlen en bijbehorende symbolen voorzien. Afhankelijk van de markering waarop u drukt, wordt een bepaalde functie opgeroepen. In de gebruiksaanwijzing is de betreffende toetszijde waarop u moet drukken zwart gemarkeerd, bijv. -
Page 191: Grafisch Hoofdmenu
Bedienen van de telefoon en menu-structuur Voorbeeld: • §§§§§§§SMS§§§§§§ Displaytoetsen De verschillende symbolen hebben bij toetsbediening de volgende betekenis: Þ Nummerherhalingstoets: de lijst van de laatste 10 telefoonnummers openen. OK-toets: menufunctie bevestigen of invoer door bevestiging opslaan. à Menutoets: in ruststand het hoofdmenu openen. Tijdens het telefoneren een contextgevoelig menu openen. -
Page 192: Tijdfuncties
Tijdfuncties Tijdfuncties Datum en tijd instellen De datum- en tijdsinstelling is nodig om correct te kunnen aangeven wanneer oproepen zijn binnengekomen. ç v; s ; ~ (dag/maand/jaar invoeren); Datum/tijd s (op de volgende regel) ~ (uren/min. invoeren); s (evt. op de volgende regel) r (12- of 24-uurs weergave kiezen); Opslaan a (terug naar de ruststand). -
Page 193: Telefoneren
Telefoneren Een ingestelde afspraak wordt met het symbool ¼ weergegeven. Het afspraaksignaal wordt alleen afgegeven als de handset op standby staat; niet als de ruimtebewaking of walkie-talkie is ingeschakeld, u in gesprek bent of tijdens de num- merherhaling. Bij ingestelde 12-uurs weergave kunt u op de regel Tijd: met de displaytoets tus- 12u/24u sen am en pm kiezen. -
Page 194: Oproep Aannemen
Telefoonboek en overige lijsten gebruiken Oproep aannemen Uw handset gaat over, de oproep wordt op het display getoond en de handsfree- toets d knippert. c (Verbindingstoets) indrukken (of displaytoets of hands- Opnemen free-toets d). Is de functie Auto aannemen ingeschakeld (pagina 19), dan hoeft u alleen maar de handset uit de oplader te halen om de oproep aan te nemen. - Page 195 Telefoonboek en overige lijsten gebruiken De bediening van de snelkieslijst is identiek aan de bediening van het telefoon- boek. Bij de invoer van namen ondersteunt de functie SnelSchrijven ◆ (EATONI) u (pagina 24, standaard uitgeschakeld). Hoe u de tekst correct invoert, ontleent u aan de Tekensettabel ◆...
-
Page 196: Vermeldingen Telefoonboek Resp. Snelkieslijst Beheren
Afzonderlijke vermelding of complete lijst naar een handset versturen U kunt afzonderlijke vermeldingen of de complete lijst aan een andere, op hetzelfde basisstation aangemelde Gigaset S1-, S1 colour-, C2-handset of Comfort-handset van de serie Gigaset 4000, 3000 en 2000 overdragen. De instellingen VIP en snelkiescijfers worden niet overgedragen. -
Page 197: Koppelen Van Een Voorkiesnummer (Lcr) Aan Een Telefoonnummer
Telefoonboek en overige lijsten gebruiken Koppelen van een voorkiesnummer (LCR) aan een telefoonnummer Met deze functie kunt u een voorkiesnummer van een netwerkaanbieder dat in de snel- kieslijst is opgeslagen, voor het telefoonnummer plaatsen ("koppelen"). à (Snelkieslijst openen); (Vermelding selecteren); (Menu openen);... -
Page 198: Vrije Geheugenruimte Weergeven
Meerdere handsets gebruiken Nieuw e-mailadres opslaan Stap 1: E-maillijst openen: (Telefoonboek openen) s Emaillijst Stap 2: E-mailvermelding aanmaken: à Adres invoeren); (Menu openen); Nieuwe invoer evt. ".", "@" of SnelSchrijven selecteren ). Bij ingeschakelde functie SnelSchrijven 1x lang en 1x kort indrukken. Stap 3: E-mailvermelding opslaan: à... -
Page 199: Handset Voor Ruimtebewaking Gebruiken
Meerdere handsets gebruiken Handset voor ruimtebewaking gebruiken Met deze functie wordt een eerder opgeslagen intern of extern telefoonnummer gebeld zodra het ingestelde geluidsniveau in de desbetreffende ruimte bereikt wordt. Wanneer u de oproep beantwoordt, hoort u het geluid in de ruimte waar het toestel staat. -
Page 200: Handsets Als Walkie-Talkie Gebruiken
Meerdere handsets gebruiken Ruimtebewaking deactiveren U kunt de ruimtebewaking van extern uitschakelen. Beantwoord de oproep van de ruimtebewaking en druk op de toetsenO R in. Circa 90 seconden na het verbreken van de verbinding is de functie uitgeschakeld. U ontvangt geen nieuwe oproepen meer van de ruimtebewaking. -
Page 201: Handset Instellen
Handset instellen Handset in walkie-talkie-modus gebruiken voor ruimtebewaking à (Menu openen); s ; r (Aan kiezen); Ruimtebewaking s (op de volgende regel); r (Laag of Hoog kiezen); Opslaan De ruimtebewakingoproep gaat alleen naar handsets die zich in de walkie-talkie-modus bevinden. Controleer voordat u weggaat de instellingen van de handset, bijvoorbeeld de gevoeligheid en het tot stand komen van de verbinding. -
Page 202: Handsetvolume Wijzigen
Handset instellen Handsetvolume wijzigen U kunt het volume voor het handsfree telefoneren op vijf niveau’s, het handsetvolume op drie niveaus instellen – ook tijdens een extern gesprek. ê v (Menu openen); s ; r (Volume handsfree telefoneren Luidsprekers selecteren); s (op de volgende regel) r (handsetvolume selecteren); Opslaan a lang indrukken (terug naar de ruststand). - Page 203 Handset instellen Attentiegeluid in-/uitschakelen Bij het uitschakelen van het belsignaal kunt u een attentiegeluid inschakelen. Bij een oproep klinkt dan een kort geluid ("beep") in plaats van het belsignaal. Oproeptoets P lang indrukken en binnen 3 sec. de displaytoets indrukken. Op Beep het display staat º.
-
Page 204: Bijlage
R&TTE-richtlijn is door de CE-markering bevestigd. Uittreksel van de originele verklaring: "We, Siemens AG, declare, that the above mentioned product is manufactured according to our Full Quality Assurance System certified by CETECOM ICT Services GmbH with the registration num- ber "Q810820M"... -
Page 205: Technische Gegevens
Bijlage Technische gegevens Aanbevolen batterijen: Nikkel-Metaal-Hydride (NiMH) Sanyo Twicell 700; Sanyo Twicell 650; Panasonic 700 mAh; GP 700 mAh; YDT AAA SUPER 700; VARTA PhonePower AAA 700 mAh; GP 850 mAh; Sanyo Ni-MH 800; Yuasa Delta AAA 800. Gebruiksduur/oplaadduur van de handset Capaciteit Standby-tijd (uren) Gesprekstijd Laadduur... -
Page 206: Snelschrijven
Bijlage Als u een toets lang indrukt, worden de tekens van de betreffende toets op de ◆ onderste displayregel getoond en na elkaar gemarkeerd. Wanneer u de toets los- laat, wordt het gemarkeerde teken aan het invoerveld toegevoegd. – De instelling van hoofdletters, kleine letters of cijfers wordt op het display getoond: –... -
Page 207: Garantie Nederland
Bijlage Garantie Nederland Siemens verleent de consument een garantie van 24 maanden voor dit toestel, te reke- nen vanaf de datum van aankoop. Als bewijs hiervoor geldt de aankoopfactuur. Binnen de garantietermijn zal Siemens alle gebreken die het gevolg zijn van materiaal- en/of productiefouten kosteloos repareren of het defecte toestel vervangen. -
Page 208: Garantiecertificaat België
De duur van de garantie wordt niet verlengd voor diensten die in het kader van de ◆ garantie tijdens de duur van de garantie worden verleend. Voor zover het niet om een garantiegeval gaat, behoudt Siemens zich het recht voor, ◆ de klant voor het vervangen of repareren kosten in rekening te brengen. - Page 209 Trefwoordenregister Trefwoordenregister Gebruik (telefoon in gebruik nemen) Gebruiksduur Afbreken (procedure) ... . . in de walkie-talkie-modus ..Afspraak ..... . ruimtebewaking .
- Page 210 Trefwoordenregister displaytaal ....Ontvangstniveau ....handsetvolume .
- Page 211 Trefwoordenregister displaytoetsen ....drukken op toets (bevestiging) ..escape/menu/wissen/OK ..navigatietoets ....nummerherhalingstoets .
- Page 212 You can get assistance easily when you have technical questions or questions about how to use your device by using our online support service on the Internet at: www.my-siemens.com/customercare. Abu Dhabi....0 26 42 38 00 Luxembourg .
Need help?
Do you have a question about the gigaset S1 and is the answer not in the manual?
Questions and answers