Table of Contents
Advertisement
Quick Links
Advertisement
Table of Contents

Related Manuals for Blackberry ITA100-1


Summary of Contents for Blackberry ITA100-1
- Page 1 RADAR ITA100 – 1 CHASSIS BRACKET January 2017...
-
Page 2: Table Of Contents
BLACKBERRY RADAR ITA100-1 CHASSIS BRACKET INSTALLATION GUIDE Table of Contents 1 Overview ....................3 2 Get ready for installation ................ 4 2.1 Prerequisites ....................4 2.2 Add available assets to the application ............4 2.3 Download installation worksheet ..............8 3 Installing BlackBerry Radar Modules ............. -
Page 3: Overview
• Track the asset on the Dashboard map For instructions on how to configure the BlackBerry Radar Dashboard or how to modify your configurations, see the BlackBerry Radar Dashboard Admin Guide at docs.radar.blackberry.com. For instructions on how to use the BlackBerry Radar Dashboard to view data, see the BlackBerry Radar Dashboard User’s Guide at... -
Page 4: Get Ready For Installation
To perform the tasks in this section, you must Have a computer with internet access • Have an account to the BlackBerry Radar Dashboard with admin privilege • 2.2 Add available assets to the application You can add all the assets you need to track by uploading a CSV file that contains the information about the assets. - Page 5 4. Click Sign In. A permission request page opens, requesting access to your profile and other information. 5. On the permission request page, under Do you approve?, click Allow access. The image below shows an example of the BlackBerry Radar Dashboard UI.
- Page 6 BLACKBERRY RADAR ITA100-1 CHASSIS BRACKET INSTALLATION GUIDE 2.2.3 Upload the CSV file Click the BlackBerry button to display the Dashboard main menu. 2. Click Assets to open the Assets view. 3. Click CSV. 4. In the Upload CSV File of Assets view, change the delimiter to match the delimiter used in your CSV file, if needed.
- Page 7 BLACKBERRY RADAR ITA100-1 CHASSIS BRACKET INSTALLATION GUIDE 7 7. In the Configure Columns area, Data Field lists the data fields required for adding assets, and CSV Field Header allows you to select the headers used in the CSV file that match the data fields. In each dropdown list under CSV Field Header, select the header name that matches the data field on the left.
-
Page 8: Download Installation Worksheet
BLACKBERRY RADAR ITA100-1 CHASSIS BRACKET INSTALLATION GUIDE 9. Click Done to go back to the Assets view. 2.3 Download installation worksheet The installation worksheet lists all the assets in the application that are not yet associated with any module. If you have just added your assets to the application following Section 2.2, those assets will appear on the installation worksheet. - Page 9 BLACKBERRY RADAR ITA100-1 CHASSIS BRACKET INSTALLATION GUIDE 9 2. Click Worksheet. 3. Click PDF Worksheet to get the worksheet in PDF format or click CSV Worksheet to get the worksheet in CSV format. 4. Click Close. 5. Open the downloaded worksheet and print it.
-
Page 10: Installing Blackberry Radar Modules
Device Package Contents External module Internal module Two screws--M6 x 65 Chassis Bracket Package Contents Chassis bracket Chassis bracket drill template If you are missing any of the above components in your package, contact your BlackBerry Sales Representative. -
Page 11: Installation Tools
BLACKBERRY RADAR ITA100-1 CHASSIS BRACKET INSTALLATION GUIDE 11 To attach the bracket to the equipment you wish to track, you will need to supply four fasteners. Depending on the construction of your mounting location, you may wish to use the following types of fasteners. Please Note: Your choice of fastener will influence the size of the tools required to create the mounting holes (drill bits) and install or remove the fasteners (i.e. -
Page 12: Matching A Module Identifier To An Asset Identifier
In order to track an asset (trailer/container), the Radar module that is installed on the asset must be associated with the asset in the BlackBerry Radar Dashboard. It is, therefore, very important to keep a clear record of which Radar module is installed on which asset. - Page 13 BLACKBERRY RADAR ITA100-1 CHASSIS BRACKET INSTALLATION GUIDE 13 3. Once you are ready to install the assembly to the asset, be sure to bring your installation worksheet. Remove the partially attached label from the outer surface of the external module and place it on your worksheet, next to the asset identifier the...
-
Page 14: Module Installation
BLACKBERRY RADAR ITA100-1 CHASSIS BRACKET INSTALLATION GUIDE 3.4 Module installation You may install the chassis bracket assembly on any flat, vertical surface that offers enough mounting area for the assembly. When selecting a mounting location, carefully consider how the asset will be used during its normal, day-to-day operation. - Page 15 BLACKBERRY RADAR ITA100-1 CHASSIS BRACKET INSTALLATION GUIDE 15 1. Remove the device from the package. Remove the cardboard spacers and place them in the device box. 2. Separate the internal module from the external module. To completely separate the two modules, you will need to guide the cable connector through the hole on the rear of the internal module.
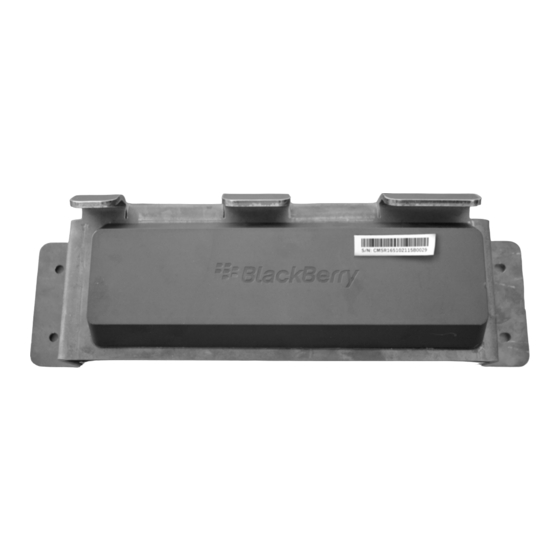
- Page 16 6. Guide the cable connector and the cable through the middle hole of the chassis bracket. Insert the screw bosses into the remaining two holes. Confirm the top of the BlackBerry logo on the external module is facing the overhang at the top of the bracket. The logo should appear as shown.
- Page 17 BLACKBERRY RADAR ITA100-1 CHASSIS BRACKET INSTALLATION GUIDE 17 7. Apply firm pressure to the external module for 30-45 seconds to ensure it adheres to the bracket. The adhesive will hold the external module in place while you complete the installation and help seal the device against water ingress.
- Page 18 BLACKBERRY RADAR ITA100-1 CHASSIS BRACKET INSTALLATION GUIDE 9. Place the screws into the screw bosses. Use the screws to fasten the modules to the bracket. Tip: For faster screw installation, you may install a T-30 Torx bit on a cordless drill.
- Page 19 BLACKBERRY RADAR ITA100-1 CHASSIS BRACKET INSTALLATION GUIDE 19 11. After completing the cable connection, the LED will blink for approximately ten seconds. This blinking LED indicates the device is powered on. Please note: it can take 20-30 seconds after the cables are connected for the LED to start blinking.
- Page 20 BLACKBERRY RADAR ITA100-1 CHASSIS BRACKET INSTALLATION GUIDE 13. Install the lid onto the internal module. Ensure lid is completely attached to the device and all snaps have been completely engaged. The following pictures show the difference between a properly installed lid, where all snaps are engaged, and an improperly installed lid.
- Page 21 BLACKBERRY RADAR ITA100-1 CHASSIS BRACKET INSTALLATION GUIDE 21 2. While holding the cable in place, begin to attach the lid to the device. Starting from the left side and working across the device to the right, snap the lid into place.
- Page 22 BLACKBERRY RADAR ITA100-1 CHASSIS BRACKET INSTALLATION GUIDE 3.4.1 Mounting the Chassis Bracket Assembly to the Asset 15. Once you have reached the asset on which you will install the device, transfer the module identifier label from the external module and place on your installation worksheet.
- Page 23 BLACKBERRY RADAR ITA100-1 CHASSIS BRACKET INSTALLATION GUIDE 23 17. Place the template in the desired mounting location. Using a drill bit, drill a hole through each cross hair indicator on the template. Note: To shorten drilling time and prolong the life of your drill bit, you may wish to use cutting tool lubricant during the drilling process.
- Page 24 BLACKBERRY RADAR ITA100-1 CHASSIS BRACKET INSTALLATION GUIDE 19. Place the chassis bracket assembly on the mounting surface, aligning the holes on the bracket with the hole on the asset. Place the washer on the fastener, then insert the fastener into the hole on the bracket and the hole in the asset. Use the fasteners to attach the chassis bracket assembly to the asset.
-
Page 25: Activating Blackberry Radar Modules
The BlackBerry Radar modules, when activated, send data to the BlackBerry Radar Dashboard application, and the application allows users to monitor asset activities on its website. The success of this communication requires two things: The BlackBerry Radar modules must be installed and powered on. See instructions in • Section 3. -
Page 26: Verify Presence Of Assets
Click Sign In. A permission request page opens, requesting access to your profile and other information. e. On the permission request page, under Do you approve?, click Allow access. The image below shows an example of the BlackBerry Radar Dashboard user interface. 2. Click the BlackBerry button... - Page 27 BLACKBERRY RADAR ITA100-1 CHASSIS BRACKET INSTALLATION GUIDE 27 3. Click Assets to open the Assets list.
- Page 28 BLACKBERRY RADAR ITA100-1 CHASSIS BRACKET INSTALLATION GUIDE 4. Make sure that all the assets that you need to pair with the modules are on the list. Check Only show unassociated assets to get a list of assets not yet associated with any modules.
-
Page 29: Verify Presence Of Modules
BLACKBERRY RADAR ITA100-1 CHASSIS BRACKET INSTALLATION GUIDE 29 4.3 Verify presence of modules 1. From the main menu, click Modules to open the Modules list. 6. Check Only show unassociated modules to display a shorter list. 7. Make sure all the modules that you need to pair with assets are on the list. -
Page 30: Pair An Asset With A Module
BLACKBERRY RADAR ITA100-1 CHASSIS BRACKET INSTALLATION GUIDE 4.4 Pair an asset with a module 1. In the main menu, click Assets to open the Assets view. 2. Search for or select the asset in the Assets view. 9. Open the Association tab. Verify that Current Association is “None.”... -
Page 31: Locate The Asset On The Map
If you did not see this, remove the module, check the connections, and try again. If the problem persists, contact the BlackBerry Radar support team with the module’s serial number. Check network connectivity of the module once it has been associated with an asset •... - Page 32 If it has not cleared the GPS error, contact the BlackBerry Radar support team with the module’s serial number. If you are still unable to locate the asset, contact the BlackBerry Radar support team at 1-844-RADAR-BB, or visit blackberry.com/support.
-
Page 33: Removing Blackberry Radar Modules
Use this procedure if you need to remove your Radar device and chassis bracket for servicing or recycling. For more information on obtaining service for your devices, or recycling and safe disposal of your devices, please contact your BlackBerry representative, or visit the following websites: blackberry.com/support--for information on service. -
Page 34: Module Removal
BLACKBERRY RADAR ITA100-1 CHASSIS BRACKET INSTALLATION GUIDE 5.2 Module removal 1. Remove the chassis bracket assembly from the asset by removing the four fasteners from the corners of the bracket. 2. Position the chassis bracket assembly with the internal module facing up. Remove the lid by inserting a large, flat head screwdriver into to the recesses on the side of the internal module, and applying upward pressure. - Page 35 BLACKBERRY RADAR ITA100-1 CHASSIS BRACKET INSTALLATION GUIDE 35 3. Remove the cable from the cable retaining features and remove the cables from the cable connector recess. 4. Disconnect the cables. Position the connectors so the indicator marks are facing you. This will assist •...
- Page 36 BLACKBERRY RADAR ITA100-1 CHASSIS BRACKET INSTALLATION GUIDE 5. Remove the screws from the device. Tip: For faster screw removal, you may use a T-30 Torx bit on a cordless drill. 6. Remove the internal module from the bracket. Guide the device along the cable and the connector through the hole on the internal module.
- Page 37 BLACKBERRY RADAR ITA100-1 CHASSIS BRACKET INSTALLATION GUIDE 37 Tip: A wide flat blade, made from durable material (e.g., a metal putty knife) works well for this purpose. IMPORTANT: Do not attempt to separate the device from the bracket using a heat gun. This can damage the device.
-
Page 38: Support
BLACKBERRY RADAR ITA100-1 CHASSIS BRACKET INSTALLATION GUIDE 6 Support If you run into any problem during the installation process, contact the BlackBerry Radar support team at 1-844-RADAR-BB. -
Page 39: Legal Notice
The terms of use of this documentation and any BlackBerry product or service are set out in a separate license or other agreement with BlackBerry applicable thereto. Certain features...
Need help?
Do you have a question about the ITA100-1 and is the answer not in the manual?
Questions and answers