Table of Contents
Advertisement
Quick Links
Advertisement
Table of Contents

Related Manuals for Hisense RL170D4BC2


Summary of Contents for Hisense RL170D4BC2
- Page 1 RL170D4BC2...
-
Page 2: Table Of Contents
Cleaning and care......12 Safety and warning information..2 What to do if........13 Description of the appliance ....7 Reversing the door......14 Control panel........7 First use an installation.....8 Installing the door handle....15 Daily use...........10 Disposal of the appliance....16 Helpful hints and tips......11 This appliance is in accordance with the following EU guidelines: 2014/35/EU and 2014/30/EU and 2009/125/EC and EC.643/2009 and 2002/96/EC For your safety and correct... - Page 3 from children as there is risk environments; -catering and similar non- of suffocation. retail applications If you are discarding the WARNING — Do not store appliance, pull the plug out of explosive substances such the socket, cut the as aerosol cans with a connection cable (as close to flammable propellant in the appliance as you can)
- Page 4 blowing gas are fire, and/or electric shock. flammable. When Electrical safety disposing of the appliance, do so only at an authorized The power cord must not waste disposal centre. Do not expose to flame. be lengthened. 2. Make sure that the power Refrigerant plug is not crushed...
- Page 5 socket instead of common Frozen food can cause one with other electric frost burns if consumed straight from the freezer appliances. Its plug must compartment. match the socket with ground Do not place the appliance wire. in direct sunlight. Daily use Keep buring candles,lamps and other items with naked Do not store flammable...
- Page 6 caution! sufficient ventilation, follow Care and cleaning the instructions relevant to Before maintenance, switch installation. off the appliance and Wherever possible the back disconnect the mains plug of the product should not be from the mains socket. too close to a wall to avoid Do not clean the appliance touching or catching warm with metal objects, steam...
-
Page 7: Description Of The Appliance
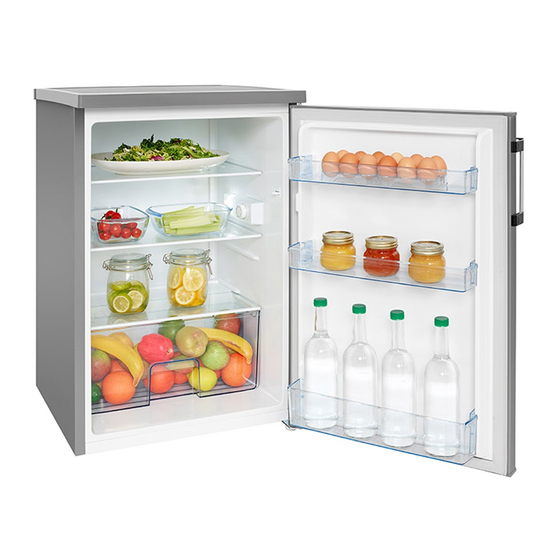
Description of the appliance View of the appliance 1. decorative board(some models have) 2. Storage shelf 3. Bulb & temperature regulator 4. Crisper cover 5. Crisper 6. Adjustable feet 7. Egg tray 8. Door handle(some models have) 9. Upper door rack 10. -
Page 8: First Use An Installation
First use an installation Cleaning before use Before using the appliance for the first time, wash the interior and all internal accessories with lukewarm water and meutral soap in order to remove the typical smell of a brand new product, then dry thoroughly. - Page 9 First use an installation Leveling 2.Put screw into the hole of rubber supporting pad. scr ew The appliance should be level in order to eliminate vibration. To make the appliance level, it should be upright and both adjusters should be in stable contact with the floor.
-
Page 10: Daily Use
Daily use Installation door rack Accessories First, install the left of the door rack. Movable shelves/trays Second, inward-press the other side and Various glass, plastic storage shelves or downward-press this side until installation wire trays are included with your appliance different models have different combinations and different models have different features. -
Page 11: Helpful Hints And Tips
Helpful hints and tips Noises during operation Hints for fresh food refrigeration Clicks - Whenever the compressor Do not store warm foods or evaporating switches on of off, a click can be heard. liquids in the appliance. Humming - As soon as the compressor is Do cover or wrap the food, particularly if in operation, you can hear it humming. -
Page 12: Cleaning And Care
Cleaning and care Cleaning and care Accumulation of dust at the condenser increases energy consumption; clean the For hygienic reasons, the appliance interior, condenser at the back of the appliance including interior accessories, should be once a year with a soft brush or a vacuum cleaned regularly. -
Page 13: What To Do If
What to do if... performed by competent service engineers. Warning! Before troubleshooting, Improper repairs can give rise to significant disconnect the power supply. Only a hazards for the user. If your appliance qualified electrician or other needs repairing, please contact your personnel must carry out the specialist dealer or your local Customer troubleshooting that is not in the manual. -
Page 14: Reversing The Door
Reversing the door The side in which the door opens can be 3.Lift the door and place it on a padded changed from the right side (as supplied) to surface to prevent scratching. Remove both the left side, if the installation site allows for adjustable feet and remove the bottom hinge it. -
Page 15: Installing The Door Handle
Installing the door handle If there is door handle separately provided in a plastic bag with your appliance, you can install it as follows . 1. Remove the screw on the door.Keep or 2. Match the handle hole to the door , then install the screw covers on the side which fix the screw which you removed from the have hinge. -
Page 16: Disposal Of The Appliance
Disposal of the appliance It is prohibited to dispose of this appliance in domestic household waste. Packaging materials Packaging materials with the recycle symbol are recyclable. Dispose of the packaging in a suitable waste collection container to recycle it. Before disposal of the appliance. 1.
Need help?
Do you have a question about the RL170D4BC2 and is the answer not in the manual?
Questions and answers