Table of Contents

Subscribe to Our Youtube Channel
Related Manuals for Eckman EKECS21


Summary of Contents for Eckman EKECS21
- Page 1 MULTI-FUNCTION ELECTRIC CHAINSAW MODEL EKECS21 INSTRUCTION MANUAL PLEASE READ AND SAVE THESE INSTRUCTIONS FOR FURTHER REFERENCE! ANY QUESTIONS OR PROBLEMS?-Call the ECKMAN Helpline on: 0844 441 3011 or go to www.ECKMAN.co.uk.
-
Page 2: Table Of Contents
Contents Symbol explanation........................2 General power tool safety warnings ..................3-4 Chainsaw safety warnings:.....................4-5 Specification..........................5 Specified Conditions Of Use.....................6 Parts description........................6-7 Assembly............................8-12 Checking the chain oil....................12 Checking the automatic oil function................12-13 Connection.............................13 Operation............................13-16 Chain Brake...........................16 Releasing Chain Brake.......................17 Chain Sharpening........................17 Maintenance and servicing......................17-18 Guarantee……………………………………………………………………………………………....18 EC Declaration of conformity....................19 Explode picture and Parts List....................20-22... -
Page 3: Symbol Explanation
Please read this instruction manual carefully before using the machine. Symbol explanation Read the instruction manual completely and carefully before using the power tool. This marking indicates that this product should not be disposed of with other household wastes. Follow the disposal instructions within this instruction manual. This power tool is class II double insulated. -
Page 4: General Power Tool Safety Warnings
General Power tool Safety Warnings WARNING Read all safety warnings and all instructions. Failure to follow the warnings and instructions may result in electric shock, fire and/or serious injury. Save all warnings and instructions for future reference. The term "power tool" in the warnings refers to your mains-operated (corded) chain saw . 1) Work area safety a) Keep work area clean and well lit. -
Page 5: Chainsaw Safety Warnings
4) Power tool use and care a) Do not force the power tool. Use the correct power tool for your application. The correct power tool will do the job better and safer at the rate for which it was designed. b) Do not use the power tool if the switch does not turn it on and off. -
Page 6: Specification
Read and understand the operating instructions before using the appliance. Abide by all the safety measures stated in this service manual. Act responsibly toward third parties. In case of any doubts about connection and operation please contact the Eckman customer services. - 5 -... -
Page 7: Specified Conditions Of Use
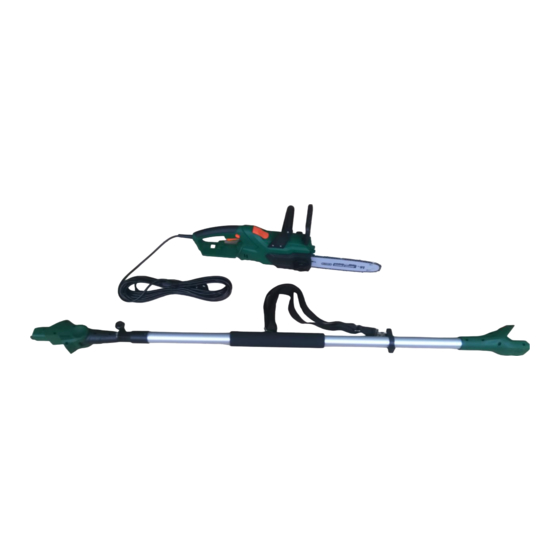
Specified Conditions Of Use Use only for purposes outlined in this instruction manual and in the manner described. Any modification by the user will invalidate this warranty. Not recommended for use by persons under the age of 18 years unless under supervision. Parts Description - 6 -... - Page 8 Fig.1 1. Handle Locking Button 2. Shoulder Strap 3. Telescopic Pole With Non-Slip Safety Grip 4. Locking knob 5. Angle Adjustment Pivot Button 6. Mechanical Brake 7. Chainsaw Front Handle 8. Chain Tension Knob 9. Bar Cover 10. Bar Tension Knob 11.
-
Page 9: Assembly
Do not discard the packing material until you have carefully inspected and satisfactorily operated the product. BEFORE ASSEMBLY Firstly unpack and check all parts have been supplied. If you think any parts are missing, first check the packaging again before calling the Eckman helpline on 0844 441 3011. WARNING: If any parts are damaged or missing, do not operate this product until the parts are replaced. - Page 10 1.Place the chain links around the drive sprocket and let the fastening bolt which is connecting on the bar cover passes through the gap of the bar. 2.Check if all parts are seated properly and hold chain and chain bar in a level position. Fit cover and adjust the chain tension knob properly, then tighten the lock knob clockwise.
- Page 11 Setting the chainsaw tension Tensioning chain for model with SDS tool-less tensioning system Loosen the lock knob by turning it anti-clockwise approximately 1-2 turns. Check whether all chain links lie correctly in the guide tracks of the bar. Press the tension ring inwards and turn it in a clockwise direction until the correct chain tension is reached. The correct tension is reached when the chain in the middle of the bar can only be raised by approximately 2-3mm.
- Page 12 Fit telescopic pole to the chain saw machine motor and secure it with the self-locking system on the machine. - USE AS A SUPER-EXTENDED LOPPING CHAINSAW Release the locking knob from the pole, extend the telescopic pole to desired length and firmly re-tighten the knob.
-
Page 13: Checking The Chain Oil
Checking the chain oil (NOTE: NEVER USE WITHOUT CHAIN OIL The chainsaw is shipped without oil in it. The chain saw must never be used without oil or with an oil level that is below the indicator. SAE #0W-30 is ideally recommended for general use. WARNING. -
Page 14: Connection
To help prevent the possibility of electric shock when using any mains-operated equipment outdoors, we highly recommend the use of an RCD (Residual Current Detector) as referred to earlier in these instructions. An RCD is available separately from Eckman or from most good DIY /Electrical retailers. Operation 1) Preparation before use a) Check if all safety equipment such as gloves ,glasses ,helmet are to hand. - Page 15 2) Instruction for cutting (WHEN BEING USED AS A POLE LOPPING CHAINSAW) a) Use both hands to grip pole saw. Use designated grip areas and strap when operating pole saw (see photo as below). Grip firmly. Thumbs and fingers must wrap around pole saw handle and pole. b) Make sure your footing is firm.
- Page 16 WARNING: When cutting free-hanging branches,the saw chain(2)and/or guide bar(1)may be pinched,or the branch may fall.Either may cause the operator to lose control over the chainsaw.If the saw chain and /or guide bar becomes pinched,stop the engine immediately,and remove the saw by lifting the branch.DO NOT try to pull the saw out,as this may lead to damage or injury.
-
Page 17: Chain Brake
Trigger lockout Trigger switch 6) ADJUSTING PIVOTING HEAD Disconnect the plug from the power supply. Place the chain saw on a flat surface. Depress the pivot button and adjust cutting head(0°-30°) until it snaps securely into place at one of the three positions indicated.(See photo as below)... -
Page 18: Releasing Chain Brake
Releasing the chain brake: To be able to use your chain saw again, you must release the saw chain again. First, switch off the chainsaw. Then push the front finger guard back into the vertical position until it locks in place . The chain brake is now fully functional again Chain sharpening It is highly recommended that once the chain loses its ability to cut cleanly and safely, either replace it,... -
Page 19: Guarantee
before making any adjustments or maintenance procedures. 1. Always keep the air holes clean on the electric chainsaw body. They tend to become clogged with sawdust during use and this affects the efficiency of cooling, causing overheating of the motor. Electric motors that become damaged due to being clogged up with debris are not covered by this warranty. -
Page 20: Ec Declaration Of Conformity
Equipment Category - (As defined in the Directive) Product Name: CHAIN SAW& POLE CHAIN SAW 2in1 Model: M1L-6ET-250(ECKMAN MODEL NO.: EKECS21) The technical documentation is kept by:Ningbo East Tools Co.,Ltd. Add: No.307,East Buzheng Rd,Wangchun Industrial Zone,Yinzhou section, Ningbo, China The conformity assessment procedure followed was in according with annex 2006/42/EC(MD),2014/35/EU(LVD),2014/30/EU(EMC) of the Directive. -
Page 21: Explode Picture And Parts List
EXPLODED VIEW - 20 -... -
Page 22: Part List
PART LIST DESCRIPTION DESCRIPTION Power Cord & Plug Locking Knob Power Cord Jacket Connecting part Screw Connecting part Power Cord fixer Screw Right handle Front handle Trigger Left Chassis Spring Bearing Capacitor Oil pump Left handle Gearbox Cover Switch worm Trigger Lockout Main shaft Spring... - Page 23 Positioning Plate Sprocket Screw Screw Saw Chain Guide Bar Scabbard Adjusting Plate Sprocket Cover Adjusting Washer Adjusting Wheel Spring Tension Wheel - 22 -...
Need help?
Do you have a question about the EKECS21 and is the answer not in the manual?
Questions and answers