Table of Contents
Advertisement
Quick Links
Advertisement
Table of Contents

Related Manuals for NUTRICHEF PiCEM62


Summary of Contents for NUTRICHEF PiCEM62
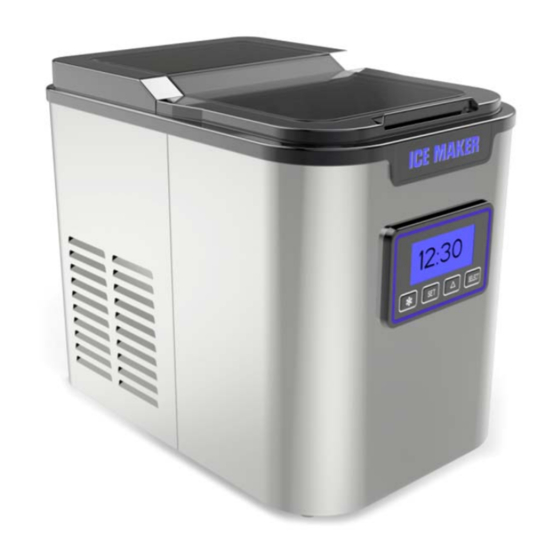
- Page 1 ICE MAKER Instruction Manual Model: PiCEM62...
- Page 2 Thank you for purchasing our product. Make sure you have read this manual before using, properly use the appliance in accordance with the instructions. Please keep this instruction manual for future reference. I. Product Features 1. Adopting compressor refrigerating technology, the ice maker process ice cubes very efficiently. 2. This Ice maker is widely used in various places, household, saloon, restaurant, etc. 3. Ice making status is watched through the transparent window. 4. Push‐button operation. LCD indicator light indicates the working status dynamically. 5. Automatically reminding for water shortage and ice cubes fullness, ice making status is always represented on the display panel ...
- Page 3 III. Safety precautions 1. Power source must be suitable for the standards of the Ice maker. If the voltage fluctuation range is big (Out of the rated voltage ± 10%), the ice maker may not work smoothly. In such conditions, please use the ice maker with a voltage regulator. 2. Hazardous articles which are explosive and flammable are prohibited to put inside the ice maker. As well as highly corrosive acid and alkali. 3. While the power cord is damaged or the plug is in fault, stop using ice Maker. Cable and plug should be replaced by professional service people. 4. Firmly pull the plug to unplug it from any connected socket; do not pull on the cable for unplugging. 5. Do not use the ice maker in a place with coal gas or other flammable gas leakage. 6. Before cleaning or maintenance e, remember to unplug the unit. 7. The Ice maker is made specifically for making ice cubes; do not use it to refrigerate food or beverages, so as to ...
- Page 4 VII. Operation Panel Buttons and Icon Functions Making Ice, Standby, Button Eliminating faults. SELECT Button Selecting Ice cube size:L, M, S ‐‐ three sizes. Power on or off time setting; power on and off time setting; three states ▲ key setting switch Clock‐time setting, power off time setting, power on and off time setting SET key switch Ice dropping fault indication, trouble‐free flashing Icon Water absence fault indication, fault‐free flashing Icon Large, medium, small size ice size instructions, the default Medium. Icon Ice full instruction. Icon Real‐time indicator icon Icon Power on time setting function indicator Icon Clock icon indicates real time(24 hour system), set real time, regular time, in hours and minutes respectively blinking, no time setting display real‐time, the Icon default time display 12:00 Ice working status indicator, flashing while ice making time, still while standby. ...
- Page 5 Real Time Setting: Press the SET button one time, hour blinking, press the ▲ button to set hour, press the SET button one time, minutes flash, press the ▲ button to set minutes. The timing for the machine start on time setting: press the SET button 3 times, hour blinking, press the ▲ minutes flash, press the ▲ button to set minutes; button to set hour, press the SET button one time, Set the machine power off time: Press the SET button 5 times, hour blinking, press the ▲ button to set hour, press the SET button one time, minutes flash, press the ▲ button to set minutes; The timer functions take on use: Press ▲ to set timer, set the cycle timer function mode: time power on→ me power off→ me off power on and off, power on default time is 8:00, power off default time is 12:00. VIII. Faults and Treatments ...
- Page 6 IX. Self‐Clean Mode The self‐clean mode should be put into operation before you use your ice maker for the first time and/or if there has been a long period without use. Three Icons as Large, Medium and small Icons will be on at the same time when the ice maker is in self‐clean mode. Stage 1 Add equal parts of water and vinegar (1:1) to the ice maker’s reservoir. With the stand‐by mode, press and hold ON/OFF button at least 5 seconds to activate the self‐clean mode. Please note that self‐clean mode will start automatically after the “Beep” sound. During the self clean mode, the upper water bucket is filled and dumped. The pump will remain in continuous operation as it feeds water to the bucket and evaporator coils. This cycle will continue five times. Upon completion, the unit automatically changes to stand‐by mode. Stage 2 Drain the cleaning solution from the internal reservoir by removing the rear drain cap and plug. Add fresh water to the MAX. permitted water volume line. While in stand‐by mode, press and hold the ON/OFF button at least 5 seconds to activate the self‐clean mode again which will now act as a rinse. ...
Need help?
Do you have a question about the PiCEM62 and is the answer not in the manual?
Questions and answers