
Related Manuals for Saeco HD8946


Summary of Contents for Saeco HD8946
-
Page 1: Operating Instructions
Register your product and get support at www.philips.com/welcome DIGITAL ID Type HD8946 SUP 038Z OPERATING INSTRUCTIONS READ THESE OPERATING INSTRUCTIONS CAREFULLY BEFORE USING THE MACHINE. -
Page 2: Important Safeguards
IMPORTANT SAFEGUARDS When using electrical appliances, basic safety precautions should always be followed, including the following: 1. Read all instructions. 2. Do not touch hot surfaces. Use handles or knobs. 3. To protect against fire, electric shock and injury to persons do not immerse cord, plugs, or appliance in water or other liquid. - Page 3 This appliance is for household use only. Any servicing, other than cleaning and user maintenance, should be performed by an authorized service center. Do not immerse machine in water. To reduce the risk of fire or electric shock, do not disassemble the machine.
- Page 4 CARAFE ASSEMBLY PROCEDURE For correct use of the carafe, refer to the instructions on page 12. The maintenance instructions for the carafe circuits are described on page 42. The disassembly and cleaning instructions for the components are described on page 47. S'ASSURER QU'ELLE EST BIEN PROPRE TANT LORS DE LA PREMIÈRE UTILISATION QU'APRÈS UN CERTAIN TEMPS D'INACTIVITÉ.
-
Page 5: Table Of Contents
GENERAL INFORMATION ............. . . 2 MACHINE COMPONENTS &... -
Page 6: General Information
GENERAL INFORMATION GENERAL INFORMATION This coffee machine is suitable for preparing espresso coffee using coffee beans and is equipped with a device to dispense steam and hot water. The machine is designed for domestic use and not suitable for heavy or professional use. Warning: No liability is held for damage caused by: IN THESE CASES, THE WARRANTY SHALL BE DEEMED NULL AND VOID. -
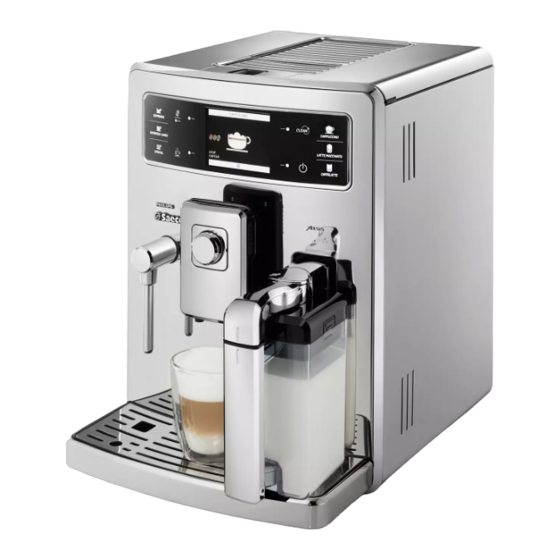
Page 7: Machine Components & Accessories Control Panel
MACHINE COMPONENTS AND ACCESSORIES CONTROL PANEL MACHINE COMPONENTS AND ACCESSORIES SBS dial Full drip tray indicator Grinder adjustment 10 Control panel 11 Milk container couplings 12 Dispensing spout CONTROL PANEL Espresso button Long espresso button 20 Milk carafe 22 Water hardness test strip 24 Descaling solution 28 Cleaning brush 29 Carafe coupling cap... -
Page 8: Installation
INSTALLATION STARTING THE MACHINE inner lid. position to turn the machine on. hopper. Replace the inner lid and close the outer lid. into the machine. machine. inner lid. Insert the plug into the socket located on the back of the machine and insert suitable current. -
Page 9: Setting The Language
SETTING THE LANGUAGE 2.2.1. LANGUAGE ITALIANO ITALIANO CH ENGLISH DEUTSCH FRANÇAIS ESPAÑOL PORTUGUÊS Select the desired language by pressing RISCALDAMENTO... RINSING STOP RINSING machine performs a rinsing cycle of the internal circuits. It is possible to interrupt button. MEASURING THE WATER HARDNESS The test strip can only be used for one measurement. -
Page 10: First Use - Use After A Period Of Inactivity
INSTALLATION FIRST USE USE AFTER A PERIOD OF INACTIVITY A few simple operations are needed to ensure the quality of your favourite beverages over time. ERT GROUND COFFEE AND SELECT OK At the end, take the container and empty it. USER MENU SELECTED... -
Page 11: Intenza Water Filter
INTENZA WATER FILTER Remove the water fi lter from its packaging, immerse it vertically (with the opening positioned upwards) in cold water and gently press its sides to let the air bubbles out. tank and store it in a dry place sheltered from dust. -
Page 12: Adjustments
ADJUSTMENTS USER SELECTION DIGITAL ID USER SELECTION Note: Refer to the "USER MENU" section in the manual (see page 22) before using this function. 17/05/09 USER BEVERAGE MENU MENU SETTINGS SELECTED MENU USER 04:17 pm 17/05/09 REMOVE FINGER CHECK IN PROGRESS... 04:17 pm 17/05/09 USER... -
Page 13: Saeco Adapting System
SAECO ADAPTING SYSTEM COFFEE GRINDER ADJUSTMENT Important Note: Adjustments to the coff ee grinder can be made only when the grinder is being used. This phase takes place during the fi rst part of a coff ee brewing. Press and turn. grinding. -
Page 14: Opti-Dose (Adjusts The Amount Of Coffee To Grind)
ADJUSTMENTS OPTIDOSE ADJUSTS THE AMOUNT OF COFFEE TO GRIND USER MENU SELECTED USER Note: This adjustment is not available when brewing an American coff ee (see "Special Products" on page 20). DISPENSING SPOUT HEIGHT ADJUSTMENT Note: In some cases the dispensing spout can be removed to allow the use of very large containers. -
Page 15: Coffee Strength (Saeco Brewing System)
COFFEE STRENGTH SBS SBS – SAECO BREWING SYSTEM STANDBY MODE Note: 1 The stand-by mode cannot be activated if the service door is left open. 2 The stand-by activation time can be changed in the "MACHINE MENU" on page 34. 3 When the stand-by mode is activated, the machine performs a rinse cycle of the internal circuits. -
Page 16: Milk Carafe Use
MILK CARAFE USE Note: Before using the carafe, make sure it is thoroughly clean and sanitary. If milk is left in the carafe, make sure it is still suitable for food consumption before using it. refrigerator. milk container connection and keep it in a clean place. - Page 17 DO NOT FORCE THE INCLINATION OF THE CARAFE. REMOVING THE CARAFE DO NOT FORCE THE INCLINATION OF THE CARAFE. pull until it releases. place.
-
Page 18: Coffee Brewing
COFFEE BREWING ESPRESSO / LONG COFFEE ESPRESSO The machine starts grinding the selected see page 28. ESPRESSO STOP COFFEE ESPRESSO STOP COFFEE... -
Page 19: Beverage Brewing With Pre-Ground Coffee
BEVERAGE BREWING WITH PREGROUND COFFEE Place 1 cup under the dispensing spout. INSERT GROUND COFFEE AND SELECT OK A message reminds the user to pour WARNING: ONLY PUT PRE-GROUND COFFEE INTO THE BYPASS DOSER WHEN YOU WISH TO BREW THIS TYPE OF PRODUCT. -
Page 20: Cappuccino / Latte Macchiato / Cafe Latte
CAPPUCCINO / LATTE MACCHIATO / CAFE LATTE PRODUCT BREWING AT THE BEGINNING OF THE DISPENSING PHASE, THE MACHINE MAY PRODUCE SOME SPURTS OF MILK AND STEAM: RISK OF SCALDING! ALWAYS WAIT FOR THE CYCLE TO END BEFORE REMOVING THE CONTAINER. REFER TO THE SECTION "MILK CARAFE USE"... -
Page 21: Cleaning Cycle
CAPPUCCIN STOP COFFEE Once milk has been dispensed, the NEVER SEIZE THE CARAFE HANDLE DURING THE CLEANING CYCLE: RISK OF SCALDING! CLEANING CYCLE Place the container as described on pages carried out independently of the presence of milk in the container. To properly insert/remove the carafe, refer to the instructions on page 12 and 13. -
Page 22: Hot Water Dispensing
HOT WATER HOT WATER DISPENSING WARNING: DISPENSING MAY BE PRECEDED BY SHORT SPURTS OF HOT WATER AND SCALDING IS POSSIBLE. THE STEAM/HOT WATER WAND MAY REACH HIGH TEMPERATURES: DO NOT TOUCH WITH BARE HANDS. USE THE APPROPRIATE HANDLE ONLY. for the dispensing of the programmed... -
Page 23: Special Beverages
SPECIAL BEVERAGES WARNING: DISPENSING MAY BE PRECEDED BY SHORT SPURTS OF HOT WATER AND SCALDING IS POSSIBLE. THE STEAM/HOT WATER WAND MAY REACH HIGH TEMPERATURES: DO NOT TOUCH WITH BARE HANDS. USE THE APPROPRIATE HANDLE ONLY. Press the special button to access the menu. -
Page 24: American Coffee
SPECIAL BEVERAGES AMERICAN COFFEE Note: Completely turn the SBS dial counter-clockwise, as shown in the display (see page 11). Two coff ee brewing cycles are performed to prepare this product. When brewing this product it is not possible to adjust the "Opti-dose" aroma (see page 10). This recipe cannot be modifi ed by the user. -
Page 25: Beverage Length Quick Programming
BREWING MAY BE PRECEDED BY SHORT SPURTS OF MILK AND STEAM: RISK OF SCALDING! REFER TO THE SECTION "MILK CONTAINER USE". Each programming applies only for the user currently selected. For other users, it is necessary to repeat the programming procedure. CAPPUCCINO FAST MILK... -
Page 26: User Menu
USER MENU Button to select the user settings CREATE NEW USER DELETE USER Note: Once deleted, settings cannot be recovered. The icon will be stored in the once again be available for a new user. USER EDIT Note: Once edited, settings cannot be restored. 17/05/09 USER BEVERAGE... - Page 27 CREATING A NEW USER Only one icon can be used for each user. Note: The icons already in use are marked with the same symbol having a lighter colour. page 24. Note: If you exit without customizing the newly created user, you will not be allowed to use the "DIGITAL ID" function to select this user.
- Page 28 USER MENU USER EDIT 3. USER SETTINGS MENU CREATE NEW USER DELETE USER USER EDIT button. instead of the icon. character and go to the Select the letter or the number by using the buttons on 3.3. USER EDIT USER1 USER2 USER3 USER4...
- Page 29 Note: Before starting the Fingerprint Enable procedure make sure that the sensor is clean (see the "Cleaning and Maintenance" section). Wash your hands thoroughly and make sure they are properly hydrated and not greasy. Do not use your thumb. The machine will request you to put your fi nger on the sensor for three times in order to widen the fi ngerprint reading 3.3.1.
- Page 30 USER MENU 3.3.1. EDIT USER 17/05/09 PLEASE PUT FINGER The machine requests you to put on perform the third reading. Only the saved fi nger can then be used to select your user. To use another fi nger, perform a new Fingerprint Enable procedure.
- Page 31 DELETE USER Any created users can be deleted using this function. 3.2. DELETE USER USER1 USER2 USER3 USER4 USER5 USER6...
-
Page 32: Beverage Menu
BEVERAGE MENU RESTORE DEFAULT SETTINGS 17/05/09 USER BEVERAGE MENU MENU SETTINGS SELECTED MENU USER 04:17 pm Scrolling/Selection button 1. BEVERAGE MENU ESPRESSO LONG ESPRESSO CAPPUCCINO LATTE MACCHIATO CAFFELATTE HOT WATER SPECIAL BEVERAGES Scrolling/Selection button... - Page 33 COFFEE AMOUNT PREBREWING COFFEE TEMPERATURE COFFEE LENGTH 1.3. CAPPUCCINO COFFEE AMOUNT PREBREWING COFFEE TEMPERATURE COFFEE LENGTH MILK LENGTH MILK FOAM RESTORE DEFAULT SETTINGS = mild dose = medium dose = strong dose...
- Page 34 BEVERAGE MENU MILK LENGTH MILK FOAM When the frothing option is disabled, the temperature of the dispensed milk might be WATER LENGTH be dispensed. 1.3. CAPPUCCINO COFFEE AMOUNT PREBREWING COFFEE TEMPERATURE COFFEE LENGTH MILK LENGTH MILK FOAM RESTORE DEFAULT SETTINGS = minimum frothing = medium frothing 1.6.
-
Page 35: Machine Menu
MACHINE MENU 17/05/09 USER BEVERAGE MENU MENU SETTINGS SELECTED MENU USER 04:17 pm Button to select the machine settings Scrolling/Selection button 2. MACHINE SETTINGS GENERAL SETTINGS DISPLAY SETTINGS CALENDAR SETTINGS WATER SETTINGS MAINTENANCE SETTINGS FACTORY SETTINGS Scrolling/Selection button... - Page 36 MACHINE MENU GENERAL SETTINGS GENERAL SETTINGS To change the machine operation settings. CUP WARMER ECOMODE FUNCTION ACOUSTIC ALARMS located on the upper part of the machine. starts up to be immediately able to dispense all kinds of...
- Page 37 DISPLAY SETTINGS DISPLAY SETTINGS This setting is of fundamental importance for correctly adjusting the LANGUAGE ENGLISH The currently selected language is displayed. BRIGHTNESS To set the correct display contrast according to the room illumination.
- Page 38 MACHINE MENU CALENDAR SETTINGS CALENDAR SETTINGS TIME HOUR MINUTES FORMAT DATE YEAR MONTH FORMAT STAND-BY This setting is fundamental for the correct operation of all those functions requiring precise time settings. To set the current hour. To set the minutes for the current hour. To set the display format for the time.
- Page 39 CALENDAR SETTINGS POWER-ON TIMER HOUR 00 MINUTES 00 DAY OF THE WEEK Note: The switch-off is managed through the "STAND-BY" programming. 2.3.4.1.3 TIMER 1 00:00 MONDAY TUESDAY WEDNESDAY THURSDAY FRIDAY SATURDAY SUNDAY time.
- Page 40 MACHINE MENU WATER SETTINGS WATER SETTINGS WATER HARDNESS right moment. Measure water hardness as shown on page 5. ENABLE FILTER needs to be replaced. ACTIVATE FILTER...
- Page 41 MAINTENANCE SETTINGS MAINTENANCE SETTINGS PRODUCT COUNTERS DESCALING CYCLE BREW UNIT CLEANING CYCLE CARAFE WASH CYCLE CARAFE AUTO CLEAN FACTORY SETTINGS Note: This wash cycle is fundamental for a correct maintenance of the carafe. This function enables automatic cleaning of the carafe after each dispensing Note: By restoring the factory settings, all the personal parameters are lost.
-
Page 42: Maintenance
MAINTENANCE BREW GROUP CLEANING CYCLE WASH CYCLES CANNOT BE STOPPED. DO NOT LEAVE THE MACHINE UNATTENDED DURING THIS OPERATION. 2.5. MAINTENANCE SETTING PRODUCT COUNTERS DESCALING CYCLE 59(I) BREW GROUP CLEANING CY CARAFE WASH CYCLE CARAFE AUTO CLEAN Select the menu option. Insert the cleaning tablet into the bypass doser. - Page 43 BOILER DESCALING CYCLE MENU this cycle; it automatically controls the distribution of the descaling solution. DO NOT LEAVE THE MACHINE UNATTENDED DURING THIS OPERATION. WARNING! NEVER USE VINEGAR AS A DESCALING SOLUTION. Only use the Saeco descaling solution, especially designed to respect the technical features of the machine, to ensure its performance instructions and/or regulations in force in the country of use.
- Page 44 MAINTENANCE EMPTY DRIP TRAY PLACED UNDER THE BREW UNIT Empty the drip tray placed under the then replace it on the machine. DESCALING CYCLE STEP 1/2 DESCALING CYCLE... PAUSE RINSE THE WATER TANK A FILL WITH FRESH WATE FILL THE CARAFE HALFWAY WITH FRESH WATER AND INSE IT IN BREWING POSITION Insert the carafe and place it in the...
- Page 45 PLACE A CONTAINER UNDER WATER & CARAFE DISP. SPOU Place a container under the dispensing spout and a container under the hot 17/05/09 USER BEVERAGE MENU MENU SETTINGS SELECTED MENU USER 04:17 pm At the end of the second step, the machine is ready for use.
- Page 46 MAINTENANCE MILK CIRCUIT MAINTENANCE WASH CYCLES CANNOT BE STOPPED. DO NOT LEAVE THE MACHINE UNATTENDED DURING THIS OPERATION. 2.5. MAINTENANCE SETTING PRODUCT COUNTERS DESCALING CYCLE 59(I) BREW GROUP CLEANING CY CARAFE WASH CYCLE CARAFE AUTO CLEAN Select the menu option. machine and its content emptied.
- Page 47 place. CARAFE WASH CYCLE STEP 1/2 WASH CYCLE… Place a large empty container under the dispensing spout. Rotate the upper part of Place a large empty container under the dispensing spout. Rotate the upper part of REFILL WATER TANK CARAFE WASH CYCLE STEP 2/2 RINSING CYCLE...
-
Page 48: Cleaning
CLEANING MAINTENANCE DURING OPERATION door. Correctly reinstall all the components. -
Page 49: General Machine Cleaning
GENERAL MACHINE CLEANING WARNING! Never immerse the machine in water. Clean the machine and the steam wand with a soft damp cloth. Do not use abrasive steel wool pads. it taking care of the seal area. Reinstall a dry cloth. drying it, reassemble and reinsert it in the machine. -
Page 50: Brew Group Cleaning
CLEANING BREW GROUP CLEANING center. WARNING! Do not wash the brew group with detergents that may compromise its correct operation. Do not wash it in the dishwasher. guides. base. dry. the supplied lubricant. Make sure the components are in the be in the correct position;... -
Page 51: Milk Carafe Cleaning
MILK CARAFE CLEANING This procedure guarantees the perfect sanitation of all components. Note: Pay attention to how the components are assembled. This little shrewdness will facilitate the subsequent reassembling. The inner side of the service door shows a quick guide on how to reassemble the carafe. machine and emptied for its cleaning. -
Page 52: Milk Carafe Assembly
CLEANING MILK CARAFE ASSEMBLY Pay attention during the assembly phase. In case the components do not smoothly enter in their positions, read the instructions more carefully and repeat the assembly procedure. Note: The inner side of the service door shows a quick guide on how to reassemble the carafe. press until fully inserting it. -
Page 53: Machine Warnings
MACHINE WARNINGS Help Message Displayed How to Reset the Message CLOSE HOPPER DOOR ADD COFFEE INSERT BREW GROUP INSERT GROUNDS DRAWER EMPTY COFFEE GROUNDS DRAWER container. Note: The used grounds drawer must be emptied only when the machine requires it and with the machine on. If you empty the drawer with the machine turned off it will not record the emptying operation. - Page 54 MACHINE WARNINGS Help Message Displayed ROTATE THE MILK CARAFE DISPENSING SPOUT INTO BREWING POSITION ROTATE THE MILK CARAFE DISPENSING SPOUT INTO RINSING POSITION PLACE MILK CARAFE IN ITS HOUSING 17/05/09 USER BENERAGE MENU MENU SELECTED SETTINGS MENU USER 04:17 pm 17/05/09 USER BEVERAGE...
-
Page 55: Safety Rules
IN CASE OF EMERGENCY IMMEDIATELY UNPLUG THE CORD FROM THE OUTLET. ONLY USE THE APPLIANCE of the appliance by a person responsible for their safety. PRECAUTIONS FOR THE USE OF THE MACHINE CONNECTION TO ELECTRICAL POWER country. INSTALLATION easy reach. check. - Page 56 SAFETY RULES DANGERS FAILURES CLEANING / DESCALING must not be used for other purposes. REPLACEMENT PARTS For safety reasons, use only original replacement parts and original accessories. WASTE DISPOSAL FIRE SAFETY ADDITIONAL INFORMATION FOR THE CORRECT USE OF THE INTENZA WATER FILTER Do not store it in direct sunlight.
- Page 57 EC DECLARATION OF CONFORMITY YEAR 09 EC 2006/95, EC 2004/108. SAECO INTERNATIONAL GROUP S.P.A AUTOMATIC COFFEE MAKER SUP 038Z to which this declaration relates is in conformity with the following standards or other normative documents : Particular requirements for appliances for heating liquids following the provisions of the Directives: EC 2006/95 , EC 2004/108.
- Page 60 The manufacturer reserves the right to change the features of the product without prior notice. www.philips.com/saeco...